Optimizing the performance of your application is absolutely necessary to enable your images to be drawn to the buffer as quickly as possible. When your application requires too much time to render a scene, the frame rate is broken and such things as calligraphic lights are not rendered at all.
One way to optimize your application is not to draw shapes that are out-of-sight. This technique among others are described in the following sections:
Do not run other IrisGL or OpenGL-based applications, such as Showcase, while running OpenGL Performer applications. If you run more than one GL application on a single-pipe machine, you incur graphics context switching overhead as the applications contend for control of the pipe.
Run applications as root so that you can the following:
Set nondegrading priorities
Restrict processors
Restricting processors allows you to reduce contention for CPU time. No other processes can run on a restricted processor. See pfStageConfigFunc for an example of how to use sysmp() to customize each pipe stage.
Nondegrading priorities are necessary to ensure response times while an application is running. Use schedctl() to set nondegrading priorities.
The statistics display shows performance information. The type of information displayed depends on the tokens passed to pfStatsClass, including:
Time required for a frame to complete the APP, CULL, and DRAW stages.
Load and stress.
CPU usage.
Rendering performance.
Fill statistics.
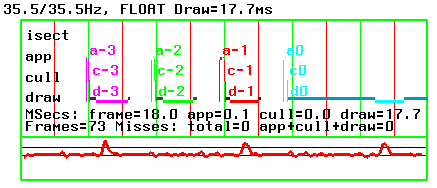
You can, for example, display just one set of statistics, as shown in Figure 15-1.
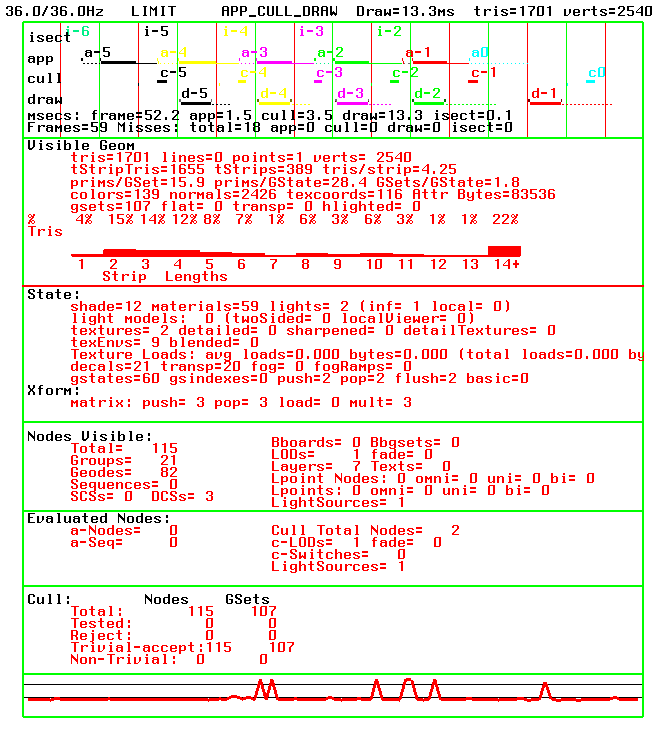
Alternately, you can display many sets of statistics, as shown in Figure 15-2. The overhead for the statistical querying, however, can be expensive.
To attach the statistics tool to a channel, use the following method:
void pfDrawChanStats(pfChannel* chan) |
Because some statistics can be expensive to gather and may influence other statistics, statistics are divided into different classes, based on the tasks they monitor. You select the specific statistics of interest using pfStatsClass.
uint pfStatsClass(pfStats *stats, uint enmask, int val); |
stats is the statistics class you want to enable. Valid values are the PFSTATS_ tokens listed in Table 15-1.
val specifies if the statistics class is enabled. Valid values for the PFSTATS_EN tokens are listed in Table 15-1.
Table 15-1. Statistics Class Table
Class | PFSTATS_ Token | PFSTATS_EN Token |
|---|---|---|
Graphics rendered | PFSTATS_GFX | PFSTATS_ENGFX |
Pixel fill | PFSTATSHW_GFXPIPE_FILL | PFSTATSHW_ENGFXPIPE_FILL |
CPU | PFSTATSHW_CPU | PFSTATSHW_ENCPU |
GfxPipe | PFSTATSHW_GFXPIPE_TIMES | PFSTATSHW_ENGFXPIPE_TIMES |
Tokens can be ORed with other statistics-enabling tokens to enable and disable multiple statistics operations.
Statistics classes have different modes of collection so that performance-expensive modes of a particular statistics class may be disabled with pfStatsClassMode.
uint pfStatsClassMode(pfStats *stats, int class, uint mask, int val); |
For a list of the mask values that specify the mode of the statistics class to use, see the OpenGL Performer Programmer's Guide .
The purpose of using the statistics display is to determine what stage of the rendering process requires the most time. To reduce bottlenecks, do the following:
Make sure the best multiprocessing model is used; the stage that requires the most time should have its own process.
If the APP stage is the bottleneck, you might have too many scene and channel changes, creating excessive CPU calculations. Use the CPU profiling tools, prof and pixie compiler tools, and cvperf and cvd from CaseVision, to find where too many calculations are being done.
If the CULL stage is the bottleneck, compare the spatial organization of the elements in the scene to the grouping of nodes in the scene graph; the two should resemble one another.
Use pfChanTravMode to limit culling calculations.
The DRAW stage is the most common bottleneck. To reduce the time spent in the DRAW stage:
Minimize graphic state changes using pfdMakeShared() and pfdMakeSharedScene().
Turn off expensive pixel operations, such as blending and multisampling.
Use 16-bit texel formats using pfTexFormat.
Buy more raster managers.
Reduce the LOD.
Use pfFlatten and pfdCleanTree to minimize transformations of static shapes.
Create smaller pfGeoSets or pfGeoArrays with smaller bounding boxes to allow more finely grained culls.
Use triangle strips instead of triangles; the longer the strip, the better.
Substitute billboards for complete geometries.
Minimize the number of active light sources.
Use pfGSetDrawMode to create GL display lists since they transfer to graphics pipeline efficiently.
Consider the topics presented in the remaining sections of this chapter.
To determine if the number of pixels is limiting performance, make the window smaller. If the frame rate jumps, performance is limited by the rate at which pixels are filling the polygons.
To determine if the number of vertices is limiting performance, turn off the lighting. If the frame rate jumps, performance is limited by per-vertex calculations.
One way to increase the rendering speed of an application is to not render unseen shapes in the scene graph. OpenGL Performer provides three ways to eliminate unseen shapes from rendering calculations:
CULL process—eliminates shapes outside the viewing frustum.
pfCullFace—eliminates the back side of shapes, such as the rear half of a ball.
pfBillboard—uses only a slice of a shape to represent the entire shape.
The following sections describe these OpenGL Performer features.
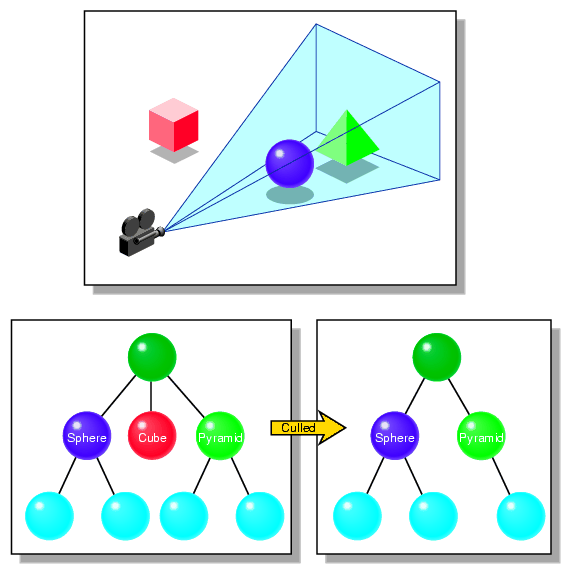
The CULL process eliminates from rendering calculations all of those shapes not in the viewing frustum. The viewing frustum is what is in the view of the channel, as illustrated in Figure 5-3.
The CULL process checks to see if the bounding sphere of a shape is in the viewing frustum. A bounding sphere is a sphere roughly the size of the shape it encloses. A bounding sphere is used because testing a sphere is computationally less expensive than testing each point on the surface of a shape.
The CULL process tests the bounding spheres of shapes to see whether or not the spheres are:
Totally inside the viewing frustum
Totally outside the viewing frustum
Partially inside and outside the viewing frustum
In the first two cases, the children nodes are not tested; all of the nodes are drawn or none of them are drawn, respectively.
In the last case, the children nodes are tested. All three cases are then used at each level of the subgraph.
Figure 15-3 shows each of the cases: the ball and box are totally inside or outside of the viewing frustum, respectively. The triangle is partially inside the viewing frustum.
The scene graph in Figure 15-3 shows how the CULL process eliminates nodes from rendering, according to whether or not they are visible.
View frustum culling works best when:
The objects in a pfGroup node are spatially close together, for example, all of the nodes representing a body are linearly hierarchical. When this is the case, the CULL process only needs to visit the top of the body subgraph. If the body nodes were distributed horizontally, the CULL process would have to visit at least some of the other body nodes.
The shapes are small compared to the full database size. If a shape is large, very likely part of it will be inside the viewing frustum so the children nodes of it must be tested, which hinders performance.
Objects that are roughly the same length in each of the three dimensions cull better than long, thin objects. An object that spans the database, for example, a beam across the ceiling of a building, cannot be culled as easily as two halves of the beam. It may be useful to divide objects that can be easily divided.
pfdGeoBuilder provides tools to group together in the scene those graph nodes whose shapes are close together in world space. OpenGL Optimizer also provides tools for arranging scene graph nodes spatially, as well as tools for creating LOD children.
When a three-dimensional shape is rendered, the side of it facing away from the camera is normally hidden by the side that faces the camera. For example, when a sphere is rendered, you normally only see its front side. You can avoid rendering the back side of a shape using pfCullFace(). Backface culling is enabled by default in pfPipeWindows for libpf applications.
The pfCullFace() mode specifies how much of a shape is rendered. The possible values include:
PFCF_OFF—Both the front and back sides of shapes are rendered.
PFCF_FRONT—Only the back sides of all shapes are rendered.
PFCF_BACK—Only the front sides of all shapes are rendered.
PFCF_BOTH—Shapes are not rendered.
pfGetCullFace() returns one of these values, whichever is current.
Not rendering either the front or back side of a geometry improves rendering performance.
Some shapes are symmetric in the horizontal plane and vertical planes, such as a sphere. Other shapes are roughly symmetric around one axis, (for example, a tree is generally symmetric around the z-axis).
Rather than render the complete shape in great detail, pfBillboard rotates a slice of a shape so that it always faces the camera. In this way, if you move a camera around a tree, the same pfBillboard slice of the image revolves around the location of the tree such that the slice appears to be the tree. The tree appears to lack the specificity of a fully rendered shape because it appears the same from all sides; on the other hand, not rendering the entire tree in detail increases the performance of the application.
A pfBillboard can rotate freely around a point or it can rotate around an axis. pfBillboard objects approximating shapes symmetric around two axes should use the point mode. pfBillboard groups approximating shapes symmetric around one axis should use the axis mode.
To specify the mode of rotation, use one of the following tokens as the value for mode in the argument of pfBboardMode():
PFBB_POINT_ROT_EYE—to rotate the billboard around a point.
PFBB_AXIAL_ROT—to rotate the billboard around an axis.
When there is too much data to render, the frame is not updated when the frame is refreshed. The result of inconsistent frame rates is jerky motion within the scene.
The key to maintaining frame rate is limiting the amount of information to be rendered. OpenGL Performer can take care of this problem automatically when you use the PFPVC_DVR_AUTO token with pfPVChanDVRMode(). This mode is called Dynamic Video Resolution (DVR).
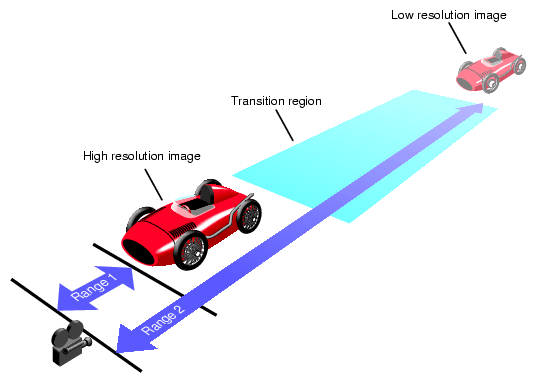
In PFPVC_DVR_AUTO mode, OpenGL Performer checks every rendered frame to find out if it required too much time to render. If it did, OpenGL Performer reduces the size of the image, and correspondingly, the number of pixels in it. Afterwards, the video hardware enlarges the images to the same size as the pfChannel; in this way, the image is the correct size, but it contains a reduced number of pixels, as suggested in Figure 15-4.
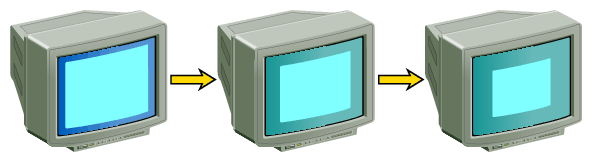
Although the viewport is reduced as stress increases, the viewer never sees the image grow smaller because bipolar filtering is used to enlarge the image to the size of the channel.
DVR scales linearly in response to the most common cause of draw overload: filling the polygons. For example, if the DRAW stage process overruns by 50%, in order to get back in under the time frame, the new scene must reduce the dimensions of the viewport by 30% in both dimensions because 0.7 X 0.7 = 0.49; (almost a 50% reduction in the number of pixels drawn.)
DVR can automatically render to a smaller viewport and let the video hardware rescale the image to the correct display size.
If pfPVChanMode is DVR_AUTO, OpenGL Performer automatically scales each of the pfChannels. pfChannels automatically scale themselves according to the scale set on the pfPipeVideoChannel they are using.
If the pfPVChanMode is DVR_MANUAL, you control scaling according to your own policy by setting the scale and size of the pfPipeVideoChannel in the application process between pfSync() and pfFrame().
| Note: For more information about customizing DVR or understanding the stress filter used by DVR, see Chapter 5, “Frame and Load Control ,” in the OpenGL Performer Programmer's Guide. |
The children of a level of detail (pfLOD) node each encapsulate a shape at a different level of resolution. The factor of resolution between children of a pfLOD is often one quarter; so when a lower resolution child replaces the current pfLOD child displayed, only one quarter of the current number of vertices needs to be rendered. The maximum reduction of detail is when all of the vertices of the highest-resolution image are reduced to a single pixel.
The pfLOD (level of detail) node is a subclass of pfSwitch. pfLOD switches between its child nodes, based on the proximity of an object to the camera.The further a shape is from the viewer, the less resolution is needed to display it. OpenGL Performer switches between the children automatically, based on a range value, to display a shape at the correct level of resolution.
pfLOD allows you to reach a compromise between performance and the level of detail rendered. For high quality images, a shape close to the camera should be rendered in high detail. When a shape recedes from the camera, the same level of detail is not necessary. Reducing the level of image detail reduces the number of vertices required to render a shape, which results in improved performance.
OpenGL Optimizer can create the pfLOD children nodes.
Each child node of a pfLOD node is associated with a range. The range can be defined as the distance over which a child of the pfLOD is displayed from the camera, expressed in world space.
Shapes are not displayed if:
They are closer to the camera than the beginning distance of the closest (highest resolution) LOD child.
They are further away than the farthest distance of the farthest (lowest resolution) LOD child.
The distance between the camera and the shape is computed during the traversal of the scene graph and the correct LOD child is automatically displayed.
You set the range value using the following pfLOD methods:
void pfLODCenter(pfLOD *lod, pfVec3 center); void pfLODCenter(const pfLOD *lod, pfVec3 center); void pfLODRange(pfLOD *lod, int index, float range); void pfLODTransition(pfLOD *lod, int index, float distance); int pfGetLODNumRanges(const pfLOD *lod); |
The pfLODCenter() method specifies the center of the LOD. The range over which a particular LOD child node is displayed is calculated as the center, plus or minus the range value specified in pfLODRange ().
pfLODRange () associates the child LOD node with its range. The child node is identified by its index number, index, where the highest resolution node is index number zero.
Generally, you set up a loop to specify the range values for the child pfLOD nodes, using the returned value of pfGetLODNumRanges() as the bounding value for the number of loops.
OpenGL Performer may disregard range values and perform as follows:
Display an already fetched level of detail while a higher level of detail is downloaded from disk.
Adjust the level of detail displayed to maintain a constant frame rate; this is always the case if you leave the range() field empty.
Disregard the range values for any other implementation-dependent reason.

Tip: For best results, specify ranges only where necessary; give browsers as much freedom as possible to choose levels of detail based on performance.
The default transition between LOD children is simply a switch from one LOD child to another. You can, however, specify a fade between LOD children over a range.
| Note: To use the fade option, your platform must have multisampling hardware. |
The pfLODTransition method specifies the distance over which one pfLOD child fades into the next, as shown in Figure 15-5.
The distance value in pfLODTransition() is applied before and after the boundary between two LOD children, such that the fade between one LOD child to another actually occurs over 2 X distance value. The default value of distance is 1.
Fading involves an alpha blending between two LOD children, such that as one LOD fades into transparency, the other LOD becomes 100% opaque.
The drawback for fading is that both LOD children must be drawn, which hinders performance.
Even though you set the transition range inpfLODTransition(), the fade is not enabled by default. To enable fading between LOD children, you must set the attribute, PFLOD_FADE, in pfChanLODAttr(), to a non-zero value. The default value for PFLOD_FADE is 0.0: no fade. For more information about pfChanLODAttr(), see “Customizing LOD Actions”.
When computing the actual distance over which one LOD child fades into another, the value supplied for PFLOD_FADE is multiplied by distance values specified in pfLODTransition().
OpenGL Performer fades one LOD child into another evenly, such that at the boundary between two LOD children, both LOD children are 50% transparent and 50% opaque.
You can, however, specify an uneven rate of fading between LOD children using pfEvaluateLOD(). By specifying a value of 1.25 in this method, for example, at the boundary between two LOD children, the higher-resolution child would only be 25% transparent, and the other child only 75% opaque.
Similarly, a value of 3.9 would mean that the higher-resolution child would only be 10% transparent, and the other child only 90% opaque, at the boundary between two LOD children.
OpenGL Performer allows you to customize LOD actions using the following pfChannel method:
extern void pfChanLODAttr(pfChannel* _chan, int attr, float val); |
attr specifies the customization; it can be one of the following values:
PFLOD_FADE—fades between LOD child nodes.
PFLOD_SCALE—globally increases or decrease the ranges for all LODs in a channel or channel group.
PFLOD_STRESS_PIX_LIMIT—prevents lower-resolution LODs from displaying as a result of stress.
PFLOD_FRUST_SCALE—changes LODs based on the size of the viewport.
val is the value you give to the attr argument.
These attributes are shared by all channels in a channel group. If you want to specify attributes per channel for channels in a group, use pfChanShare.
For more information about PFLOD_FADE, see “Enabling Fading”.
The following sections describe the other attribute values.
When you change the scale of the images displayed, you also need to change the scale of the LOD children ranges. The PFLOD_SCALE attribute enables you to make global changes to all of the ranges in a channel.
When you specify PFLOD_SCALE, the float you supply as its value in pfChanLODAttr() becomes the multiplier for all of the range values. For example, if you specify 2.0 as the value for PFLOD_SCALE, all ranges are doubled. The default value is 1.0.
This attribute is valuable for global changes in ranges.
When the images displayed are complex enough that the frame rate is not maintained, simpler LODs are drawn to reduce the graphics load. In some situations, however, it is undesirable to use low-resolution LOD nodes, for example, when the shapes in the LOD node are close to the viewer and occupy considerable screen space. You can avoid this problem by using the PFLOD_STRESS_PIX_LIMIT attribute, which will keep exempt specific LODs from being affected by system stress.
When you specify PFLOD_STRESS_PIX_LIMIT, the pixel size you supply as its value in pfChanLODAttr() becomes the determining factor as to whether or not stress can change the selection of LOD children displayed.
Stress, computed with pfChanStress(), can automatically reduce the level of detail displayed if the frame rate is not maintained. The PFLOD_STRESS_PIX_LIMIT attribute specifies the pixel size, above which stress has no effect on the selection of LOD children displayed.
When the value of PFLOD_STRESS_PIX_LIMIT is less than or equal to zero, stress has no effect on the selection of LOD children displayed.
For more information about stress, see “Reducing System Stress”.
When you change the size of the viewport in which a channel is displayed, you scale the image to fit the viewport. When you make the viewport smaller, the level of resolution necessary to display the images is lowered. You can reduce the graphics load by tying the scaling of the viewport with the selection of LOD children displayed, by using the PFLOD_FRUST_SCALE attribute.
When you specify PFLOD_FRUST_SCALE and supply a non-zero value for it, LOD ranges are multiplied by a factor according to the size of the viewport:
The smaller the viewport, the shorter the ranges.
The larger the viewport, the longer the ranges.
The general effect of the attribute is that as you reduce the size of the viewport, lower-resolution LODs are displayed.
OpenGL Performer tries to maintain a fixed frame rate by displaying different LOD children to reduce or increase the graphics load. At the end of each frame, OpenGL Performer computes a load value for each pfChannel based on the length of time required to render the pfChannel. When rendering time approaches or exceeds a frame period, the stress value is increased and lower-resolution LOD children are displayed as a result.
Load is the rendering time divided by the desired frame period. The value of stress varies directly with the load; the more complex the display, the higher the system stress.
The stress filter monitors the system load and either raises or lowers the stress value according to its parameters. OpenGL Performer multiplies the stress value times the LOD ranges for the next frame. A stress value greater than one increases the LOD ranges so that coarser LOD children are drawn, and the graphics load is reduced. If stress = 1.0, the system is not in stress and LOD ranges are not modified.
Whether or not the stress value is modified depends on the parameters in the stress filter:
void pfChanStressFilter(pfChannel *chan, float frac, float low,
    float high, float scale, float max);

void pfChanStress(pfChannel *chan, float stress);
|
low and high define a hysteresis band for system load. When the load is:
Less than low, the stress value is reduced.
Higher than high, the stress value is increased.
Between low and high, the stress value is unchanged.
Stress values are clamped to the range [1.0, max].
Because the stress is computed for every frame, stress values can change often. An undesirable side effect in changing the stress value so often is overcompensating for too much or too little system load. For example, the stress filter could change the load, so that in adjacent frames the system load is too great, too little, too great, too little, and so on. The effect is to display different LOD children in every frame.
To counteract this overcompensation, the stress filter includes the argument, scale. Stress increases or decreases proportionally to the value of scale. With a small scale value, stress values can change slowly; with a high scale value, stress values can change quickly.
When rendering multiple channels, each channel must be rendered in a fraction of the frame rate. Because load is partially based on the time you expect a channel to be rendered, you can set frac to different values for different channels. frac is the proportion of time you expect it will take a channel to be rendered.
When rendering a single channel on a pfPipe, frac should be 1.0, because the single channel consumes all of the rendering time.
When rendering multiple channels, set the frac value larger for those channels that require more time to render. For example, if channel 0 showed a scene, and channel 1 showed a smaller view of channel 0 with cross hairs superimposed on it, you might set the frac for channel 0 to 0.7 and the frac for channel 1 to 0.3, because the smaller view requires less time to render.
The following are two ways to optimize geometry performance:
Using the scene graph optimizer
Using display lists
Through the use of the following three functions, OpenGL Performer provides an optimization pipeline for pfGeoSets and pfGeoArrays:
Optimizing the geometry can significantly improve performance on systems that have hardware vertex caches, such as Onyx4 or Prism systems. For more details, see Chapter 8, “Geometry” , in the OpenGL Performer Programmer's Guide.
Transferring geometry data from disk to system memory is time consuming. You can eliminate this delay for geometries that do not change vertices, color, normals, or texture coordinates.
The following method compiles a GL display list, which contains geometry data. The compilation of the data eliminates the data download time.
void pfGSetDrawMode(pfGeoState *gset, PFGS_COMPILE_GL, PF_ON); |
A GL display list is not modifiable. You can, however, use pfDCS and pfSCS nodes to transform geometries stored in GL display lists. Another option is to use packed attribute arrays for pfGeoSet vertex attributes. See Chapter 8, “Geometry” , in the OpenGL Performer Programmer's Guide for more information on these topics.
The following tools can optimize graphics state changes:
The pfdMakeShared() method performs as follows:
Finds all pfGeoStates that are the same.
Points all pfGeoSets or pfGeoArrays using identical pfGeoStates at the same pfGeoState object.
Eliminates all duplicate pfGeoState objects.
Eliminating pfGeoState objects reduces memory consumption.
The pfdMakeSharedScene() method performs as follows:
Examines all pfGeoStates in a scene graph.
Computes the optimal pfGeoState values that reflect how most of the geometries look.
Change local pfGeoState values according to the newly calculated, global pfGeoState values.
The following tips provide improved application performance when handling textures:
Use images with dimensions that are powers of two.
Use 16-bit texel formats.
Larger texels slow down the application linearly, for example, a 32-bit texel texture is twice as slow as a 16-bit texel texture.
Download textures to hardware before the simulation loop.
For more information about downloading textures, see “Preloading Textures” in Chapter 8.
Although you can use files in many formats (specified by their file extensions), you can dramatically reduce database loading time by preconverting databases into the PFB format and images into the PFI format.
To convert to the PFB file format or the PFI image format, use the pfconv and pficonv utilities.
The pfconv utility converts from any format for which a pfdLoadFile...() function exists into any format for which a pfdStoreFile...() exists. The most common format to convert to is the PFB format. For example, to convert cow.obj into the PFB format, use the following command:
% pfconv cow.obj cow.pfb |
By default, pfconv optimizes the scene graph when performing the conversion. The optimizations are controlled with the -o and -O command line options. Builder options are controlled with the -b and -B command line options. Converter modes are controlled with the -m and -M command line options. See the help page for more specific information about the command line options by entering:
% pfconv -h |
When converting to the PFB format, texture files can be converted to the PFI format using the following command line options:
% pfconv -M pfb, 5, 1 |
5 means PFPFB_SAVE_TEXTURE_PFI.
1 means convert .rgb texture images to .pfi.
The pficonv utility converts from the IRIS RGB image format to the PFI image format. For example, to convert cafe.rgb into the PFI format, use the following command:
% pficonv cafe.rgb cafe.pfi |
Mipmaps can be automatically generated and stored in the resulting PFI files by adding -m to the command line.