How To includes:
To choose specific settings:
Open the Settings window (see “Opening the Settings Window”).
Adjust the settings with the controls provided (see “Guide to Available Accessibility Settings”).
Apply and/or save the settings (see “Applying or Resetting Settings” and “Creating and Using Settings Profiles”).
To customize the settings, use the Settings window. Open it from the Accessibility Status window by clicking the Settings button.
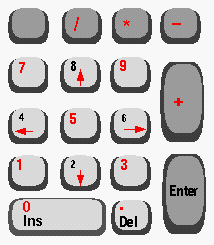
Table 1-1 helps you determine which setting to use based on the type of customization you want. The Settings window also contains text that describes each setting. Table 1-2 supplements Table 1-1 by detailing how to use the number keypad when you use the Mouse Keys feature. Figure 1-2 illustrates a number keypad; the keys that are used with mouse keys are indicated by the color red in the illustration.
Related Topic: “Using the Time Out Feature”.
Table 1-1. Table of Accessibility Settings
Customization | Setting to Use |
|---|---|
Control keyboard response to consecutive key presses.
| Bounce Keys |
Make modifier keys (such as Shift and Ctrl) “stick” until next key is pressed, so that you do not have to press two keys at once. You can also “lock down” modifier keys. See “Monitoring the Status of Modifier (Sticky) Keys ”.
| Sticky Keys |
Control how long a key must be pressed before it is accepted.
| Slow Keys |
Specify how long a key should be pressed before it is repeats, and how fast it repeats.
| Repeat Keys |
Control mouse pointer (cursor) with the keyboard number pad instead of the mouse. See Table 1-2 and “Monitoring the Mouse Button Status”.
| Mouse Keys |
Table 1-2. Mouse Keys Mapping on Number Keypad
Key on Number Keypad (see Figure 1-2) | Function of Key When Mouse Keys is Enabled |
|---|---|
Arrow Keys | Move mouse cursor in direction of arrow pressed. |
“5” Key | Pressing this key is like pressing the default mouse button. |
“0” Key | Holds down the default mouse button (use for dragging). |
“.” Key | Releases the default mouse button (to stop dragging). |
“+” Key | Double-clicks at current position of cursor. |
“/” Key | Sets the default mouse button to mouse button 1. |
“*” Key | Sets the default mouse button to mouse button 2. |
“-” Key | Sets the default mouse button to mouse button 3. |
“7,” “9,” “1,” and “3” Keys | Moves the mouse cursor diagonally. For example, “9” would move the cursor toward the upper right corner of the screen. |
After you make changes to the Settings window, apply those changes by clicking Apply, or press the Reset... button if you want to revert to the last applied settings or to the default factory settings. You can also apply the factory profile or a saved user profile by using the profile menu button in the lower left corner of the Accessibility Status window. For more information, see “Creating and Using Settings Profiles”. It is important to note that unless you preserve your settings as a profile that you can invoke later, they will be lost when you log out.
| Note: The factory settings profile contains factory-set values and is not user-editable. |
| Tip: Save your favorite settings as a profile, otherwise you will have to reset them every time you log in. |
A settings profile is a previously saved and named group of accessibility settings. Unless you preserve your settings as a profile you can invoke later, they will be lost when you log out.
A settings profile is useful when more than one person uses your system or when two people need to collaborate at the same console during the same login session. Each user can have their own set of profiles. For example, one person may need to use Sticky Keys and Slow Keys, while the other wants to use the factory keyboard and mouse settings. The person who uses Sticky Keys and Slow Keys could save those settings as a profile called StickySlow, so that the next time they use their system they can open the Accessibility Status window and use the profile menu button to choose StickySlow instead of the default, Factory.
To create and use a user settings profile:
Use the Settings window to select your settings, then click the Save As Profile... button.
In the dialog that appears, type the name you want to use for your profile and click OK.
To apply the profile settings you can do either of the following:
Click the Apply button in the Settings window.
Choose the profile name from the profile menu button in the lower left corner of the Accessibility Status window.
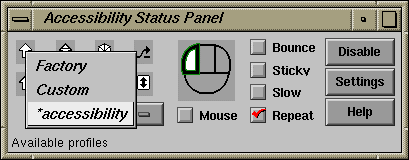
The Profile Displayed menu displays the Custom setting profile when you have changed the settings but have not saved them as a user settings profile. You can also select Custom from the menu to retrieve the settings that you were previously editing in the Settings window. Once you save your settings in a settings profile, the Profile Displayed menu displays the name of that saved profile.
To modify a user settings profile:
Load the user settings profile in the Settings window, using the profile name.
Make the changes as required.
Save the changes by selecting Save as Profile... and by entering the name of the profile you selected in step 1. You will be prompted to confirm that the original profile should be overwritten.
An addition to user settings profiles are global templates. A template allows an administrator to globally define Accessibility Panel settings to best suit the user's needs. The benefit is that many global templates can be created with different variations. The global templates are located in the /usr/X11/lib/accessx directory. The Accessibility Panel only reads from this directory and does not write to it. If the global template directory does not exist, then accessx will ignore it.
A global template is indicated by an asterisk `*' at the beginning of each name in the drop-down list, as shown in Figure 1-3.
Procedure 1-1. Steps to Create a New Template File
As a user, adjust the Settings Panel settings to the preferred settings and save the newly created profile as shown in “Creating and Using Settings Profiles”.
Then as the root user, move the file created in the previous step from the $HOME/.desktop-hostname/accessx directory (where all user defined profiles are located), to the global template directory /usr/X11/lib/accessx.
Restart the Accessibility Panel. The new system template will appear in the drop-down list.
A pre-existing template /usr/X11/lib/accessx/accessibility exists as an example.
This section includes:
The image of a mouse is displayed on the Accessibility Status window so that when you are using mouse keys, you can monitor the following indicators:
A check mark next to the word Mouse indicates that the Mouse Keys feature is on.
A thick green outline indicates which mouse button is active (for example, if the mouse is mapped for right hand use, the first button is active).
A solid green button indicates which button is depressed.
When Sticky Keys is enabled, it causes modifier keys (such as Shift and Ctrl) to “stick” until the next key is pressed, so that you do not have to press two keys at once. For example, if Sticky Keys is on and you press Shift, and then press w, a capital W is the result.
You can also “lock down” modifier keys so that they stay in the lock position (the same way Caps Lock locks down the Shift key for letter keys). To enable the “press twice to lock” feature, on the Settings Panel, click to put check marks next to Use StickyKeys and Press twice to lock a modifier key.
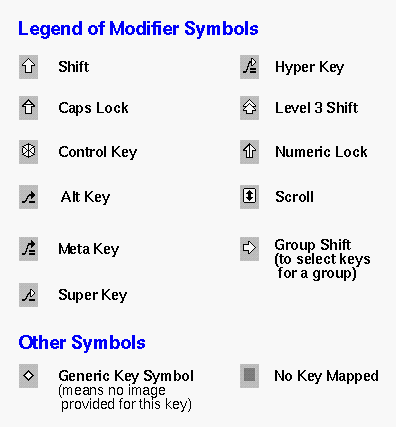
The upper left side of the Accessibility Status window displays symbols representing each of the modifiers keys that are mapped to a function. See Figure 1-4 for a legend of these symbols and functions. The Accessibility Status window helps you keep track of the state of the modifier keys by a color code, as outlined in Table 1-3 below.
Table 1-3. Monitoring Modifier (Sticky) Keys
Color Behind Key Symbol | What the Color Indicates About the Modifier Key |
|---|---|
Gray | Key is not pressed |
Yellow | Key is active |
Mint-green | Key is latched (temporarily pressed— used in combination with next key pressed) |
Green | Key is locked (held down) |
This section includes:
The Settings window lets you program the accessibility features to “time out.” “Time out” means that the accessibility settings cease and the factory settings return after a specified time lapse.
To set the time out, use the Settings window, which you can open from the Accessibility Status window by clicking the Settings button. Put a check mark in the checkbox next to Time out after... and use the slider to specify when the time out should occur. The time out time count begins when you turn on your system or when you click the Accessibility Status window Enable button to return to accessibility settings.
| Note: When you use the time out feature, you should probably save your settings as a profile that you can access again if time out occurs. See “Creating and Using Settings Profiles”. |
Click Disable on the Accessibility Status window to restore factory settings, which turns off all accessibility settings except Repeat Keys. If you have not set Repeat Keys preferences yet, Repeat Keys is also off. Click the Enable button on the Accessibility Status window to turn all currently selected accessibility settings back on.
You can also turn individual settings on and off by adding or removing check marks in the Bounce, Sticky, Slow, Repeat, and Mouse checkboxes. Any changes made with the Accessibility Status window controls will override the current Settings window settings.


