This chapter describes how to operate your SGI Onyx 300 graphics system. Specifically, it explains how to perform the following procedures:
“Installing or Removing Disk Drives”

Warning: Before you install, operate, or service any part of this product, read the safety information.
| Warning: Power off the equipment before you install or remove power cords. The Onyx 300 graphics system operates on 200-240 Vac. Use extreme caution when working around this voltage. |
| Caution: Always use two people to move the 24-inch SuperWide color monitors. Be sure to practice proper lifting techniques. |
| Note: This product requires the use of external shielded cables in order to maintain compliance with Part 15 of the FCC rules. |
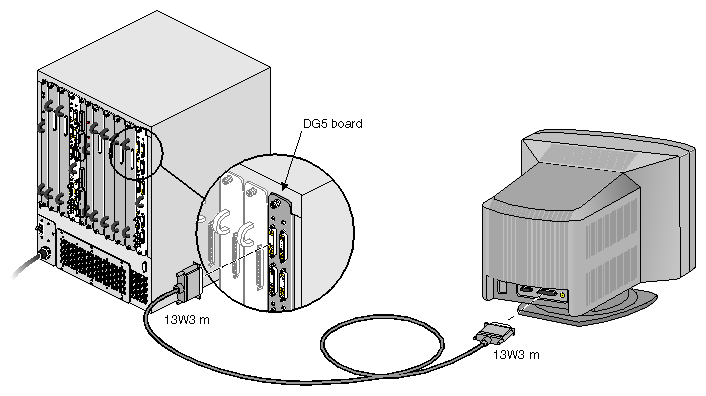
A high-resolution SuperWide (1920 x 1200-pixel) 24-inch monitor is shipped as a standard monitor for the SGI Onyx 300 graphics systems. The graphics monitor connects to the DG5 board located in the InfiniteReality graphics module via a 30-ft. (9.1-m) monitor cable. Refer to Figure 2-1.
| Caution: Ensure that the electrical rating on the monitor label matches the outlet voltage range (100–120 Vac or 220–240 Vac) before you plug in the monitor. |
When you use a monitor in locations that do not have the appropriate outlets, contact your SGI system support engineer (SSE) before plugging in the monitor power cable.
Plug in and turn on your monitor as described in the documentation that accompanies your monitor.
| Note: If you are using a monitor that was not shipped with your Onyx 300 graphics system and it has adjustable RGB connectors, ensure that they are in the 75-ohm position; otherwise, the monitor displays incorrect colors. |
The default monitor resolution supported by the Onyx 300 graphics system SuperWide monitor is 1920 x 1200 at 66 Hz. The maximum output bandwidth is approximately 300 Mpix/s. With two monitors, the transfer rate of each monitor at a resolution of 1920 x 1200 at 66 Hz is approximately 188 Mpix/s. If you connect more than two monitors, you must use a combination of low– and high-resolution monitors that are within the limit of 300 Mpix/s.
To change the default video format for your monitor, use the setmon command. For more information about the setmon command options, see the setmon(1G) man page.
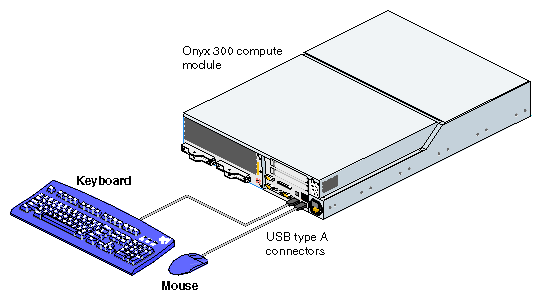
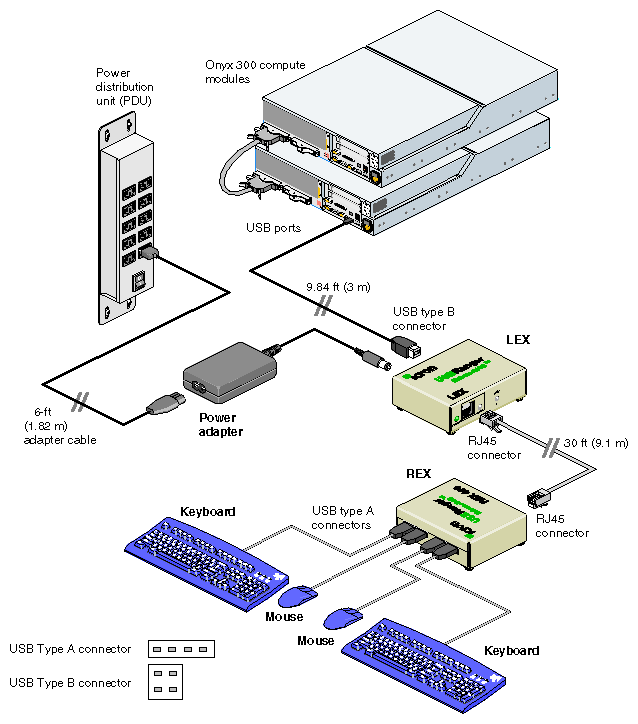
To use your SuperWide monitor, your graphics system is shipped with a standard 101-key USB keyboard and a USB mouse. You can plug the keyboard and mouse directly into the USB connectors of an Onyx 300 compute module (refer to Figure 2-2), or you can use a USB extender that allows you to place the keyboard and mouse up to 328.68 ft (100 m) from the Onyx 300 compute module. Refer to Figure 2-3.
| Note: You can have one keyboard and one mouse per graphics pipe. |
| Note: The local extender (LEX) receives AC power from the power distribution unit (PDU) in the rack. A 6-ft. (1.82-m) adapter cable connects the extender's power adapter to the PDU. The remote extender (REX) does not use an external power source. |
The ioconfig(1m) command establishes logical device numbers for each keyboard and mouse in an Onyx 300 graphics system. When the system first initializes the USB hardware, it scans each USB bus looking for devices. Initially, these devices are assigned a device ID of -1. Later in the boot process, the ioconfig(1m) command assigns device IDs based on the contents of the file /etc/ioconfig.conf.
If the device is already represented in ioconfig.conf, the associated device ID is assigned. If the device is new (not already in ioconfig.conf), a new device ID is allocated and assigned, and a corresponding entry is appended to the ioconfig.conf file.
Each line in the ioconfig.conf file is a two-column entry. The left column is the numeric logical device ID (0 in our example), and the right column is the hardware path pointing to the device. For example:
0 /hw/module/001c13/Ibrick/xtalk/15/pci/5/usb/1/1/keyboard 0 /hw/module/001c13/Ibrick/xtalk/15/pci/5/usb/1/2/mouse |
| Note: The device IDs are unique only among devices of a given type. Different device types may use overlapping device IDs. |
For USB devices, the hardware path is divided into two parts: the USB controller prefix, and the USB relative path. The controller prefix is the portion of the path up to and including the component “usb.” For example:
/hw/module/001c13/Ibrick/xtalk/15/pci/5/usb |
The controller prefix encodes the hardware components leading to the USB controller. In the previous example, the controller path indicates that there is a USB controller at PCI slot 5 of the compute module that is located at 001c13.
The USB relative path is the portion of the path after the “usb” component. This path indicates the path leading from the controller to the actual device. The path is a series of numeric components terminated with a device type. The numeric components represent USB hub port numbers. You can think of the '/' separator as representing a hub and the numeric component as a port on that hub.
Multiple numeric components represent multiple layers of USB hubs, with the leftmost component representing the root hub, or the hub built into the USB controller.
The following example indicates a keyboard device attached to port 1 of a hub, which is attached to port 1 of the root hub:
.../usb/1/1/keyboard |
The following example shows a mouse attached to port 2 of the same hub:
.../usb/1/2/mouse |
You can use the hinv command to display the ID of a device. See the hinv(1) man page for additional information.
The device ID of a keyboard or mouse determines under which /dev/input directory the keyboard or mouse is placed. A keyboard or mouse with device ID 0 will be placed under /dev/input (for historical reasons), while a device with an ID greater than 0 will be placed under /dev/inputX (where X is the numeric device ID).
When the X Window System server starts, the -devdir option controls which directory is searched for input devices. By default, /dev/input is used.
If it becomes necessary to reconfigure the keyboard or mouse layout, manual configuration is necessary. Reasons for reconfiguration may include:
Adding a new keyboard and mouse
Adding hubs
Moving a keyboard and mouse
Follow these steps to reconfigure the keyboard and mouse setup:
Run /usr/gfx/stopgfx to shut down the graphics subsystem.
Add or move devices as necessary.
Run /sbin/ioconfig -f /hw to assign temporary device IDs.
Edit the /etc/ioconfig.conf file.
Re–run /sbin/ioconfig -f /hw if you made changes in step 4.
Restart the graphics subsystem using the command /usr/gfx/startgfx.
Steps 4 and 5 are the keys to binding the devices in your new configuration to the correct IDs. Because a keyboard and mouse with the same ID are put in the same /dev/inputX directory, you must ensure that the keyboard and mouse pair used by a given X server has the same ID.
Because ioconfig does not know what device IDs to assign automatically for new devices, step 3 may not assign the correct IDs. You can change the device IDs manually by editing /etc/ioconfig.conf and then re–running ioconfig. The /dev/input/keyboard and /dev/input/mouse entries are always created, even if a keyboard and/or mouse with device ID 0 are not present. This allows the default X server to run without a keyboard or mouse physically attached for manufacturing checkout purposes.
| Note: If you boot the system in this mode and plug in a keyboard or mouse after the system is running, you must restart the graphics system to use the devices. |
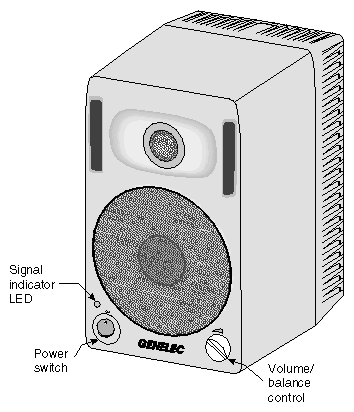
The graphics system can connect to digital audio speakers. The speakers, like the one shown in Figure 2-4, have the following features:
96-kHz/24-bit digital audio interface.
AES/EBU digital audio and analog audio inputs.
Single-knob stereo pair volume and balance control.

Warning: Each of the speakers weighs 12.5 lbs (5.7 kg). Secure or enclose speakers that are placed off the ground to prevent them from falling and causing injury to personnel or damage to equipment.
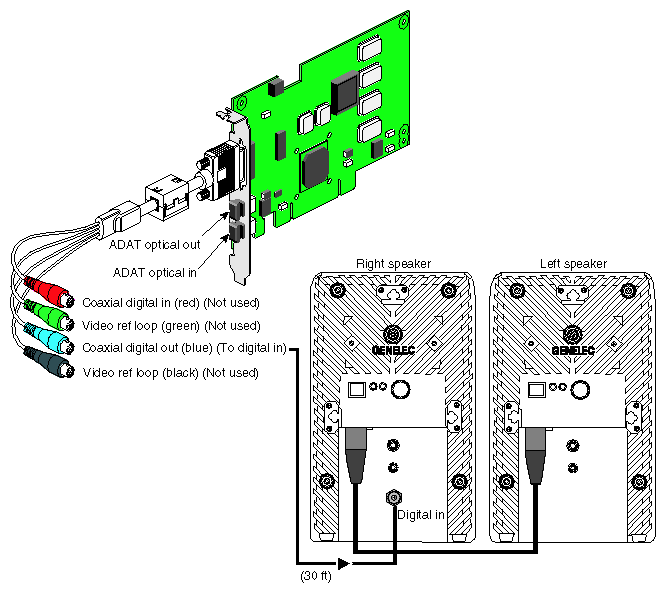
The speakers connect to a radical audio PCI card that resides in an Onyx 300 compute module or PCI expansion module. Refer to Figure 2-5 for connections between the audio PCI card and the speakers.
To connect the speakers, follow these steps:
Locate the audio PCI card and connect the audio breakout cable to the DB15 connector.
Connect one end of a BNC audio cable (a 30-ft. extension cable) to the AES-3id digital audio connection on the breakout cable (the blue BNC connector).

Note: The breakout cable has four BNC connections. Only the blue connection is used. Connect the other end of the BNC audio cable to the back of the right speaker.
Connect the left and right speakers to each other with the cable provided.
Note the following operating information before you use your speakers:
The “commercial” version of the speakers is labeled Model 2029B. The SGI version is the Model 2029B-Y, which differs in the following ways:
The digital input on the right (master) speaker is equipped with a BNC input connector (the commercial version has an XLR connector).
Each speaker in a pair is labeled as either 2029BL-Y (left) or 2029BR-Y (right).
Each speaker is equipped with its own power cord.
The speakers are dual-voltage (switchable between 110 V and 220 V operation).
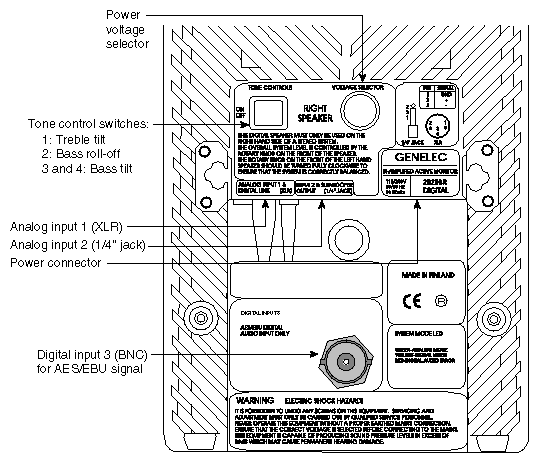
Each speaker has its voltage switch set to 220 V operation as a default. If you are in North America or other locations using 110 V sources, you need to manually switch to 110 V.

Caution: Do not plug the speaker into 220 V if the voltage select switch is set to 110 V, or the speaker fuse will blow. If the switch is set to 220 V and you plug the speaker into 110 V, the speaker will not function properly, and the speaker fuse may blow.
Figure 2-6 shows the location of the controls and connectors on the back of the right speaker.
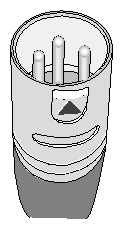
Figure 2-7 shows the connector that is used on the speaker-to-speaker interconnect cable.
The system console, which is an optional component, enables you to perform the following activities:
Monitor your system by reading the status and error message information that the L1 and L2 controllers generate.
Enter L1 and L2 controller commands to monitor or change particular system functions. You can, for example, monitor the speed of fans for a particular module.
Power on or power off individual modules or all modules (except for the storage modules) in your system.
If you connect a console that contains SGIconsole software, you can perform the functions listed above and have boundary scan capabilities. Boundary scan capabilities enable an SGI system support engineer (SSE) to test the functionality of your system.
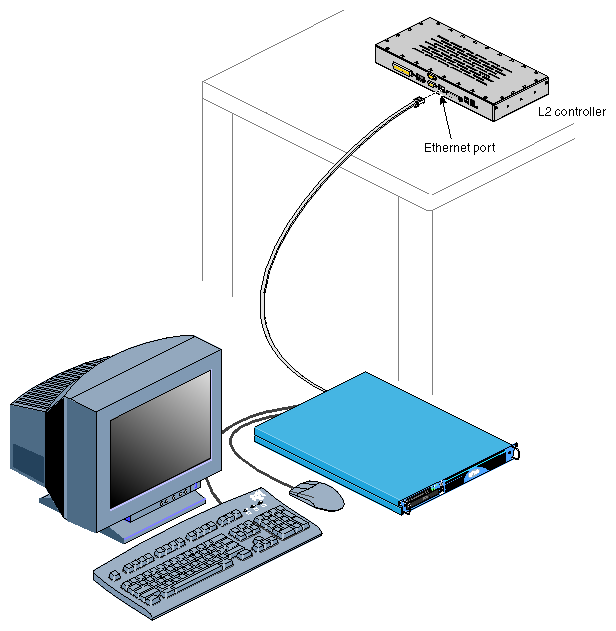
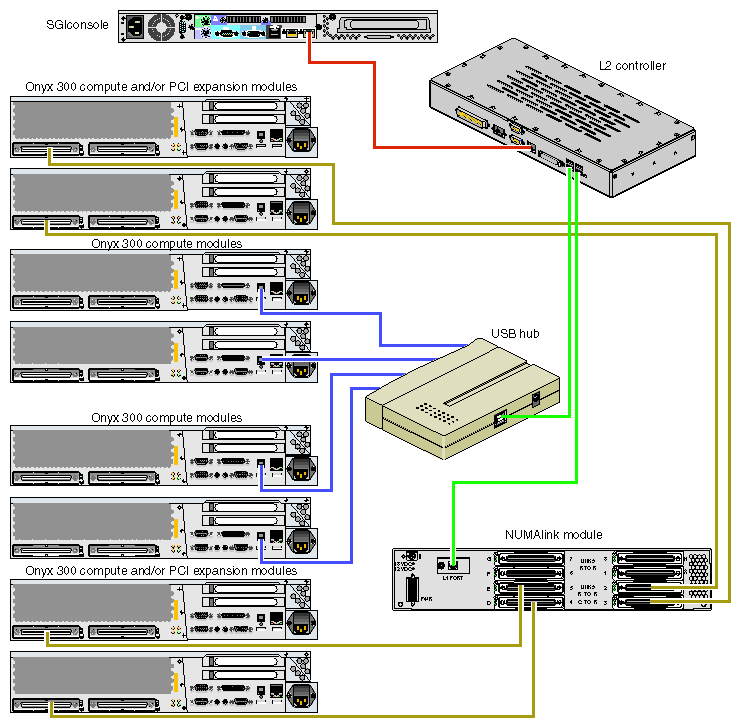
To attach a system console that runs the SGIconsole software to your system, connect the system console to the L2 controller Ethernet port connector as shown in Figure 2-8.
The following sections describe how to power on and power off individual modules or your entire SGI Onyx 300 system.
-

Note: The following information applies to the InfiniteReality graphics modules, Onyx 300 compute modules, the NUMAlink module, and PCI expansion modules. You must manually power on a TP900 storage module by placing the power switch(es) in the 1 position. Refer to Figure 2-9.
This section describes power-on procedures in the following subsections:
To prepare to power on the system, perform the following tasks:
Confirm that the power cables between the following components are secure:
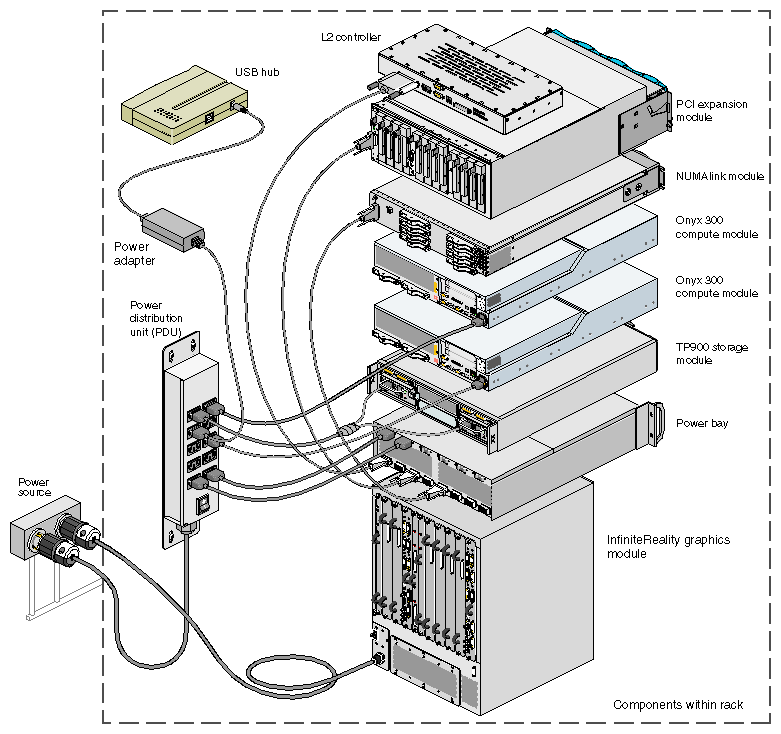
Between the InfiniteReality graphics module(s) and the external power receptacle(s) (refer to Figure 2-10).
Between the power bay and the following modules: DC-powered NUMAlink module, PCI expansion module(s), and L2 controller module (refer to Figure 2-10).

Note: When the system does not contain a DC-powered NUMAlink module, the L2 controller does not receive power from a power bay; instead, it receives power from a power supply. This power supply receives AC voltage from a PDU or power strip and converts the voltage to 48 Vdc, which is the input voltage that the L2 controller requires. Between the power distribution unit (PDU) and the following components: Onyx 300 compute module(s), AC-powered NUMAlink module, USB hub, TP900 storage module(s), L2 controller power supply, power bay, and power strip.
Between the PDU and the external power receptacle.
Figure 2-10 shows the connection between an InfiniteReality graphics module and an external power receptacle. It also shows the PDU and power bay connections to the other components within a system that contains a DC-powered NUMAlink module.
Confirm that the cables between the L2 controller and the following components are secure:
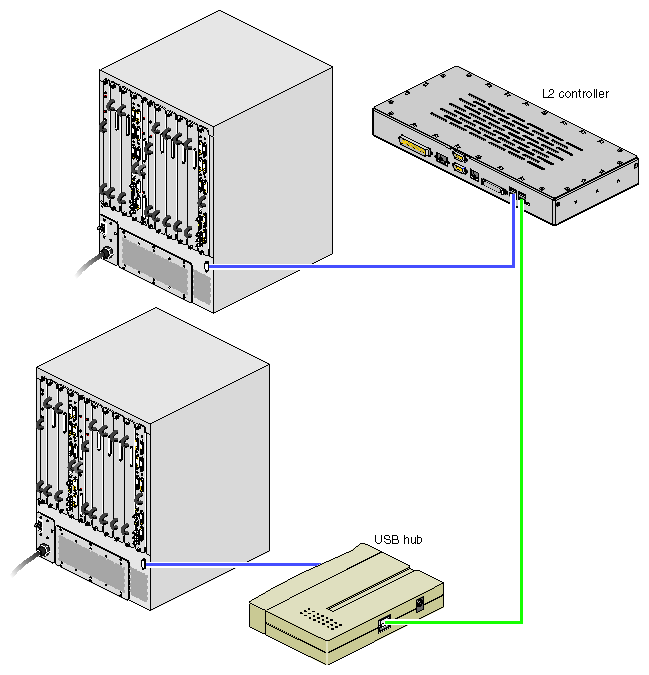
InfiniteReality graphics module (refer to Figure 2-11)

Note: If the InfiniteReality graphics module resides in a separate rack, the graphics module connects to a USB hub; the USB hub connects to the L2 controller. NUMAlink module (refer to Figure 2-12)

Note: If your system does not have a NUMAlink module, the Onyx 300 compute modules connect directly to the L2 controller (refer to Figure 2-13). USB hub
Figure 2-12 shows how the components of a graphics system that contains a NUMAlink module connect to the L2 controller.
Figure 2-13 shows how the Onyx 300 compute modules in a graphics system that does not contain a NUMAlink module connect to the L2 controller. The top Onyx 300 compute module communicates with the L2 controller via its NUMAlink connection to the bottom Onyx 300 compute module. Likewise, if a system contains one Onyx 300 compute module and one PCI expansion module, the PCI expansion module connects to the L2 controller via its NUMAlink connection to the Onyx 300 compute module (refer to Figure 2-14).
Ensure that the power switch on each DC-powered NUMAlink and PCI expansion module that you want to power on is set to the On (1) position. The power switch is located in the upper-left corner of the module (refer to Figure 2-15). This switch enables the L1 controllers of the DC-powered NUMAlink module and PCI expansion modules to power on after you turn on the circuit breaker of the PDU.

Note: The Onyx 300 compute and AC-powered NUMAlink modules do not have a power switch; when the PDU circuit breaker is on, their L1 controllers are powered on. 
Note: Complete the power preparation steps in this section before you set the power switch of the InfiniteReality graphics module to the On position. The InfiniteReality graphics module does not plug in to the PDU; therefore, when you set the power switch to the On position, the L1 controller of the graphics module powers on. Ensure that the power receptacles for the graphics module and the PDU are sourced and grounded from the same breaker box. For additional information on this topic, contact your SGI system support engineer (SSE).
| Warning: Turn off equipment before you install or remove power cords. The rackmount system operates on 200-240 Vac. Use extreme caution when you work around this voltage. |
Power on the graphics system as follows:
If the monitors and other peripherals are equipped with voltage select switches, verify that they are set for the appropriate AC voltage and plug them in. Note that they are normally plugged into sources outside the rack system.
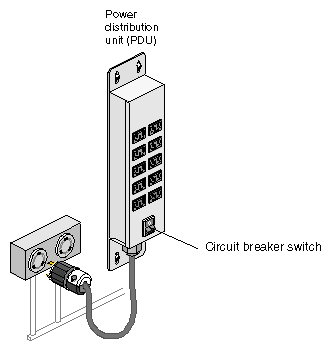
Turn on the circuit breaker switch of the PDU as shown in Figure 2-16.
Set the power switch of the InfiniteReality graphics module to the On position. Figure 2-17 shows the location of the power switch.
Verify that all of the L1 controllers display “L1 running.” If any L1 controllers are not running, contact your SGI system support engineer (SSE).
At the system console, access the L2 controller by entering the following command:
$> /stand/sysco/bin/12term
From the L2 prompt, display the system configuration by entering the following command:
L2> cfg
This command lists the modules that the L2 controller detects in the system and their system controller addresses. If a module that you want to power on does not appear in the list, it will not power on. Ensure that the module's L1 controller is running and that it is cabled properly.
From the L2 prompt (L2>), power on an individual module by entering the following command. (If you want to power on the entire system, proceed to step 8.)
L2> r <rack#> s <slot#> pwr u
For example, to power on an Onyx 300 compute module in rack 1, slot 18, enter the following command:
L2> r 1 s 18 pwr u
The slot number is the unit number of the module within the rack. For more information about unit numbers, refer to Chapter 1 of this document.
If you want to power on several selected modules of a rack at the same time, you must enter the rack number followed by the slot numbers of the modules that you want to power on. For example, to power on the modules in slots 18, 20, and 22, enter the following command:
L2> r 1 s 18,20,22 pwr u
If you want to power on the entire system, enter the following command:
L2> pwr u
(The default setting for the pwr u command is all racks and slots.)
When the L2 prompt appears, you will not see the output that is produced during the power-on procedure unless you redirect the keyboard input from the L2 controller to the normal console by entering the following:
L2> ctrl d
When the power-on procedure completes, the System Maintenance Menu appears on the system console or the graphics monitor. Select Start System (option 1) to boot the IRIX operating system.
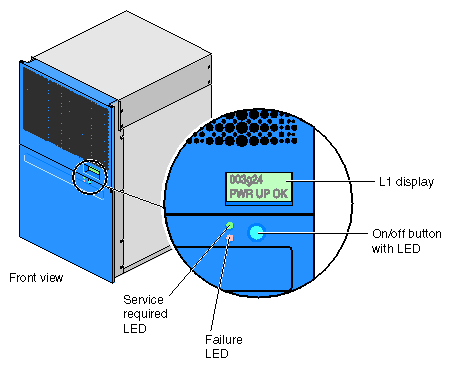
If your system does not have a system console, you can power on your system manually by using power buttons. Each module that has an L1 controller has a power button with an LED; this button is located on the front of the module (refer to Figure 2-18). The TP900 storage module power switch(es) are located at the rear of the module (refer again to Figure 2-9).
Power on the graphics system as follows:
If the monitors and other peripherals are equipped with voltage select switches, verify that they are set for the appropriate AC voltage and plug them in. Note that they are normally plugged into sources outside the rack system.
Turn on the circuit breaker switch of the PDU as shown in Figure 2-19.
Set the power switch(es) of the InfiniteReality graphics module(s) to the On position. Figure 2-20 shows the location of the power switch.
Set the power switch(es) of the TP900 storage module(s) to the On position.
Verify that all of the L1 controllers display “L1 running.” If any L1 controllers are not running, contact your SGI system support engineer (SSE).
Press the power buttons that are located on the front of the modules that you want to power on. Always power on the PCI expansion and InfiniteReality graphics modules first. Next, power on the NUMAlink module. Last, power on the Onyx 300 compute modules starting with the global master (the lowest compute module in the rack).
The power-button LEDs illuminate when the modules are powered on.
When the power-on procedure completes, the System Maintenance Menu appears on the graphics monitor. Select Start System (option 1) to boot the IRIX operating system.
This section explains how to power off individual modules or your entire system from the system console or via the power buttons.
| Note: The system should be powered off only for routine maintenance or repair. |
| Note: The following information applies only to InfiniteReality graphics modules, Onyx 300 compute modules, the NUMAlink module, and PCI expansion modules. You must manually power off the TP900 storage module by placing the power switch(es) in the 0 position. Refer to Figure 2-21. |
To power off your system using the system console, follow these steps:
Shut down the IRIX operating system by entering the following command:
# init 0
To access the L2 prompt, direct the keyboard input to the L2 controller by entering the following:
$> ctrl t
From the L2 prompt (L2>), power off an individual module by entering the following command. (If you want to power off the entire system, proceed to step 4.)
L2> r <rack#> s <slot#> pwr d
For example, to power off an Onyx 300 compute module in rack 1, slot 18, enter the following command:
L2> r 1 s 18 pwr d
The slot number is the unit number of the module within the rack. For more information about unit numbers, refer to Chapter 1 of this document.
If you want to power off several selected modules from the rack at the same time, enter the rack number followed by the slot numbers of the modules that you want to power off. For example, to power off the modules in slots 18, 20, and 22, enter the following command:
L2> r 1 s 18,20,22 pwr d
If you want to power off all of the modules within the rack, enter the following command:
L2> pwr d
(The default setting for the pwr d command is all racks and slots.)
“Powered Down” appears on the L1 display when the module is powered off. The L1 controller is still powered on.
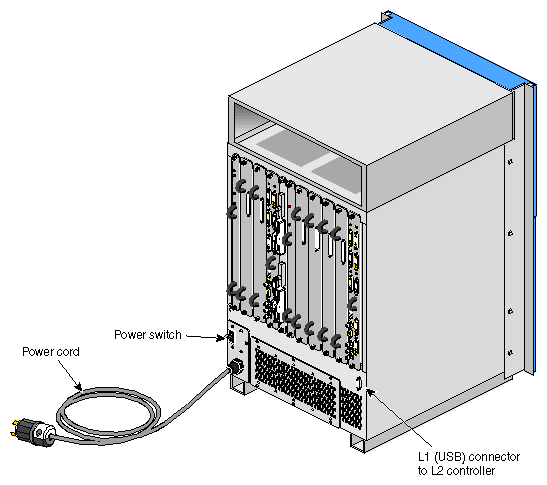
To power off an L1 controller of a DC-powered NUMAlink, PCI expansion, or InfiniteReality graphics module, set the power switch to the Off position. The power switch of the DC-powered NUMAlink or PCI expansion module is located in the upper-left corner of the rear of the module. The power switch of the InfiniteReality graphics module is located in the lower-left corner of the rear of the module.

Note: The Onyx 300 compute and AC-powered NUMAlink modules do not have a power switch. To power off their L1 controllers, unplug the modules from the PDU.
| Note: The system should be powered off only for routine maintenance or repair. |
To manually power off your system using power buttons, follow these steps:
Shut down the IRIX operating system by entering the following command:
# init 0
Press the power buttons that are located on the front of the modules that you want to power off. You can power off the modules in any order.
To power off an L1 controller of a DC-powered NUMAlink, PCI expansion, or InfiniteReality graphics module, set the power switch to the Off position. The power switch of the DC-powered NUMAlink or PCI expansion module is located in the upper-left corner of the rear of the module. The power switch of the InfiniteReality graphics module is located in the lower-left corner of the rear of the module.

Note: The Onyx 300 compute and AC-powered NUMAlink modules do not have a power switch. To power off their L1 controllers, unplug the modules from the PDU.
You can monitor your SGI Onyx 300 graphics system from the following sources:
You can view individual module (graphics, compute, NUMAlink, and PCI expansion) status and error messages via the module's L1 controller display. For example, you can determine whether the fans of a particular module are operating properly.
The system console enables you to view the status and error messages that are generated by both the L1 and L2 controllers. Refer to the SGI Origin 300 System with NUMAlink Module User's Guide for L1 and L2 commands.
You can monitor the status of the TP900 storage modules by viewing the LEDs on the front and the rear of the storage modules.
You can use the Embedded Support Partner (ESP) system, which is discussed in the next section.
Embedded Support Partner (ESP) automatically detects system conditions that indicate potential problems and then notifies the appropriate personnel. This enables you and SGI system support engineers (SSEs) to proactively support systems and resolve issues before they develop into actual failures.
ESP enables users to monitor one or more systems at a site from a local or remote connection. ESP can perform the following functions:
Monitor the system configuration, events, performance, and availability.
Notify SSEs when specific events occur.
Generate reports.
ESP also supports:
Remote support and on-site troubleshooting.
System group management, which enables you to manage an entire group of systems from a single system.
For more information about ESP, refer to Chapter 4, “Troubleshooting.” For information about configuring ESP, refer to the Embedded Support Partner User Guide.
| Note: The following disk drive procedures apply to the Onyx 300 compute module only. For disk drive installation and removal procedures for the TP900 storage module, refer to the SGI Total Performance 900 Storage System User's Guide. |
Each Onyx 300 compute module can contain one or two sled-mounted Ultra3 SCSI disk drives (refer to Figure 2-22).
One of the following disk drives/blanks is required to install or replace a disk drive:
18-GB disk drive P/N 013-3485-00x
73-GB disk drive P/N 013-3486-00x
Disk drive blank P/N 9470464
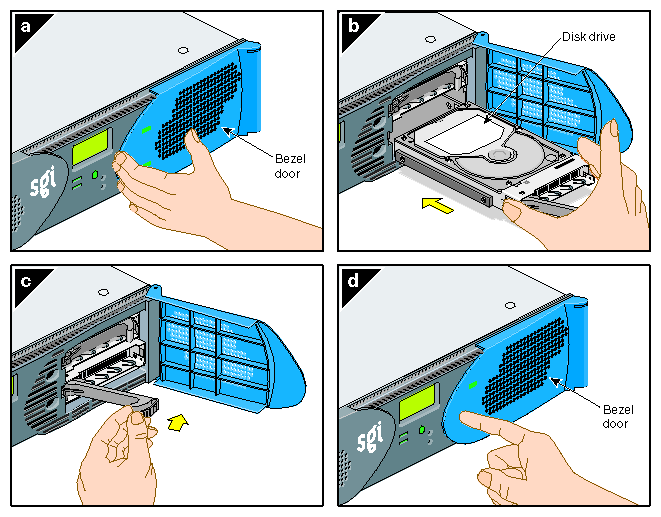
To install a disk drive, follow these steps:
Open the bezel door as shown in Figure 2-23a.
Position the drive assembly so that it engages the bay guide rails and gently push the drive into the bay (refer to Figure 2-23b).
Swing the locking handle towards the chassis until the locking handle engages the latch (refer to Figure 2-23c).
Close the bezel door as shown in Figure 2-23d.
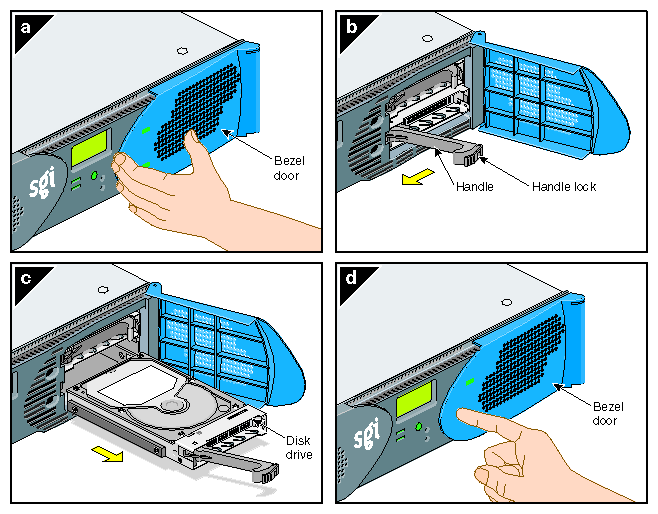
To remove a disk drive, follow these steps:
To replace a data drive, ensure that the drive has spun down before you remove it.
Open the bezel door as shown in Figure 2-24a.
Remove a drive by depressing its handle lock with your thumb and pulling the handle away from the chassis until the handle disengages the drive connector from the backplane connector (refer to Figure 2-24b).
Carefully slide the drive out of the bay (refer to Figure 2-24c) and place it on an ESD-safe surface. Do not use the handle to pull the drive out of the bay.
Close the bezel door as shown in Figure 2-24d.
