The WorkShop Debugger is a UNIX source-level debugging tool that provides special windows (views) for displaying program data and execution states as the program executes. The Debugger lets you set various types of breakpoints and watch points where you can conveniently view data such as variables, expressions, structures, large arrays, call stacks, and machine-level values.
The Debugger goes far beyond the capabilities of dbx. It includes fast data watchpoints and other types of breakpoints; graphical views for displaying local variables, source-level expressions, array variables, and data structures; and debugging at the machine level.
All WorkShop activities can be accessed from the Main View window, which is illustrated in Figure 2-1.
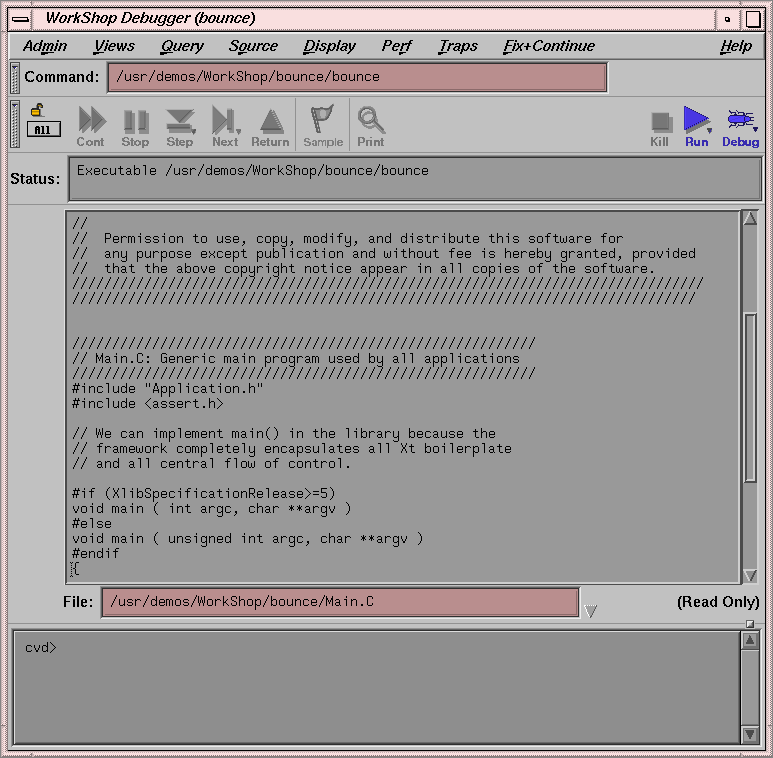
The Main View window is divided into four major areas:
The menu bar which contains all the submenus for the Debugger.
The control panel, which contains buttons and pathnames for controlling program execution.
The source code area, where the source is viewed or edited. On the left of the source code is the annotation column where you can set or view traps.
The debugger command line, for using the command line interface.
In addition to the menu bar, dynamic menus are available throughout many of the WorkShop views, or screens. Press the right mouse button to access a dynamic menu; the default action for the menu can be initiated by clicking quickly on the right mouse button. Depending on the cursor location, the result of a mouse action will vary:
In the Source View, a click of the mouse button over a variable displays a list of actions that can be performed on the variable.
Clicking a mouse button over a blank area in a view brings up a menu that allows you to Jump To the selected line or Continue To the selected line.
When in the icon canvas area (the part of the screen left of the source code listing), holding a mouse button down provides a list of actions that can be performed against that line of code (for example, set and delete traps, or access the trap manager).
Data diving is available in several debugger views and screens. Click the right mouse button over any item and a default action occurs (when appropriate). For example:
In the Source View window, a right mouse button action on a variable displays that variable in a Data View.
A right mouse button action on a user function in the Source View displays the source for that function.
In the icon canvas area (to the left of the source code listing), a right mouse button action sets and unsets a breakpoint.
The basic steps for debugging an application are as follows:
Invoke the Debugger by typing:
% cvd [executable [corefile]]
The -pid option lets you attach the Debugger to a running process. You can use this to determine why a live process is in an infinite loop or is otherwise hung.
The -host option lets you specify a remote host on which the target executable will be run; the Debugger runs locally. This option is useful if any of the following criteria apply to your application:
You do not want Debugger windows to interfere with the application you are debugging.
You are supporting an application remotely.
You do not want to use the Debugger on the target system for another reason.
The argument executable is the name of the executable file for the process you want to run. It is optional; you can invoke the Debugger first and later specify the name of the executable file.
The corefile option lets you invoke the Debugger and specify a core file (with the name of its executable file) to try to determine why a program crashed.
Set breakpoints in the source code.
You can set a simple breakpoints by clicking the left mouse button in the annotation column to the left of the source code display or by using the Traps menu. More complex traps can be set and managed from the Trap Manager window, the Signal Panel, and the Syscall Panel, all of which can be accessed from the Views menu. You can also set breakpoints by typing them at the Debugger command line in the Main View window. You can stop a process at any time by clicking the Stop button in the Main View.
Start the program by clicking the Run button in the Main View.
When the process stops at a breakpoint or other stopping point of interest, you can examine the data in one of the Debugger view windows (accessed from the Views menu).
You can display windows at any time; they update automatically each time the program stops.
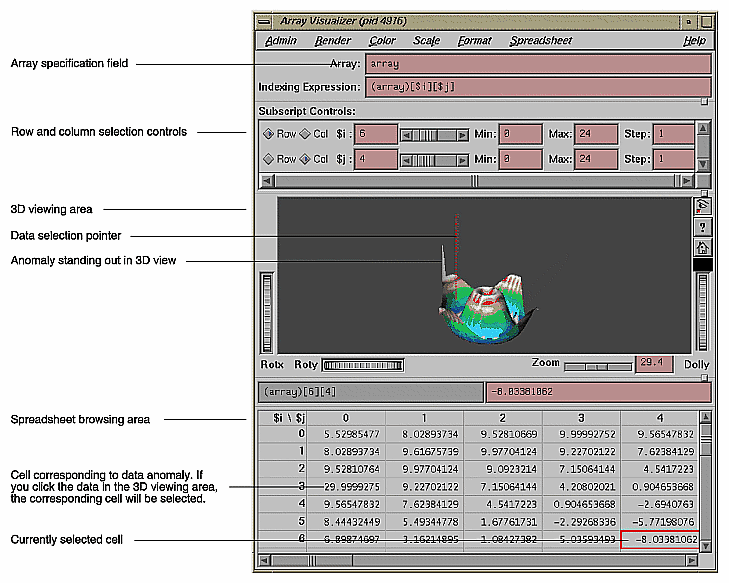
Figure 2-2, shows the Array Visualizer window, a powerful view for examining data in arrays of up to 100 x 100 elements. You can look for problem areas in a 3D rendering of the array, click on the area of interest, and view the numerical values in a spreadsheet format.

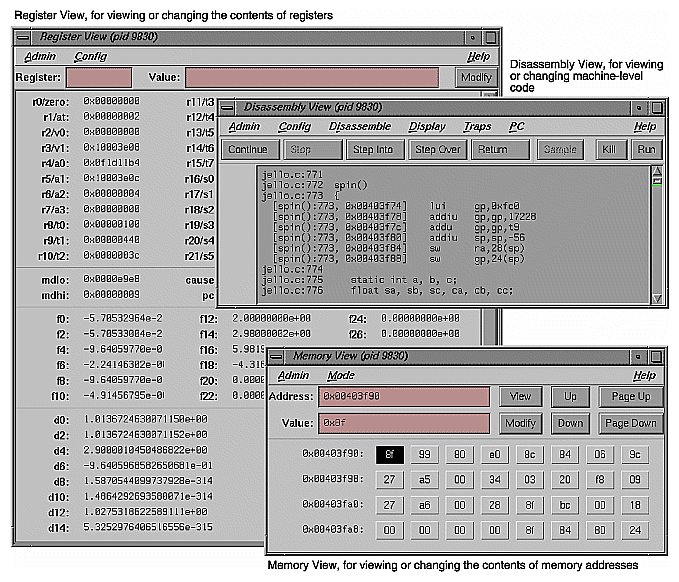
Note: For an explanation of all controls and menus on this window, refer to the ProDev WorkShop: Debugger User's Guide. If you need to debug your application at the machine level, you can use Register View, Disassembly View, or Memory View, as shown in Figure 2-3. These views are accessed from the Views menu in the Debugger Main View.
Use the control panel options in the Main View to continue execution (see Figure 2-1).
From any breakpoint or trap, you have the following options:
Click the Continue button to run the program until the next breakpoint.
Choose the Continue To selection in the dynamic popup menu to proceed to a specified source line. (Placing the cursor on a specific source line also specifies the line.)
Choose the Jump To selection in the PC menu to go to the line specified by the cursor, skipping over any intermediate code.
Click the Step Into button to continue execution by one line or by a specified number of lines. To specify a number, hold down the right mouse button while the cursor is positioned over the Step Into button and select a number from the resulting dialog box. The process then continues the specified number of source lines and enters any called functions.
Click the Step Over button to continue execution by one line or by a specified number of lines as with the Step Into button. The process then continues the specified number of source lines but does not enter any called functions.
Click the Return button to execute the remaining instructions in a function and stop upon return from that function.
Check out the source code that needs to be fixed.
If you find a bug and are using an integrated source control program, you can check out the source code from the Main View (or the Source View window, an alternate editing window).
Choose Check Out from the Versioning submenu of the Source menu.
Fix any problems in your code by using the source code display area in the Main View, Source View, or by using the editor of your choice.
Both the Main View and Source View allow you to annotate and do simple edits on your code. Source View also lets you display test data from the Performance Analyzer and Tester in the annotation column. If you prefer to view source code in a text editor other than Source View, add the following line to your .Xdefaults file:
*editorCommand: editor
The editor option is the command for the editor you want to use.
Recompile using the Build Manager.
The Build Manager has two windows: Build View and Build Analyzer. Build View lets you compile, view compile error lists, and access the problem code in Source View or an editor of your choice. Build Analyzer lets you view build dependencies and recompilation requirements, and access source files. Build View uses the UNIX make facility as its default build software. Although Build Analyzer determines dependencies using make, you can substitute the build software of your choice, that is, any make facility that runs on SGI platforms.
The following table details where to find more information about the Debugger in the ProDev WorkShop: Debugger User's Guide.
Table 2-1. Debugger Information Details
Topic | See |
|---|---|
General Debugger information | Chapter 1, “WorkShop Debugger Overview” |
Basic Debugger Usage | Chapter 2, “Basic Debugger Usage |
Debugger interaction with source files | Chapter 3, “Selecting Source Files |
Debugger tutorial | Chapter 4, “Tutorial: The jello Program” |
Comprehensive information about setting breakpoints and traps | Chapter 5, “Setting Traps” |
Controlling execution in a process (stepping, jumping, etc.) | Chapter 6, “Controlling Program Execution” |
Examining Debugger data in general at the source level | Chapter 7, “Viewing Program Data” |
Tracing through the call stack | Chapter 7, “Viewing Program Data” |
Entering expressions to be evaluated at stopping points | Chapter 7, “Viewing Program Data ” |
Fix+Continue | Chapter 8, “Debugging with Fix+Continue” |
Using the debugger to trap memory allocation problems | Chapter 9, “Detecting Heap Corruption” |
Debugging multiprocesses | Chapter 10, “Multiple Process Debugging” |
X/Motif Analyzer | Chapter 11, “X/Motif Analyzer” |
The following table details where to find more information about the Debugger in the ProDev WorkShop: Debugger Reference Manual.
Table 2-2. Debugger Information Details
Topic | See |
|---|---|
Viewing or changing the values of variables | Chapter 6, “Data Examination Windows”, Variable Browser subsection |
Examining data in arrays using the 3D or spreadsheet format | Chapter 6, “Data Examination Windows,” Array Browser subsection |
Determining the data structures of variables | Chapter 6, “Data Examination Windows,” Data Explorer subsection |
Using the Debugger command line | Chapter 9, “Debugger Command Line” subsection |
Examining debugger data at the machine level | Chapter 7, “Machine-level Debugging Windows” subsection |