Many tools in the ProDev WorkShop toolkit and related products provide graphical views. The graphical view is a useful device for depicting relationships. This appendix covers these topics:
Graphical views provide data overviews that show the relationships between entities. In a graphical view, entities are shown as rectangles (or nodes) and relationships as connecting arrows (or arcs). When entities represent source code, double-clicking a node brings up Source View, which displays the corresponding code in a format that is available for editing.
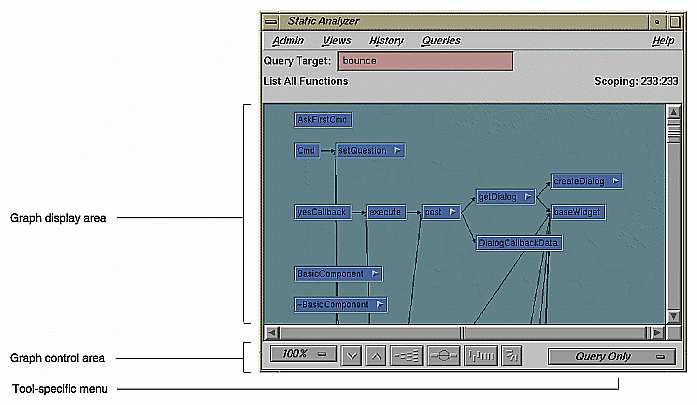
A typical graphical view appears in Figure A-1. Graphical views have a display area with a row of controls underneath it. If the graph is larger than the viewing area, scroll bars are be enabled.
Since an overwhelming amount of information can be displayed in a graphical view, a number of methods are provided for simplifying the display. They fall into two categories: those that manipulate the display without changing the current contents and those that let you filter nodes and arcs from the display.
This section covers the methods that change the display without altering the contents.
All graphical views have a control area, containing a row of graph controls as shown in Figure A-2.

| Note: In some cases, the Multiple Arcs button may be disabled. This is appropriate where there can only be one arc between nodes. |
These graphical view controls are as follows:
Zoom menu: shows the current scale of the graph. If clicked on, a pop-up menu appears displaying other available scales. The scaling range is between 15% and 300% of the normal (100%) size.
Zoom Out button: resets the scale of the graph to the next available smaller size in the range.
Zoom In button: resets the scale of the graph to the next available larger size in the range.

Note: If you reposition nodes by dragging and then use one of the Zoom buttons, the configuration will return to the initial position. Overview button: invokes the overview pop-up display, which shows a scaled-down representation of the graph. The nodes appear in the analogous places on the overview pop-up, and a white outline may be used to position the main graph relative to the pop-up. Alternatively, the main graph may be repositioned with its scroll bars. See the following section for more details.
Multiple Arcs button: toggles between single and multiple arc mode. Multiple arc mode is extremely useful for the List Arcs query, because it graphically indicates how many of the paths between two functions were actually used.
Realign button: redraws the graph, restoring the positions of any nodes that were repositioned.
Rotate button: flips the orientation of the graph between horizontal (calling nodes at the left) and vertical (calling nodes at the top).
Note: If you reposition the nodes by dragging and then change orientation, the nodes will return to the initial positioning relative to each other.
The Overview window lets you view the entire graph at a reduced scale. To display the Overview window, click the overview button.
Figure A-3 shows a typical Overview window with the resulting graph. The Overview window has a movable viewport that lets you select the portion of the graph displayed in the main window. Special nodes and arcs are highlighted for easy detection.
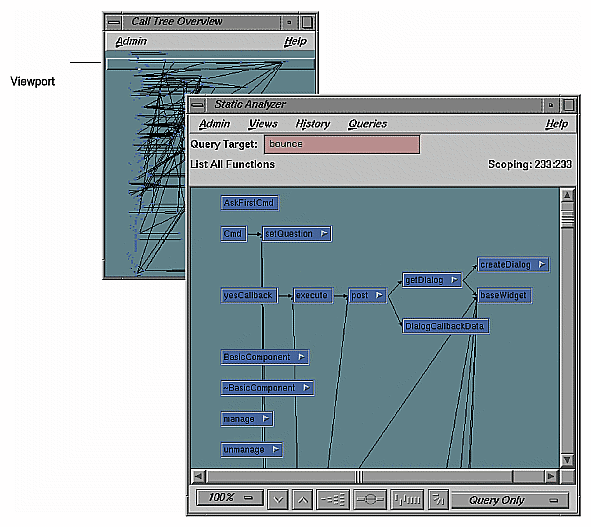
The Overview window has an Admin menu with the following selections:
You can move an individual node in a graph by dragging it with the middle mouse button. This can help reveal obscured arc annotations.
You can select multiple nodes by dragging a selection rectangle around them. You can Ctrl-click to add a single node to the group. Shift-clicking a node adds it to the group along with all the nodes that it calls. Once you have selected a group of nodes, you can move them as a group with the middle mouse button or perform other operations on them.
Another way to simplify a graph is to reduce the number of nodes and arcs. Different tools have different filtering options. All graphs have two types of node menus (accessed by holding the right mouse button) for filtering nodes: the Node menu and the Selected Nodes menu. Both menus are shown in Figure A-4.
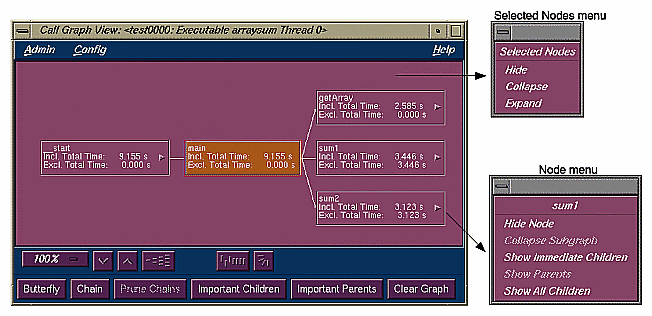
The Node menu lets you filter a single node. It is displayed by holding the right mouse button down while the cursor is over the node. The name of the selected node appears at the top of the menu. The Node menu contains the following selections:
Hide Node: removes the selected node from the graph display.
Collapse Subgraph: removes the nodes called by the selected node (and subsequently called nodes) from the graph display.
Show Immediate Children: displays the functions called by the selected node.
Show Parents: displays all the functions that call the selected node.
Show All Children: displays all the functions (descendants) called by the selected node.
The Selected Nodes menu lets you filter multiple nodes. You can select multiple nodes by dragging a selection rectangle around them. You can also Shift-click a node and it will be selected along with all the nodes that it calls. Holding down the right mouse button anywhere in the graph displays the Selected Nodes menu. The Selected Nodes menu has the following selections: