This tutorial demonstrates the main features in the Browser. It outlines common tasks you can perform with the Browser, using sample C++ source code to illustrate the use of each function.
The demonstration directory, /usr/demos/WorkShop/bounce, contains the complete source code for the C++ sample application bounce. To prepare for the session, you must create the fileset and static analysis database, then launch the browser from the Static Analyzer.
Procedure 8-1. Preparing for the sample session
Prepare for the session by following these steps:
Open a shell window and change to the /usr/demos/WorkShop/bounce directory.
Start the Static Analyzer by entering cvstatic &
The Static Analyzer window opens.
Select Browser from the Static Analyzer Admin menu.
This starts the Browser if a parser mode static analysis database has already been built.
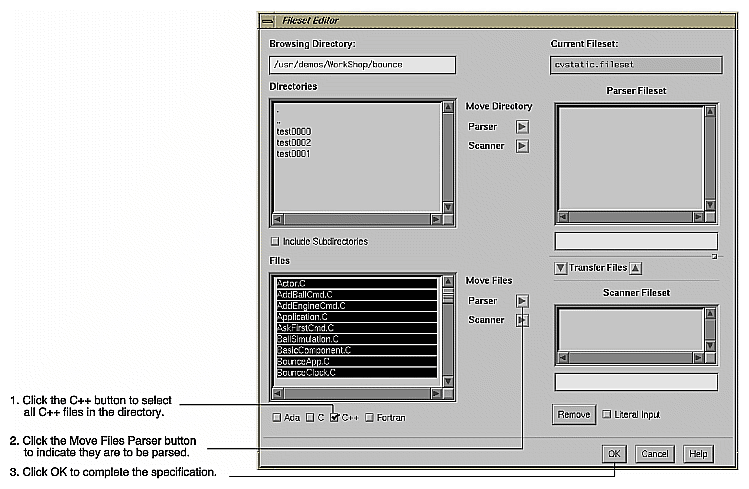
If no database is available, an error message appears, and you must specify a parser mode fileset. Select Fileset Editor from the Admin menu and follow the steps as as shown in Figure 8-1. Then you need to select Browser from the Admin menu again. This causes a new database to be built using parser mode and takes several minutes to complete.
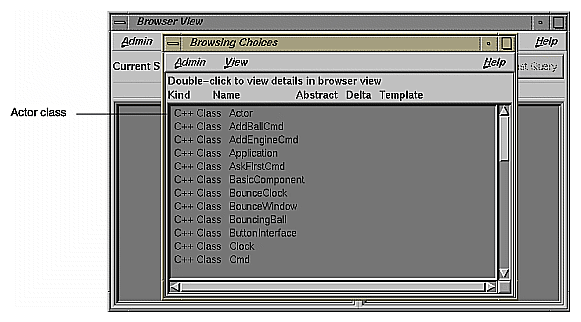
The Browsing Choices chooser window opens at the same time as the Browser View window so that you can select the first class. The Browsing Choices chooser window contains the complete list of C++ classes included in the current fileset. Locate the Actor class in the chooser window. See Figure 8-2.
Procedure 8-2. Understanding the Browser View Window
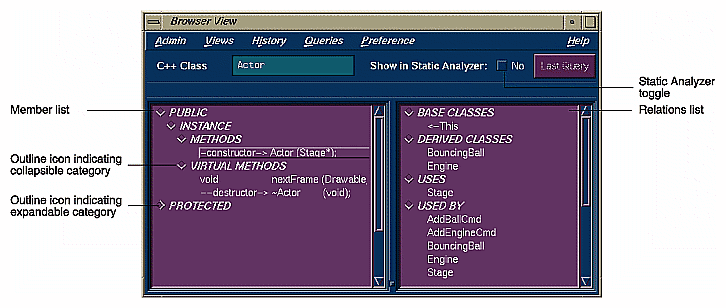
Double-click the Actor class in the chooser window. The Browsing Choices window closes, and the data for Actor now appears in the Browser View window. The class name Actor is displayed in the Current Subject text field. Information about the class appears in the outline list views in the side-by-side panes (see Figure 8-3). Actor is now the current subject (class).
Examine the screen contents for the Browser View window.
The member list is on the left. It displays members according to their accessibility: PUBLIC, INSTANCE, or PRIVATE.
Each kind of member can be STATIC or INSTANCE (nonstatic). Static objects of a given class contain the same value for a given member. INSTANCE members can contain different data values in different instances of that class.
The member pane displays four kinds of class members: TYPES, DATA, METHODS, and VIRTUAL METHODS.
The relations list is on the left right side of the Browser View window. It displays information on related classes and methods, based on the point of view of the current class: BASE CLASSES, DERIVED CLASSES, USES (classes that the current class uses), USED BY (classes that the current class is used by), FRIENDS, FRIEND FUNCTIONS, and FRIEND OF relationships.
The layout of both list displays are customizable.
Procedure 8-3. Expanding and Collapsing Categories
Click the outline icon to the left of the PROTECTED category (see Figure 8-3).
This displays the elements in the PROTECTED category and causes the arrow in the outline icon to point downward.
Then click the outline icon to the left of the PROTECTED category again. This hides the elements and causes the arrow in the outline icon to point to the right again.
Click the Queries menu and examine the results.
Queries search the static analysis database for specific information about classes and their members, including class hierarchy, class and member declarations and definitions, and the interactions among members and classes (for example, which members call which members, where a definition overrides another, where an instance is created or destroyed, and so on).
The Browser provides two types of menus for making queries:
Queries menu: accessed from the menu bar, its queries apply to the current class
Element-specific popup menus: accessed by holding down the right mouse button while the pointer is over the selected element you want to query
The Browser provides answers to queries by highlighting items in the member and related class lists that match the query. Optionally, you can display more detailed query results in the Static Analyzer window from which you launched the Browser.
Click the Show in Static Analyzer toggle button in the Browser View window (shown in Figure 8-3).
This button lets you view the results of queries in the Static Analyzer window along with the Browser window. The Static Analyzer window has the advantage of showing source lines for your queries
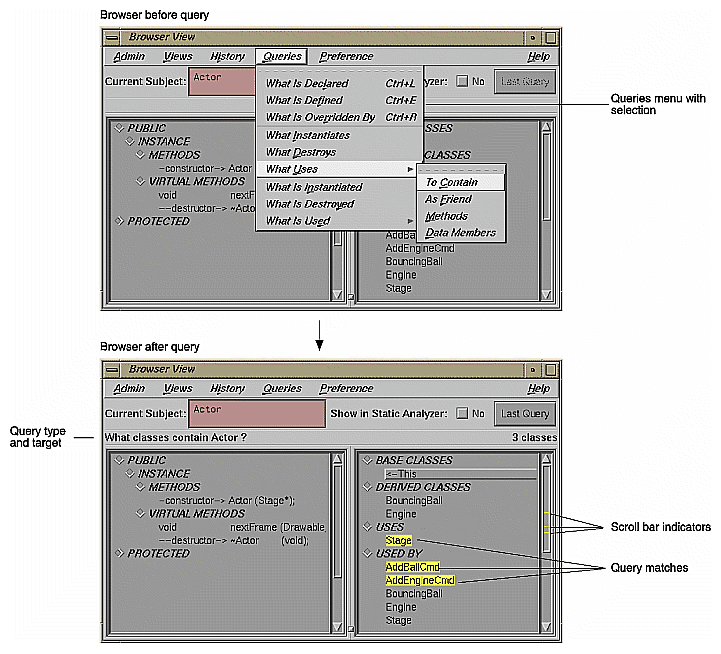
Select What Uses from the Queries menu and To Contain from its submenu (see Figure 8-4).
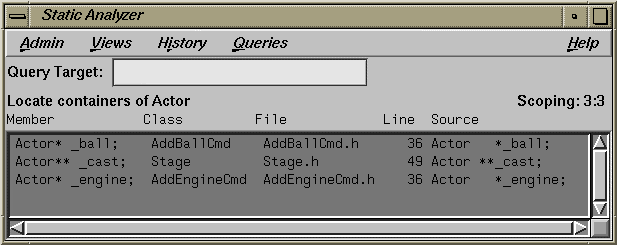
The Queries menu in the menu bar lets you request relationship information for the current class. In addition to highlighting the matching elements in the list, the Browser displays indicator marks in the scroll bar showing the relative locations of matching elements. Also, the query is identified in the field over the outline list area. If you click on an indicator mark, you will scroll directly to the matching element. Because you turned on the Show in Static Analyzer toggle, the results are shown in the Browser as well, including the file, line number, and source line for the classes containing Actor. See Figure 8-5.
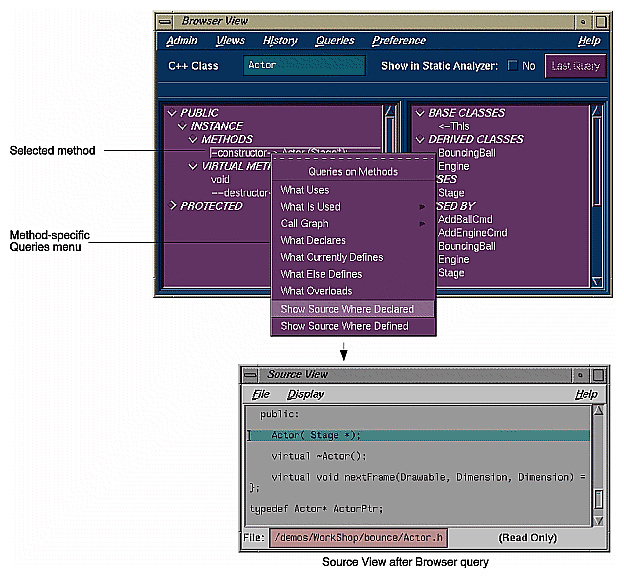
Select the constructor method in the METHODS category by holding down the right mouse button. Then select Show Source Where Declared. See Figure 8-6.
This displays the Queries menu specific to methods. In this case, the query lets us see the source code where it is declared. The Source View window now displays with the matching code highlighted.
For practice, try a few random queries.
Click the Last Query button in the Browser View window.
Clicking this button displays the results of the most recent query in the Static Analyzer window from which the Browser was launched.
Procedure 8-5. Using the Browser Graphical Views
Look at the graphical views supplied by the Browser and Select Show Containment Graph from the Views menu in the Browser View window.
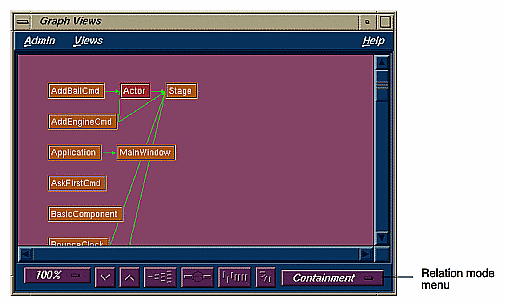
The Graph Views window is displayed, set to Containment as shown in Figure 8-7. You can switch to other relationship modes through the Relation mode menu.
Pull down the Views menu, select Show Butterfly, and resize the Graph Views Window to be smaller.
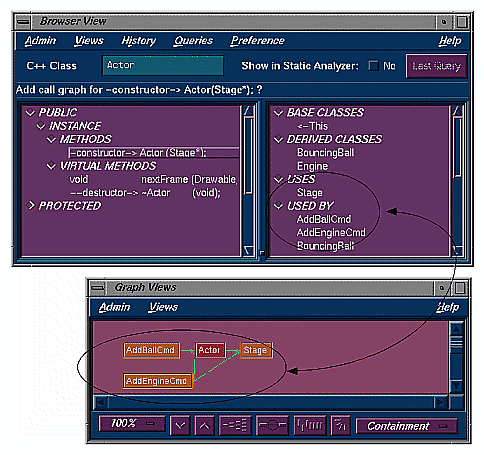
This eliminates extraneous classes from the graph, displaying only those classes that Actor contains or is contained by. Now compare the graph with the query results shown in the Browser.
Click on the Relation mode menu in the lower right corner of the Graph Views window and select Inheritance from the displayed options (see Figure 8-7).
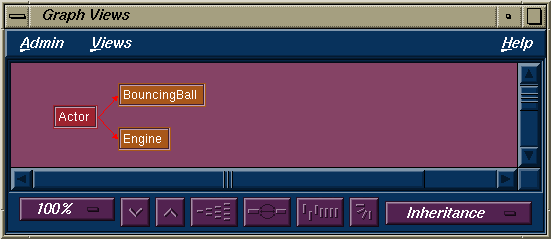
This shows the inheritance relationships. In this case, the derived classes BouncingBall and Engine inherit from Actor, as shown in Figure 8-9.
Next, select Interaction from the Relation mode menu options.
This displays the classes that directly interact with Actor. Those that use Actor appear on the left and those that are used by Actor appear on the right. Compare the display results with those from the Inheritance display.
Procedure 8-6. Shortcuts for Entering Subjects
Go back to the Browser View window, clear the Current Subject field, and type a question mark (?), followed by pressing the Enter key.
This is a shortcut for displaying the Browsing Choices window. However, instead of selecting through the Browsing Choices window, we are going to demonstrate how name completion works.
Type Main and press the space bar.
The Browser fills in the rest of the name, MainWindow in this example, and its data.
Procedure 8-7. Generating Man Pages
The Browser generates man page templates from your classes so that all you have to do is fill in the descriptions and provide comments. To create man pages for classes in the fileset, follow these steps:
From the Browser View Admin menu, select Generate Man Pages.
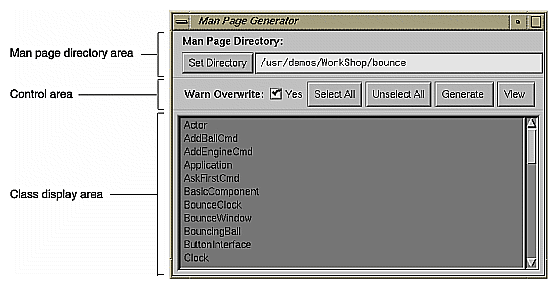
The Man Page Generator window opens, as shown in Figure 8-10.
You can specify the target directory in the area at the top of the window, either directly in the Man Page Directory field, or by browsing in the dialog box displayed by clicking the Set Directory button. The control area lets you receive warnings if a man page already exists, select or unselect all classes, generate new man pages, and display shells showing the new man pages.
Click the Select All button in the control area.
This selects all the classes in the class list. If you need only a subset of the list, simply click the desired classes. If you change your mind, you can remove any current selections by clicking the Unselect All button.
Click Generate.
Wait for a few seconds while your files are generated.
Click View to view the output files.
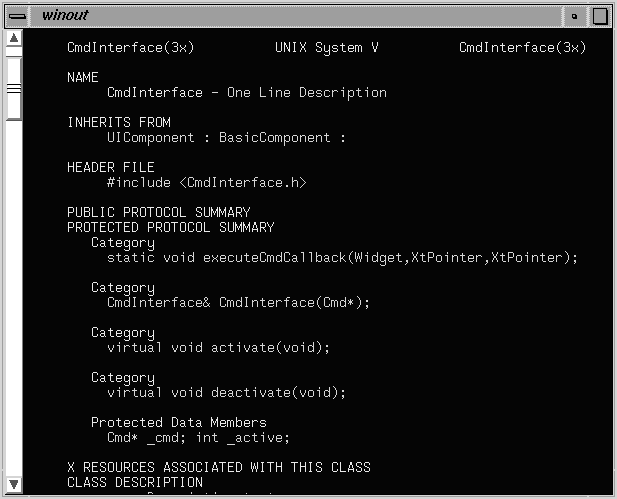
A winout window containing the man page text opens, as shown in Figure 8-11. You can edit this file using a text editor, such as vi.
Close the winout window using the window menu in the upper left corner.
Procedure 8-8. Generating Web Pages
The Browser also lets you generate web pages, that is, documentation in HTML format compatible with World Wide Web readers. To generate a web page, follow these steps:
From the Browser View Admin menu, select Generate Web Pages.
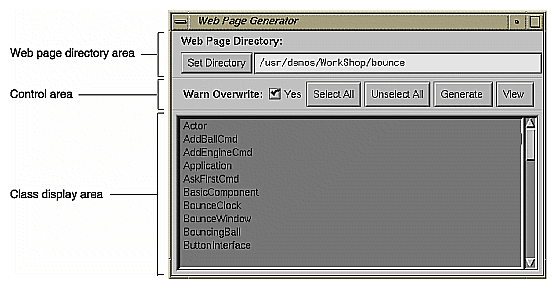
The Web Page Generator window opens, as shown in Figure 8-12.
This window operates in the same manner as the Man Page Generator window. You specify the target directory by typing directly in the Web Page Directory field or by browsing in the dialog box that comes up when you click the Set Directory button. The control area lets you receive warnings if a web page already exists, select or unselect all classes, generate new web pages, and display a shell showing the new web pages.
Click the Select All button in the control area.
This selects all the classes in the class list. If you need only a subset of the list, simply click the desired classes. If you change your mind, you can remove any current selections by clicking the Unselect All button.
Click Generate.
Wait for a few seconds while your files are generated.
Click View to view the output files.
You have reached the end of the C++ tutorial. You can exit both the Static Analyzer and the Browser by pulling down the Static Analyzer Admin menu and choosing Exit.
