This chapter discusses some of the additional views available through the Debugger: the Execution View, Multiprocess Explorer, Source View, and Process Meter.
The Execution View window is a simple shell that allows you to set environment variables and inspect error messages. If your program is designed to be interactive using standard I/O, this interaction takes place in the Execution View window. Any standard I/O that is not redirected by your Target command is displayed in the Execution View window. Execution View is launched (and iconified) automatically with the Debugger.
WorkShop supports debugging of multiprocess applications, including pthreaded programs and processes spawned with either fork or sproc commands.
Multiprocess debugging is supported primarily through the Multiprocess Explorer window. To display this window, select Multiprocess Explorer from the Admin menu of the Main View window. Multiprocess Explorer window displays a hierarchical view of your pthreaded application. Pthreaded processes are marked with a folder icon. Clicking the folder changes the view to show that process's pthreads. Clicking on a thread opens a call stack for that thread.
For each process or thread, clicking the right mouse button brings up a menu that applies to the selected item. This menu is a duplicate of the Process menu. See “Controlling Multiple Processes” for more information.
When the Multiprocess Explorer window comes up, it defaults to a list of the status of all processes in the process group.
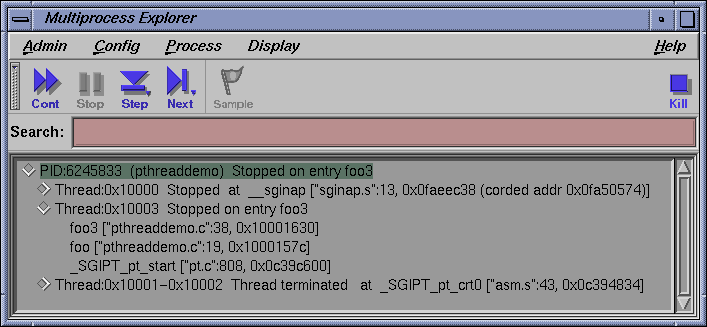
This view includes the following information:
OmpThread: OmpThread number or Rank. The MPI rank number is shown if this is an OpenMP or MPI application.
PID: Shows the process identifier (PID).
executable name: Name of the executable for this process.
Process Status for the process. This typically matches the process status line of the Main View.
Function/PC: Indicates the current function and program counter (PC) for any stopped processes. This typically matches the process status line of Main View.
If pthreads are present in the process, clicking the open widget to the left of the Process line displays any pthreads that the process may have and the following information:
thread: The thread number for each thread.
State: Shows pthread state depending on how the preferences are set on the Multiprocess Explorer menu, brought up by selecting Preferences from the Config menu and using the Hide Thread State toggle. State is the kernel-level status and is not displayed by default.
Status: status is user-level and is always displayed.
The Multiprocess Explorer also allows viewing by process/thread status. This groups processes and/or threads at the same status and location under one status node and reduces the amount of information displayed on the screen when there are very large numbers of processes and/or threads. This is most useful for large OpenMP and MPI jobs.
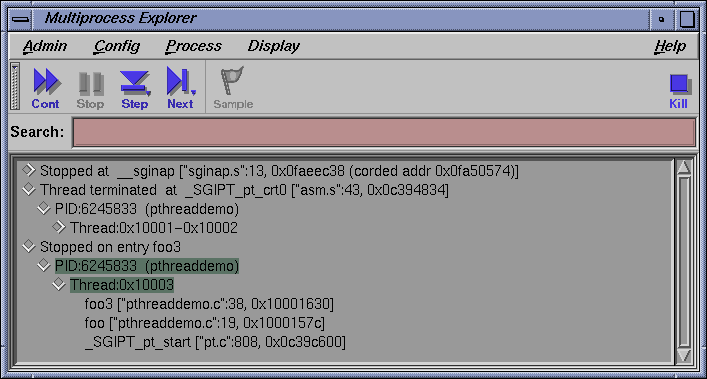
This view includes the following information:
top level status node: This typically matches the process status line of Main View. Selecting this node's open widget opens the Status node to reveal a list of process' threads that are at this particular status.
process nodes: the process nodes are directly under the Status nodes and are displayed as PID: number followed by the executable name for the process.
If a process contains pthreads, toggling the process node widget to the left of the process number displays the pthreads as thread: number and the pthread state if the Hide Thread State preference is not selected in the Multiprocess Explorer preferences.
The following Status and State conditions are possible:
The Multiprocess Explorer window uses the same control buttons as are in the Main View window with following exceptions:
There are no Run, Return, or Print buttons in the Multiprocess Explorer.
The buttons in this view apply to all processes as a group.
Using a control button in the Multiprocess Explorer window has the same effect as clicking the button in each process's Main View window.
These buttons operate identically to those described for the Main View window with the All option effect. Refer to “Primary Components of the Main View Window” in Chapter 1, for descriptions of these buttons.
The Admin menu in the Multiprocess Explorer window lets you perform several administrative functions. Only the Save as Text, Close, and Exit items are described here. All other options perform as those found in the Admin menu of the Main View window, described in “Admin Menu” in Chapter 1.
Save as Text: The process status list from in the Multiprocess Explorer window is saved to the file you select using the Save Text dialog.
Launch Tool: Allows you to run other WorkShop tools. You can switch to the other tools by selecting Build Analyzer, Static Analyzer, Performance Analyzer, or Tester. Selecting Debugger allows you to start another debugging session. If you have ProDev ProMP (formerly called WorkShop Pro MPF) installed on your system, the Parallel Analyzer selection is also available.
Remap Path: Opens a dialog that allows you to enter a new pathname.
Close: Closes the Multiprocess Explorer window only.
Exit: Exits all views in the session and terminates the session.
The Preferences option in the Config menu brings up the Multiprocess Explorer Preferences dialog that allows you to control when processes are added to the group and specifies their behavior. This option also contains a Save option that allows you to save your preferences. A sample configuration screen is shown below with typical settings for multiprocess debugging sessions.
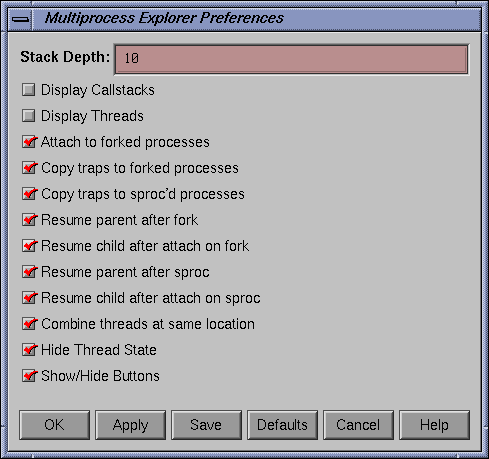
The Multiprocess Explorer preference options are:
Stack Depth: Allows you to set how many lines of the call stack should be displayed when opening the call stack. Default is 10.
Display Callstacks: Allows you to specify that processes and threads in the Multiprocess Explorer window are opened to display their call stacks. This is useful if you have very large numbers of processes and/or threads and you would like to search all the call stacks for a particular name or address. The default is off.
Display threads: Allows you to specify if the process node is always opened to display pthreads (if a process had pthreads). Default is off.
Attach to forked processes: Automatically attaches new processes spawned by the fork command to the group. (Note that processes spawned by sproc are always attached.) Default is off.
Copy traps to forked processes: Copies traps you have set in the parent process to new forked processes automatically. Alternatively, if you create parent traps with Trap Manager and specify pgrp, then the children inherit these traps automatically, regardless of the state of this flag. Default is off.
Copy traps to sproc'd processes : Copies traps you have set in the parent process to new sproc'd processes automatically. As in the previous option, if you create parent traps with the Trap Manager and specify pgrp, the children inherit these traps automatically, whether this flag is set or not. Default is on.
Resume parent after fork: Restarts the parent process automatically when a child is forked . Default is on.
Resume child after attach on fork : Restarts the new forked process automatically when it is attached. If this option is left off, a new process stops as soon as it is attached. Default is on.
Resume parent after sproc: Restarts the parent process automatically when a child is sproc'd . Default is on.
Resume child after attach on sproc : Restarts the new sproc'd process automatically when it is attached. If this option is left off, a new process stops as soon as it is attached. Default is on.
Combine threads at same location: Applies a collapsing algorithm to display threads stopped at the same location at the same time. (It is possible for threads to arrive at the same location through different logical routes.) Default is on.
Hide Thread State: Displays thread state, which is the kernel-level status. Default is to hide the thread state.
Show/Hide Buttons: When this option is ON, the Continue All, Stop All, Step Into All, Step Over All, Sample All, and Kill All buttons appear near the top of the Multiprocess Explorer window.
The Process menu of the Multiprocess Explorer allows you to control processes and threads. The Process menu has the following options:
| Change focus to this entry | |
Opens a dialog that allows you to switch the process or thread currently focused on in the Main View window to the process or thread selected in the Multiprocess Explorer window. Selecting a call stack entry changes the Main View window's focus to that process or thread and positions the cvmain window at the offset of the selected call stack. | |
| Create a new window | |
Brings up a new Main View window for the selected process or thread. | |
| Goto | |
Opens a dialog box that allows you to enter the name of a thread on which focus should be switched. This is useful when multiple threads, all at the same location, are collapsed into a single line. While Change focus to this entry always takes you to the first thread, Goto allows you to jump to any thread. | |
| Add | |
Opens a dialog in which you can select from a list of process ids. Selecting a process id (PID) in the dialog and pressing OK causes the process to be attached and added into the Multiprocess Explorer window's list of processes. | |
| Remove | |
After you select a process/thread (by highlighting it), click on Remove to remove it from the list of processes in the Multiprocess Explorer window. A process in a sproc share group cannot be removed from the process group. | |
Many of these menu options are available via dynamic menus. Clicking and holding the right mouse button down shows the actions available on a popup menu. Quickly clicking down on the right mouse button gives the default action.
The Source View window is brought up by choosing Views -> Source View from the Main View window menu bar. By default, a copy of the source on display in the Main View window source pane is displayed in this window.
The Source View menu bar contains selections duplicated from the Main View window: Display, Traps, and Fix+Continue. Each of these menus has the same functionality as its counterpart in the Main View window (see “Main View” in Chapter 8). The only new menu selection is the File menu described below:
Open: Launches the Open dialog that allows you to choose a file to load into Source View .
Open Recent: Lists recent files that have been opened previously.
Save: Records changes made to the file during the current debugging session. You must first select Make Editable from this File menu when the file is read only.
Save As: Records changes made during the debugging session to the source file under a different file name, the name of which you can enter or select using the Save As Text dialog.
Save As Text: Records information in the display area as a text file, the name of which you can enter or select using the Save As Text dialog.
Open Separate: Launches the Open Separate dialog that allows you to create a new Source View with the contents of a different source file.
Insert File: Inserts the text of a file within your current file. This item description is available only if the file is editable. The Make Editable item description from this File menu can be used to switch the file from read only.
Clone: Clones the current window.
Fork Editor: Starts your default editor on the current file. The default editor is determined by the editorCommand resource in the app-defaults file. The value of this resource defaults to wsh -c vi +%d, which means run vi in a wsh window and scroll to the current line. If the editor allows you to specify a starting line, enter %d in the resource to indicate the new line number.
Recompile: Displays the Build View window that allows you to compile the source code associated with the current executable.
Make Editable: Toggles the source code displayed between (Read Only) and (Editable) so that you can edit your code.
Search: Searches for a literal case-sensitive, literal case-insensitive, or regular expression. After you have set your target and clicked Apply (or pressed Enter), each instance is marked by a search target indicator in the scroll bar. You can search forward or backward in the file by clicking the Next or the Prev button. You can also click an indicator with the middle mouse button to scroll to that point. Clicking Reset removes the search target indicators.
Go To Line: Launches the Go To Line dialog that allows you to go to a specific line in the source. You can type in the line, or select the line number via the slider bar.
Versioning: Provides access to the configuration management tool, if you have designated one.
The cvconfig script allows you to designate ClearCase, RCS or SCCS. Type the following:
/usr/sbin/cvconfig [rcs | sccs | ptools | clearcase]
You must have root permissions to run cvconfig .
Selecting any option displays a shell in which you can access the configuration management tool. The selections in the submenu are:
CheckIn -- Saves the source file and checks it into the database as a new version.
CheckOut -- Recalls the source file from the tool's database if you have the proper authority, locks it, and makes it editable.
UncheckOut -- Cancels the checkout, with no changes registered.
Close: Dismisses the Source View window.
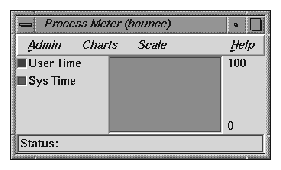
The Process Meter window is brought up by choosing Views -> Process Meter from the Main View menu bar. The Process Meter monitors resource usage of a running process without saving the data. Figure 2-4, shows the Process Meter in its default configuration (with only the User Time and Sys Time fields active).
The Process Meter contains its own menu bar that contains the Admin, Charts, Scale, and Help menus. The Admin menu is the same as that described in “Admin Menu, Task View” in Chapter 3. The Help menu is the same as that described in “Help Menu” in Chapter 1. The other menus are described in the following list:
Charts Menu: The Charts menu contains a set of toggles that allow you to choose which charts are displayed in the Process Meter window. You can display as many charts simultaneously as you wish. The following choices are available:
User/Sys Time (the default) Major/Minor Faults Context Switches Bytes Read/Written Read/Write Sys Calls Other Sys Calls Total Sys Calls Signals Process Size Scale Menu: The Scale menu allows you to set the time scale for the processes displayed in the Process Meter window. A menu allows you to choose a time scale from 2 seconds to 10 minutes.