The Fix+Continue utility interacts with several Debugger windows. The Main View and Source View windows access the Fix+Continue utility from the menu bars. The standard output results of running redefined code are displayed in the Execution View window (refer to “Changes to Debugger Views”).
Special line numbers (in decimal notation) applied to redefined functions appear in several views.
| Note: Fix+Continue functionality within the debugger is limited to C++ programs compiled with the -o32 compiler option. |
The following windows, devoted entirely to Fix+Continue functions, can be brought up by selecting Fix+Continue -> View from the Main View window menu bar:
Status Window
Message Window
Build Environment Window
This chapter describes Fix+Continue menu selections and windows.
The Fix+Continue menu is available from the Main View menu bar. The menu selections operate on the selected code or the file shown in the Source View window. The Fix+Continue menu is also available from Source View window and from the Fix+Continue Status window.
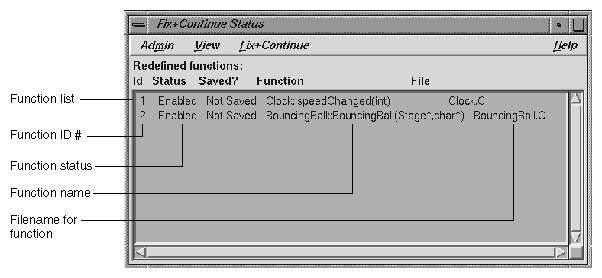
The Fix+Continue Status window (see Figure 8-1) provides you with a summary of the modifications you have made during your session. It also allows you quick access to your modifications and somewhat expanded menu options.
The function ID number, status, name, and file name are displayed in the window. Double-clicking a line in the window brings up the corresponding source in the Debugger main window.
The following menus and options are available:
The View menu contains options for sorting information in the window and displaying file names.
Sort Status View: Sorts the information in the status view according to the field currently selected.
Show Long Filenames: Toggles among absolute (long) path names or base names.
The Fix+Continue menu available from the Fix+Continue Status window is somewhat different from that available through the Debugger Main View. It contains a number of options and submenus that are described below. These options and submenus are active on the item you select in the source pane of the Main View window. Before using this menu, you should select an item by clicking on it. The following options and submenus are available:
External Editor: Allows you to edit with an external editor such as vi, rather than the Debugger's default editor.
Parse And Load: Parses your modified code and loads it for execution. You can execute the modified code by clicking on the Run or Continue command buttons in the Main View window.
Update All Files: Launches the Save File+Fixes As dialog that allows you to update the current session while saving all the modifications to the appropriate files.
Show Difference submenu: Allows you to show the difference between the original source and your modified code. You can show the difference in the code in one of the two following ways:
For Function -- Shows the differences for the current function only.
For File -- Shows the differences for the entire file that contains the current function.
Enable submenu: Allows you to enable the changes in your modified code in one of the following ways:
Function -- Enables the changes in the current function.
Functions in File -- Enables the changes to the current function in its own file.
All Functions -- Enables the changes to all functions in the modified code.
Disable submenu: Has the same menu choices as the Enable submenu, but disables rather than enables.
Save submenu: Allows you to save your code changes to a file. You can save the changes in one of the following ways:
Function -- Launches the File dialog, allowing you to save only the current function to a file.
File -- Launches the Save File+Fixes As pop-up window allowing you to save the entire file that contains the current function.
Delete submenu: Has the same menu choices as the Save submenu, but deletes rather than saves.
Show submenu: Allows you to launch any of the following windows:
Message Window -- Launches a Fix+Continue Error Messages window for the selected item. See “Fix+Continue Message Window”, for more details.
Build Env for File -- Launches a Fix+Continue Build Environment window for the file shown in the Source View window. See “Fix+Continue Build Environment Window”, for more details on the Fix+Continue Build Environment window.
Default Build Env -- Launches the Fix+Continue Build Environment window to show the options that are to be used in cases where they could not be obtained from the target. See “Fix+Continue Build Environment Window”, for details on the Fix+Continue Build Environment window.
The Fix+Continue Message window contains a list of errors and other system messages that pertain to your source modifications, parses, and attempts to run your modified source.
You can highlight the source line where the error occurred by double-clicking the appropriate line in the window. The Fix+Continue Message window contains the following buttons:
Clear: Clears all the parsing errors and warnings.
Next: Puts a check mark on the next unchecked error warning entry in the parse messages. It displays the corresponding file and line in the Source view, highlighting it according to the type of error or warning. The Next option does not work after all the entries in the messages are ticked.
Rescan: Erases all the ticks, so that you can rescan all the error warnings from the beginning.
The Admin menu allows you to perform either of the following operations:
Clear All: Clears all messages in the window.
Close: Closes the window.
The View menu allows you to set any of the following toggles:
Show Warnings: Causes compile warnings to be displayed in the parse errors list.
Append Parse Messages: Causes parse messages to be appended to the parse errors list.
Append Load Messages: Causes load messages to be appended to the load errors list.
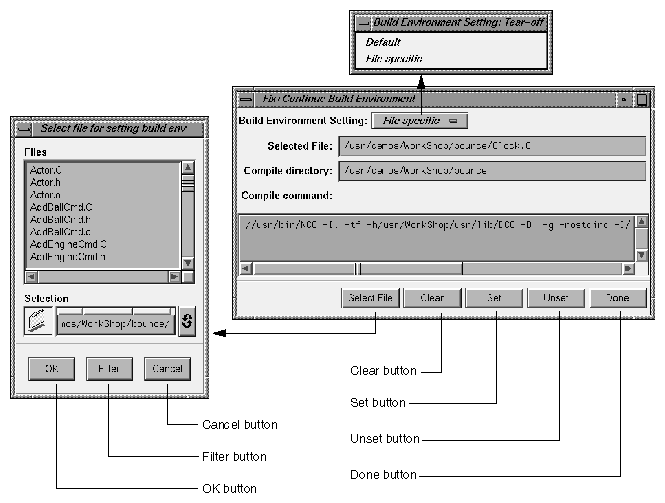
This section describes the Fix+Continue Build Environment window (see Figure 8-2). The Fix+Continue Build Environment window provides you with the build information for your source code in your current environment. It displays the command that was used to build your executable and the name of the file that contains the function that you currently have selected.
The compiler and associated flags that were used to compile the file are normally gathered from the target. You can use this window to make any changes to these flags.
The window allows you to select your build environment setting through the Build Environment Setting toggle that contains the following two options:
Default: Sets the build environment to default that is displayed in the window.
File Specific: Sets the build environment to that of the file that contains the currently selected function. You can change the file by clicking the Select File button, which launches the File dialog.
The Fix+Continue Build Environment window also contains the following buttons:
Select File: Launches the File dialog and allows you to select a file from which to set the build environment.
Clear: Clears the window.
Set: Sets the build environment to what is displayed in the window.
Unset: Unsets the build environment.
Done: Dismisses the window.
When you use Fix+Continue, views change to show redefined functions or stopped lines containing redefined functions.
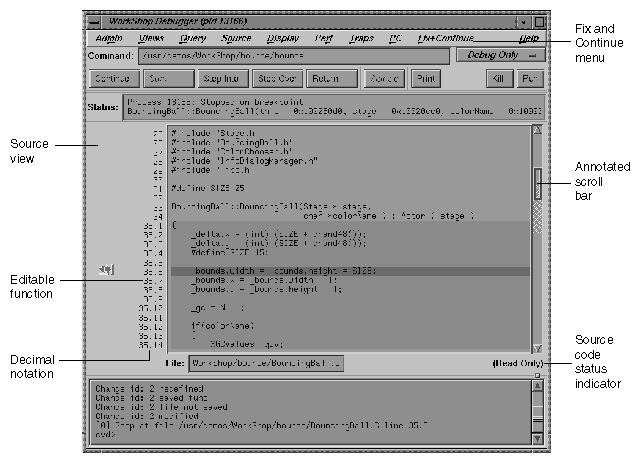
All Fix+Continue actions are available through the Fix+Continue menu on the Main View window. See Figure 8-3, for details.
You can select commands from the Fix+Continue menu or enter them at the Debugger command line. The source code status is Read Only. Color coding shows the differences between editable code, enabled redefinitions, disabled definitions, and breakpoints. Line numbers in redefined functions have decimal notation that is used for every reference to the line number. The integer portion of the decimal is the same as the first line of the function. This ensures that compiled source code line numbers remain unchanged.
The Debugger command line interface accepts Fix+Continue commands and reports status involving redefined functions or files. Figure 8-4, shows a function successfully redefined using the command line. Change id 1 was previously redefined and assigned the number 1.
The Call Stack recognizes redefined functions. It uses the decimal notation for line numbers, as shown in Figure 8-5.
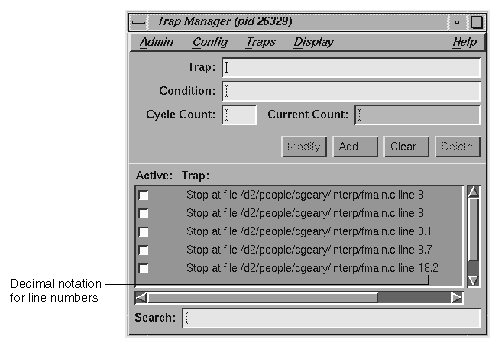
The Trap Manager recognizes redefined functions. It uses the decimal notation for line numbers, as shown in Figure 8-6.


