This chapter describes how to add additional storage devices, as well as peripherals such as printers and modems, to your Onyx graphics workstation.
This section shows you how to configure and install a Silicon Graphics FLD (front-loading drive). The information provided covers the hardware configuration. Refer to the IRIX Admin: Disks and Filesystems manual, or the IRIX Admin: Peripheral Devices manual, for additional system and software configuration information.
Before you install an FLD in the SCSIBox 2 drive enclosure, perform the following four steps:
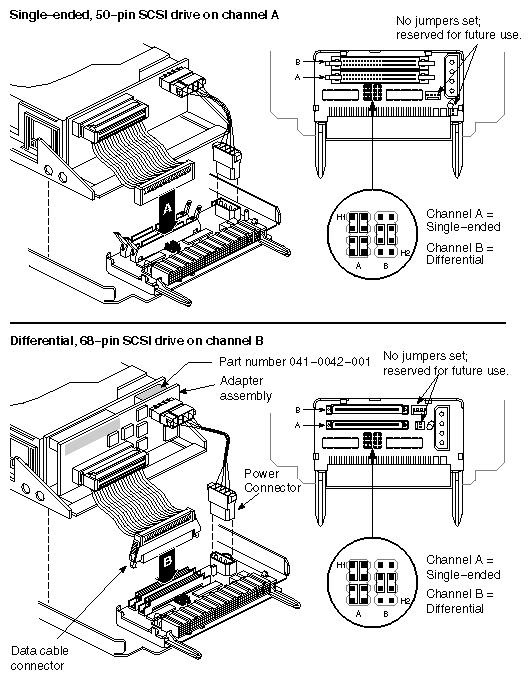
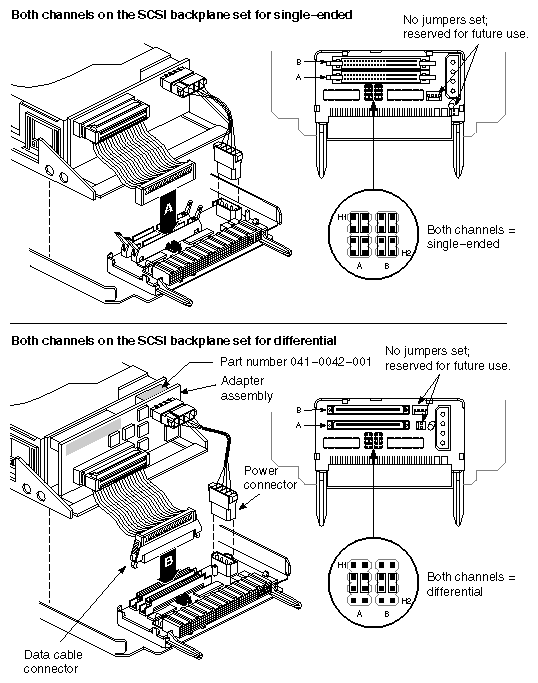
Determine whether or not the drive in the FLD is single-ended or differential.
Each FLD is shipped with a drive sled channel adapter that must be configured to match the attached drive. Then the FLD must be installed in a SCSI channel of the same configuration as the drive and the channel adapter. Ensure that your channel adapter configuration matches the configuration of your drive. Possible channel configurations are shown in Figure 4-1 and Figure 4-2.

Note: The channel adapter must be configured for both of the SCSIBox channels. Do not install an FLD in the SCSIBox with only one channel configured.
Verify that the SCSI bus ID for your drive is a number between 1 and 7 (for single-ended SCSI buses) or between 1 and 15 (for differential SCSI buses), and that the number is not assigned to any other drive on the SCSI channel to which you are attaching it.
Note: 0 is reserved as the bus ID for the SCSI bus controller. Never change the drive ID while the drive is running. Check the drive IDs currently used by your system by opening a shell tool and typing hinv and pressing <Enter>. The system displays a complete hardware inventory, listing all of the devices seen by the CPU. The ID for the device you are installing is displayed in a small window at either the front or the rear of the device (depending upon the manufacturer). The drive ID on newer drives is set by either turning a small thumbwheel or by pushing a select button. Older drives use jumpers to set the drive ID.
Confirm that the FLD is configured for the SCSI channel that you wish it to communicate on.
Note: The two standard SCSI channels, located on the IO4 board, are factory preconfigured. Channel 0 is configured as single-ended and channel 1 is configured as differential. Channels 0 and 1 correspond to the SCSIBox channels A and B, respectively. To select the SCSI channel to which the FLD will be attached, insert the free end of the ribbon cable, coming from the drive, into the connector on the drive sled channel adapter that corresponds to the selected channel (see Figure 4-1 and Figure 4-2).
Install or remove an FLD from the SCSIBox drive enclosure by referring to the procedure in a section called “Installing and Removing FLDs” in
Chapter 3.
The following list describes the more common symptoms associated with misconfiguring an FLD for the channel to which it is attached:
If you plug a single-ended drive into a channel configured for differential operation, nothing on the channel will work.
If you plug a differential drive into a channel configured as single-ended, the differential drive will not work. Single-ended drives on the channel will continue to work.
If you install a drive in the system and it refuses to reboot, follow these steps:
Power off the system, remove the drives, and recheck all the configuration settings on the FLD assembly.
Check to be sure that each drive on the channel has an individual SCSI ID number.
Contact your system administrator or service provider if the system refuses to boot after you reinstall the drives.
| Caution: Never plug a drive into your system while it is powered on. |
Configure your SCSIBox for full-height drives by following these steps:
Open the lower front door of the chassis and ensure that the system is powered down.
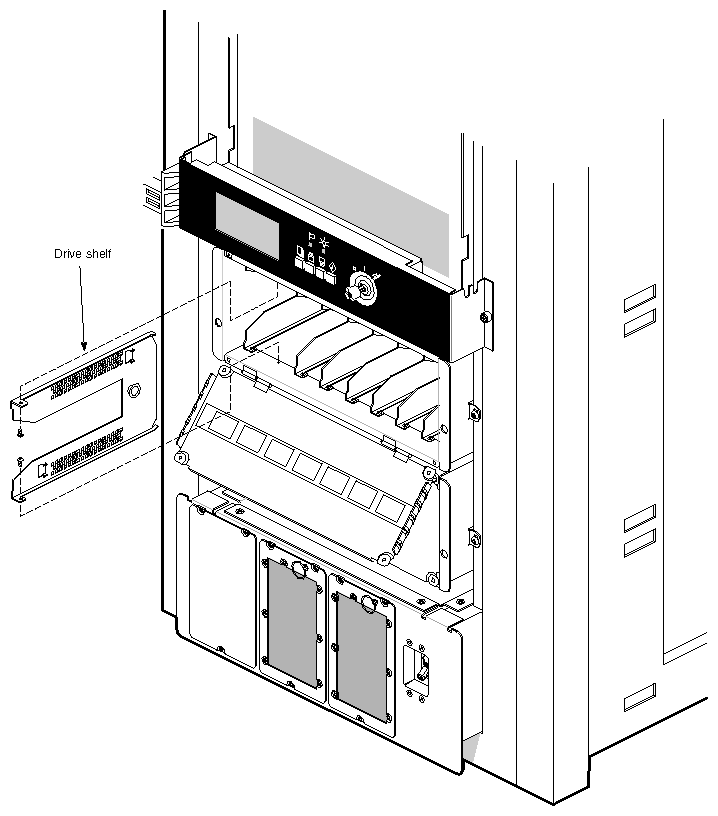
Open the door to the SCSIBox by releasing the two wing nuts (see Figure 3-6).
Identify the drive bay in which you want to install the full-height drive.
Note: A full-height drive occupies two SCSIBox drive bays. This means that wherever you decide to install the drive, the drive shelf to the immediate right must be removed. Remove the two crosshead screws securing the upper and lower front corners of the drive shelf (see Figure 4-3). This requires a No. 0 crosshead screwdriver.
Remove the drive shelf from the front of the SCSIBox (note that the rear corners of the drive shelf have tabs to position them in the SCSIBox).
Store the drive shelf and its securing screws in a safe place in case you have to return the SCSIBox to its original configuration.
Configure the FLD, as described previously in this chapter. Refer to “Installing and Removing FLDs” in Chapter 3 for installation instructions.
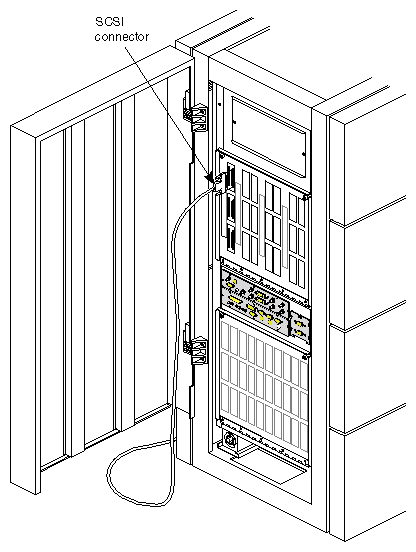
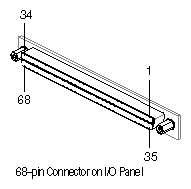
External SCSI devices can be connected to the system if the cardcage 2 I/O door is fitted with the appropriate connectors. External devices require either a 68-pin differential (DF SCSI) or a 68-pin single-ended (SE SCSI) connector. Figure 4-4 illustrates how to connect an external SCSI device. Table 4-1 and Table 4-2 provide pinout information for these connectors.
| Note: See Chapter 3, “Getting Started,” for SCSI cable length limitations. |
| Note: A differential connector is labeled as DF SCSI and a singled-ended connector is labeled as SE SCSI. |
Table 4-1. 68-Pin Single-Ended, High-Density SCSI Pinouts
Signal Name | Pin | Pin | Signal | Connector View |
|---|---|---|---|---|
Ground | 1 | 35 | -DB(12) | See Figure 4-5. |
Table 4-2. 68-Pin Differential, High-Density SCSI Pinouts
Signal Name | Pin | Pin | Signal | Connector View |
|---|---|---|---|---|
+DB(12) | 1 | 35 | -DB(12) | See Figure 4-5. |
Follow these instructions to use a CD-ROM drive, configured as an FLD, to load the IRIX operating system:
Verify that the CD-ROM drive is correctly mounted on a P8 drive sled and that it is configured for a single-ended SCSI channel.
Gain access to the SCSIBox drive enclosure and install the CD-ROM drive, as described in “Installing and Removing FLDs” in Chapter 3.
Locate the compact disc that contains the operating system.
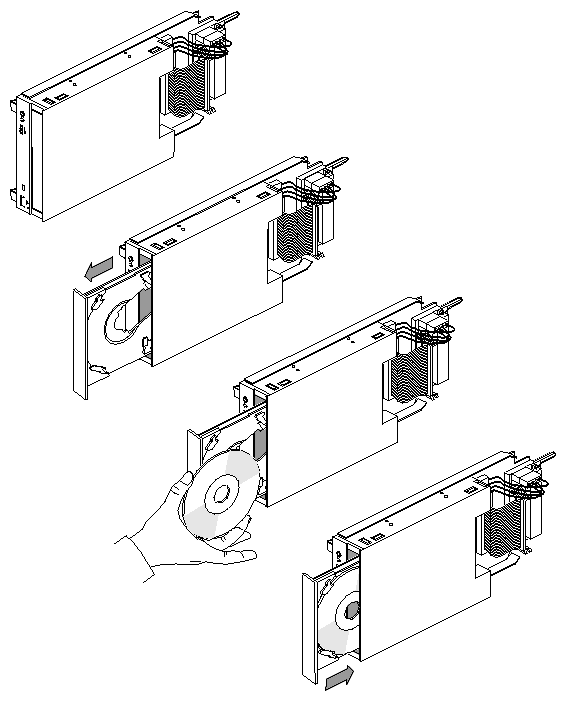
Open the CD-ROM drawer, pull back two of the retaining latches and insert the CD-ROM into the drawer, as shown in Figure 4-6.
Note: If you are using an older CD-ROM drive that does not have a built-in drawer (caddy), do not insert the disc into the drive without using a caddy. With the compact disc secure under the lips of the four retaining latches, close the CD drawer.
See the IRIX Admin: Software Installation and Licensing manual for complete instructions on loading software.
Load the appropriate IRIX operating system version from the initial prompt. Select 2, as shown in the following example menu, to load the operating system from a CD-ROM FLD.
Installing System Software
	Select drive for installation:
	1-tape tpsc (xxx,xx)
	2-CDROM dksc (xxx,xx,x)
	3-tape tpsc (xxx,xx)
which?
A series of dots appears as the operating system loads.
See Appendix B for information on proper maintenance and use of your CD-ROM drive and discs.
Connect a serial printer or ASCII terminal to your system by attaching a printer cable to one of the 9-pin RS-232 connectors on the main I/O panel. If the peripherals that you are installing have 25-pin connectors, you must use a 9-pin to 25-pin adapter cable. The pin assignments for both connectors are shown in Table 4-3. Be sure that the pin assignments, not the pin numbers, on the system's serial port are properly matched to the pin assignments on your printer or terminal.
Table 4-3. Typical Null Modem Connector Pin Assignments
25-pin (DB-25) Connector (Printer/Terminal) | 9-pin (DB-9) Connector (Onyx) | Signal Description |
|---|---|---|
3 | 2 | Transmitted Data (TXD) |
7 | 7 | Signal Ground (GND) |
2 | 3 | Received Data (RXD) |
| Note: This product requires the use of external shielded cables in order to maintain compliance with Part 15 of the FCC rules. Serial cables from vendors other than Silicon Graphics may not be compatible. Verify the pinout of your cable before making the connection. |
Connect a serial printer or terminal as follows:
Make sure the power switch on the printer or terminal is turned off and the power cord is not connected to an outlet.
Attach the appropriate cable to the printer or terminal.
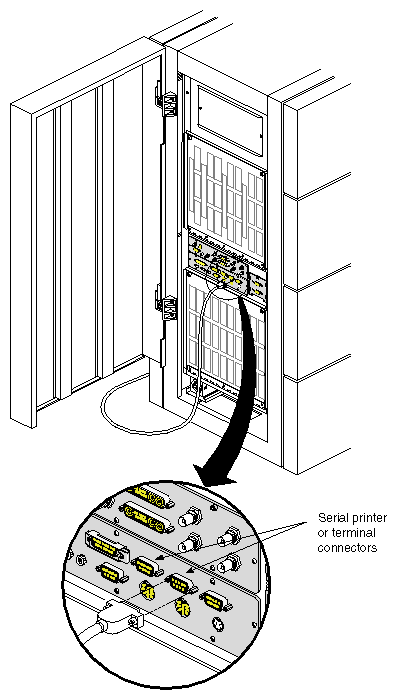
Open the rear door of the system chassis to expose the main I/O panel.
Attach the free end of the printer or terminal cable to one of the serial connectors on the main I/O panel, as shown in Figure 4-7.
Attach the power cord and turn on the printer or terminal.
If you have installed a printer, select the printer icon from the System Manager menu to configure the software to recognize it. If you have connected a terminal to your system, select the Serial Ports icon from the System Manager menu to configure it. Note that your terminal should be configured for 9600 baud.
See the IRIX Admin: Peripheral Devices manual for more information on configuring your printer and terminal.
To connect a parallel printer to your system, attach the printer cable to the 25-pin parallel connector on the main I/O panel. The pin assignments for the Centronics compatible 25-pin sub-D connector are shown in Table 4-4. Be sure that the pin assignments, not the pin numbers, on the system's parallel port are properly matched to the pin assignments on your printer.
Table 4-4. Parallel Printer Connector Pin Assignments
25-Pin Connector | Signal Description |
|---|---|
1 | STB (Data Strobe) |
2 | DATA 0 |
3 | DATA 1 |
4 | DATA 2 |
5 | DATA 3 |
6 | DATA 4 |
7 | DATA 5 |
8 | DATA 6 |
9 | DATA 7 |
10 | DATA ACK |
11 | BUSY |
12 | PE (Paper Empty) |
13 | SLCT (Select) |
14 | AUTOFD (Autofeed) |
15 | ERROR |
16 | INIT (Reset) |
17 | SLCTIN |
18-25 | GND |
Once you are sure that your cable is correctly configured, use the following procedure to connect the printer to your system:
Make sure the power switch on the printer is turned off and the power cord is not connected to an outlet.
Attach the appropriate cable to the printer.
Open the rear door of the chassis to expose the main I/O panel.
Attach the free end of the printer cable to the parallel connector on the main I/O panel, as shown in Figure 4-8.
Attach the power cord and turn on the printer.
Use the System Manager's “Printers” tool to configure the software to recognize the printer.
See the IRIX Admin: Peripheral Devices manual for more information on configuring your printer.
Attach a modem to your system using one of the 9-pin serial ports located on the main I/O panel at the rear of the system chassis. Your modem has a 25-pin DB-25 female connector. To connect it to the system's 9-pin serial port, you need an RS-232 cable with a female DB-25 connector at one end and a male DB-9 connector at the other end.
Be sure that the pin assignments, not the pin numbers, on the system's serial port are properly matched to the pin assignments on your modem. The pin assignments for the 9- and 25-pin RS-232 connectors are shown in Table 4-5.
Table 4-5. RS-232 Modem Connector Pin Assignments
25-Pin (DB-25) Connector | 9-Pin (DB-9) | Signal Description |
|---|---|---|
20 | 9 | Data Terminal Ready (DTR) |
5 | 5 | Clear to Send (CTS) |
2 | 2 | Transmit Data (TXD) |
3 | 3 | Receive Data (RXD) |
4 | 4 | Request to Send (RTS) |
8 | 8 | Data Carrier Detect (DCD) |
7 | 7 | Signal Ground (GND) |
Request to Send (RTS) and Clear to Send (CTS) are the two signals that control the flow of data between the system and the modem. The modem turns on the CTS signal when it is ready to receive data and turns the signal off when it cannot accept any more information. The system uses RTS in the same way, that is, RTS is turned on when the system can accept data and turned off when it cannot. These signals allow the system and the modem to exchange data at a high rate without running the risk of overflowing their respective data buffers and losing data.
Data Terminal Ready (DTR) tells the modem that the system is ready to begin a data exchange.
Transmit Data (TXD) and Receive Data (RXD) are the lines that transfer the data between the system and the modem. TXD carries data from the system to the modem, and RXD carries data from the modem to the system.
Data Carrier Detect (DCD) tells the system that a carrier signal is present at the modem.
| Note: This product requires the use of external shielded cables in order to maintain compliance with Part 15 of the FCC rules. Serial cables from different vendors are not compatible. |
Once you are sure that your cable is correctly configured, use the following procedure to connect a modem to your system:
Make sure the power switch on the modem is turned off.
Attach the cable to the modem.
Open the rear door of the chassis to expose the main I/O panel.
Attach the connector on the other end of the cable to one of the
9-pin serial connectors on the main I/O panel (refer to Figure 4-7).Attach the modem power cord and turn on the modem.
Refer to the IRIX Admin: Peripheral Devices manual for information about configuring your modem.
If your system has more than one IO4 board, or if you have just added another IO4 board, you must perform the following procedure to activate the additional serial ports.
| Note: To check if your system has additional IO4 boards, check the IO panels in the front of the system for extra serial connectors. See Figure 2-11 in Chapter 2, “Touring the Chassis,” as required. |
Using a text editor such as jot or vi, open the file /var/sysgen/system/irix.sm and find the following comment line:
*VECTOR: bustype=EPC module=epcserial unit=1 slot=? ioa=1
Remove the leading (*) to enable the comment line, and enter the appropriate slot number of the IO4 that has been added. The following is an example for a Challenge XL system with a second IO4 in slot 9 (the one next to the primary IO4).
VECTOR: bustype=EPC module=epcserial unit=1 slot=9 ioa=1
Write the file and save it.
Rebuild the kernel using the autoconfig command and then reboot.
Next, create the appropriate device nodes by entering:
/dev/MAKEDEV ttys
This creates the following files:
/dev/ttyd45 Major=0, Minor=5
/dev/ttyd46 Major=0, Minor=6
/dev/ttyd47 Major=0, Minor=7
/dev/ttyd48 Major=0, Minor=8
/dev/ttyf45 Major=0, Minor=101
/dev/ttyf46 Major=0, Minor=102
/dev/ttyf47 Major=0, Minor=103
/dev/ttyf48 Major=0, Minor=104
/dev/ttym45 Major=0, Minor=37
/dev/ttym46 Major=0, Minor=38
/dev/ttym47 Major=0, Minor=39
/dev/ttym48 Major=0, Minor=40
Afterwards, edit the /etc/inittab file by changing the word “off” to “respawn” in the lines associated with the ttys that was just enabled, that is, ttyd45 through ttyd47.
Note: The “ttyd48” file corresponds to the RS422 port and does not need to have have a getty started on it, since RS422 connectivity is supported only on the primary I/O panel, and is currently not supported on secondary I/O panels. Execute telinit q to force the init process to reread /etc/inittab and spawn gettys on the additional ports.
Device nodes of the form tty[fm]* are used with modems. See the getty(1M), uugetty(1M), init(1M), gettydefs(4), and inittab(4) reference (man) pages.
| Note: Comments in the /etc/inittab file are somewhat confusing since they refer to the older nomenclature and architecture used in previous Silicon Graphics systems. When “I/O” board is mentioned, you should infer “VME serial I/O controller”; and where “CPU board” is mentioned, you should replace it with “IO4 board.” |
As alluded to earlier, the MAKEDEV script for ttys creates an extra set of device nodes for each IO4. For the second IO4, these are /dev/ttyd48, /dev/ttyf48, and /dev/ttym48. Analogous nodes are created for subsequent IO4s. These nodes are benign and should cause no problem.
Follow these instructions to enable the parallel ports for your system.
Type cd /dev <Enter>.
Type ./MAKEDEV plp <Enter>.
The MAKEDEV command checks the hardware configuration of the system. It performs an hinv (hardware inventory) and, if the process sees an EPC (Everest perhiperal controller), it makes parallel port device nodes for all 15 possible ports.