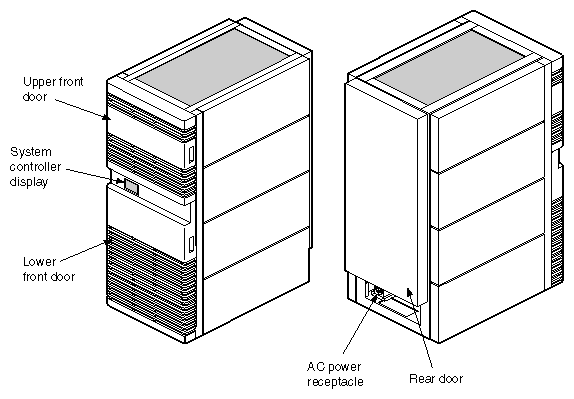
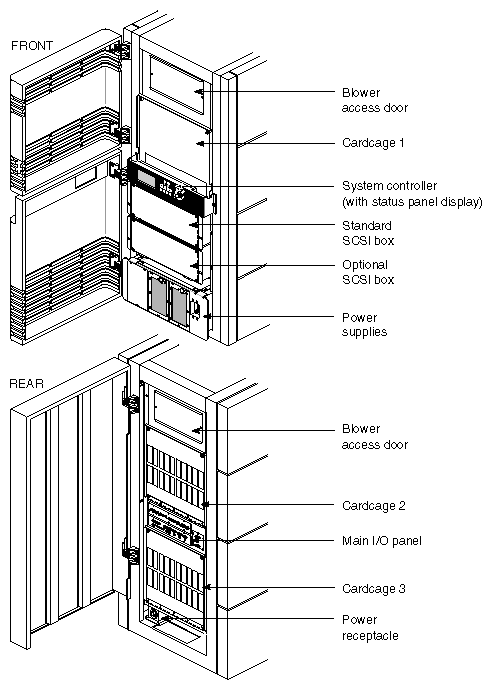
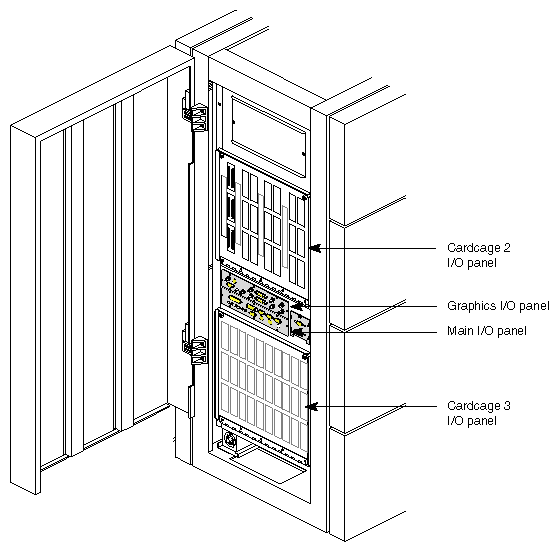
The Onyx rackmount graphics workstation uses a highly configurable rack-mounted chassis, as shown in Figure 2-1. Access to the interior of the chassis is through the upper and lower front doors and through the single rear door. Figure 2-2 illustrates the chassis components that are visible with the access doors open.
This chapter is provided to give you a more thorough understanding of your graphics workstation. It is not intended to be used to disassemble the machine. Many of the components described in the following pages are not user-serviceable, and you should not attempt to access them.
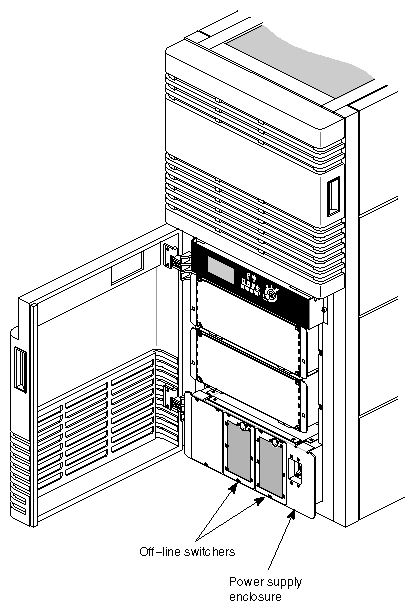
The main power switch is located in the lower right corner of the front of the system chassis (see Figure 2-3). Immediately to the left of the power switch are two or three POWERmodules (referred to as offline switchers [OLSs]). Each OLS has a pair of light-emitting diodes (LEDs) located in the lower right corner of its front panel. The LEDs are visible through the metal mesh when they are lit. The amber input power LED lights when AC power levels are normal, and the green output power LED lights when the DC voltage outputs are normal.
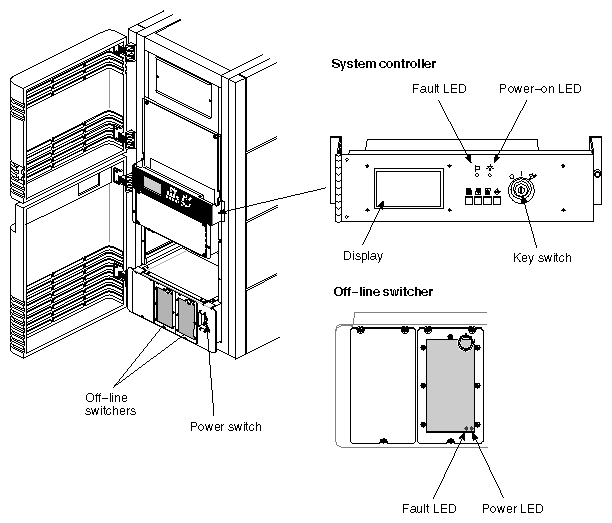
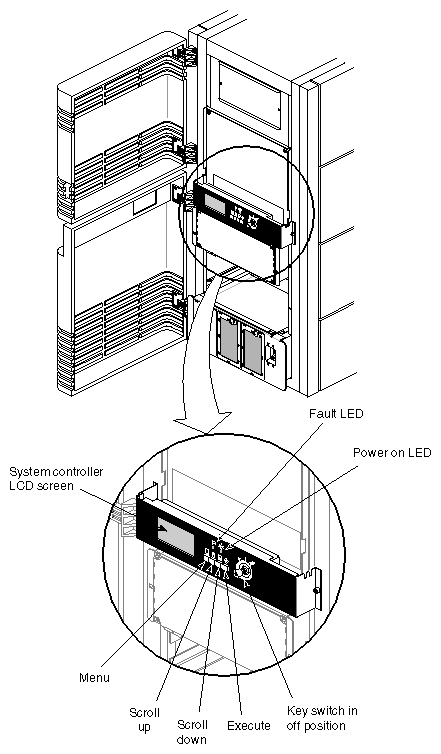
The System Controller is located in approximately the center of the front of the chassis. Its display is visible through a cutout in the lower front access door. With the door open, the System Controller key switch, function buttons, and LEDs are visible.
The key switch turns on the system by applying the voltages converted by the OLSs to the various system components.
| Caution: Remove the key from the key switch before closing the lower front access door. If you close the door without removing the key, the key may be broken off in the key switch. |
The function buttons allow the operator to display various status and error messages (this is explained in more detail later in this chapter).
The green power-on LED lights to indicate that the DC voltage from the OLSs has reached the system midplane.
The amber fault LED lights briefly when power is applied to the System Controller. This LED remains lit until the System Controller successfully initializes and a series of power-on tests have completed.
This section describes the various I/O panels and their connectors. The system has two primary I/O panels: the main I/O panel and the graphics I/O panel. Both panels are located in approximately the center of the rear of the Onyx system chassis. Two additional I/O panels are located above and below the primary I/O panels (see Figure 2-4).
The InfiniteReality graphics I/O panel is just above the main panel. See Figure 2-5 for the location of each InfiniteReality graphics connector.
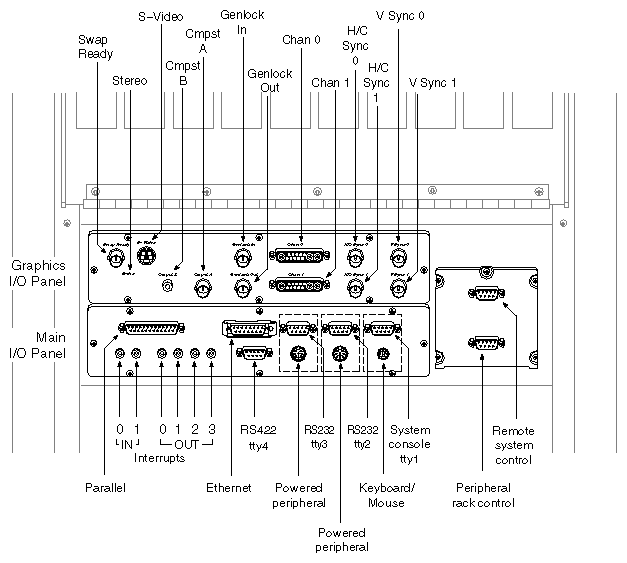
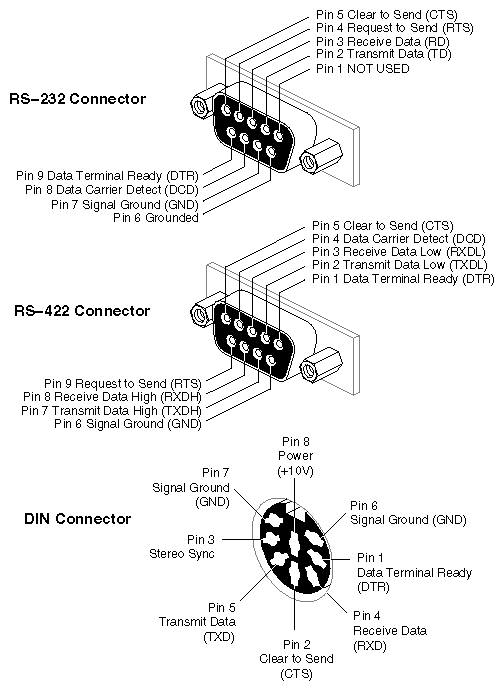
The main I/O panel contains all of the standard system interfaces: the keyboard and mouse connector, an AUI Ethernet port, two powered peripheral ports, three RS-232 serial ports, an RS-422 serial connector, a parallel printer port, and six interrupt jacks.
See Figure 2-6 for an illustration of the RE2 and main I/O panel connectors and Table 2-1 for a listing of the main I/O connectors and their descriptions.
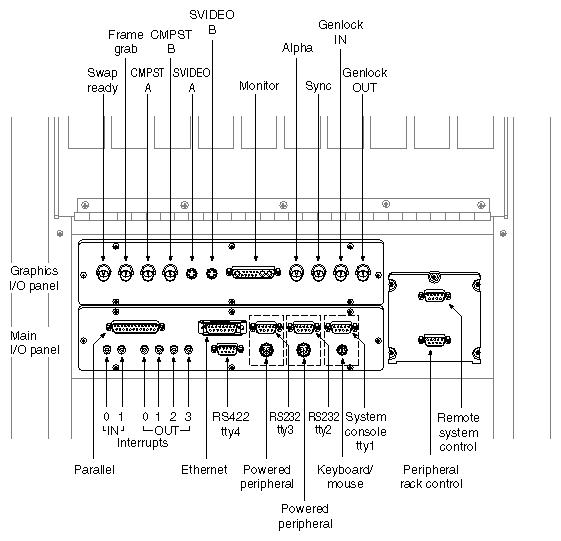
Table 2-1. Main I/O Panel Connector Descriptions
Connector Description | Connector Type | Function |
|---|---|---|
Keyboard/Mouse | 6-pin mini-DIN | Keyboard and mouse connection |
AUI Ethernet | 15-pin sub-D | Standard Ethernet port |
Serial Port | 9-pin sub-D | Standard RS-232 serial interface |
Powered Peripheral Port | 8-pin circular DIN | Provides power as well as RS-232 interface |
Interrupt 0-1 Input | 3.5-mm Tip-ring-sleeve Jacks | Provides external system CPU interrupts |
Parallel Port | 25-pin sub-D | Parallel printer interface |
RS-422 Serial Port | 9-pin sub-D | RS-422 differential serial interface |
The InfiniteReality graphics I/O panel provides a set of interface connectors required to support a single graphics subsystem. The panel consists of a swap-ready port, a 9-pin StereoView connector, a 4-pin S-Video connector, composite video ports (0 and 1), Genlock (IN and OUT) connectors, two 13W3 monitor connectors, two horizontal sync, and two vertical sync BNC connectors.
Refer to Figure 2-5 for the locations of InfiniteReality graphics connectors. See Table 2-2 for a listing of the InfiniteReality connectors and their descriptions.
Table 2-2. InfiniteReality Graphics Connectors
Connector Type | Connector Description | Connector Function |
|---|---|---|
BNC | Swap ready | Interface to other graphics systems |
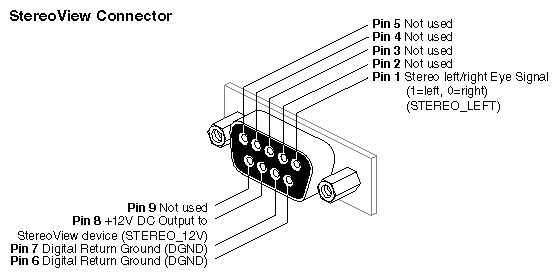
9-Pin sub-D | Stereoview | Interface to Stereoview device |
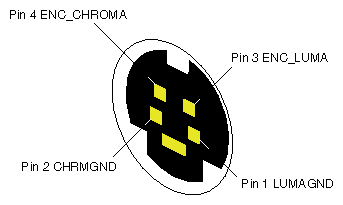
4-Pin mini-DIN | S-Video | Interface to SVHS VCR or monitor |
RCA jack | CMPST 1 | Interface to composite monitor or VCR |
BNC | CMPST 0 | Interface to composite VCR or monitor |
BNC | Genlock IN | Interface to video mixer |
BNC | Genlock OUT | Loop through connection |
13W3 | Monitor connection | 1280 x 1024 hi-res monitor |
13W3 | Monitor connection | 1280 x 1024 hi-res monitor |
BNC | Sync 0 | Horizontal optional sync for monitors |
BNC | Sync 1 | Horizontal optional sync for monitors |
BNC | Vsync 0 | Vertical optional sync for monitors |
BNC | Vsync 1 | Vertical optional sync for monitors |
Figure 2-7 shows the 13W3 connector pinouts for the InfiniteReality graphics panel. Note that optional expansion graphics panel 13W3 connectors all use the same pinout pattern as that shown in Figure 2-7.
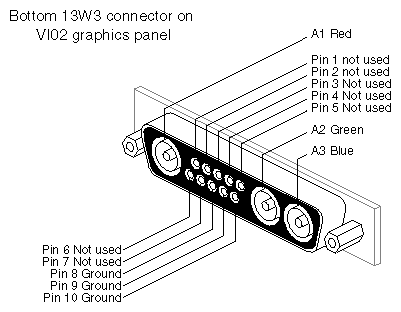
Figure 2-8 shows the 9-pin StereoView connector pinouts. Figure 2-9 shows the pinouts for the InfiniteReality graphics S-Video connector.
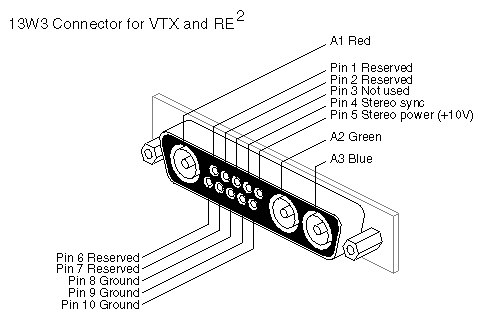
Figure 2-10 shows the 13W3 Monitor connector pinouts for VTX and RE2.
The RE2 and VTX graphics I/O panel provides all of the interfaces required to support a single graphics subsystem. The panel consists of composite video ports (A and B), S-Video connectors (A and B), the color monitor connector, Frame Grab and Swap Ready ports, Alpha and Sync connectors, and Genlock (IN and OUT) connectors.
See Figure 2-10 for the 13W3 pinouts for RE2 and VTX.
Refer to Figure 2-6 for the locations of the connectors and to Table 2-3 for a listing of the connectors and their descriptions.
Table 2-3. RE2 or VTX Graphics I/O Panel Connector Descriptions
Connector Description | Connector Type | Function |
|---|---|---|
Swap Ready | BNC | Interface to other graphics systems |
Frame Grab | BNC | Interface to the grab trigger |
CMPST A | BNC | Interface to composite SVHS VCR |
CMPST B | BNC | Interface to composite video monitor |
S-Video A | 4-pin mini-DIN | Interface to Super VHS VCR |
S-Video B | 4-pin mini-DIN | Interface to Super VHS video monitor |
Monitor | 13W3 | Main system color monitor |
Alpha | BNC | Provides sync for other vendors' monitors |
Sync | BNC | Provides sync to monitors requiring external sync |
Genlock IN | BNC | Allows the system to line-lock to an external video source |
Genlock OUT | BNC | Enables master sync source to loop through the system to other equipment |
| Note: CMPST A and B are identical and can be exchanged. |
The Cardcage 2 and optional Cardcage 3 I/O panels can contain a variety of connectors, depending on the system configuration. The most common configurations populate the Cardcage 2 I/O panel with multiple SCSI connectors. The optional Cardcage 3 I/O panel contains the interfaces for the second and third graphics subsystems. The graphics interfaces are arranged exactly as they are on the graphics I/O panel, except that on the Cardcage 3 I/O panel, they are mounted vertically.
Figure 2-11 illustrates possible configurations for the two panels, and Table 2-4 lists the connectors and their descriptions.
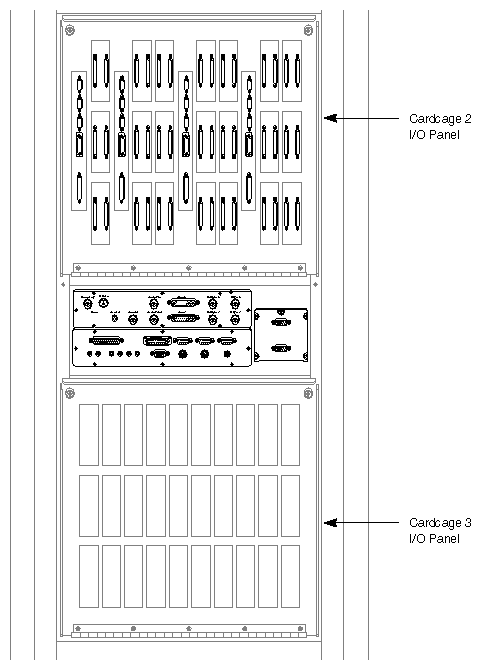
Table 2-4. Cardcage 2 and 3 I/O Panel Connector Descriptions
Connector Description | Connector Type | Function |
|---|---|---|
SCSI | 68-pin High-density D-type | Small Computer System Interface |
FDDI | Fixed Shroud Duplex (FSD) | Fiber Distributed Data Interface |
The main I/O panel provides both powered and unpowered serial connectors. Terminals, modems, printers, and other peripherals with internal power sources use the unpowered, 9-pin, sub-D connectors. Peripherals without internal power supplies, such as Spaceball[tm] and StereoView[tm], use the 8-pin DIN connectors as both an interface and a power source.
Note that the two powered peripheral connectors, on the main I/O panel, are located immediately below two standard RS-232 ports (refer to Figure 2-6). Each powered peripheral connector is paired with the 9-pin serial port directly above it. Each pair of connectors is tied to the same RS-232 serial channel, meaning that only one port from each connector pair can have a peripheral attached to it. Devices will not operate if they are simultaneously attached to the same connector pair.
The two 8-pin powered connectors together support a total of 3 amps of current at +10 V for powered peripherals. You may connect one or two powered peripherals as long as the current drawn by the device(s) does not exceed 3 amps of current at +10 V.
The RS-232 standard recommends the use of cables no longer than 50 feet (15.2 meters). This standard should also be applied to the RS-422 connector. Longer runs introduce a greater possibility of line noise occurring. This can affect data transmission and cause errors. For serial cable runs longer than 50 feet (15.2 meters), use an appropriate extender device.
Figure 2-12 shows illustrations of the connector types and pin assignments.
The 25-pin parallel port is located on the main I/O panel. The parallel port connector and its pin assignments are shown in Figure 2-13. The parallel port connector pinouts are listed in Table 2-5.
| Note: The parallel port is a 25-pin Centronics® compatible connector. The recommended cable length for a parallel port is 10 feet. The maximum allowable length is 20 feet. |
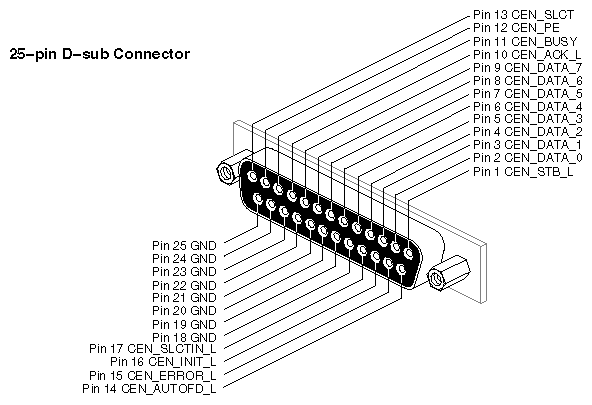
Table 2-5. Parallel Port Connector Pin Assignments
25-pin DB-25 Connector | Signal Description |
|---|---|
1 | STB (Data Strobe) |
2 | DATA 0 |
3 | DATA 1 |
4 | DATA 2 |
5 | DATA 3 |
6 | DATA 4 |
7 | DATA 5 |
8 | DATA 6 |
9 | DATA 7 |
10 | DATA ACK |
11 | BUSY |
12 | PE (Paper Empty) |
13 | SLCT (Select) |
14 | AUTOFD (Autofeed) |
15 | ERROR |
16 | INIT (reset) |
17 | SLCTIN |
18-25 | GND |
The System Controller has three basic operating conditions:
It acts as a control conduit when directed by the operator to power off or boot up the system. It actively displays a running account of the boot process and flags any errors encountered. It also sends the bootmaster CPU a message when a system event, such as a power-off or reboot, is initiated.
When operating conditions are within normal limits, the System Controller is a passive monitor. Its front panel display provides a running CPU activity graph that shows the level of each processor's activity. You can inspect previously logged errors by using the function buttons to select menus.
The System Controller can act independently to shut down the system when it detects a threatening condition. It can also adjust electromechanical parameters (such as blower fan speed) to compensate for external change. Parameters are monitored and problems are identified through a series of sensors, located throughout the system chassis.
The operator interface to the System Controller consists of a 128-character liquid crystal display (LCD), a key switch, and four function buttons (see Figure 2-14). The display is visible through a cutout in the lower front door of the system chassis. During normal system operation, CPU activity is displayed as a histogram. A histogram is a series of vertically moving bars, where each bar represents the activity of one processor. If a system fault is detected, or if the function buttons are being used, the histogram is replaced with either error messages or menu selections.
The key switch has three positions: On, Off, and Manager (represented by an icon of a hand holding a wrench). The On position enables the system and provides access to four menus: the CPU Activity menu, the Event History Log menu, the Boot Status menu, and the Master CPU Selection menu. The Off position turns off the system power. The Manager position is used by system administrators or authorized service personnel only.
The function buttons are reached by opening the lower front door. The Scroll Up and Scroll Down buttons allow you to move back and forth through the display screens. Press the Menu button to display the executable options in the selected menu. Use the Execute button to execute the option currently displayed or highlighted.
More detailed explanations of the System Controller's operation are found in Chapters 3 and 5.
The SCSIBox 2 drive enclosure is located at the front of the system chassis, below the System Controller. The optional, second SCSIBox is installed immediately below the first enclosure. Access to both SCSIBoxes is through the lower front door (see Figure 2-15). These SCSI drive enclosures are configured to accept eight half-height drives, but they can be reconfigured to house four full-height drives or a combination of the two types.
| Note: See Chapter 4, “Installing and Using Optional Peripherals,” for instructions on reconfiguring the SCSIBoxes. |
Each SCSIBox provides two SCSI channels; they can be used as either 8- or 16-bit SCSI buses and can be configured for either single-ended or differential SCSI (see Chapter 3, “Getting Started,” for a brief description of the two SCSI channel configurations).
The SCSIBoxes receive 48 VDC directly from the system backplane and convert that voltage to the levels used by the SCSI storage devices. This type of drive enclosure requires less physical space than the SCSI drive boxes used previously.
| Note: The rackmount systems are the only Silicon Graphics products to use drive enclosures without power supplies. The SCSIBoxes found in other products, such as the CHALLENGE[tm] Vault XL expansion rack, are not interchangeable. |
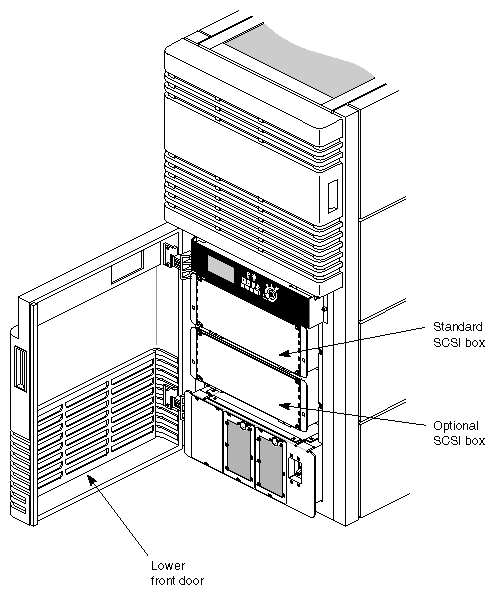
Additional information about the SCSIBox, SCSI drive configuration requirements, and installing and removing drives is found in Chapter 3.
The Onyx rackmount chassis is air cooled by two 11-inch vaned rotors (refer to Figure 2-2). The rotors are mounted in the top of the chassis and draw air from floor level. The incoming air is drawn up through the drive boxes and cardcages and is finally exhausted through the screen in the top of the chassis.
The rotors are connected directly to the System Controller, which monitors their speed. Temperature sensors in the cardcages and drive boxes allow the System Controller to adjust the rotor speed for the most efficient cooling.
| Note: It is critical that there be an unobstructed flow of air through the system |
The Onyx graphics workstation comes with two or three offline switchers (OLSs), depending on the system configuration. The OLSs are installed in a power supply enclosure at the lower front of the system chassis (see Figure 2-16).
The offline switchers convert the incoming AC line voltage to 48 VDC for use by the system midplane and optional cardcage 3 backplane. The midplane and backplane voltages are, in turn, converted to the voltage levels needed for the circuit boards by a series of power boards.
The power boards are DC-to-DC voltage convertors that may be installed in dedicated slots in cardcage 1, on the cardcage 3 backplane, and on the SCSIBox backplanes. They are available in a variety of voltages and amperages, allowing the power subsystem to be precisely tailored to meet the needs of your particular system configuration.
Systems configured with the two standard cardcages can have two or three OLSs, depending on the number of boards installed. Systems with two OLSs are wired to accept 220-volt, two-phase AC power. Systems with additional boards, or with the optional third cardcage, are shipped with three OLSs mounted in a special power supply enclosure. Three-cardcage systems are wired for 208-volt, three-phase power.