The Silicon Graphics Onyx2 deskside system is designed to be a fully functional standalone workstation. When your deskside system is initially set up in the work area, a trained system support engineering (SSE) technician should configure and connect it. Any standard or optional interconnect technologies ordered from SGI may be connected at this time.
System interface connectors and cabling options are covered in the following sections in this chapter.
This section describes the DG5 main display board, VIO5H video option connector panel board, and the Serial Digital Video Output from Graphics (GVO) option board. The information is mainly concerned with the DG5 board and options.
Table 4-1 summarizes DG5 configurations.
DG5 | VIO5H | GVO | Description |
|---|---|---|---|
DG5-2 | Not required | Not required | Basic configuration: two high-resolution video outputs |
DG5-8 | Required | Not required | Eight high-resolution video outputs |
DG5-2 | Not required | Required | Two high-resolution video outputs with two CCIR601 outputs |
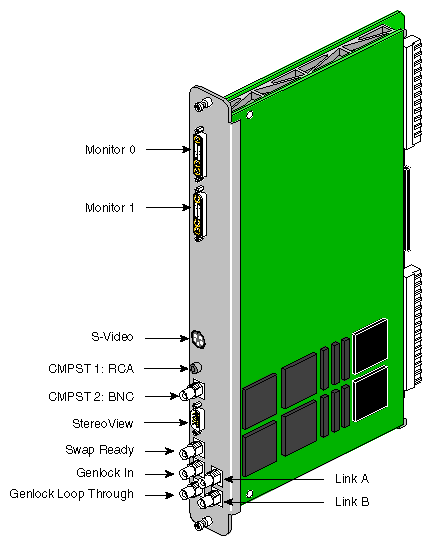
Figure 4-1 shows connectors on the DG5-8 option board with the VIO5H daughterboard.
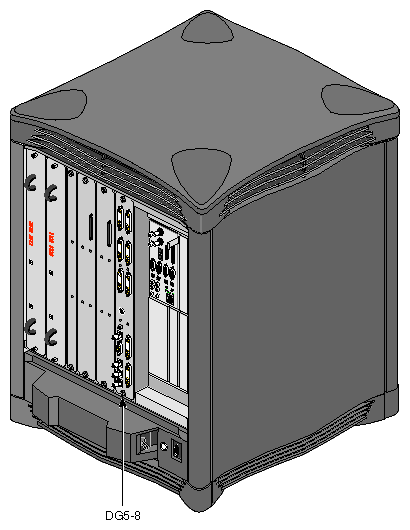
Note that the DG5-8 option requires the VIO5H board. Notice also that the DG5 board always goes in the rightmost graphics board slot in the Onyx2 deskside graphics system, next to the graphics BaseIO board assembly.
The display generator subsystem requests and receives digital frame buffer pixel data from the RM/TM board. The DG5 board processes the pixel data and streams it onto the video packet bus. The DG5 board also handles all pixel clocking and genlocking and cursor display functions, and performs the role of the functional manager.
From the packet bus, processed video can be sent to one of the video output channels, or to the NTSC or PAL encoder (VTR channel). The video output controller supplies data to a 3-DAC array that feeds the analog RGB signals out. NTSC or PAL circuitry signals come from the VOC through encoder and field buffer RAMs.
The default monitor resolution supported by the InfiniteReality2 board set and SuperWide monitor is 1920 x 1200 at 66 Hz. The maximum output bandwidth is about 300 Mpix/sec. With two monitors, each 1920 x 1200 at 66 Hz, speed is about 188 Mpix/sec. If you connect more than two monitors, you must use a combination of lower and higher resolution monitors that is within the limit of 300 Mpix/sec.
Table 4-2 summarizes DG5-8/VIO5H connectors.
Table 4-2. DG5-8/VIO5H Connectors
Label | Type | Function |
|---|---|---|
Monitor 0 through 7 | 13W3 | Variable high-resolution monitor outputs |
S-Video | 4-pin mini-DIN | Interface to SVHS VCR or monitor |
CMPST 1 | RCA jack; BNC | Interface to composite monitor or VCR |
StereoView | 9-pin sub-D | Interface to stereoview device |
Genlock In | BNC | Interface to video mixer |
Genlock Out | BNC | Loopthrough connection |
Swap Ready | BNC | Interface to other graphics systems |
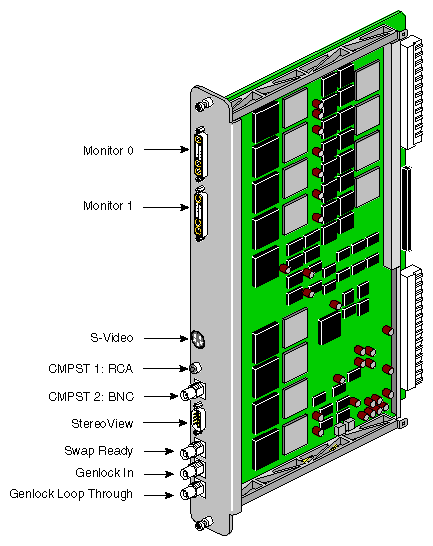
The DG5 board always goes in the rightmost graphics board slot in the Onyx2 deskside graphics system. Figure 4-2 shows the DG5 board without options (DG5-2).
The VIO5H video option connector panel board mounts on the DG5-8 and outputs five high-resolution video channels. Figure 4-3 shows connectors on the panel for the DG5-8 option board with the VIO5H daughterboard.
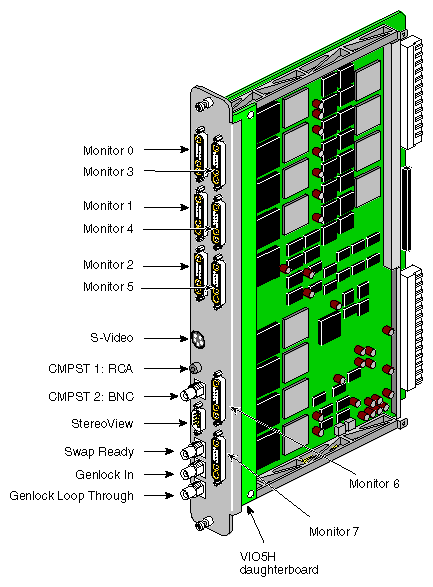
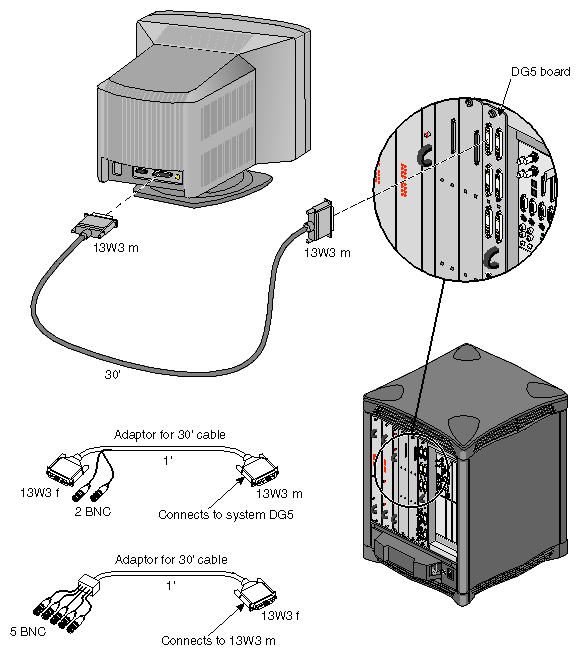
Figure 4-4 shows the 13W3 pinouts for the monitor connectors on the DG5/VIO2 I/O panel. Each 13W3 uses the same pinout pattern.
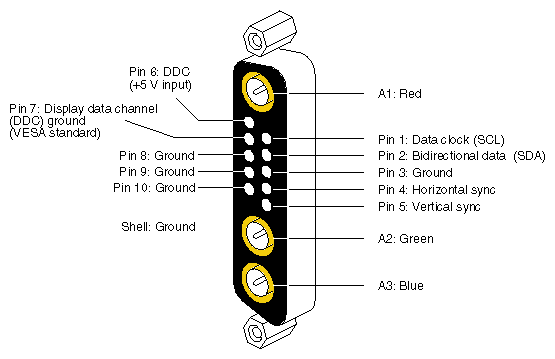
In the A1, A2, and A3 connectors, the center conductor carries the video signals. The outer conductors of the A1, A2, and A3 connectors are their video returns, which are tied to the monitor's grounded chassis.
The graphics-to-video option (GVO) daughterboard comes assembled with the DG5 and is designed to provide direct output from graphics to video in real time.
The GVO daughter board has two CCIR601 connectors implemented as BNCs. Figure 4-5 shows connectors on the panel for the DG5-2 board with an optional GVO daughterboard combination.
Three cable options are offered for the DG5:
13W3-13W3: For use with the Silicon Graphics 24-inch (SuperWide) monitor and other compatible monitors; see Figure 4-6.
13W3-five BNCs: Separate connectors for R, G, B, horizontal sync, and vertical sync (for monitors that require these separate connectors).
13W3-13W3HV: Separate connectors for horizontal and vertical sync; for example, for synchronizing video out (genlocking).
Figure 4-7 shows the standard cable and adapters.
The graphics BaseIO assembly (IO6G) is a graphics-oriented set of interface connectors that comes standard with each Onyx2 deskside system. The connectors on the BaseIO include support for Ethernet, two keyboards, analog and digital audio, serial and parallel connectors, and others. The following sections provide location and pinout information for these connectors.
Figure 4-8 identifies all the connectors on the graphics BaseIO panel.
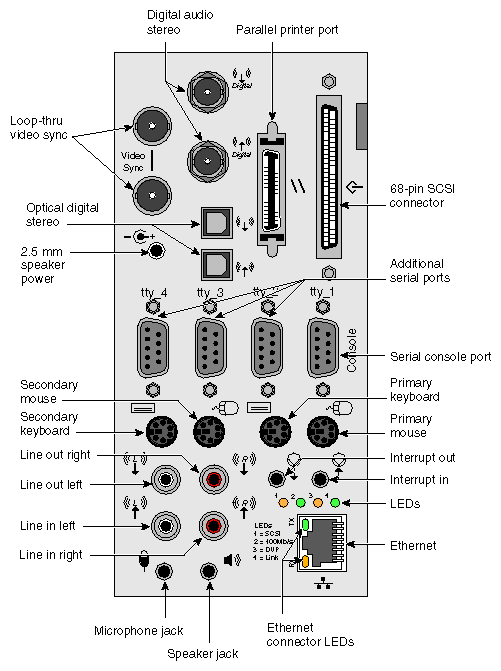
A single 10/100 Base-T Ethernet connection is provided on the BaseIO panel. Figure 4-9 shows the location and pinouts of the connector.
Use of additional 10/100 Base-T Ethernet connectors is possible with an optional XIO board.
There are two LEDs on the RJ-45 Ethernet; the top (green) LED lights only when the system is transmitting. The bottom (yellow) LED lights whenever it sees any packet on the wire. This includes packets not destined for your system.
Just above the RJ-45 Ethernet connector is a set of four LEDs. They have the following functions:
The yellow LED on the far left (LED 1) lights to indicate SCSI activity on the BaseIO single-ended SCSI connector.
The green LED (LED 2) lights to indicate 100 Mb-per-second packet activity.
The yellow LED on the right (LED 3) indicates when the Ethernet is operating at full duplex rates of transfer or receive.
The rightmost green LED (LED 4) shows the Ethernet link test. It lights when linkstate is valid.
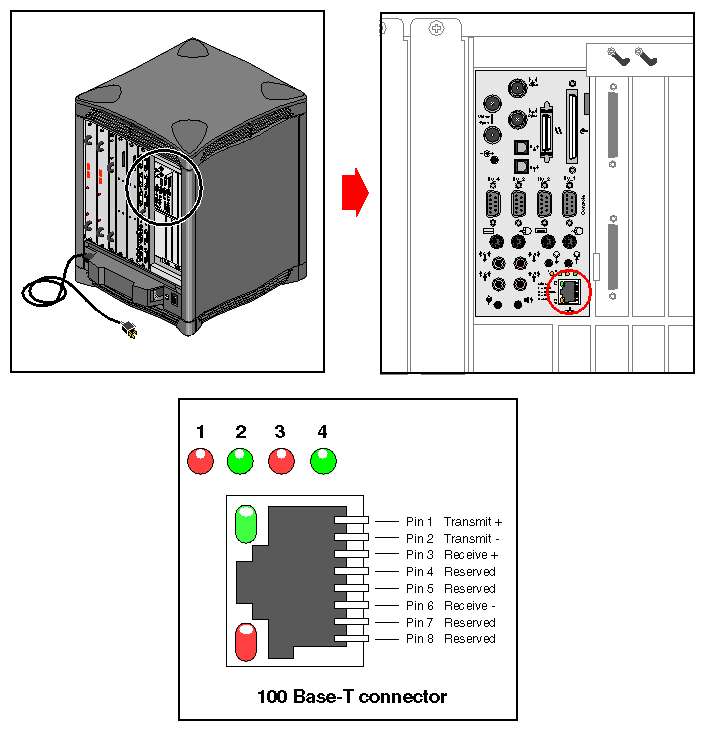
Table 4-3 shows the cable pinout assignments for the Ethernet 100 Base-T Ethernet port.
Table 4-3. Ethernet 100 Base-T Ethernet Port Pin assignments
Pin | Assignment |
|---|---|
1 | TRANSMIT+ |
2 | TRANSMIT– |
3 | RECEIVE+ |
4 | (Reserved) |
5 | (Reserved) |
6 | RECEIVE– |
7 | (Reserved) |
8 | (Reserved) |
The BaseIO board supports one IEEE 1284-C 36-pin parallel port connector. The location of this connector is shown in Figure 4-10. Pinouts for the parallel port connector are listed in Table 4-4.
Suitable cables for use with this port should be marked “IEEE 1284-compliant.” For most parallel printers, you can use a cable with an IEEE 1284-C connector at the Onyx2 end and an IEEE 1284-B connector (also known as a Centronics style) at the printer end.
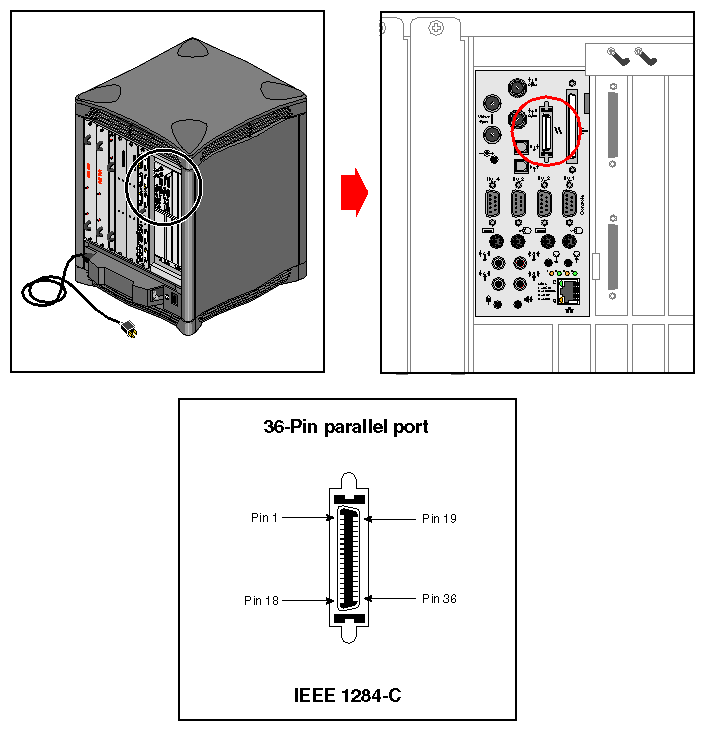
Table 4-4. Pinouts for the 36-Pin Parallel Port Connector
Pin | Signal | Source |
|---|---|---|
1 | Busy | Printer |
2 | Select | Printer |
3 | nAck | Printer |
4 | nFault | Printer |
5 | PError | Printer |
6 | Data 1 (LSB) | Bi-directional |
7 | Data 2 | Bi-directional |
8 | Data 3 | Bi-directional |
9 | Data 4 | Bi-directional |
10 | Data 5 | Bi-directional |
11 | Data 6 | Bi-directional |
12 | Data 7 | Bi-directional |
13 | Data 8 (MSB) | Bi-directional |
14 | nInit | Host |
15 | nStrobe | Host |
16 | nSelectIn | Host |
17 | nAutoFd | Host |
18 | Host Logic High | N/A |
19 | Signal ground (Busy) | N/A |
20 | Signal ground (Select) | N/A |
21 | Signal ground (nAck) | N/A |
22 | Signal ground (nFault) | N/A |
23 | Signal ground (pError) | N/A |
24 | Signal ground (Data 1) | N/A |
25 | Signal ground (Data 2) | N/A |
26 | Signal ground (Data 3) | N/A |
27 | Signal ground (Data 4) | N/A |
28 | Signal ground (Data 5) | N/A |
29 | Signal ground (Data 6) | N/A |
30 | Signal ground (Data 7) | N/A |
31 | Signal ground (Data 8) | N/A |
32 | Signal ground (nInit) | N/A |
33 | Signal ground (nStrobe) | N/A |
34 | Signal ground (nSelectIn) | N/A |
35 | Signal ground (nAutoFd) | N/A |
36 | Peripheral logic high | Printer |
Each Onyx2 deskside workstation comes with two keyboard and mouse connectors.
Figure 4-11 shows the location of the connectors and their pinouts.
There are two sets of keyboard and mouse connectors on the rear of the graphics BaseIO panel provided with each Onyx2 system. If your system uses one keyboard and mouse, attach them to the primary keyboard and mouse connector ports. These primary ports are located on the right side of the BaseIO panel.
You can plug the keyboard and mouse cables directly into the BaseIO panel. However, in cases where your monitor, keyboard, and mouse are located away from the system, use the included extension cable. Each system comes with a 24-foot (7.3 m) keyboard and mouse extension cable.
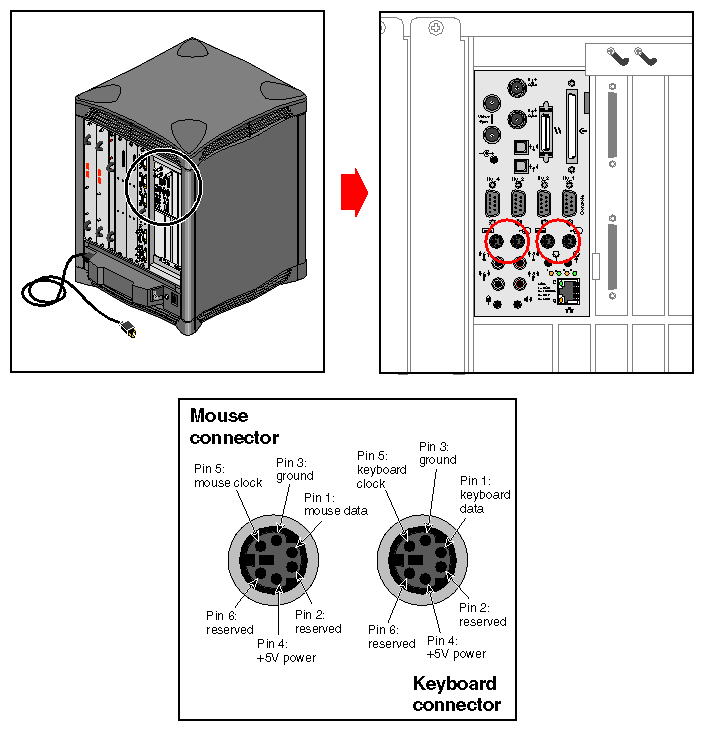
Table 4-5 shows the cable pinout assignments for the keyboard port.
Table 4-5. Keyboard Port (6-Pin Mini-DIN) Pin Assignments
Pin | Assignment |
|---|---|
1 | KEYBOARD DATA |
2 | (Reserved) |
3 | GROUND |
4 | KEYBOARD POWER (+5 V) |
5 | KEYBOARD CLOCK |
6 | (Reserved) |
Table 4-6 shows the cable pinout assignments for the mouse port.
Table 4-6. Mouse Port (6-Pin Mini-DIN) Pin Assignments
Pin | Assignment |
|---|---|
1 | MOUSE DATA |
2 | (Reserved) |
3 | GROUND |
4 | MOUSE POWER (+5 V) |
5 | MOUSE CLOCK |
6 | (Reserved) |
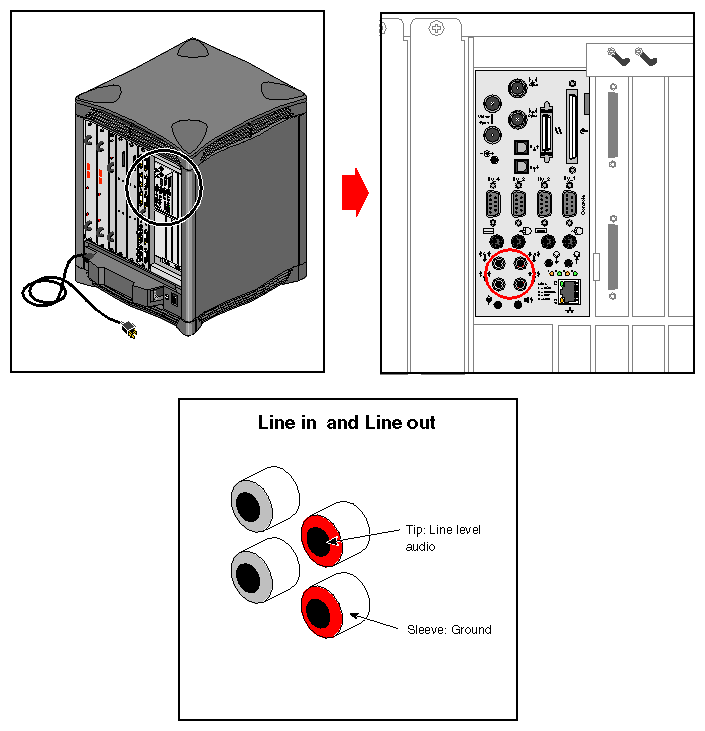
Table 4-7 shows the cable pinout assignments for the line-level audio (RCA-type) ports.
Table 4-7. Analog Composite Video Port Pin Assignments
Pin | Assignment |
|---|---|
(sleeve) | GROUND |
(tip) | Line level audio |
You may connect audio equipment to the line-level inputs and outputs using standard shielded RCA type connectors (see Figure 4-12). For best results, always route these analog signal cables away from power cords.
The right channel is color-coded red, and the left channel is white.
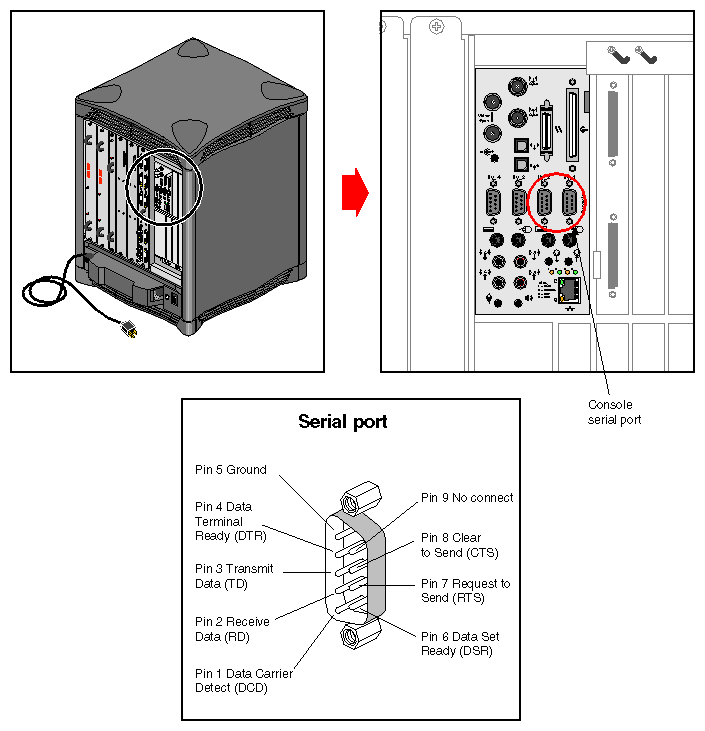
The Onyx2 deskside system comes with four standard 9-pin serial connectors. The connectors are all male and use a PC-compatible signal assignment. Figure 4-13 shows the connector locations and pin assignments.
The RS-232 standard recommends the use of cables no longer than 50 feet (15.2 meters). This standard should also be applied to RS-422 serial use. Longer runs introduce a greater possibility of line noise occurring. This can affect data transmission and cause errors. For cable runs longer than 50 feet (15.2 meters), use an appropriate extender device.
| Note: Do not run cables through areas that are electrically noisy, such as areas where large electric motors, welding apparatus, or X-ray machines operate. Bury outside wiring in conduit to prevent lighting strikes from damaging the system. |
Just above serial port two are the single-jack ADAT optical connectors (see Figure 4-14). These ports can be used with multi-track digital audio recording input and output devices.
These connections support optical input and output of eight channels at up to 24 bits and up to 48 Hz sample rates.
Use standard plastic fiber interconnecting cables. You will need two cables; one for input and one for output. The Onyx2 system ships with connector cover plugs over the input and output ports. These must be removed before using the optical connectors. Retain these dust covers for use when shipping or if you discontinue ADAT use.
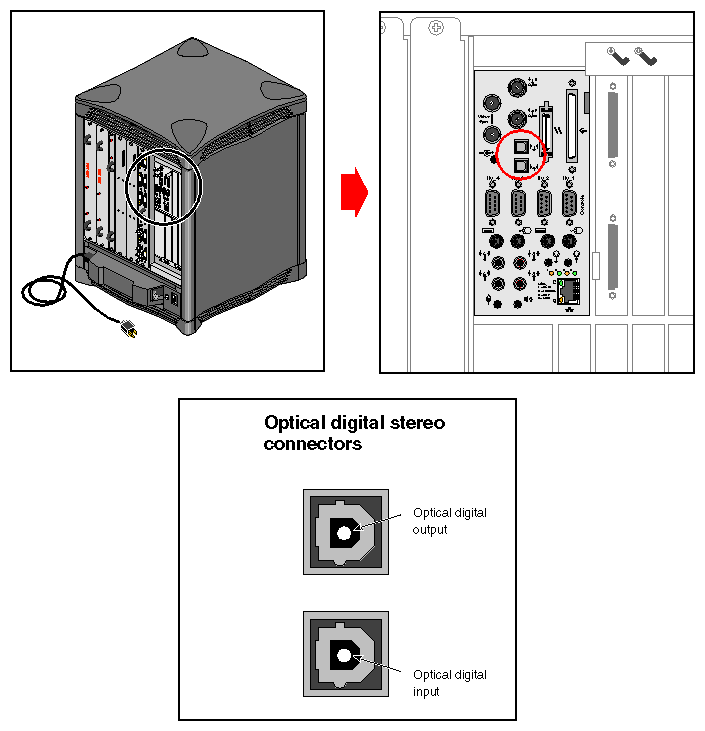
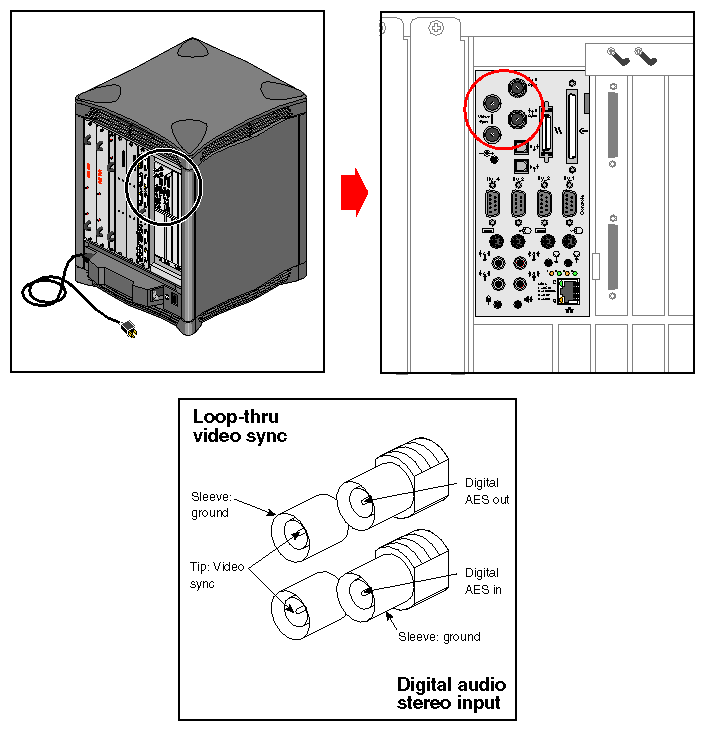
Figure 4-15 shows the loopthrough and digital audio connectors.
The AES and EBU digital audio connectors support 75-ohm signals at a nominal 1.0 volts (peak-to-peak) signal level. You should use 75-ohm coaxial cable with standard BNC connectors for interconnections (such as with digital video recorders).
Some equipment supporting AES and EBU digital audio signals uses 3-pin XLR connectors that support balanced 110-ohm signals. To successfully interconnect with equipment of this type, install a digital audio “BALUN” adapter at the equipment's XLR connector points. The BALUN adapter connects the 3-pin XLR to a 75-ohm BNC connection. The 75-ohm coaxial cable then connects between the Onyx2 system and the BALUN adapter.
| Note: 110-to 75-ohm digital audio BALUN adapters come in male and female versions. You need one of each type when using both the input and output AES and EBU connectors. |
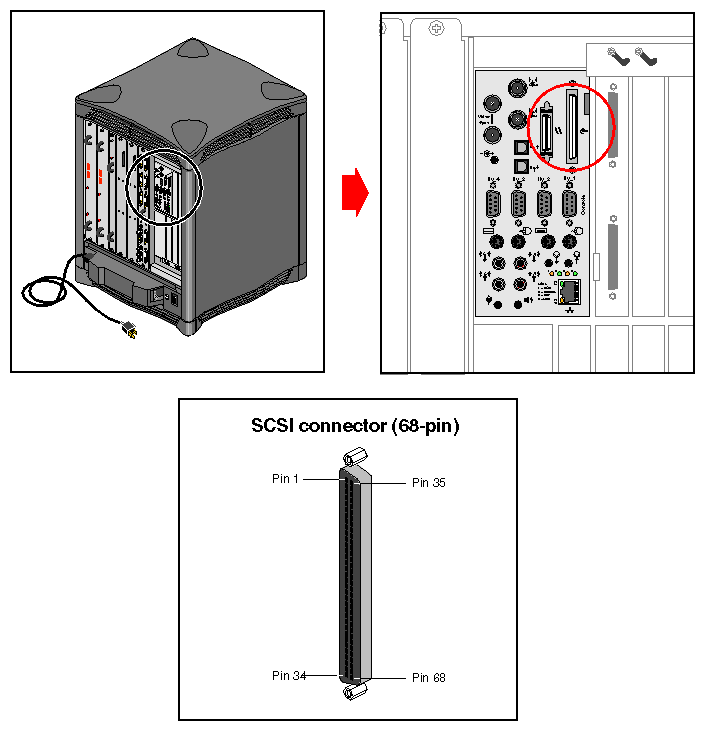
A single-ended external 68-pin SCSI connector is provided on the BaseIO panel (see Figure 4-16). This connector supports both Ultra SCSI and SCSI-2 devices. The connector is always single-ended.
Optional additional SCSI ports can be implemented using XIO option boards. See the section “Optional Interfaces” for additional information.
The hyphen preceding a signal name indicates that the signal is low. Note that 8-bit devices that connect to the P-cable leave these signals open: -DB(8), -DB(9), -DB(10), -DB(11), -DB(12), -DB(13), -DB(14), -DB(15), -DB(P1). All other signals are connected as shown in Table 4-8.
Table 4-8. 68-Pin Single-Ended, High-Density SCSI Pinouts
Signal Name | Pin Number | Pin Number | Signal Name |
|---|---|---|---|
Ground | 1 | 35 | -DB(12) |
Ground | 2 | 36 | -DB(13) |
Ground | 3 | 37 | -DB(14) |
Ground | 4 | 38 | -DB(15) |
Ground | 5 | 39 | -DB(P1) |
Ground | 6 | 40 | -DB(0) |
Ground | 7 | 41 | -DB(1) |
Ground | 8 | 42 | -DB(2) |
Ground | 9 | 43 | -DB(3) |
Ground | 10 | 44 | -DB(4) |
Ground | 11 | 45 | -DB(5) |
Ground | 12 | 46 | -DB(6) |
Ground | 13 | 47 | -DB(7) |
Ground | 14 | 48 | -DB(P) |
Ground | 15 | 49 | Ground |
Ground | 16 | 50 | Ground |
TERMPWR | 17 | 51 | TERMPWR |
TERMPWR | 18 | 52 | TERMPWR |
Reserved | 19 | 53 | Reserved |
Ground | 20 | 54 | Ground |
Ground | 21 | 55 | -ATN |
Ground | 22 | 56 | Ground |
Ground | 23 | 57 | -BSY |
Ground | 24 | 58 | -ACK |
Ground | 25 | 59 | -RST |
Ground | 26 | 60 | -MSG |
Ground | 27 | 61 | -SEL |
Ground | 28 | 62 | -C/D |
Ground | 29 | 63 | -REQ |
Ground | 30 | 64 | -I/O |
Ground | 31 | 65 | -DB(8) |
Ground | 32 | 66 | -DB(9) |
Ground | 33 | 67 | -DB(10) |
Ground | 34 | 68 | -DB(11) |
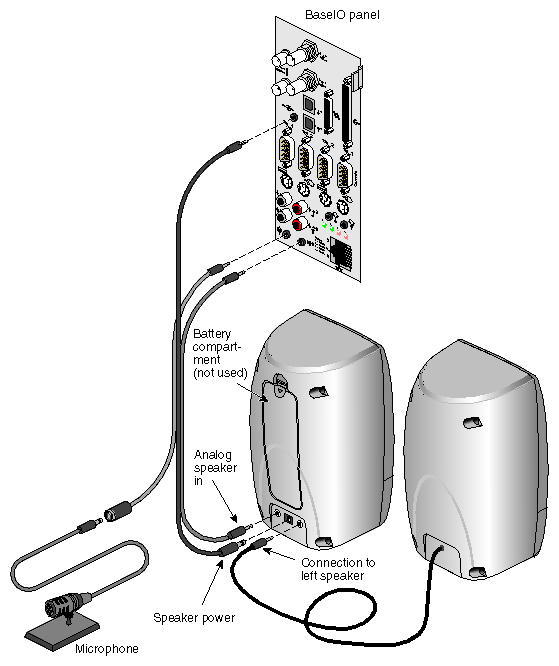
The Onyx2 BaseIO panel uses a 30-foot (9.1 m), three-connector bundled cable to connect a microphone and a pair of speakers (included with your Onyx2 system).
Figure 4-17 shows the connection points on the rear of the speakers.
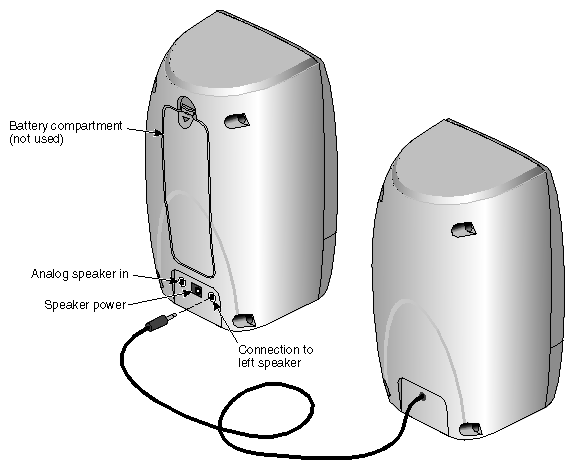
The analog speaker connector plugs into the BaseIO board and the other end goes to the analog speaker plug. The analog speaker power connector goes from the BaseIO to the middle plug on the back of the right speaker (see Figure 4-18).
The microphone connector goes from the BaseIO panel and you plug in your (included) microphone at the other end (look for the microphone logo on the connector). Note that there is also a 10-foot (3 m) “speaker only” cable included with your Onyx2 system. This 10-foot cable does not supply a microphone plug and limits where you may place the speaker set.
Optional interfaces you may wish to use could include
multiple SCSI
ATM
HIPPI
multiple Ethernet
Every deskside system comes ready to be plugged into a standard Ethernet network using an 8-pin RJ-45 style connector.
Optional XIO interface boards install in the rear of the system. You may have up to four optional XIO boards in the Onyx2 deskside workstation.