This chapter contains the following sections:
The procedure in this section explains how to configure a workstation, with one interface, for an Ethernet network using its local /etc/hosts file (without BIND or NIS). Configuring the station takes six steps:
Bring the station down.
Attach the station to the network.
Check the station's network configuration.
Modify the /etc/hosts database.
Name the station.
Test the connection.
Each of these steps is explained in the sections that follow:
Attach your station to the network by connecting one end of the Ethernet cable to the I/O port on the back of your station, and the other end into the network.
You can use the ping command to check your Ethernet connection. This command tests whether you can connect with another system on the Ethernet network. Perform the following steps:
Obtain the hostname of at least one reliable station on the local area network to which your system is connected. If possible, get the fully qualified hostname and the IP address. (For example, a hostname might be hancock, and the fully qualified hostname might be hancock.corp.gen.com, while the IP address might be 128.70.3.56.) It is important that the station you select has a reliable Ethernet connection and that it is up and running.
Once you have obtained a hostname and IP address, enter the command
ping -r hostname
You should see a series of records indicating the returned packets from the remote host. For example (using our example system):
PING hancock (128.70.3.56): 56 data bytes
64 bytes from 128.70.3.56: icmp_seq=0 ttl=255 time=2 ms
64 bytes from 128.70.3.56: icmp_seq=1 ttl=255 time=2 ms
64 bytes from 128.70.3.56: icmp_seq=2 ttl=255 time=2 ms
64 bytes from 128.70.3.56: icmp_seq=3 ttl=255 time=2 ms
64 bytes from 128.70.3.56: icmp_seq=4 ttl=255 time=2 ms
Press Ctrl+C or your Delete key to stop the ping command. You see the tallied results of the ping command. For example:
----hancock PING Statistics----
5 packets transmitted, 5 packets received, 0% packet loss
round-trip min/avg/max = 2/2/2 ms
If your network connection is working, you should see results comparable to those above. Your ping results should show 0% packet loss and an equal number of packets transmitted and received. If some packets are being lost, the first thing you should check is the tightness and quality of the cable connections. Loose cables are frequently the cause of lost packets. The round-trip time factors are a function of the size and general load of your network, and not necessarily an indication of a problem with your Ethernet connection.
If your ping command is not successful, there are several things you should check. Perform these steps:
Try to ping the station by its IP address. For example, using our sample host hancock, enter the command
ping -r 128.70.3.56
Try to use the ping command on a different station on your local network, or use the broadcast address shown when you enter the command ifconfig ec0. You should see your system and answering duplicate responses from other systems.
Check the network configuration on your system with the netstat -in command. You should see information similar to this:
Name Mtu  Network  Address    Ipkts Ierrs Opkts Oerrs
ec0  1500 128.70.3 128.70.3.9 18    0     18    0
The ec0 entry indicates your primary Ethernet connection. The Ipkts and Opkts fields indicate the number of inbound and outbound packets the network interface has processed. The Ierrs and Oerrs fields indicate the number of errors in input and output, respectively.
For the purposes of this troubleshooting session, though, check that the portion of the IP address shown under the Network heading match the IP address of the hostname that you attempted to ping. If the network addresses are not the same, the station is on a different network and the ping likely failed for that reason. Find a system on your immediate local network to which you can send the ping command.
Check the /var/adm/SYSLOG file for Ethernet error messages. Confirm that the designations for netmask and broadcast, as shown by ifconfig ec0 match those of other systems on the same network or subnet.
Check to ensure that other stations are operating normally on the local network.
Check to ensure that the correct software (eoe.sw.tcp) package has been installed on your system.
Check the physical connections to the Ethernet cables for tightness and connection. If your Ethernet hardware is loose or disconnected, the /var/adm/SYSLOG file and your system console should both show messages such as
ec0: no carrier: check Ethernet cable
If all connections are tight and you still receive errors, replace the pieces of the Ethernet connection outside your system (the cable).
If you receive a message indicating that another host has the same IP address, find out which host has the same address, and determine which host has set their address incorrectly. (It is more likely that the same address was accidentally assigned to a second system, or that the new system being tested incorrectly set the address.)
When the station comes up, verify the station's software configuration. Log into the station as root.
Enter the chkconfig command to check that your station's standard networking software is correctly configured:
/etc/chkconfig |
You see information similar to this:
named off network on rwhod off timed on timeslave off gated off mrouted off rtnetd off snmpd on routed on |
| Note: Your output will vary from the output above depending upon installed software and configuration flag settings. |
If you are familiar with the network-related daemons, you can customize your configuration flags to suit your network needs. If you are not familiar with the network-related daemons, set your network-related flags as shown above. In particular, make sure that the network variable is configured on.
The hosts file is the hostname database. It contains information regarding known stations, from the perspective of the local station.
The /etc/hosts database is an ASCII file that you can modify with any text editor. The file contains lines of text that specify a station's address, its “official” name, and any aliases. The “official” name should be the fully qualified domain name. The address and name(s) are separated by blanks, tabs, or both. Comments begin with a pound sign (#) and continue to the end of the line.
Before you modify the hosts database, you should have a list of station names and valid Internet addresses of all stations in your network, as discussed in “IP Address Allocation” in Chapter 2. If the network has routers (stations with multiple network interfaces), there must be a valid Internet address and name for each interface. See “Internet Protocol Addresses” in Chapter 2 for a description of IP addresses.
This example assumes that you are not using NIS or BIND. If you are using NIS, refer to the NIS Administration Guide for more information. If you are using BIND, refer to Chapter 6, “BIND Name Server”, for more information.
An /etc/hosts database is shown in this sample /etc/hosts file:
# This is a comment 127.0.0.1 localhost 119.0.3.20 tuna.salad.com tuna # tuna is an alias 119.0.3.21 chicken.salad.com salad 119.0.3.22 walrus.salad.com walrus |
Each system must have a copy of /etc/hosts that contains entries for localhost and all of its network interfaces. As shipped, the /etc/hosts database contains two entries. The first entry is a name you can use to test the local network software:
127.0.0.1 localhost |
When you reference localhost, the message is looped back internally; it is never transmitted across the network.
| Note: The address 192.0.2.1 is a special address; networking will not be enabled if the system is given that address. |
You need to edit two files to enable a system to access the network:
/etc/hosts file. You must add the system IP address in the /etc/hosts file as in the following example (see sample /etc/hosts above):
119.0.3.22 walrus.salad.com walrus
/etc/sys_id file. Your /etc/sys_id file entry must include the same system name as written in the /etc/hosts, whether as the official hostname or as an alias:
walrus
Here, host walrus can be expressed as either walrus or walrus.salad.com.
If you change the system's name in /etc/sys_id, update the entry in /etc/hosts; if not, the network software will not initialize properly. If the following message appears during station startup, then the /etc/hosts and /etc/sys_id files are inconsistent and must be fixed:
*** Can't find hostname's Internet address in /etc/hosts |
If your system is a gateway, each network interface must be assigned an Internet address, each on a different network, and have an entry in /etc/hosts, as described in “Setting Up a Router”.
It is important that each station have a consistent version of the host database. The proper method for maintaining the consistency depends on the size of your network and whether the network is connected to the Internet. You can use the rcp or rdist programs by means of a cron job to ensure that the hosts files stay in sync.
Edit the /etc/hosts file and add the hostnames and Internet addresses for all stations on your network. Each station on the network must have all station names in the local /etc/hosts file. If you have a large /etc/hosts file, the easiest way to install it on a new system is to set up a minimal hosts file with entries for the new system and for another system that has an authoritative copy of the hosts file. This allows you to get the new system on the net and copy the more complete hosts file from the other system (using rcp or ftp). Another option is to transfer the hosts file on tape or disk.
Once you have determined your station's name, edit the /etc/sys_id file to give your station its new identity.
Remove the default station name (IRIS) and replace it with the new station name (setup1 for this example). You can use this command:
echo setup1 > /etc/sys_id
For the change to take affect, reboot your station with this command:
reboot
When your station comes back up, it should have the new station name as the login prompt.
Two network management tools, rup and ping, provide quick information about network connectivity. rup indicates if there is a physical problem with the network, such as your station being unable to contact the other stations. Since rup uses broadcasts as a default, it does not go through routers. If your station can see the other stations on the network, use ping to test communication abilities. ping uses the Internet Control Message Protocol (ICMP), which requests an echo from the designated station. It lets you know if you can transmit and receive packets to and from specific stations.
Enter the rup command to determine if your station can contact the other stations on the network:
/usr/bin/rup
You should get output on each of the stations on your network. The other stations on your network must be up for your station to get a user-friendly response. If the other stations are powered on and attached to the network but not up in user mode, the information comes back in hexadecimal.
Enter the ping command to see if your station can communicate with the other stations on the network:
/usr/etc/ping station_name
Let the output run a few seconds, then use Ctrl+C to break it. Pay particular attention to the ping statistics. ping gives you the number of packets transmitted, number of packets received, percentage packet loss, and round trip time (minimum, maximum, and average). These are all good indicators as to the general condition of your network. Obviously, you want 0% packet loss and a fast round-trip time.
A router is a station with multiple network connections that forwards packets between networks. This section provides the configuration procedure for a router with two interfaces and a router with more than two interfaces. A station can have multiple interfaces and not act as a router. The procedure for turning forwarding off on a station with multiple interfaces is also provided in this section. The specific subsections are
The /etc/init.d/network script is designed to automatically detect and configure a router with two interfaces if the default naming scheme for the interfaces is used. By default, the Internet addresses of the primary and secondary interfaces are derived from the /etc/sys_id file. The primary interface uses the name in the sys_id file. The secondary interface prefixes gate- to the name specified in the sys_id file.
To set up a router with two interfaces using the default naming scheme, follow this procedure:
Log in as root.
Assign valid Internet names and addresses to both interfaces in the /etc/hosts file. For example, the /etc/hosts file entries for the primary and secondary interfaces on the station biway might look like this:
198.70.75.2     biway.salad.com   biway
198.70.80.3     gate-biway.salad.com   gate-biway
Ensure that the router has the appropriate name in its /etc/sys_id file. Following this example, the /etc/sys_id file should look like this:
biway
Reconfigure the kernel and reboot the station to initialize your changes and interfaces. Some systems prompt you for permission, as in the following example. Others simply return a shell prompt. In either case, enter the reboot command when the kernel has been reconfigured:
/etc/autoconfig
Automatically reconfigure the operating system? (y/n)y
reboot

Note: If you do not want to use the standard router naming scheme, you must modify the /etc/config/netif.options file. “Modifying the Network Interface Configuration With the /etc/config/netif.options File”, details the procedure for changing an interface name.
If the router contains more than two interfaces, you must modify the /etc/config/netif.options file in addition to the /etc/hosts and /etc/sys_id files. In the netif.options file, you must define the interface type (enp1, ipg0, and so on). By default, the names for the third and fourth interfaces are gate2-$HOSTNAME and gate3-$HOSTNAME, where $HOSTNAME is the value returned when you issue the hostname command. If you want to modify the interface names, see “Modifying the Network Interface Configuration With the /etc/config/netif.options File”, for the detailed procedure.
To set up a router with more than two interfaces and using the default naming scheme, follow this procedure:
Log in as root.
Assign valid Internet names and addresses to all interfaces in the /etc/hosts file. For example, the /etc/hosts file entries for the router freeway, with four interfaces, would look like this:
198.70.30.1     freeway
198.70.32.4     gate-freeway
198.70.41.5     gate2-freeway
198.70.59.6     gate3-freeway
Ensure that the router has the appropriate name in its /etc/sys_id file. Following this example, the /etc/sys_id file should look like this:
freeway
Modify the netif.options file to define your interface types. For this example, the third and fourth interfaces are FDDI (ipg*). Change the if3name and if4name variables from
if3name=
if4name=
to
if3name=ipg0
if4name=ipg1
Save your changes to the netif.options file.
Reconfigure the kernel and reboot the station to initialize your changes and interfaces. Some systems prompt you for permission, as in the following example. Others simply return a shell prompt. In either case, enter the reboot command when the kernel has been reconfigured:
/etc/autoconfig
Automatically reconfigure the operating system? (y/n)y
reboot
By default, when a station has two or more network interfaces, it automatically forwards (routes) packets between the two interfaces. If you do not want the station to serve as a router on its network, disable its route advertising.
Modify the /etc/config/routed.options file so the router will not supply routing information about general network routes (-q) or local interface routes (-h)
echo -qh > /etc/config/routed.options
Using the /etc/init.d/network script, turn the network off momentarily, then start it again
/etc/init.d/network stop
/etc/init.d/network start
When the network comes up, verify that it is not forwarding packets with the netstat tool
netstat -s -p ip |grep forward
To change forwarding dynamics, create or edit the /etc/config/routed.options file to contain the desired options. Some of the behaviors that can be altered by means of the /etc/config/routed.options file are listed below:
Suppress or force publicizing of routing information.
Enable tracing of all received packets.
Filter packets destined for specific networks.
See the routed(1M) online reference page for more details.
Multicast routing is a delivery method in which a message is sent to a designated group of receivers by the shortest delivery path (see Figure 3-1). SGI systems implement the Distance-Vector Multicast Routing Protocol (DVMRP, originally specified by RFC-1075) with the mrouted process.
| Note: As of IRIX 6.3, multicast routing can be used in combination with Network Information Service (NIS) to reduce the number of NIS servers needed throughout the network. For details, see the information on multicast-YP in the portmap(1M) and nisserv(7P) reference pages. |
To turn on multicast routing:
Identify the routers on each network that need to support multicasting. Make sure that the routers you select are running IRIX Version 5.2 or later.
If you haven't already done so, install on each router the eoe.sw.ipgate subsystem from your IRIX distribution source. Run autoconfig if necessary.
As root, enter the command
chkconfig mrouted on
Restart the system with the reboot command.
Figure 3-1 shows an example network with three routers.
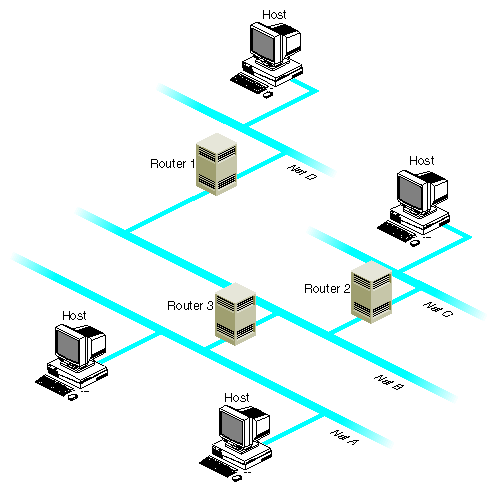
If people on networks A, C, and D are listening for packets, as shown in the figure, all four networks receive the multicast packets.
If people on networks A and C are listening for packets, networks A, B, and C receive the multicast packets.
If three or more people on network A are listening for packets, networks A and B receive the multicast packets. The multicast routing protocol prevents packets from being sent to “leafs” of the network, such as networks C and D; however, it doesn't prevent packets from being sent to interior networks, such as network B.
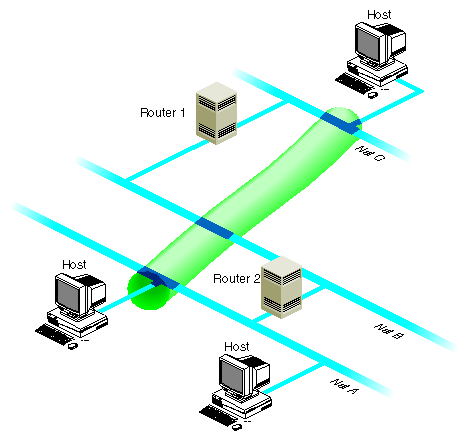
If your routers do not support multicast routing, you can support multicast packets by creating tunnels between the networks. Any SGI workstation running IRIX Version 5.2 or later can be configured as the endpoint of a tunnel. With tunneling, the multicast packets are encapsulated inside unicast packets, and then are sent to the other end of the tunnel. They are converted back into multicast packets when they are received.
Figure 3-2 shows an example of a setup with a tunnel between networks A and C.
To create the tunnel, edit the file /etc/mrouted.conf. Step-by-step instructions follow:
Select the systems on each network that you will use for the sending and receiving end of the tunnel.
Choose a system that is running IRIX Version 5.2 or later, is fast, and is not used extensively. The audio and video data may be intermittent if the system you select is slow or overloaded.
If you haven't already done so, install the eoe.sw.ipgate subsystem from your IRIX distribution source.
As root, edit the file /etc/mrouted.conf on the sending and receiving end of the tunnel. Note that these endpoints can be separated by many routers; you can use any machine on the network that is running IRIX Version 5.2 or later.
Add the following line for each network to which you want to establish a tunnel.
tunnel <local IP address> <remote IP address>
In the above example, the system on network D would have the following entry:
tunnel 128.70.58.1 128.65.170.2
The system on network A would have the following entry:
tunnel 128.65.170.2 128.70.58.1
You can specify other optional settings for the tunnel. For details, see the mrouted(1M) reference page.
Restart the system.
Note: One copy of the multicast packets is sent for each tunnel entry in mrouted.conf. This results in extra network traffic. For example, suppose you have a workstation with one network interface and you set up tunnels to workstations on three other networks. The packets are replicated three times.
The IRIX copy of the /etc/rpc file contains additions that are essential for using certain multicast utilities if you're running the Network Information Service (NIS). If the NIS master is not running IRIX Version 5.2 or later, or is not a SGI workstation, verify that the /etc/rpc file on the NIS master includes these additions:
sgi_iphone 391010 sgi_videod 391011 |
Implementing the subnet address scheme is a very simple procedure. Subnetting consists of the following:
-
Note: If you have not done so already, read Chapter 2, “Planning a Network”. It contains information about partitioning Internet addresses for subnetting.
The netmask option of the ifconfig command is used to interpret and define the network portion (subnets included) of the Internet address. A network mask defines the portion of the Internet address that is to be considered the network part. This mask normally contains the bits corresponding to the standard network part as well as the portion of the host part that has been assigned to subnetworks. If no network mask is specified when the address is set, it will be set according to the class of the network.
To configure a station's primary interface to recognize a subnetted Class B address that is using 8 bits of the host ID for defining the subnets, create or modify the /etc/config/ifconfig-1.options file and insert the following line:
netmask 0xffffff00 |
This netmask value indicates that for the primary interface, the upper 24 bits of the Internet address represent the network portion of the address, and the remaining 8 bits represent the host ID. The nonsubnetted netmask for a Class B address (in hexadecimal) would be 0xffff0000. The netmask value can be set using hexadecimal, dot-notation Internet address, or pseudo-network name formats. This entry must be made on all stations on the subnet.
| Note: For stations with multiple interfaces, the network mask should be set for each interface in the appropriate ifconfig-*.options file. |
Although variable subnet masks, that is, different masks on different interfaces, are supported as of IRIX 6.2, they are difficult to set up and maintain. It is therefore strongly recommended that you avoid using them unless there is no other way of accomplishing your site requirements.
When the netmask value is set, the station must be reconfigured and rebooted to incorporate the new network address into the stations routing tables. Always reboot routers before regular stations, because they provide routing information to other stations and networks.
Reconfigure the kernel and reboot the station to initialize your changes and interfaces. Some systems prompt for permission before reconfiguring the kernel, while others simply return a shell prompt. In either case, enter the reboot command explicitly:
/etc/autoconfig Automatically reconfigure the operating system? (y/n)y reboot |
You do not always need to modify (configure) a station's network interface; in most situations, the default configuration suits the site's needs. Modifying the network interface configuration requires that you modify the /etc/config/netif.options file. You modify this file if
the station has more than two interfaces
you don't like or use the default naming conventions
the default order is incorrect, or you prefer a different order.
You can identify the station's installed network interfaces using the hinv command with the network option, as described on “Controller Interface Names” in Chapter 1. See also the hinv(1M) reference page. For a summary of configuring multiple network interfaces see “Configuring Multiple Network Interfaces”.
There are two configurable variables in the netif.options file: interface name and interface address. The interface name variable designates the order (first, second, third, or fourth) and type of interface involved. The interface address variable assigns a valid Internet address to each interface. There must be a valid Internet address for each interface in the /etc/hosts file.
These subsections tell you about the following tasks
Table 3-1 summarizes the interface name and interface address variables.
Table 3-1. Variables for the netif.options File
Variable Name | Variable | Examples |
|---|---|---|
Interface Name | ifxname= where: x = 1, 2, 3, or 4 name=ec0, et0, enp0, enp1, fxp1, ipg0, ipg1, etc. | if1name=enp0 if2name=ipg0 if3name=enp1 if4name=enp2 |
Interface Address | ifxaddress= where: x = 1, 2, 3, or 4 address=$HOSTNAME, station name, or Internet address | if1address=$HOSTNAME if2address=fddi-$HOSTNAME if3address=gate-goofy if4address=128.70.28.2 |
You can modify either or both variables. Instructions for modifying both variables are provided below.
| Note: $HOSTNAME will be set to the value in /etc/sys_id. |
When a station has more than two network interfaces, you must modify the name entries in the /etc/config/netif.options file to assign the interface order. Default order is assigned only to the first two interfaces. Additionally, if you want to change the order (first, second, and so on) or interface type assigned to a network interface, you must modify the /etc/config/netif.options file. This example makes the first FDDI interface secondary.
Using the netstat command, verify the network interface's name:
/usr/etc/netstat -ina
Using vi or any editor, open the netif.options file for editing:
vi /etc/config/netif.options
Locate and modify the appropriate interface name variable. For this example, search for the secondary interface name variable (if2name) and change it from the default configuration to a configuration that supports the first FDDI interface as secondary.
Change from this
: if2name =
to this
if2name=ipg0

Caution: Note that all default variables (primary and secondary) start with a leading colon (:). You must remove it and enter the interface type to change the default interface name. Save and exit the file.
If you have no other changes, autoconfigure and reboot the station. Otherwise, repeat this procedure for each interface name change.
| Note: When you alter the order of one network interface, the other interfaces in the station remain in their default relative ordering. For example, on a three-interface station (a=first, b=second, and c=third), if you were to make the default second the first (b=first), the remaining interfaces would be configured a=second and c=third. |
To change the default interface address, modify the /etc/config/netif.options file. All interface names require valid Internet addresses as found in the /etc/hosts file. The $HOSTNAME variable pulls the station name from the /etc/sys_id file. This example changes the second, third, and fourth interface addresses as follows:
second interface address: fddi-$HOSTNAME
third interface address: gate-goofy
fourth interface address: 128.70.28.26
Follow these instructions to modify your network interface address according to the above example:
Verify or assign a valid entry for each interface in the /etc/hosts file. Write down the name and address for each interface.
Using vi or any editor, open the netif.options file for editing:
vi /etc/config/netif.options
Locate and modify the appropriate interface address variable. For this example, we want to modify the second, third, and fourth interface address variables. Find and modify each variable as follows.
Change from this
: if2addr=gate-$HOSTNAME
if3addr=gate2-$HOSTNAME
if4addr=gate3-$HOSTNAME
to this
if2addr=fddi-$HOSTNAME
if3addr=gate-goofy
if4addr=128.70.28.26
Caution: Note that all default variables (primary and secondary) start with a leading colon (:). You must remove it and enter the interface address to change the default interface address. Save and exit the file.
Repeat this procedure for each interface address change. If you have no other changes, reconfigure and reboot the station.
You can assign multiple IP addresses to a single network interface using the IP aliasing feature of the ifconfig command (see ifconfig(1M) ). This feature is useful if you find it necessary to use the same network interface for connections to several networks; it is also useful for maintaining an obsolete address for a host until users learn its new address. IP aliasing is supported on all network interface types.
The following subsections will help you understand and implement IP aliasing:
When IP aliasing is implemented on a host, the address that the /etc/host file assigns to the hostname in /etc/sys_id is considered the primary address for the interface, and alternative names assigned by the ifconfig command are considered IP aliases. When you display network information (see “Collecting Network Statistics With netstat” in Chapter 4), the primary address of an interface is listed first, followed by its aliases.
To assign an IP alias, use this form of the ifconfig command :
# ifconfig interface alias address [netmask mask_num] [broadcast address] |
| Note: Be sure to read the information in “Guidelines for Assigning IP Aliases” (below) before assigning IP aliases. |
You can specify a hostname from /etc/hosts instead of an IP address as the value of alias. For example, either command below assigns an IP alias to the ec0 interface. The interface in this example uses a netmask and broadcast address, but these fields are optional:
# ifconfig ec0 alias 128.70.40.93 netmask 0xffffff00 broadcast 128.70.40.255 # ifconfig ec0 alias plum netmask 0xffffff00 broadcast 128.70.40.255 |
In theory, the number of IP aliases assigned to a given network interface is limitless; however, the recommended maximum number is 1000. In addition, the primary address of an interface and all its IP aliases should share a common subnet address. For example, if the primary address of an interface on a class B network is 128.70.12.23, its IP aliases should be addresses such as 128.70.12.19, 128.70.12.53, and so on.
You can save IP alias settings in the /etc/config/ipaliases.options file so they are automatically assigned during the network initialization process. The ipaliases.options file is read by the network script if the /etc/config/ipaliases file contains the value on. Use the procedure below to create an ipaliases.options file and assign IP aliases automatically during network initialization:
Edit ipaliases.options using your favorite editor:
# vi /etc/config/ipaliases.options
Your entries should look similar to the example below. In this example, broadcasting is performed on the Ethernet but not the FDDI network:
ec0  128.64.56.51 netmask 0xffffff00 broadcast 128.64.56.255
ec0  128.64.56.12 netmask 0xffffff00 broadcast 128.64.56.255
ipg0 190.111.79.16 netmask 0xffffff00
ipg0 190.111.79.10 netmask 0xffffff00
Create an ipaliases file and set IP aliasing on in the file:
# chkconfig -f ipaliases on
Stop and restart the network to put your changes into effect:
/etc/init.d/network stop
/etc/init.d/network start
Each IP alias is maintained in the IRIX routing table as a host route between the primary address and the alias. By default, IRIX assumes that a host containing multiple network interfaces is a router. These multi-homed hosts perform packet forwarding and advertise routing information on the networks to which they are attached. However, if you implement IP aliasing on a host with a single network interface (to connect a local network and the Internet, for example), route advertising is not enabled. In this case, it is necessary to force route advertising to make the network location of the local hosts known.
To force route advertising, enter the -s option in the routed.options file on the IP-aliased host.
Network parameters are those settings that determine how an interface processes or supplies certain network information. Modifying network parameters requires that you create and modify the appropriate /etc/config/ifconfig-#.options file (where # can be 1, 2, 3, or 4, based on the interface name).
The default parameter settings are known to function well and suit most site needs. Changing the settings can cause a network to become dysfunctional. It is recommended that these parameters be changed only by experienced or trained network managers.
There are four nondefault network parameters that can be set in the ifconfig-#.options file:
netmask
broadcast address
Address Resolution Protocol (ARP)
route metric
These steps show how to set the nondefault network parameters:
Using the netstat command, determine the order assigned to the network interface at configuration time:
/usr/etc/netstat -i
Using vi or any editor, open or create the file /etc/config/ifconfig-#.options, where the pound sign (#) represents the network interface's name. For example, to configure a primary interface, open or create the file /etc/config/ifconfig-1.options.
To change the network mask value for a network interface, enter a line with the word netmask followed by a space and either the 32-bit hexadecimal value, Internet address dot-notation, or the pseudo-network name:
netmask 0xffffff00
See “Turning On Multicast Routing”, for more details regarding netmasks.
To change the broadcast address for a network interface, enter a line with the word broadcast followed by a space and the dotted decimal IP broadcast address:
broadcast 189.170.6.0
To enable or disable the Address Resolution Protocol (ARP), enter a line with arp (to enable) or -arp (to disable):
arp
The ARP tables are used by some of the network management tools (netstat, ifconfig, and so on) and provide the administrator with invaluable network information.
To change the routing metric count for a network interface, enter a line with the word metric followed by a space and the count:
metric 7
The default metric count, also called hops, is 0. The routed daemon monitors the number of hops required to route data from one network to another. If you want to reduce network traffic on a particular route, increase the metric count on the appropriate router.
The interface configuration file for the secondary interface might look like the following:
cat /etc/config/ifconfig-2.options netmask 255.255.255.0 broadcast 129.78.50.0 -arp metric 4 |
The interface configuration file above indicates that the Class B network is subnetted using 8 bits of the host ID for the subnet. It uses 0 as the broadcast address instead of the default 1. ARP has been disabled and the metric (hop) count has been set to 4 to discourage router traffic.
| Note: A gateway is a host or router on which the routed daemon runs with the -s option to supply routing information. A client, on the other hand, does not supply routing information. Therefore, it runs routed with the -q option. (See the routed(1M) reference page for more information.) |
The /etc/gateways file is a list of distant gateways (that is, hosts and routers that supply routing information) that is used by networks that do not support broadcast or multicast, such as ATM or HIPPI.
This file tells a host either of two things:
Which gateways have hosts on their subnets
Which subnets/gateways are reachable through a directly-connected gateway
Hosts then use this file to determine where to send routing information protocol (RIP) requests and, if the hosts also supply routing information, where RIP responses should be sent.
Entrie in the /etc/gateways file should include all gateways reachable on the ATM or HIPPI network in the following formats:
The /etc/gateways file includes a series of lines, each in one of the following two formats.
Format 1:
host Nname [mask value] gateway Gname metric value [passive|active|external] |
Format 2:
host Hname gateway Gname metric value [passive|active|external] |
These are described as follows:
| Nname, Hname | The name of the destination network or host. | |
| mask value | Optional. Value between 1 and 32 to indicate the netmask associated with Nname. | |
| Gname | The address of the gateway to which RIP sends requests and, should the host provide routing information, responses. | |
| metric value | The hop count to the destination host or network. | |
| passive | The gateway is not expected to exchange RIP packets. Routes through passive gateways are installed in the kernel's routing tables at startup and are not included in routing updates. | |
| active | Indicates if the gateway is willing to exchange RIP packets. | |
| external | Indicates that the gateway is passive, but placed in the kernel routing table. Entries marked as external indicate that another routing process will install such a route, if necessary. |
Lines that do not start with net or host must consist of one or more of the following parameter settings, separated by commas or blanks:
| if=ifname | This parameter ndicates that the other parameters on the line apply to the interface name ifname. | |
| subnet=nname [/mask value][,metric] | This parameter advertises a route to the network nname with the mask value and the supplied metric value (default is 1). The network number must specify a full, 32-bit value, as in 192.0.2.0 instead of 192.0.2. It you choose to add an alias to the loopback interface, the alias must be reachable. | |
| passive | This parameter marks the interface to not be advertised in updates sent via other interfaces, and turns off all RIP and router discovery through the interface. This is very useful for failsafe interfaces or for interfaces for which you do not want RIP traffic to route through. | |
| no_ripv1_in | This parameter causes RIPv1-received responses to be ignored. | |
| ripv2_out | This parameter generates RIPv2 output, and causes RIPv2 advertisements to be multicast, when possible. | |
| ripv2 | This parameter is equivalent to no_ripv1_in and ripv2_out. | |
| rdisc_interval=N | This parameter sets the nominal interval with which router discovery advertisements are transmitted to N seconds and their lifetime to 3*N. This should be set to 45. |
Also, rather than running routed with the -P parm options, you can instead add the parameter line parm to the /etc/gateways file.
The /etc/gateways file in Example 3-1 belongs to a host that has two HIPPI interfaces, one on the 192.168.0.0/27 subnet and the other on subnet 192.168.0.96/27. This host functions as a client. It sends RIP requests to one gateway on the 192.168.0.0/27 subnet, and to two gateways on the 192.168.0.96/27 subnet. It should neither generate nor process RIP packets on its et0 interface.
Example 3-1. /etc/gateways File for Host With Two HIPPI Interfaces
#if brodcast is not supported #-- 192.168.0.0/27 subnet host 192.168.0.1 gateway 192.168.0.1 metric 1 active i #-- 192.168.0.96/27 subnet host 192.168.0.97 gateway 192.168.0.97 metric 1 active host 192.168.0.99 gateway 192.168.0.99 metric 1 active ripv2_out rdisc_interval=45 if=et0 passive if=et1 passive |
The /etc/gateways file in Example 3-2 belongs to a host that functions as a gateway. It has two HIPPI interfaces, one on subnet 192.168.0.96/27 and one on subnet 192.168.0.128/27. There is one other gateway with which this host should exchange routing updates on the 192.168.0.96/27 subnet, and one on the 192.168.0.128/27 subnet.
This host solely and permanently owns an IP address in the 192.168.0.202 subnet; this IP address is actually an alias that we want advertised as long as there is at least one active interface left, thus the subnet=192.168.0.202/31,1 entry. It should neither generate nor process RIP packets on its et0 interface.
Example 3-2. /etc/gateways File for Host Functioning as a Gateway
#if brodcast is not supported #-- 192.168.0.96/27 subnet host 192.168.0.97 gateway 192.168.0.97 metric 1 active host 192.168.0.99 gateway 192.168.0.99 metric 0 active #-- 192.168.0.128/27 subnet host 192.168.0.129 gateway 192.168.0.129 metric 1 active host 192.168.0.131 gateway 192.168.0.131 metric 0 active subnet=192.168.0.202/31,1 ripv2_out rdisc_interval=45 if=ef0 passive |
For further information, see the routed(1M) reference page.
Configuring a station with multiple network interfaces is much like configuring a router, except that forwarding is not enabled. With several network controllers (physical boards or chips), the system must configure a unique interface name for each. Multiple interfaces usually connect systems to more than one subnet and require an address for each connected interface.
The default network configuration file is /etc/init.d/network, which initializes and tests the network interface names and addresses. The site-specific network configuration files dealing with the daemons and their options are /etc/config/netif.options and /etc/config/ifconfig-<n>.options (where <n> is 1, 2, 3, and so on, based on the interface variable name). The file /etc/config/netif.options overrides the defaults specified in the file/etc/init.d/network.
By default, the network configuration script only configures two network interfaces, regardless of how many network interfaces exist on a system. To increase the number of configured network interfaces you must follow these steps:
Identify all the unique network interfaces—“Controller Interface Names” in Chapter 1.
Modify the network interface configuration in the /etc/config/netif.options file—“Modifying the Network Interface Configuration With the /etc/config/netif.options File”.
Assign and implement IP aliasing—“Assigning IP Aliases”.
Change network parameters in the ifconfig-#.options file—“Changing Network Parameters in the ifconfig-#.options File”.
Reboot the system.
This section describes the IRIX proclaim facility, which is based on the dynamic host configuration protocol (DHCP) described in RFC 2131. Proclaim and DHCP allow you to allocate hostnames and network addresses automatically.
DHCP permits site administrators to set up one or more server systems that dynamically distribute network IP addresses and site configuration parameters to new or requesting client systems. In this way, a site with only a few available addresses can serve a large number of hosts that connect to the network only occasionally, or a large site can manage the permanent assignment of addresses with a minimum of administrative attention.
The proclaim facility consists of a daemon that runs on a master server, optional relay daemons for servers on subnets, GUI configuration programs, and a client application that communicates with the DHCP servers. All these programs are bundled with the IRIX operating system.
If you need to refresh your knowledge of the basic concepts of networking, IP addresses, and netmasks, please read “Internet Protocol Addresses” in Chapter 2, and “Setting the Netmask” before continuing with this section.
These subsections provide information about configuring proclaim servers and clients:
The DHCP server is started by inetd(1M), as configured in the inetd.conf file. The basic operation of the DHCP protocol is a series of packet exchanges as follows:
The client machine broadcasts a DHCPDISCOVER packet to the DHCP server's UDP port, using a UDP broadcast equivalent. The request packet includes the requester's network hardware address, and a list of desired configuration options.
All the DHCP servers on the same network as the client machine receive the client's request as do the bootp relay agents, which forward the request to other subnets.
The server looks up the requester in its configuration files to determine if it is configured to serve clients from the requesting subnet. The server now looks in the propel database or the /etc/ethers file (see ethers(4)) for an entry with the client's network hardware address. If an entry is found, the server checks the hostname of that entry against the propel database or the /etc/hosts file (see hosts(4)) to complete the network hardware address to Internet address mapping.
If no entry is found, the server generates an appropriate IP address and hostname using its configuration files; see dhcp_bootp(1M).
The server now returns a response in the form of a DHCPOFFER packet, which also includes other configuration information requested by the client.
The client accepts the first valid offer from a server and broadcasts back a DHCPREQUEST message, which includes all the configuration options from the DHCPDISCOVER message plus the address of the selected server.
The selected server makes a permanent mapping for the client's hostname, IP address, and hardware address, and responds with a DHCPACK message.
On receiving the DHCPACK message from the server, the client writes the configuration information into the appropriate configuration files and then executes the networking initialization scripts.
The dhcp_bootp program is a server that communicates with DHCP and proclaim clients to provide host configuration information, including an IP address at minimum. If your site uses DNS to maintain the hosts map, you need some external mechanism (such as a script) to update the DNS map from the DHCP server. If your site uses NIS to maintain the hosts and ethers maps, dhcp_bootp must be run on the same machine as the NIS master server.
The DHCP server generally uses configuration parameters based upon the subnet number of the originating client request. The configuration files are all placed in the directory /var/dhcp/config and are named in the form config.<netnumber>. For example, the configuration file for clients on the 128.78.61 network should be named config.128.78.61.0. If the subnet configuration file does not exist, then the config.Default file applies instead. If the default configuration file is missing or unreadable, clients are configured to match the DHCP server itself.
To configure the DHCP server, you can do one of the following:
Run the ProclaimServerMgr graphical interface, as described by the ProclaimServerMgr(1M) reference page.
Edit the /etc/config/dhcp_bootp.options file and use the dhcp_bootp command to control the execution of the DHCP server
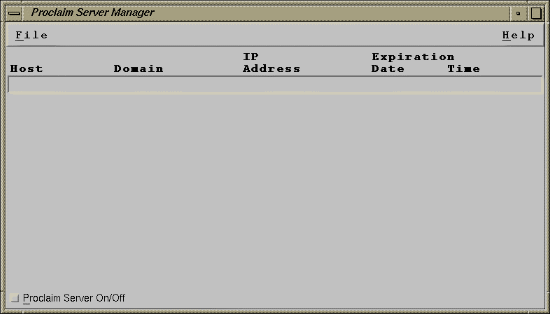
ProclaimServerMgr is a graphical front end that displays the status and configuration of the proclaim server running on the local host. It displays the set of IP addresses and lease times that are currently assigned. Proclaim is an implementation of DHCP (dynamic host configuration protocol). Use the following command to invoke ProclaimServerMgr.
/usr/sbin/ProclaimServerMgr
Figure 3-3 shows the graphical interface for the proclaim server configuration.
The File button on the main window opens a pull-down menu for editing options and configuration files as show in Figure 3-4.
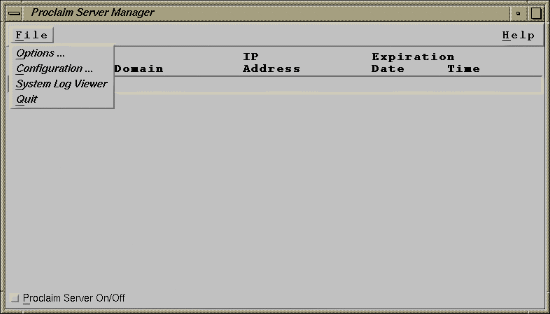
The Options menu choice allows you to edit proclaim server options defined in the /etc/config/proclaim_server.options file.
The Configuration menu choice allows you to add, delete, and edit configuration parameters. Configurations are saved in files and define the IP addresses, lease times, and other options returned to clients. See “DHCP Server Configuration Parameters”, and the dhcp_bootp(1M) for details about configuration parameters.
To view messages logged by the server in the system log file (/var/adm/SYSLOG), launch sysmon(1M) from the main window by choosing the System Log Viewer menu item.
You can disable or enable DHCP by clicking the Proclaim Server On/Off button in the main window.
You can use the dhcp_bootp command to control the execution of the DHCP server.
You can specify the additional DHCP-related options in the /etc/config/dhcp_bootp.options file. The command is as follows:
/usr/etc/dhcp_bootp [ -fd ] [ -o dhcp_options_file ]
The dhcp_bootp(1M) command accepts the following options:
| -f | This enables cross network forwarding if the client is requesting for service from a dhcp server which is reachable via this server and on a different wire. | |
| -d | This enables the dhcp_server into a debug mode in which it logs messages to /var/adm/SYSLOG. | |
| -o | The path ot the dhcp_options_file can be mentioned using this option. The default location is /etc/config/dhcp_bootp.options. |
| You can control the execution of the dhcp_bootp program by following these steps: |
Use vi or your some other text editor to specify the additional DHCP-related options in the /etc/config/dhcp_bootp.options file as follows:
-y If you are using NIS to propagate the hosts and ethers map, this system is required to be the NIS master server for proclaim to work correctly.
-w hosts_map Specifies the optional location of the hosts map. The default is /etc/hosts.
-e ethers_map Specifies the optional location of the ethers map. The default is /etc/ethers.
-u sysname Specifies the name for an optional sysname file. The default is /unix.
-c proclaim_config_dir Specifies the optional proclaim server configuration directory. The default directory is /var/dhcp/config
-t seconds A timeout period for the dhcp_bootp server can be set else the default period will be used.If a timeout period of 0 seconds is used then the dhcp_bootp server will become a persistent daemon.
-x This option is used in conjunction with a Domain Name Server that provides the IP address to hostname mapping for the initial assignment of IP addresses to hosts by the DHCP server. The option has been found to be particularly useful in an Internet Service Provider type of setup where the IP address to hostname mapping may be required to remain fixed. Once an IP address is assigned it is written to the etherToIP.pag file. When this option is in effect, etherToIP.pag is the only file consulted to determine whether a particular IP address or hostname is already assigned.
-n Specifies that the server should return a netmask with its reply regardless of whether a client requested it or not.
-m options Specifies additional options to be sent by the server to clients irrespective of whether the client requests them or not. The additional options are specified as a comma or colon separated list with no spaces.
-r script_file_path Specifies an optional script file to execute when the server changes the etherToIP database. The complete path to the script must be specified as an a argument. The server calls the script with several command-line arguments: -c client_identifier -m physical_address -i ip_address -h hostname -l lease -o operation -t dhcp_message_type. The script is executed in the background.The value of the operation argument is 0 if it was a record creation, 1 if it was a deletion, and 2 if the lease was updated. The dhcp_message_type is the same as defined message types in the DHCP literature. If a message is sent to the client that message type is passed as an argument, otherwise the message type received from the client is passed. This script may be used to perform other functions such as dynamic DNS updates.
-W Specifies that the the hosts map file or /etc/hosts file should not be updated when leases are added or removed.
-E Specifies that the ethers map file or /etc/ethers file should not be updated when leases are added or removed.
-pn Specifies that a ping be sent before an address is leased to check if a host is using the IP address. If a reply is received then a message is logged in the SYSLOG indicating that "Address <addr> appears to be STOLEN" and a record is added into the database with a lease time of -2 for this IP address. The DHCP administrator should investigate the occurrence and remove the entry in the database with the dhcpdb command once it has been resolved. The DHCP server tries to give out another address to the requesting client. The server attempts to recycle stolen addresses when it runs out of addresses and at a frequency specified by the lease time in the configuration files.
-pt ping_timeout Specifies the timeout for the ping. If a reply to a ping is not received in ping_timeout seconds the address is considered to be not taken. The default value for the timeout is 1 second. Note that the server processes requests from other DHCP clients while waiting for the timeout to expire. The server does not block waiting for a reply to a ping request. If blocking pings are required for some reason use the -pb option instead of the -pn option.
-pl number_of_outstanding_pings This is the maximum number of pings outstanding. Once this value is reached the server automatically stops sending ping to check if an IP address is taken. The server begins to send ping request once the number of outstanding ping requests falls below his value. It is set to 16 by default.
-pd This option is available for backward compatibility with earlier versions. In prior versions (if -x was not specified) while assigning a new address the server would make a gethostbyaddr(3N) call to check if it could assign an IP address to a client for which it had no prior binding. If a binding was found in DNS maps then the particular address was not assigned. In the new version of the server to obtain this older behavior it is necessary to specify the -pd option. If this is not specified the server will not perform a gethostbyaddr(3N) call to check if an IP address is available.
The following options (-dx,-l) can be set only with the Enhanced DHCP server product.
-dn Specifies that dynamic DNS updates are on. The behavior of DNS updates are modified by the following (-da-db-dc-ds-dt) additional options. Note that if the -x DHCP server option is specified then the -dn option is silently ignored. With the -x option DNS maps are pre-populated so it does not make any sense to update DNS dynamically.
-da Ordinarily the server will perform dynamic DNS updates (if the -dn option is specified) only if the Dynamic DNS option is sent by the client (option 81 as per the draft). If this (-da) option is used the server will update DNS regardless of whether option was sent by the client or not.
-db If this is specified the DNS updates are performed before an ACKnowledgement is sent to the client. By default the dynamic DNS updates are performed after the ACK is sent to the client.
-dc If this is specified the DNS A RR is also updated by the server. Otherwise whether the A RR is updated or not depends on the flags value sent in the dynamic DNS update option by the client.
-ds Specifies that the security feature should not be used. By default secure updates are performed using TSIG for those networks for which a key is specified.
-df filename Specifies the file that contains the (TSIG) keys for the various networks served by the DHCP server. The default file name is /var/dhcp/config/dhcp_ddns.conf. A key must be specified for each network number for which secured updates are required. Each line in this file specifies the network number (netnumber) followed by the keyname, algorithm, and the base 64 encoded secret key. Fields are separated with spaces or tabs. The keyname and algorithm-name are the same as that used in the BIND 8.2 configuration file.
-dt time_to_live Specifies the time to live (ttl in seconds) for records that are added to the DNS. The ttl specified by the DHCP server in the DNS update is the minimum of this value and the lease duration.
-l /var/dhcp/config/dhcp_ldap.conf This option specifies that the ldap related options should be picked from the /var/dhcp/ldap/dhcp_ldap.conf file. See the file /var/dhcp/ldap/dhcp_ldap.conf to see various options and what may need to be specified in order to use the DHCP server with an LDAP server to store configuration and leases.
Create one or more network configuration files based on the network numbers this server is responsible for. A default configuration file is provided, which is /var/dhcp/config/config.Default. The new file(s) should be named config.<netnumber> in the same directory. For example, if this server is serving clients on the 192.26.61 network, the configuration file should be named config.192.26.61.0. See the list of configuration parameters below.
The DHCP server also provides MAC address based filtering. The filters are specified in the /var/dhcp/config/dhcpmtab file. MAC addresses can be specified as either complete addresses or as a regular expression to specify a set of addresses. The regular expression syntax is described in the man pages for regcmp(3G).
If a DHCP packet from a client with a matching MAC address is received then the corresponding actions are taken. Regular expression matching is attempted only if a complete match is not found. The length and hardware type must also match for non-regular expression entries. The length may not match for entries that have regular expressions. Once a match is found the remaining entries are not searched. An example of the configuration file is as follows:
# dhcpmtab - mac address based filtering for DHCP
#len htype     mac            action
6    1    01:02:03:8a:8b:8c   K
0    1    01:02:*             L|K
The actions can be specified as a combination of L and K. Each of the actions L=log request, and K=drop request, is acted upon in that order. The system log is updated if the L action is requested. If the K action is specified and an L is not specified then the packet is silently dropped.
The DHCP server can be configured to send specific user defined options based on the value of the vendor class option sent by the DHCP client. To define new options for this purpose use the /var/dhcp/config/dhcp_option_types file. The format of this file is described as comments within this file. Each line consists of a user selected name, an option number, and the type of the option. The value to be returned by the DHCP server can be specified in the /var/dhcp/config/vendor_options file. See the file for the format. The vendor class and the network number to which option values apply can be specified within the file.
Enable the proclaim server by giving the command:
chkconfig proclaim_server on
Replace the "bootp" entry in /usr/etc/inetd.conf with this line:
bootp dgram udp wait root /usr/etc/dhcp_bootp dhcp_bootp -o \ /etc/config/dhcp_bootp.options
Issue this command, to restart inetd with /etc/killall -HUP inetd:
/etc/killall bootp
These parameters can be supplied in the configuration file for each network. All of the address fields can either be in standard IP address dot notation, or as a hex number prefixed with a 0x. Most of the fields can be left blank to render them non-applicable.
| pro_address_counter | This integer field specifies the host number for the next IP address. The next address is constructed using the counter and checked through the range of the assignable addresses. The first available address in the range is assigned. | |
| pro_host_pfx_counter | This integer field specifies the starting number appended to the pro_host_prefix to generate a new hostname. This counter is incremented and a new hostname generated until a unique unused name is found. | |
| pro_netmask | This field takes a netmask in address form. For more information on netmasks, see “Setting the Netmask”. This field specifies the subnetmask used by the client systems. | |
| pro_lease | This unsigned integer field specifies the client address lease time in seconds. This implementation of the DHCP server assigns 3 year leases by default, and the leases are expired only when explicitly surrendered by the client. | |
| pro_host_prefix | This string field specifies the default text prefix for generating client hostnames. For example, the prefix iris directs proclaim to generate hostnames of the form iris1, iris2, iris3, and so on. | |
| pro_choose_name | This boolean (true or false) flag specifies whether the client systems are allowed to choose their own hostname or whether they must be assigned the name given to them by the server. A value of 1 (true) in this field brings up a dialog box on the client system giving the user the option of either taking the name offered by the server or entering a hostname of the user's choice. If the userselects a name, the server allows this name if it passes basic tests for syntax and uniqueness, otherwise the server/client dialogue continues until a mutually acceptable name is submitted. A value of 0 (false) in this field indicates that the user on the client system must accept the name provided by the server. This option can be used with SGI DHCP clients and servers only. The client and server exchange DHCPREQUEST and DHCPOFFER packets until a mutually acceptable name is chosen. This option is being deprecated; use the -H host-name option with SGI clients to specify host names. | |
| pro_ipaddress_range | This field takes an entry of integers using standard numeric range rules. The entry defines the range of host number addresses assignable by this server. For example, if the value is: 1-3, 5-7, 9. The server issues IP addresses with the base address specified in the configuration filename (such as config.192.26.61.0) Each client is issued an IP address matching the name of the configuration file, suffixed with the numbers 1 through 3, and 5 through 7, and 9, but not 4 or 8. This option can be to restrict the IP addresses offered by a given server. This is very useful if the administrator wants to assign only certain block(s) of addresses using proclaim, or in the absence of a server to server protocol, wishes to have multiple servers serve clients on the same subnet. | |
| pro_router_addr | This field of comma-separated IP addresses specifies a list of addresses for network routers on the client's subnet. Routers should be listed in the order of preference for their use. | |
| pro_bootfile_size | Specifies length in 512-octet blocks of the default boot image for the client. | |
| pro_time_offset | Specifies offset of the client's subnet from Coordinated Universal Time (UTC) in seconds. | |
| pro_meritdump_pathname | Specifies a file for dumping a core image in case the client crashes. | |
| pro_root_pathnam | Specifies the directory that contains the client's root disk partition | |
| pro_extensions_pathname | Specifies a TFTP file containing vendor extensions for bootp. On SGI systems the this file has the same format as the config.netnumber file. | |
| pro_TFTPserver_name | Specifies a TFTP server for the client. | |
| pro_bootfile_name | Specifies the pathname of the default boot image for the client. | |
| pro_dns_domain | This text field specifies the domain name that client should use when resolving hostnames using DNS. | |
| pro_dnsserver_addr | This field of comma-separated IP addresses specifies a list of addresses for Domain Name System servers available to the client. Servers should be listed in the order of preference for their use. | |
| pro_propel_server | This IP address specifies the address of the propel server that serves the clients on this subnet. Additional information about propel can be found in Chapter 2, "Software Distribution, User, and Host Management With propel," of the IRIXpro Administrator's Guide. | |
| pro_timeserver_add | This field of comma-separated IP addresses specifies a list of addresses for time servers available to the client. Addresses should be listed in the order of preference for their use. | |
| pro_logserver_addr | Specifies a list of UDP log servers available to the client. | |
| pro_cookieserver_addr | Specifies a list of RFC 865 cookie servers available to the client. | |
| pro_LPRserver_addr | Specifies a list of RFC 1179 line printer servers available to the client. | |
| pro_resourceserver_addr | Specifies a list of RFC 887 resource location servers available to the client. | |
| pro_swapserver_addr | Specifies the IP address of the client's swap server. | |
| pro_nis_domain | This text field specifies the name of the client's NIS domain. | |
| pro_nisserver_addr | This field of comma-separated IP addresses specifies a list of addresses indicating NIS servers available to the client. Servers should be listed in the order of preference for their use. | |
| pro_mtu | This unsigned short integer field specifies the MTU (maximum transmission unit) to use on the network interface configured in this file. The minimum legal value for the MTU is 68. | |
| pro_allnets_local | This boolean (true/false) field specifies whether or not the client can assume that all other subnets of the IP network to which the client is connected use the same MTU as the subnet to which the client is directly connected. A value of 1 (true) indicates that all subnets share the same MTU. A value of 0 (false) means that the client should assume that some other subnets can have smaller MTUs. | |
| pro_broadcast | This IP address field specifies the broadcast address in use on the client's subnet. | |
| pro_domask_disc | This boolean (true/false) Perform Mask Discovery field specifies whether or not the client should perform subnet mask discovery using ICMP. A value of 1 (true) means that the client should perform mask discovery, while a value of 0 (false) indicates that the client should not perform mask discovery. | |
| pro_resp_mask_req | This boolean (true/false) Mask Supplier field specifies whether or not the client should respond to subnet mask requests using ICMP. A value of 1 (true) means that the client should respond. A value of 0 (false) in this field means that the client should not respond. | |
| pro_static_routes | This field takes a comma-separated list of routes in the following form: dest_address - router_address, dest_address2 - router_address2. The static route field specifies a list of static routes that the client should install in its routing cache. If multiple routes to the same destination are specified, they should be listed in descending order of priority. The routes consist of a list of IP address pairs. The first address is the destination address; its counterpart address, separated by a dash (-), is the address of the router to the destination. The default route (0.0.0.0) is an illegal destination for a static route. | |
| Serve_This_Network | Toggle DHCP serving of this subnet. | |
| Other Options | The proclaim server also handles other options listed in RFC 1533. To set values for these options use of the ProclaimServerMgr(1M) graphical user interface is recommended. You can view the standard config.Default file in the /var/dhcp/config directory to see all the supported options. |
The following are the active lines only from a working config.netnumber configuration file:
Serve_This_Network: 1 pro_address_counter: 1 pro_host_pfx_counter: 1 pro_netmask: 255.255.255.0 pro_lease: 604800 pro_host_prefix: n6634 pro_choose_name: 1 pro_ipaddress_range: 1-254 pro_dns_domain: engr.sgi.com pro_nis_domain: engr.sgi.com pro_mtu: 1500 pro_allnets_local: 1 pro_domask_disc: 0 pro_resp_mask_req: 0 |
For additional information about the dhcp_bootp, see the dhcp_bootp(1M) reference page.
The dhcp_relay program is a subnet agent that communicates with the main DHCP server to provide DHCP clients with host configuration information. If your site uses DNS to maintain the hosts map, you need some external mechanism (such as a script) to update the DNS map from the DHCP server. If your site uses NIS to maintain the hosts and ethers maps, your site's main DHCP server must be on the same machine as the NIS master. In any case, you should run dhcp_relay on all subnets besides the one with the main DHCP server.
The DHCP relay agent reads the configuration file /var/dhcp/config/dhcp_relay.servers to determine the location of the main DHCP server. This configuration file should contain the IP address and hostname of the DHCP server, on two separate lines.
Use the following command to invoke ProclaimRelayMgr.
/usr/sbin/ProclaimRelayMgr
The the ProclaimRelayMgr graphical interface (GUI) appears, as shown in Figure 3-5
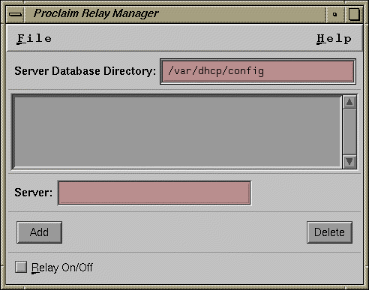
The main window allows you to add and delete addresses and names of proclaim servers. You can enable or disable the relay-agent by clicking the Relay On/Off button in the main window.
The File button opens a pull-down menu for saving the options and server addresses displayed in the main window to a file (using the Save button). To view messages logged by the relay-agent in the system log file (/var/adm/SYSLOG), launch sysmon(1M) from the pull-down menu by choosing the System Log Viewer item.
To control the execution of dhcp_relay, perform the following:
Specify relay-agent options in the /etc/config/dhcp_relay.options file, if any, as in this example:-c proclaim_config_dir This specifies an optional proclaim server configuration directory. The default directory is /var/dhcp/config.
The configuration directory contains a file dhcp_relay.servers, which has a list of proclaim servers, one per line. DHCP messages are forwarded to each server contained in this file. Proclaim servers may be specified using either an Internet host name or an Internet address in standard dot notation (see inet(3N)). Here is a sample dhcp_relay.servers configuration file:
192.26.61.9
dhcpserver.sgi.com
Enable the proclaim relay-agent by entering these commands:
chkconfig proclaim_relayagent on
chkconfig proclaim_server off
Replace the bootp entry in /usr/etc/inetd.conf with this line:
bootp dgram udp wait root /usr/etc/dhcp_relay dhcp_relay -o \ /etc/config/dhcp_relay.options
Kill any running bootp with this command:
/etc/killall bootp
Restart inetd with this command:
etc/killall -HUP inetd
For more information on how to configure the relay agent by running the ProclaimRelayMgr GUI, see the ProclaimRelayMgr(1M) reference page. If you prefer, you can configure relay agent options using your favorite text editor, following the steps documented on the dhcp_relay(1M) reference page.
The proclaim client communicates with a DHCP server to obtain host configuration parameters, including an IP address and an IP address lease at minimum. You can use proclaim to set up and configure new systems automatically, and also to move systems from one network to another without administrative intervention. The proclaim client can also verify configurations at reboot time.
Only the superuser can employ proclaim. If the primary network interface is changed, proclaim updates the netaddr variable in the NVRAM.
In the absence of the DHCPoptionsToGet keyword, proclaim requests the following configuration parameters from an available DHCP server:
an IP address
the lease duration (3 year default)
the subnet mask
hostname (users may be allowed to choose their own)
DNS domainname
NIS domainname if the NIS option is installed.
IP address of the DHCP server; see the dhcp_bootp(1M) man page.
If the server is configured in a manner where clients from specific subnets are allowed to choose their own hostname, then at the receipt of the DHCPOFFER message the client requests user input to either accept the offered hostname or specify a different one. This dialog between the server and client continues until a valid and unique mutually acceptable name is selected. Alternately, the -w option can be used to request a hostname and/or IP address non-interactively. The client will print an error and exit if the requested hostname or address is invalid.
Proclaim sleeps after obtaining a new lease or after verifying an existing lease, until it is time to renew the lease. The client wakes up at times specified by the DHCP protocol and attempts to renew the lease until it succeeds or the current lease expires. If the client is unable to renew the lease then it can shutoff network access depending on the use of the -E option.
To set up a the DHCP Proclaim Client, follow these steps:
Edit the /etc/config/proclaim.options file if necessary.
Edit the /usr/etc/dhcpcopt.local if you want to add to the processing of options
Execute the following: chkconfig autoconfig_ipaddress on
Optionally, backup files which may be changed by the dhcpcopt script as follows:
cp /etc/resolv.conf /etc/resolv.conf.orig
cp /etc/config/static-route.options /etc/config/static-route.options.orig
Determine whether you need to change the /etc/hosts or /etc/sys_id files as follows:
IRIS is the host name by default, if this is acceptable you do not have to change the files
If you have configured your system to have the DHCP server supply the host name, no change is necessary.
If neither a nor b applies, change the /etc/sys_id and /etc/hosts files to reflect the desired host name.
Reboot the system
The command is as follows:
/usr/etc/proclaim [ -B ] [ -b lease_time ] [ -d -s server_addr ] [ -E ] [ -e 2nd_interface ] [ -I ] [ -i ] [ -l lease_time ] [ -p ] [ -r lease_time -s server_addr ] [ -t repeat ] [ -x max_timeout ] [ -H hostname ] [ -w -h host_name -a ip_addr ]
The proclaim(1M) command accepts the following options:
| -B | T he -B option broadcasts a BOOTP packet to a BOOTP 1533 server. This is useful when you just want to obtain the other configuration data, and the IP address is not otherwise known to the BOOTP or DHCP server. The data is placed in the file /var/adm/proclaim.data. proclaim does not change any networking state with this option. | |
| -b | The -b lease_time option is used to manually rebind the lease; a lease_time in seconds must be specified. | |
| -d | The -d option allows the client to surrender its address lease and shutdown all networking. This option can only be used in conjunction with the -s server_address option to specify the Proclaim server address. This usually is the server from where the original address lease was obtained. If there is a client running on the host use the /etc/init.d/run-proclaim surrender command to surrender the lease. | |
| -E | The -E option is used to specify that network access should be shut off if the client is unable to renew the lease and the lease expires. The default behavior does not shut off network access if the lease expires. | |
| -e | The -e 2nd_interface option is used to specify the device for a second network interface. | |
| -I | The -I option is used to send a DHCPINFORM packet to a DHCP server. This is useful when an IP address was assigned to the host using some other means and it is required to obtain only other configuration parameter. | |
| -i | The -i option is used where the client is seeking to verify a previously allocated, cached configuration. If the client receives a DHCPNAK response to this message, it means that either the 'requested IP address' parameter is incorrect or the client is on the wrong network. The client automatically requests a new address and lease and proceeds to install the new configuration. If there is no response, it means the server(s) has no record of this client. These messages are logged using the system logging daemon syslogd(1M). If a client is running on the host use the /etc/init.d/run-proclaim verify command to verify the lease. | |
| -l lease_time | The -l lease_time option is used to request a different address lease duration than the default of 3 years. The lease time needs to be specified in number of seconds. | |
| -p | The -p option is used to print the status of the current lease and other configuration parameters. This status is obtained from the /var/adm/proclaim.lease_info file created at the time the lease was obtained. | |
| -r lease_time | See the -s server_addr option. | |
| -s server_addr | The -r lease_time -s server_addr option is used to manually renew the lease; a lease_time in seconds must be specified. The server_addr specifies the server with which to renew the lease. The server address may be obtained by using the -p option of proclaim. | |
| -t invocations | The -t invocations option is used to specify the number of invocations of the client using the run-proclaim(1M) script, after which the autoconfig_ipaddress flag is set to off (see chkconfig(1M)). When this option is not specified the client may be run up to a default 2 (or as specified in the /etc/config/proclaim.options file) number of times using the script after which the flag is set to off. Use of the script to run the client requires the flag to be set to on. | |
| -x max_timeout | The -x max_timeout option is used to specify a maximum timeout (time to wait for a server to reply) in seconds. The current default is set to 6 seconds. | |
| -H hostname | The -H hostname option is used to specify a hostname using the DHCP Host Name Option. The run-proclaim(1M) script uses this option to request the current hostname of the client from the server. | |
| -w -h host_name | The -w -h host_name option -a ip_addr option is used to choose a hostname and IP address without the user being prompted by the client. If no host_name or ip_addr is specified, the the hostname and IP address offered by the server will be used. If only the host_name is specified, the server will choose an appropriate IP address. This option was added to make it possible to run proclaim from a CGI script |
Options File
Options may also be specified in the /etc/config/proclaim.options file. Options specified on the command line supersede those specified in this file. Lines beginning with a '#' are treated as comments. The option keywords in this file must be followed immediately by a colon, then by any number of tabs or spaces, and finally by the value of the option
The following keywords are supported:
Invocations - equivalent to -t option
MaxTimeout - equivalent to -x option
ServerAddress - equivalent to -s option
ShutdownOnExpiry - equivalent to -E option
Lease - equivalent to -l option
DHCPoptionsToGet - additional options to request from DHCP server
DHCPoptionsRenew - options to request for lease renewal/rebind
The values for DHCPoptionsToGet and DHCPoptionsRenew are specified by listing the option numbers separated only by a comma. For example,
DHCPoptionsToGet: 3,6,26,27,41 |
DHCPoptionsToGet lists options to get in addition to the standard (default) configuration. This affects the initial lease request.
For a complete list of options, see RFC 2132.
DHCPoptionsRenew specifies what options should be included in the renew/rebind request. DHCPoptionsRenew is expected to be a subset of the options requested when the lease is acquired (the standard configuration parameters plus the additional ones listed in DHCPoptionsToGet).
Options returned from a renew/rebind request will be checked. If basic values have changed (IP address, host name, subnet mask, DNS domain, NIS domain) the host will be reconfigured and the /usr/etc/dhcpcopt script will be run. If only non-basic values have changed, only the script will be run. The dhcpcopt script file contains processing of the gateway, DNS domain and NIS domain. A script file /usr/etc/dhcpcopt.local may be created to add processing of options. If this file exists, dhcpcopt calls it for additional actions for the options returned.
Additional options which are not keywords specify whether the run-proclaim script should try to obtain configuration parameters for all the network interfaces on the system. If none of these options are present then the proclaim client is invoked for the primary interface only.
The options are:
Primary on|off Interface |
The presence of an on invokes the proclaim client and off does not invoke it for the specified interface when the run-proclaim script is executed with a start argument. The value of interface is the name, for example, ec1, xpi1, etc.
For more information about setting up proclaim on client systems, see the proclaim(1M) reference page.
The following restrictions and limitations are present in this release:
The DHCP server must be the NIS master if your site uses NIS for hostname, IP address, or network hardware address validation and mapping. Note that NIS is an optional software product, and not all systems and networks use it.
If your site uses DNS to maintain the hosts map, you need an external mechanism (manual or automated) to update the DNS map from DHCP. This limitation should be lifted in the next release.
The server cannot respond to both DHCP and bootp client requests contained within a single packet, although it can act as the bootp server for normal bootp requests.
To start and terminate locally developed network daemons, or to publish ARP entries and set routes, create the separate shell script /etc/init.d/network.local. Make symbolic links in /etc/rc0.d and /etc/rc2.d to this file to have it called during station startup and shutdown:
ln -s /etc/init.d/network.local /etc/rc0.d/K39network ln -s /etc/init.d/network.local /etc/rc2.d/S31network |
See /etc/init.d/network for the basic format of the script. Also refer to network (1M) , rc2 (1M), and rc0 (1M) for more information.
Several network daemons have an option that lets you log remote accesses to the station log file /var/adm/SYSLOG by using syslogd. Sites connected to the Internet should use this feature. To enable logging for ftpd, tftpd, and rshd, edit /etc/inetd.conf and add -l after the right-most instance of ftpd and tftpd. Add -L after the right-most instance of rshd. For additional ftp logging, add -ll to the ftpd entry. Signal inetd to reread its file after you have added your changes:
/etc/killall -HUP inetd |
Remote logins by means of rlogin, telnet, and the 4DDN sethost programs can be logged by login. Edit /etc/default/login and add the keywords SYSLOG=ALL or SYSLOG=FAIL to it. For example, this command in the login file logs successful and failed local and remote login attempts to syslogd:
syslog=all |
See the login(1) reference page for details.
In addition to the required software that you must set up on each system on the network, you may want to designate certain systems to provide network-wide services. For example, you can set up a system as an InfoSearch server, so that users can access a complete set of InfoSearch books without installing them all on their local disks.
The following sections discuss setting up an anonymous ftp server, and setting up an InfoSearch server.
An anonymous FTP account is a way for you to make information on your system available to anybody, while still restricting access to your system. An anonymous FTP account lets anybody log in to your system as the “anonymous” or “ftp” user. The FTP daemon does a chroot to the FTP home directory (~ftp) for anonymous FTP users, which effectively prevents them from accessing parts of the system that are not subdirectories of ~ftp; see chroot(1M) . If you prefer to limit access to users with passwords, after setting up an anonymous account continue with “Setting Up a Password-Protected FTP Account”.
The following procedure is designed to help you set up a network-accessible anonymous FTP account. As usual, understanding the various steps and continually monitoring how the account is used are necessary to protect your system security.
| Note: If you are using IRIX 6.3, 6.4, or 6.5, you must copy certain files into the /lib32 and /usr directories. See “Updating FTP for IRIX 6.3, 6.4, and 6.5” for details. Otherwise follow the steps below. |
Create the anonymous FTP user entry in /etc/passwd. The username should be ftp. Put an asterisk (*) in the password field, and assign user and group IDs, a home directory, and a login shell. The following is an example of a typical entry in /etc/passwd for the anonymous FTP account:
ftp:*:997:995:Anonymous FTP Account:/disk2/ftp:/dev/null
The login shell /dev/null is recommended but not required, and the home directory can be anywhere, with reservations as explained in the next step.

Tip: For public servers, SGI recommends that you create a shadow password file. Run the pwconv command from the /etc directory: # pwconv
This command updates the contents of /etc/passwd and moves encrypted passwords to /etc/shadow, which is then inaccessible to non-privileged users. If you run NIS, see the shadow(4) reference page for interoperability information.
Create an FTP home directory. This may be wherever you like but, especially if you are going to allow writes to it, it should probably be on a separate partition from / or /usr. That way, if the partition fills up, it will not disable basic system operations. In this example procedure, /disk2/ftp is the name of the anonymous FTP directory. First, make the directory:
# mkdir /disk2/ftp
Then, if it is a separate disk or disk partition, you can mount the device on it; see mount(1M) . The anonymous FTP home directory you make must be the same one you specify in the /etc/passwd file.
Change directory to the ftp home directory and create the subdirectories used for FTP access:
# cd /disk2/ftp
# mkdir bin dev etc lib pub incoming
In addition to the standard bin, dev, etc, lib, and pub directories, you may wish to create an incoming directory for incoming files.
Copy the ls command from /sbin to ~ftp/bin:
# cp /sbin/ls bin
Note: In order for the ls command to work with an IRIX 6.5.x system, perform the following steps: # cp /lib32/libc.so.1 /dir2/ftp/lib32 # cp /lib32/rld /dir2/ftp/lib32 # chmod -R 555 /dir2/ftp/lib32
Copy /etc/passwd and /etc/group to ~ftp/etc and edit them to an acceptable minimum:
# cp /etc/passwd /etc/group etc
A good choice for the contents of ~ftp/etc/passwd might be
root:*:0:0:Super-User:/:/dev/null
bin:*:2:2:System Tools Owner:/bin:/dev/null
sys:*:4:0:System Activity Owner:/var/adm:/dev/null
ftp:*:997:999:Anonymous FTP Account:/disk2/ftp:/dev/null
A good choice for the contents of ~ftp/etc/group might be
sys:*:0:
other::995:
guest:*:998:
Add appropriate device and library files for anonymous FTP as follows:
# /sbin/mknod dev/zero c 37 0
# cp /lib/libc.so.1 /lib/rld lib
The dev/zero file helps zero out sensitive data; ~ftp/bin/ls requires the library files.
Set restrictive permissions on ~ftp/etc/passwd, ~ftp/etc/group and ~ftp/dev/zero:
# chmod 444 etc/* dev/*
Make sure the bin, dev, etc, lib and ~ftp directories are owned by root, with group being sys, having restricted write permission:
# chown root.sys bin dev etc lib .
# chmod 555 bin dev etc lib .
In the chown command, the dot separates owner and group.
For the pub directory, set the owner to root, the group to sys, and global read and access permission:
# chown root.sys pub
# chmod 755 pub
If you created an incoming directory, set the permissions to allow anybody to write there but not to read its contents:
# chown ftp.other incoming
# chmod 333 incoming
Any FTP user can now get or put files in the incoming directory, but they must know the name of the file beforehand, because they cannot list directory contents.
Caution: By allowing write permission, you make it possible for anonymous FTP users to fill the entire disk partition. For instructions on setting up a more restricted alternative, see “Setting Up a Password-Protected FTP Account”. As a security precaution, add the following entry to the /etc/aliases file to cause mail sent to the user ftp to be intercepted by the postmaster:
ftp: postmaster
Run the command newaliases to make this take effect. (This assumes you have an alias of postmaster in /etc/aliases. See aliases(4) and newaliases(1M) .)
Enable FTP logging as described in “Limiting inetd Services” in Chapter 5 in IRIX Admin: Backup, Security, and Accounting . Note that if you use one -l argument with ftpd, you record only successful and failed FTP login attempts. If you use two ls, you also record the retrieve (get), store (put), append, delete, make directory, remove directory, and rename operations (and their filename arguments) performed during ftp login sessions. If you use three ls, the report includes the number of bytes transferred in get and put operations.
For example, the following entry in /etc/inetd.conf means FTP sessions and get or put operations (excluding byte count) are logged in /var/adm/SYSLOG:
ftp stream tcp nowait root /usr/etc/ftpd ftpd -ll
Once you have edited /etc/inetd.conf, restart inetd with the following command:
# /etc/killall -HUP inetd
Note: Although FTP logging records in /var/adm/SYSLOG show any passwords entered by users logging in, no password checking is done for anonymous FTP. The convention is for anonymous users to enter their e-mail addresses for passwords, but they could just as easily enter another user's address or anything at all.
If you place text in the /etc/issue file, it displays when a user connects to your system, before the FTP login prompt. You might want to include information here about the kind of services your FTP site offers, and whom to contact in case of problems. In addition, text in the ~/ftp/README file displays after an FTP user logs in.
Refer to crontab(1) , syslogd(1M) , and the file /var/spool/cron/crontabs/root for information on changing the frequency or nature of system log file maintenance—you may, for example, want to increase the length of time you keep log files. To help you keep track of the demands made on your public FTP server, see the
Password-protected FTP accounts allow only valid users to access your system. This is a way to make file transfer available to selected people, while still restricting access to the rest of your system. Only users with a password in /etc/passwd may connect to these FTP services. Additionally, restricted FTP users cannot access any part of a system that is not part of their home directory; the system does this with chroot.
The following procedure is designed to help you set up a network-accessible secure FTP account. As usual, understanding the various steps and continually monitoring how the account is used are necessary to protect system security. Before beginning this procedure, you must have completed all steps in “Setting Up an Anonymous FTP Account”..
Modify the ftp user entry in /etc/passwd. The username should be “ftpX” where X is a variable. Leave the password field empty for now, assign a user ID and group ID, and home directory. The following is an example of a typical entry in /etc/passwd for a password-protected FTP account:
ftp1::197:995:FTP user:/disk2/ftp:/dev/null
The login shell /dev/null prevents FTP users from gaining UNIX shell access. The second field will contain the user's encrypted password.
Tip: The FTP daemon grants anonymous FTP privileges to the user named ftp, so if there is no ftp line in /etc/passwd, the system does not permit anonymous FTP. Assign the FTP user a reasonable password, maybe asking what the person prefers:
# passwd ftp1
New password:
Re-enter new password:
Copy the line for the FTP user from /etc/passwd and paste it into ~ftp/etc/passwd, changing the encrypted password to an asterisk:
ftp1:*:197:995:FTP user:/disk2/ftp:/dev/null
Create or edit the /etc/ftpusers file so it contains this line:
ftp1 restrict
This causes the FTP daemon to chroot this user to its home directory; see ftpd(1M) .
Create the FTP user's home directory inside ftp/pub:
# mkdir /disk2/ftp/pub/ftp1
For the FTP user's home directory, set ownership and group other, and give the user read, write, and access permissions:
# chown ftp1.other /disk2/ftp/pub/ftp1
# chmod 700 /disk2/ftp/pub/ftp1
Caution: With write permission, FTP users can fill up the containing disk partition, just as was true with the ~ftp/incoming directory. Create the file ~ftp/README telling FTP users where to find their home directory:
Your home directory is under pub/.
As a security precaution, add the following entry to the file /etc/aliases to cause mail sent to the FTP user to go to the postmaster instead:
ftp1: postmaster
Run the command newaliases to make this take effect; see newaliases(1M) .
If you are running IRIX 6.3, 6.4, or 6.5, you will need to copy the runtime loader into the /lib32 directory, as well as /usr/lib/iconv/iconvtab into the /usr/iconv directory.
Create a directory for ~ftp/lib32:
# mkdir ~ftp/lib32
Copy the runtime loader into the directory:
# cp /lib32/rld ~ftp/lib32
Create a directory for ~ftp/usr/iconv:
# mkdir ~ftp/usr/iconv
Copy the font files into the directory:
# cp /usr/lib/iconv/iconvtab ~ftp/usr/lib/iconv
The files and directories that make up the InfoSearch system of online documentation take up a great deal of space. In your network, there is no reason for each system to maintain a separate copy of the InfoSearch documents as long as all systems are at substantially the same software revision level. If the InfoSearch software revision level is the same across several systems, you can designate one system to serve the others with the InfoSearch files, thus freeing up disk space on the client systems.
Be sure to choose a server system that is not called upon to carry a heavy workload, and take your network performance into account before you begin. If your users use InfoSearch a great deal and your network is already burdened, you may find that your users will not appreciate the decreased response time from both InfoSearch and your network in general. Also, if a person is to use the InfoSearch server as his or her workstation, that person must be prepared to accept a certain (possibly substantial) amount of disk, CPU, and network overhead as a result.
There are two convenient ways to set up an InfoSearch server. These will be detailed in the next two subsections. Both methods require that you have the NFS software option installed. If you do not understand the terms and concepts behind NFS, you should read the ONC3/NFS Administrator's Guide and the NIS Administration Guide before undertaking these projects. The second method described here also requires a dedicated CD-ROM drive to hold the InfoSearch distribution media.
To install the InfoSearch Viewer and Document Library on a remote server and retrieve the information from a local client system, follow the steps below.
On the server system:
Log in as root (superuser).
Bring up inst and install the complete InfoSearch product image (from your CD-ROM drive or distribution directory) with these commands:
Inst> install InfoSearch InfoSearch_gloss *.books.*
Inst> go
The total size of the viewer and document library is a little less than 23 megabytes.
Export the /usr/share/InfoSearch/library/SGI_bookshelves directory using the System Manager or the exportfs command:
exportfs -i /usr/share/InfoSearch/library/SGI_bookshelves
If the server does not have a graphical display, a warning is generated during the exit. This warning relates to updating the X server's font directory and can be ignored.
On the client system:
Log in as root (superuser).
Enter the command
versions remove *.books.*
to remove the books on your bookshelves.
Run the inst command on your client system and enter the following commands to install the InfoSearch.sw.client subsystem (you may want to install the InfoSearch.man.man and the InfoSearch.man.relnotes subsystems as well):
Inst> keep InfoSearch InfoSearch_gloss
Inst> install InfoSearch.sw.client
Inst> go
Mount the SGI_bookshelves directory from your server on your client system. In the example below, the name of the server machine is capra.
mkdir /usr/share/InfoSearch/library/SGI_bookshelves
mount capra:/usr/share/InfoSearch/library/SGI_bookshelves /usr/share/InfoSearch/library/SGI_bookshelves
Note that when you enter the mount command on your client system, the entire command line goes on a single line. The command is broken across two lines in this example due to formatting limitations.
Note: If you have remote-mounted your InfoSearch books, the SGI desktophelp system will not operate correctly while the books are mounted. To view the desktophelp, unmount the books temporarily.
With this method, you need not use up your disk space for the InfoSearch files if you have a CD-ROM drive you can dedicate to InfoSearch. You simply leave the CD with the InfoSearch distribution in the drive and link the mounted distribution to the directory where InfoSearch would have installed the files. The drawback of this system is that you must dedicate a CD-ROM drive to the purpose, but this method can be used with NFS to provide server access to your entire network.
| Note: If you have a version of the InfoSearch Document Library installed on your client disk but you want to mount the books from the CD-ROM, you must remove all the files in /usr/share/InfoSearch/library before creating the symbolic link described in step 2. Use the versions remove command to cleanly remove the books, then check the directory to be sure all files have been removed. |
If you wish to use the InfoSearch Viewer and Document Library from the CD-ROM and access the information from a local or remote system, follow the steps below.
On the server system with the CD-ROM drive:
Log in as root (superuser).
Insert the InfoSearch CD into the CD-ROM drive. If the drive is not mounted, use the System Manager or the mount command to mount the drive. The most common mount point is /CDROM. If the drive is mounted correctly, you should be able to change directories to /CDROM and see all the files in the InfoSearch CD. To see the files, use the command
cd /CDROM/InfoSearch
As root, create a symbolic link from /usr/InfoSearch/library/SGI_bookshelves to the CD InfoSearch directory. You may need to create the directory /usr/InfoSearch/library if it doesn't exist. Use these commands:
mkdir -p /usr/share/InfoSearch/library
ln -s /CDROM/InfoSearch/SGI_bookshelves /usr/share/InfoSearch/library
Note that when you enter the link command on your client system, the entire command line goes on a single line. The command is broken across two lines in this example due to formatting limitations.
At this point, the InfoSearch bookshelves are mounted on your server and available for use on that system. To allow users on other systems on your network to use the bookshelves, proceed to step 4.
If you want to share the bookshelves with other users on your network, export the /CDROM directory using the System Manager or the exportfs command:
exportfs -i /CDROM
On each client system, perform the following steps:
Log in as root (superuser).
Run the inst command and give the following commands to install the InfoSearch.sw.client subsystem (you may want to install the InfoSearch.man.man and the InfoSearch.man.relnotes subsystems as well). You can get the installation software from the CD in the /CDROM/dist directory on the server.
Inst> keep *
Inst> install InfoSearch.sw.client
Inst> go
Mount the bookshelves from the server. In the example below, the name of the server machine is capra. Use the following command:
mount capra:/CDROM/InfoSearch/SGI_bookshelves /usr/share/InfoSearch/library/SGI_bookshelves
Note: When you enter the mount command on your client system, type the entire command on a single line. The command in the previous example is broken across two lines due to formatting limitations.
After the software has been installed, you should force your shell to remake its list of available programs and commands with the command rehash.
You can now invoke the InfoSearch Viewer. The command to invoke the viewer is iiv (an acronym for InfoSearch Viewer) iiv.
Beginning with IRIX 6.5, you can configure access to the Internet using the Internet Gateway software, which allows access to network services using a graphical user interface. Online help provides guidance; this section outlines the processes.
The interface allows you to administer FTP, DHCP, various naming services, and routing from the Network Services entry screen, as well as connecting to the Internet through an Internet Service Provider.
To access the Internet Gateway server, bring up a Web browser, and fill out a series of forms that complete the configuration process.
Ensure the server is running, then use the chkconfig command to turn the Internet Gateway on:
# chkconfig webface on
Start the Internet Gateway web server:
# /etc/init.d/webface start
The Web browser can be run from any computer or workstation that is on the same LAN as the Internet Gateway server.
Open the following uniform resource locator (URL):
http://server_ip_address:2077/
In this URL, server_ip_address is the IP address you assigned to the Internet Gateway server. For example:
http://151.166.96.36:2077/
You will be prompted to enter an administrative account user ID and create a password for the administrative account. You will also be required to enter the root password.
You can now follow the online instructions to continue setting up your server to act as an Internet gateway.
Beginning with IRIX 6.5, the Resource Reservation Protocol (RSVP) allows applications to set up pathways through computer networks by reserving bandwidth. This is particularly useful for applications such as video conferencing, video broadcasting, and Internet telephony, that may wish to guarantee a specific bandwidth, regardless of the current network load.
Of the two types of integrated services defined for RSVP, controlled load and guaranteed, only the controlled load service is supported. This service ensures that packets are delivered with minimal loss and delay. Each host and router along the pathway has the option of committing to provide the service or not, depending on current commitments and other factors.
An application communicates with the IRIX system daemon rsvpd, using the API defined by X/Open. The daemon rsvpd then sends and receives RSVP control messages on behalf of the application. rsvpd sends PATH messages advertising the availability of one or more of the integrated services, and those systems receiving a PATH message may send back a RESV message to reserve bandwidth. A packet handler in the IRIX kernel identifies packets belonging to an RSVP session, and gives them the quality of service defined by the controlled load specification. The packet handler does this while maintaining high line utilization and low CPU overhead.
Before attempting to use RSVP, make sure a supported network interface together with the appropriate driver are installed on the system. To determine which network interfaces are present on the system, use the hinv command:
% hinv |
The output should reveal the output as listed in Table 3-2.
Table 3-2. Supported Cards for RSVP
Type of Network Interface |
| Output from hinv |
|---|---|---|
FDDI | xpi | xpin |
FDDI | ipg | ipgn |
FDDI | rns | rnsn |
Ethernet | me | ecn |
Ethernet | ec2 | ecn |
Ethernet | ef | efn |
Ethernet | ecf | ecfn |
Ethernet | ee | etn |
Ethernet | ep | epn |
With the supported hardware installed, verify that the appropriate level of the IRIX operating system is installed. You can check currently installed software using the desktop Software Manager, or from the command line, using showprods. If you need to install the software, refer to IRIX Admin: Software Installation and Licensing for instructions.
When your system is configured to handle RSVP, the next step is to start the RSVP daemon, /usr/etc/rsvpd. To have rsvpd start automatically during system boot, use the chkconfig command:
# chkconfig rsvpd on |
This should then activate your system to use the RSVP facility next time you boot. The rsvpd(1M) reference page provides details of available command line options.
The state of network bandwidth reservation may be monitored using the command rstat. The output of the command identifies each interface, line by line, the session address and port, and the next hop address. If no reservations exist for the session, no resv is displayed. See the rstat(1M) reference page for details and options.
RSVP can be configured on a particular interface using the command psifconfig. You can set the reservable bandwidth on the interface, see how much bandwidth is currently reserved, or completely disable or restore RSVP on that interface. See the psifconfig(1M) reference page for details of options.
If you prefer, you can configure rsvpd and monitor current RSVP status in graphical form using the Internet Gateway, see “Accessing Network Services through Internet Gateway”. The following options may be handled in this way:
RSVP configured on or off with chkconfig.
Determine which sessions are being advertised and reserved with rstat.
Configure RSVP on a particular interface with psifconfig.
Logging level may be set to control the logging of data for debugging.
You can, however, use RSVP from the command line, without the Internet Gateway.
Because RSVP is an extremely new technology, some troubleshooting should be expected. The following represent the first effort at determining what may occur.
If you experience a marked slowdown in network file transfer, RSVP may be interfering with normal transmission. Your first action should be to turn off RSVP, using the kill command:
# killall -TERM rsvpd |
Once you have benchmarked file transfer, restart RSVP.
Smooth, seamless delivery of video picture should be the norm using RSVP, and a RSVP-capable video application. If picture delivery becomes jerky or interrupted, run rstat to see what reservations are in place on that machine. See the rstat(1M) reference page for explanation of output.
This section addresses some of the common Ethernet-related problems:
See also “Troubleshooting System Configuration Using System Error Messages” in IRIX Admin: System Configuration and Operation .
Unplugged or loose cables are the most common problem that causes Ethernet-related error messages. For example:
unix: <ethernet_device>: no carrier: check Ethernet cable |
This message means that the carrier was not detected when attempting to transmit. One recommendation is to check to see if the Ethernet cable is unplugged from the back of the machine. For detailed instructions on connecting the cable, see your owner's guide. You do not need to shut down the system to connect or disconnect the cable. If you re-connected the cable, test the network connection.
After determining that the transceiver cable is plugged into the back of the machine and also into the transceiver box, look for other possible reasons for failure.:
Check the machine's transceiver.
Check the transceiver cable, and try swapping it out with one that is working on another machine.
Check for a problem with a 10baseT hub.
Try a different port on the hub.
Try a different cable.
Try a different hub.
If you try all the troubleshooting techniques and you still cannot access the network, contact your service provider; the network itself may be temporarily out of order.
For more information on this error, see the reference page for ethernet(7) .
Often the controller tried to transmit a packet but received a late collision signal from another machine. This usually indicates a problem in the Ethernet cable layout. The most frequent causes of this problem are excessively long cables and loose cable connections.
To isolate the problem, first look for violations of the Ethernet cable limits. For 10BASE5 cable (thicknet) the maximum segment length is 500 m; for 10BASE2 cable (thinnet) the maximum segment length is 200 m. The length of a transceiver cable (the cable that goes between a machine's Ethernet port and its transceiver) should not exceed 50 meters. If all cables are within the specified limits and all connectors are firmly seated, this error could indicate a hardware problem in an Ethernet controller or transceiver. Some recommendations are:
Check other machines on the network for bad Ethernet controllers.
Check other machines on the network for bad transceivers. If you suspect a bad transceiver, you can try swapping in a different one that works on another system.
Check to see if removing a certain machine from the network makes the problem change or disappear.
A bad Ethernet controller somewhere on the network can cause problems by sending packets that are too large or too small, causing errors like this:
unix: <ethernet_device>: packet too small (length = <packet size>) |
unix: <ethernet_device>: packet too large (length = <packet size>) |
The Ethernet controller received a packet that was smaller than the minimum packet size or larger than the maximum packet size allowed by Ethernet. This problem is caused by another machine with a bad Ethernet controller or transceiver. Some recommendations are
Check other machines on the network for bad Ethernet controllers.
Check other machines on the network for bad transceivers. I f you suspect a bad transceiver, you can try swapping in a different one that works on another system.
Check to see if removing a certain machine from the network makes the problem change or disappear.
For more information on this error, see the reference page for ethernet(7) .
When your system cannot contact a network system, an error message similar to this is displayed:
portmapper not responding: giving up |
This problem occurs in one of these situations:
The system is not running.
Physically go to the system or call the system's Primary User or Administrator to check to see if the system is powered on and running.
The network is not running.
To check, try to access another system on the network.
The network administrator changed some information about the system or about the system's logical location on the network.
Check whether this is the case, and get the appropriate information to fix the problem.
The system has too many users or systems using its resources. It cannot provide services to you at this time.
Contact the system's Primary User or Administrator to check on this.
The two most common errors messages are:
Host unreachable - usually indicates a configuration error. It is caused by arp broadcasting the local network to convert an IP address to Ethernet address.
Network unreachable - usually indicates no default or network route exists in the routing table.
If your system has more than one network interface (additional interfaces are usually fiber-optic [FDDI] links or SLIP connections or other Ethernet boards) you can easily perform the above checks on each network interface.
To check your other network interfaces, enter the netstat -in command. You see output similar to the following:
Name Mtu Network Address Ipkts Ierrs Opkts Oerrs Coll ec0 1500 128.70.0 128.70.0.9 15 0 15 0 24 ec1 1500 128.70.2 128.70.2.5 15 0 15 0 24 sl0 1006 (pt-to-pt) 128.70.0.9 0 0 0 0 0 lo0 8304 loopback localhost 8101 0 8101 0 0 |
The second Ethernet connection is to the network 128.70.2, a different LAN from the first Ethernet connection. The address of the local station on the second LAN is 128.70.2.5. To check that connection, use the ping command to test the connection to another station on that network.
There is also a SLIP link running in this example. The SLIP link extends the same LAN as ec0 to another system in a different location. To test this link, find the hostname or IP address of the station at the other end of the SLIP link and use the ping command to test connectivity.
The lo0 interface is the loopback network interface on the local host.
To determine which piece of hardware controls which interface, enter the command
ls -lS /hw/net/XXN |
where N is the network interface number of type XX. For example:
% ls -lS /hw/net/ef0 crw------- 1 root sys 0 Jun 6 14:14 /hw/net/ef0 -> /hw/module/4/slot/io1/baseio/pci/2/ef |