This chapter describes how to set up the ESP environment on your system. The ESP environment includes the following components:
Customer profile
Network permissions
User permissions
Global configuration
Paging parameters
Database archives
System Group Manager (SGM) parameters
You must set up the environmental components when you first configure ESP on a system. After that, modify specific parameters only when the corresponding environmental component changes (for example, if you change paging service providers, you must modify the paging parameters).
Customer profiles provide contact information for a system/site. If the service contract for your site includes automatic call logging, ESP sends the name, telephone number, and e-mail address of the contact person to the call logging tool at SGI.
Perform the following procedure to use the Web-based interface to set up the customer profile for a system:
Click on the Set Environment button.
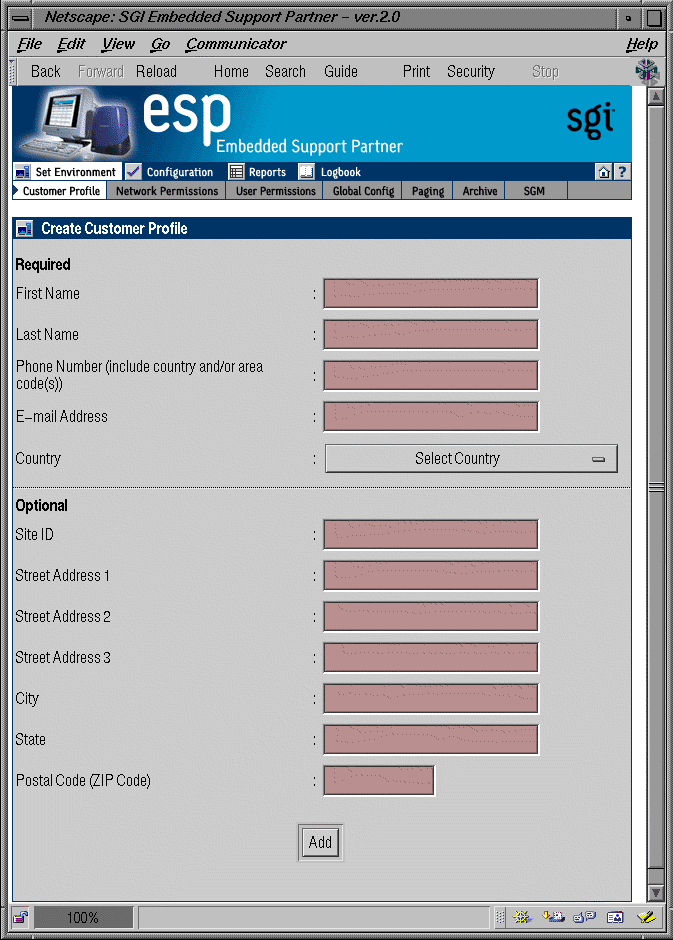
By default, the interface displays the Create Customer Profile window. (Refer to Figure 3-1.)
Update the customer profile parameters. (Table 3-1 describes the parameters.)
Table 3-1. Customer Profile Parameters
Parameter
Description
Required Parameters [a]
First Name
First name of the site contact person
Last Name
Last name of the site contact person
Phone Number
Phone number of the site contact person (include only numbers and dashes; for example: 1-715-123-4567)
E-mail Address
E-mail address of the site contact person (ESP sends a copy of any automated e-mail messages to this address)
Country
Country where the site is located
Optional Parameters [b]
Site ID
Identification number for the site
Street Address 1
Street Address 2
Street Address 3Street address for the site
City
City where the site is located
State
State where the site is located
Postal Code (Zip Code)
Postal code or zip code of the site location
[a] Information in the required fields is necessary to enable automatic call logging. If this information is not pro vided, automatic call logging is disabled.
[b] Although these fields are optional, it is recommended that you provide this information
Click on the Add button.
You can use the espconfig command to view, set up, or modify the customer profile from the command line interface:
Use the following command syntax to view the current customer profile:
/usr/sbin/espconfig -show customer_profile
Use the following command syntax to set up the initial customer profile:
/usr/sbin/espconfig -create customer_profile
                    -fname   <first name>
                    -lname   <last name>
                    -phone   <phone>
                    -email   <email>
                    [-street1 <street address line1>]
                    [-street2 <street address line2>]
                    [-street3 <street address line3>]
                    [-city    <city>]
                    [-state   <state/province>]
                    [-zip    <postal code>]
                    -country <country>
                    [-site_id <site id>]
Use the following command syntax to update an existing customer profile:
/usr/sbin/espconfig -update customer_profile
                    [-fname   <first name>]
                    [-lname   <last name>]
                    [-phone   <phone>]
                    [-email   <email>]
                    [-street1 <street address line1>]
                    [-street2 <street address line2>]
                    [-street3 <street address line3>]
                    [-city    <city>]
                    [-state   <state/province>]
                    [-post    <postal code>]
                    [-country <country>]
                    [-site_id <site id>]
Network permissions enable you to specify which systems can access the Web server that ESP uses. These permissions provide a layer of security to prevent unauthorized systems from accessing ESP data from your systems.
If you want to restrict access to ESP, you must set up a “restrict access” list and an “allow access” list. (If you do not set up a “restrict access” list, all IP addresses can connect to ESP regardless of the “allow access” list settings because the default configuration allows connections from all IP addresses if no “restrict access” list exists.)
The most secure configuration is to set the “restrict access” list to all hosts (*.*.*.*) and set the “allow access” list to the hosts that you want to have access to ESP. (For example, set the “allow access” list to 197.*.*.* and the “restrict access” list to *.*.*.* if you want only the systems that have IP addresses that begin with 197 to have access to ESP.)
| Caution: All changes that you make to the “restrict access” and “allow access” lists immediately take effect. Ensure that you do not set up access lists that prevent your administration system from connecting to ESP. |
By default, the “restrict access” list is set to *.*.*.* to restrict all hosts. You must enable access by the local host (127.0.0.0 and 127.0.0.1) before you can access the ESP Web server. To do this, enter the espconfig -enable ipaddr 127.0.0.0 and espconfig -enable ipaddr 127.0.0.1 commands before you attempt to access ESP on a system for the first time.
Perform the following procedure to use the Web-based interface to set up network permissions:
Click on the Set Environment button.
Click on the Network Permissions button.
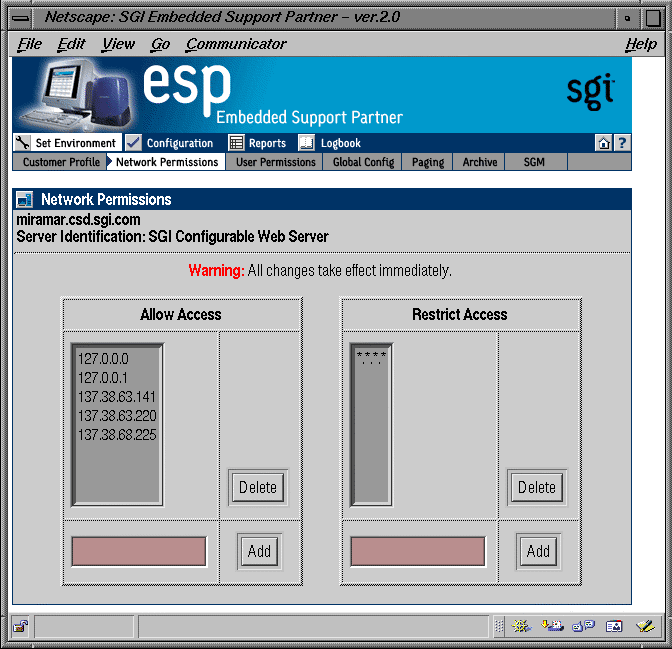
The interface displays the Network Permissions window. (Refer to Figure 3-2.)
To modify the Allow Access list:
To add an address, enter the IP address or IP address mask (using * as a wild card for one or more values in the address) in the box, and click on the Add button.
To delete an address, click on the address in the Allow Access list, and click on the Delete button.
To modify the Restrict Access list:
To add an address, enter the IP address or IP address mask (using * as a wild card for one or more values in the address) in the box, and click on the Add button.
To delete an address, click on the address in the Restrict Access list, and click on the Delete button.
You can use the espconfig command to set up the network permissions from the command line interface:
| Tip: Use an asterisk as a wild card character in any of the IP addresses that you enter for the <ip address> parameter (for example, 123.23.2.*, 123.255.*.*, and *.*.*.*). |
Use the following command syntax to enable IP addresses to access the ESP Web server:
/usr/sbin/espconfig -enable ipaddr <ip address> ... <ip address>
You must specify at least one IP address. If you specify an IP address that is already enabled, it remains enabled. If you specify an IP address that is disabled, ESP moves it from the “restrict access” list to the “allow access” list to enable it for Web server access. If you specify a new IP address, ESP adds it to the “allow access” list to enable it for access to the Web server.
Use the following command syntax to restrict IP addresses from accessing the ESP Web server:
/usr/sbin/espconfig -disable ipaddr <ip address> ...<ip address>
You must specify at least one IP address. If you specify an IP address that is disabled, it remains disabled. If you specify an address that was enabled for Web server access, ESP moves it from the “allow access” list to the “restrict access” list to prevent it from accessing the Web server. If you specify a new IP address, ESP adds it to the “restrict access” list to prevent it from accessing the Web server.
Use the following command syntax to delete IP addresses from the access lists on the system:
/usr/sbin/espconfig -delete ipaddr <ip address> ...<ip address>
You must specify at least one IP address.
Use the following command syntax to list the IP addresses that are contained in the access lists on the system and the current state of the IP addresses:
/usr/sbin/espconfig -list ipaddr <ip address>...<ip address> [-enabled | -disabled]
If you do not specify an IP address, this command lists all IP addresses in the access lists on the system. If you specify the -enabled option, this command lists only the IP addresses that are in the “allow access” list. If you specify the -disabled option, this command lists only the IP addresses that are included in the “restrict access” list.
User permissions provide an additional security layer by enabling you to create individual user accounts within ESP. Each user account can have access to different areas of ESP (for example, one account could have access only to availability reports and a second account could have access to all reports).
ESP contains one user account by default (login: administrator; password: partner). The administrator account has full access to all ESP features.
| Note: This is no direct correlation between ESP user accounts and “normal” user accounts on a system. |
You can view a list of all ESP user accounts that are currently available.
Click on the Set Environment button.
Click on the User Permissions button.
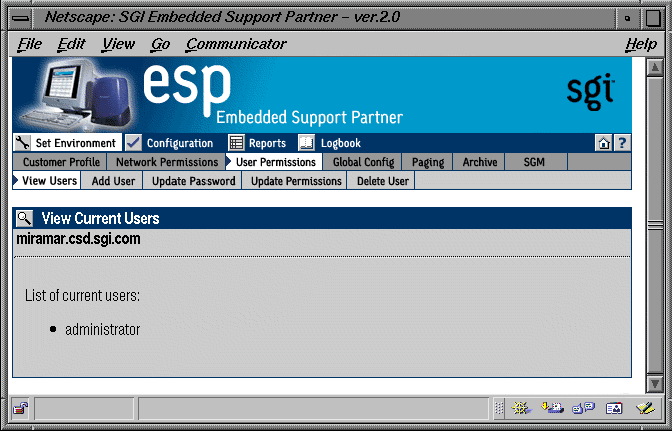
The interface shows the list of current users. (Refer to Figure 3-3.)
Use the following syntax of the espconfig command to view a list of current users:
/usr/sbin/espconfig -list user [-name <username>] |
If you include the -name option, this command displays information about a specific user. If you do not include the -name option, this command lists all users.
Any user with the “Set Environment” permission can add new users and configure access permissions for them.
Perform the following procedure to use the Web-based interface to add a user:
Click on the Set Environment button.
Click on the User Permissions button.
Click on the Add User button.
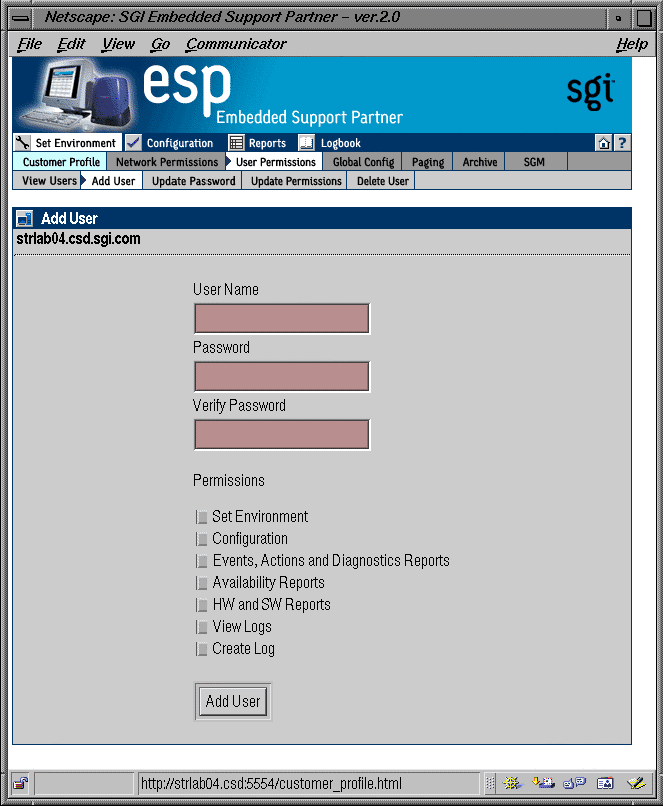
The interface displays the Add User window. (Refer to Figure 3-4.)
Enter the login name for the user in the User Name field.
User names have the following restrictions:
User names are case sensitive; for example, User is different than USer.
User names cannot be more than 126 characters.
User names cannot include the following characters: ? & * “ < > %
Enter the password for the user in the Password field.
Passwords have the following restrictions:
Passwords are case sensitive; for example, Password is different than PAssword.
Passwords cannot be more than 126 characters.
Passwords cannot include the following characters: ? & * “ < > % <SPACE> <Tab>
Re-enter the password for the user in the Verify Password field. (You must enter the password twice to ensure that it is entered correctly.)
Set the permissions for the user. (Table 3-2 describes the permissions.)
Table 3-2. Available User Permissions
Permission
Description
Set Environment
Enables the user to perform all activities in the Set Environment section of the interface (set up customer profile, network permissions, user permissions, global configuration, paging parameters, archive settings, and SGM settings)
Configuration
Enables the user to perform all activities in the Configuration section of the interface (configure events, actions, performance monitoring, and system monitoring)
Events, Actions and Diagnostics Reports
Enables the user to view all event reports, action reports, and diagnostic reports
Availability Reports
Enables the user to view availability reports
HW and SW Reports
Enables the user to view hardware inventory reports, software inventory reports, and system reports
View Logs
Enables the user to view logbook entries
Create Log
Enables the user to create logbook entries
Click on the Add User button.
Use the following syntax of the espconfig command to add a new user:
/usr/sbin/espconfig -add user -name <username> [-p <password>] |
User names have the following restrictions:
User names are case sensitive; for example, User is different than USer.
User names cannot be more than 126 characters.
User names cannot include the following characters: ? & * “ < > %
Passwords have the following restrictions:
Passwords are case sensitive; for example, Password is different than PAssword.
Passwords cannot be more than 126 characters.
Passwords cannot include the following characters: ? & * “ < > % <SPACE> <Tab>
Any user with the “Set Environment” permission can update user passwords. (You must know a user's current password to update their password. If a user forgets their password, delete their current user account and create a new account with the same user name.)
Perform the following procedure to use the Web-based interface to update a user password:
Click on the Set Environment button.
Click on the User Permissions button.
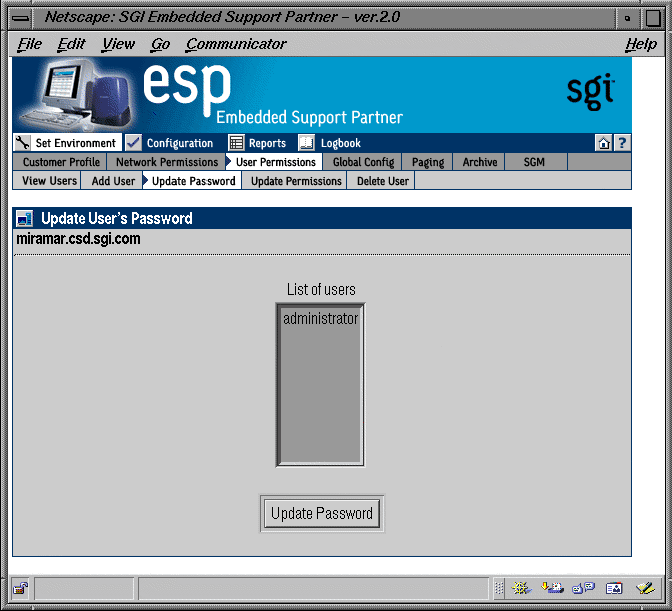
Click on the Update Password button.
The interface displays the Update Password for User window. (Refer to Figure 3-5.)
Select the user whose password you want to update.
Click on the Update Password button.
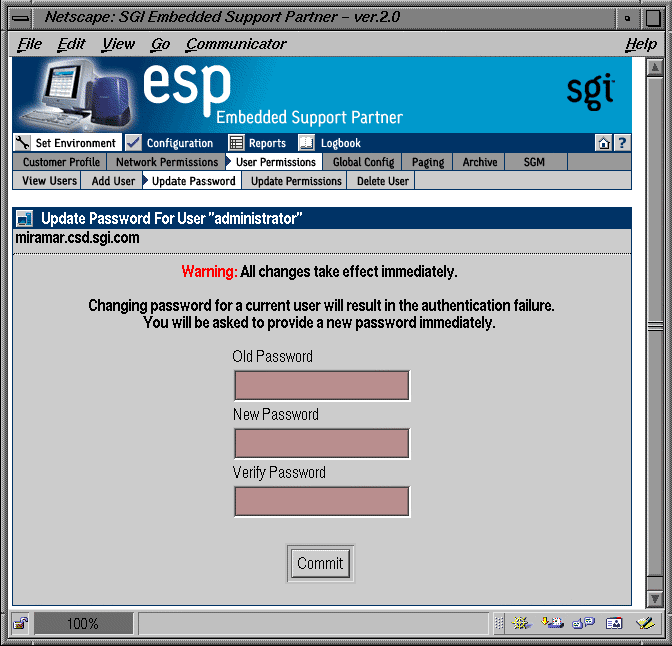
The interface displays the Add User window. (Refer to Figure 3-4.)
Enter the old password for the selected user in the Old Password field.
Enter the new password in the New Password field.
Passwords have the following restrictions:
Passwords are case sensitive; for example, Password is different than PAssword.
Passwords cannot be more than 126 characters.
Passwords cannot include the following characters: ? & * “ < > % <SPACE> <Tab>
Re-enter the new password in the Verify Password field. (You must enter the password twice to ensure that it is entered correctly.)
Click on the Commit button.
| Note: If you change the password for the account you are currently using, the interface displays an Authorization Failed message and prompts you for the new password. |
Use the following syntax of the espconfig command to update a password:
/usr/sbin/espconfig -update user -name <username> [-p <new_password>] |
Passwords have the following restrictions:
Passwords are case sensitive; for example, Password is different than PAssword.
Passwords cannot be more than 126 characters.
Passwords cannot include the following characters: ? & * “ < > % <SPACE> <Tab>
Any user with “Set Environment” permission can update permissions for other users. (Updating permissions enables you to add or remove specific permissions for a user.)
| Note: If a user attempts to access a feature for which he/she does not have permission, the interface displays an Authorization Failed message and ESP does not perform the requested operation. |
| Caution: Do not change the permissions for the administrator account. The administrator account is the main ESP account and should always have full permissions. |
Perform the following procedure to use the Web-based interface to update permissions for a user:
Click on the Set Environment button.
Click on the User Permissions button.
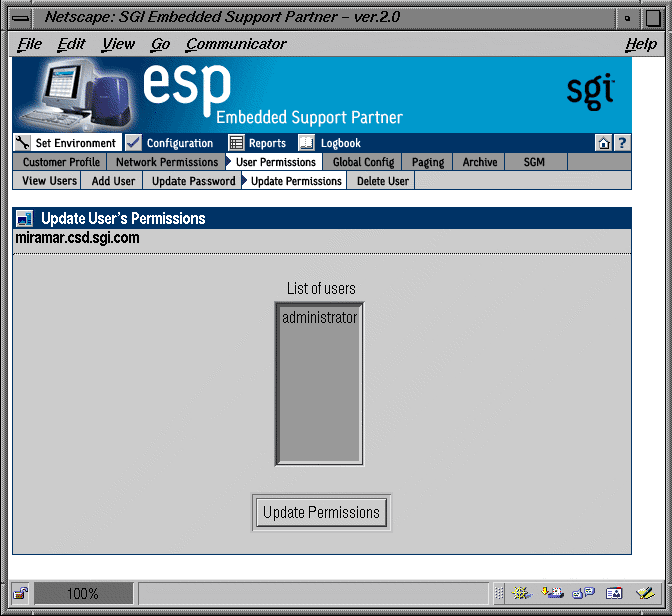
Click on the Update Permissions button.
The interface displays the Update User's Permissions window. (Refer to Figure 3-7.)
Select the user whose permissions you want to update.
Click on the Update Permissions button.
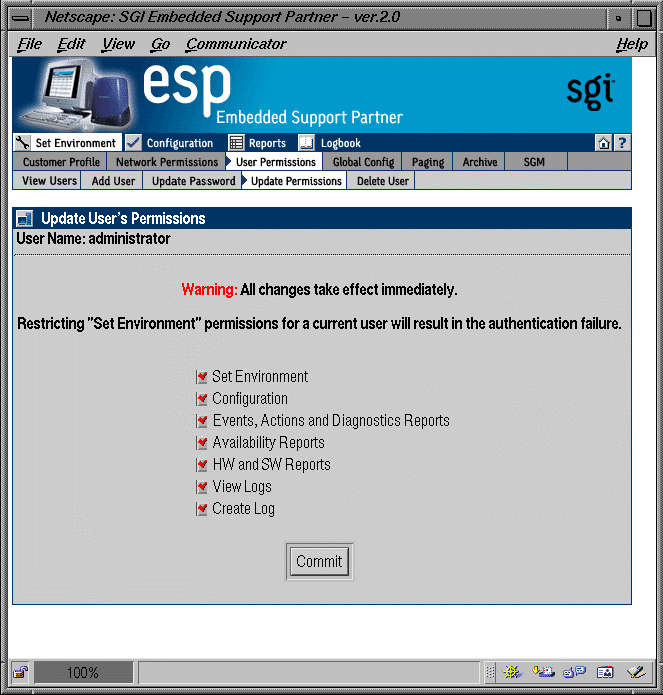
The interface updates the Update User's Permissions window. (Refer to Figure 3-8.)
Select the permissions that you want the user to have. (Refer again to Table 3-2 on page 57 for descriptions of the permissions.)

Note: Restricting the “Set Environment” permission for the current user causes the interface to display an Authorization Failed message because the account no longer has access to the Update Permissions command. Click on the Commit button.
You can use the espconfig command to list the available permissions on a system and to list, add, or delete user permissions:
Use the following command syntax to create the default user account and password:
/usr/sbin/espconfig -createadmin
Use the following command syntax to list the permissions that are available on a system:
/usr/sbin/espconfig -list permdesc [-perm <permission name>..<permission name>]
If you do not specify a specific permission name, this command displays all permissions that are available on the system.
Use the following command syntax to add a new type of permission to a system:
/usr/sbin/espconfig -add permdesc -perm <permission name> -desc <permission description>
Use the following command syntax to delete a specific type of permission from a system:
/usr/sbin/espconfig -delete permdesc -perm <permission name>
Use the following command syntax to list permissions for a user:
/usr/sbin/espconfig -list userperm [-name <user name>] [-perm <permission name>]
If you do not specify a user name, this command lists all users. If you do not specify a permission name, this command lists all permissions. If you do not specify a user name or permission name, this command lists all permissions for all users.
Use the following command syntax to add new permissions for a user:
/usr/sbin/espconfig -add userperm [-name <user name>] -perm <permission name>
Table 3-3 lists the settings for the <permission name> parameter.
Table 3-3. Command Line Interface User Permission Settings
Permission
Setting
Set environment
ESPpermission:set_environment
Configuration
ESPpermission:configuration
Event registered, actions taken, and diagnostic results reports
ESPpermission:events_actions_diag_reports
Availability reports
ESPpermission:availability_reports
Hardware and software configuration reports
ESPpermission:hw_sw_reports
View logs
ESPpermission:logbook_view
Create log
ESPpermission:logbook
If you do not specify a user name, this command adds the permission to all users.
Use the following command syntax to delete permissions from a user:
/usr/sbin/espconfig -delete userperm [-name <user name>] [-perm <permission name>]
If you do not specify a user name, this command deletes the specified permission from all users. If you do not specify a permission name, this command deletes all permissions from the specified user. If you do not specify a permission name or user name, this command deletes all permissions from all users.
Any user with the “Set Environment” permission can delete other ESP users. To ensure that security is not compromised, always delete users that no longer need access to ESP on a specific system.
| Caution: Do not delete the administrator user account. All systems should have the administrator account. |
Perform the following procedure to use the Web-based interface to delete a user:
Click on the Set Environment button.
Click on the User Permissions button.
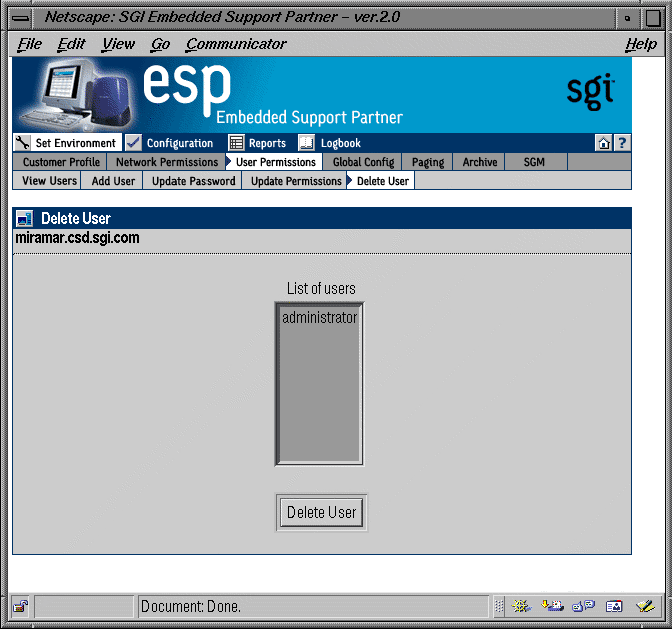
Click on the Delete User button.
The interface displays the Delete User window. (Refer to Figure 3-9.)
Select one or more user accounts to delete.
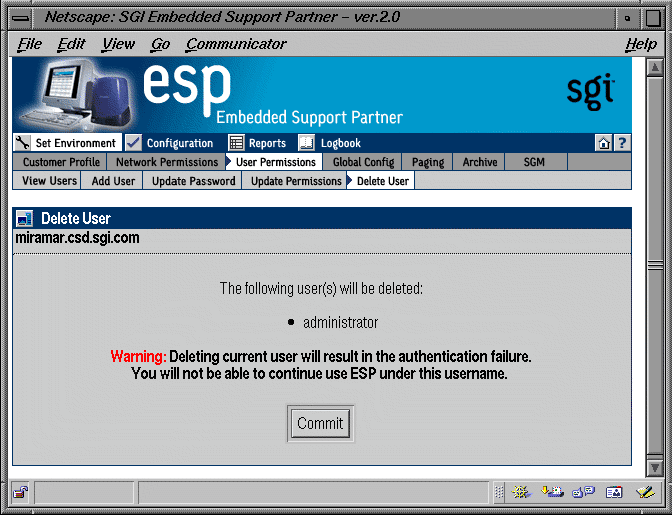
Click on the Delete User button.
The interface updates the Delete User window. (Refer to Figure 3-10.)
Click on the Commit button.
Use the following syntax of the espconfig command to delete a user:
espconfig -delete user -name <user name> [-p <user password>] |
If you do not provide the password for the user account that you want to delete, this command prompts you for the password (but does not display the password on the screen).
The global configuration parameters define global ESP behaviors and are divided into the following categories:
Global event handling parameters, which determine if ESP should register events, throttle events, and perform any actions
Global availability parameter, which determines if a reason must be supplied when the system is shutdown
Global registration parameters, which determine if event information is returned to SGI, the format of the message that contains the event information, and any additional recipients of the message
Perform the following procedure to use the Web-based interface to set up the global configuration parameters:
Click on the Set Environment button.
Click on the Global Config button.
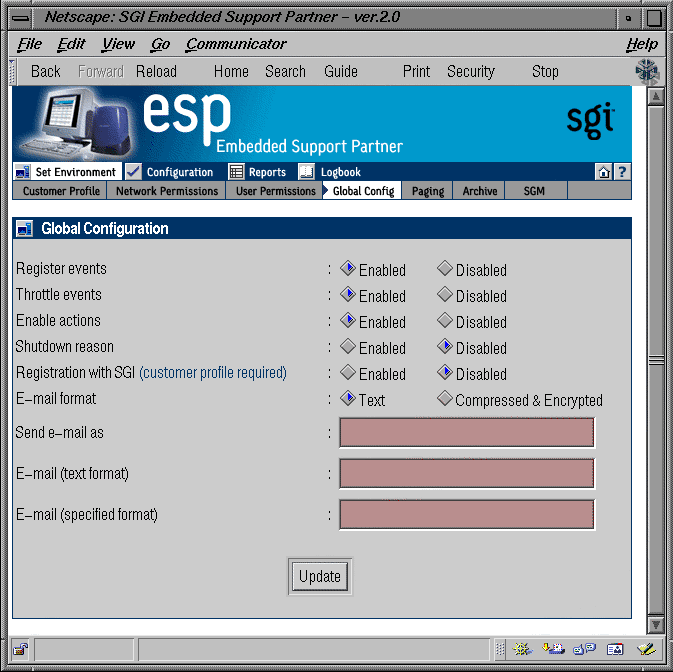
The interface displays the Global Configuration window. (Refer to Figure 3-11.)
Set the parameters. (Table 3-4 describes the global configuration parameters.)
Table 3-4. Global Configuration Parameters
Parameter
Description
Register events
Specifies whether or not ESP should register events in the ESP database
Set this parameter to Enabled if you want to register event information in the ESP database on your system
Set this parameter to Disabled if you do not want to register event information in the ESP database on your system (if you set this parameter to Disabled, it overrides the individual event settings)
Recommendation: Always set this parameter to Enabled to capture all event information in the ESP database on your system
Throttle events
Specifies whether or not ESP should throttle events
Set this parameter to Enabled to require that a specific number of events must occur before the event is registered in the ESP database on your system
Set this parameter to Disabled to register every event in the ESP database
Recommendation: Set this parameter to Enabled and configure the individual throttle values for each event
Enable actions
Specifies whether or not ESP should perform actions
Set this parameter to Enabled to specify that ESP should perform any assigned actions in response to all events that occur
Set this parameter to Disabled to specify that ESP should not perform actions for any events (if you set this parameter to Disabled, it overrides any action settings for individual events)
Recommendation: Set this parameter to Enabled and assign the desired actions for each event
Shutdown reason
Specifies whether or not users will be prompted to enter a reason when they shut down the system
Set this parameter to Enabled to prompt users for a reason whenever they shut down the system
Set this parameter to Disabled to allow users to shut down the system without providing a reason
Recommendation: Always set this parameter to Enabled to ensure that ESP generates accurate availability metrics
Registration with SGI
Specifies whether or not ESP should send data (system hardware and software information, event information, crash analysis reports, and system availability reports) to SGI at esp@sgi.com (under specific service contracts, SGI uses this data to open trouble tickets and respond to problems on your system before the problems affect system availability)
Set this parameter to Enabled to have ESP send e-mail messages to SGI
Set this parameter to Disabled to prevent ESP from sending e-mail messages to SGI
Recommendation: Always set this parameter to Enabled so SGI can provide proactive support for your system (providing this information helps the call center provide quick and accurate responses to problems on your system)
E-mail format
Specifies the format for e-mail that ESP sends. ESP can send e-mail in plain text format or compressed and encrypted (uuencoded) format.
If e-mail is sent in compressed and encrypted format, recipients should use the amreceiver program to decode the e-mail; refer to the amreceiver man page for more information.
Recommendation: Set this parameter to Compressed & Encrypted.
Send e-mail as
Specifies the name that appears in the "From" portion of the e-mail header. This option affects e-mail messages sent by espnotify, availmon, and espcall (when registration with SGI is enabled).
E-mail (text format)E-mail (specified format)
Specify e-mail addresses that should receive e-mail from ESP. ESP sends these addresses the same messages that it sends to esp@sgi.com. If the Registration with SGI parameter is disabled, ESP sends e-mail to these addresses only; it does not send e-mail to esp@sgi.com.
The E-mail (text format) parameter specifies e-mail addresses that should receive the e-mail in plain text format.
The E-mail (specified format) parameter specifies e-mail addresses that should receive e-mail in the format specified by the E-mail format parameter.
Each field can hold up to 255 characters; you should separate multiple e-mail addresses with spaces or commas.
Recommendation: Enter e-mail addresses of local personnel that are interested in this information (for example, system administrators)
Click on the Update button. The interface displays a confirmation window.
Click on the Commit button.
You can use the espconfig command to update the global configuration parameters:
Use the following command syntax to view the current setting of the event registration parameter:
/usr/sbin/espconfig -show event_registration
Use the following command syntax to enable event registration by ESP:
/usr/sbin/espconfig -enable event_registration
Use the following command syntax to disable event registration by ESP:
/usr/sbin/espconfig -disable event_registration
Use the following command syntax to view the current setting of the event throttling parameter:
/usr/sbin/espconfig -show event_throttling
Use the following command syntax to enable event throttling:
/usr/sbin/espconfig -enable event_throttling
Use the following command syntax to disable event throttling:
/usr/sbin/espconfig -disable event_throttling
Use the following command syntax to view the current setting of the actions parameter:
/usr/sbin/espconfig -show event_actions
Use the following command syntax to enable actions:
/usr/sbin/espconfig -enable event_actions
Use the following command syntax to disable actions:
/usr/sbin/espconfig -disable event_actions
Use the following command syntax to view the current setting of the shutdown description parameter:
/usr/sbin/espconfig -show shutdown_reason
Use the following command syntax to prompt users for a description when they shut down the system:
/usr/sbin/espconfig -enable shutdown_reason
Use the following command syntax to allow users to shut down the system without providing a reason:
/usr/sbin/espconfig -disable shutdown_reason
Use the following command syntax to view the current setting of the call logging parameter:
/usr/sbin/espconfig -show call_logging
Use the following command syntax to enable call logging (which sends event information to SGI to provide proactive support):
/usr/sbin/espconfig -enable call_logging  [-text|-comp_encoded]
                   [-email1 <email address>]
                   [-email2 <email address>]
Note: You must set up a customer profile for call logging to work. The -text option specifies that ESP should send the e-mail message in plain text format; the -comp_encoded option specifies that ESP should send the message in uuencoded format. The e-mail address lists can contain up to 255 characters of comma separated e-mail addresses.
Use the following command syntax to disable call logging:
/usr/sbin/espconfig -disable call_logging
Use the following command syntax to view the current setting of the e-mail parameter:
/usr/sbin/espconfig -show mail
Use the following command syntax to enable ESP to send e-mail messages and specify the e-mail account that sends the messages:
/usr/sbin/espconfig -enable mail -from <email address>
Use the following command syntax to disable ESP from sending e-mail messages:
/usr/sbin/espconfig -disable mail
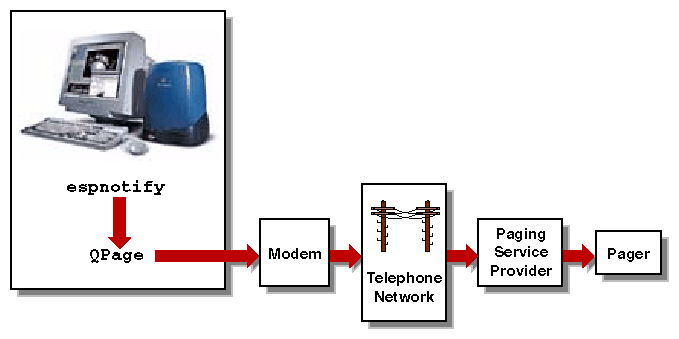
QuickPage (QPage) is a third-party client/server application that ESP uses to send messages to an alphanumeric pager. QPage uses a modem to send an IXO/TAP-protocol message to a telephone number that is connected to a paging service. QPage is integrated in the ESP software suite, and its services are accessed through the /usr/bin/espnotify application. (Refer to Figure 3-12.)
QPage is installed on your system by default and is chkconfig'ed off. Perform the following procedure to set it up and enable it:
Enter the following command to turn QPage on:
chkconfig quickpage on
Enter the following command to start the QPage server:
/etc/init.d/qpageserver start

Note: The QPage server automatically restarts whenever you reboot the system. Set up the following paging parameters:
Modem parameters that specify the modem that QPage should use to connect to the paging service provider.
Paging service provider parameters that provide information about the paging service provider and how to contact it.
Pager parameters that provide information about the pager to use.
The following sections describe how to set up these parameters.
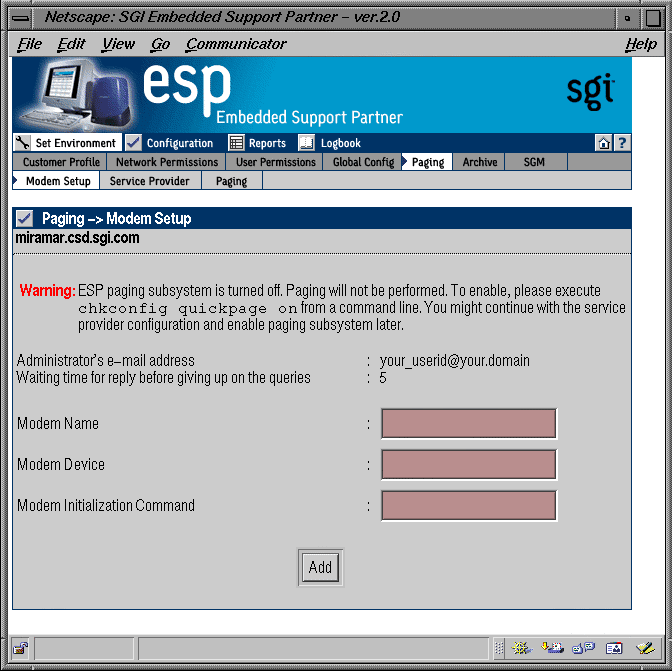
A modem must be connected to the system that is running ESP so that the software can send pages when events occur. You must specify the device to which the modem is connected and specify the modem initialization command. (ESP has been tested with the U. S. Robotics Sportster fax modem with X2.)
Perform the following procedure to use the Web-based interface to set up the modem parameters:
Click on the Set Environment button.
Click on the Paging button.
By default, the interface displays the Paging -> Modem Setup window. (Refer to Figure 3-13.)
Enter a modem name in the Modem Name field (do not include blank spaces).
Enter the device name to which the modem is connected in the Modem Device field. (Example: /dev/ttyd)
Enter the modem initialization command in the Modem Initialization Command field. (Example: ATZ)
Be aware of the following information when you configure the initialization command:
The initialization command is specific to the modem that you are using. Refer to your modem user manual for specific details about the initialization command.
The initialization command can vary, based on requirements from your paging service provider. For example, many paging services require you to turn off error correction on your modem. (This can be done on the U. S. Robotics Sportster fax modem with X2 with the &A0&K0&M0 initialization command.) Contact your paging service provider to determine any special requirements.
Click on the Add button.
The interface displays a confirmation window.
Click on the Commit button
Once you have a modem configured, you have the following options to modify the modem parameters when you click on the Modem Setup button:
To add a new modem, click on the Add button.
To update a modem, click on the check box next to the modem and then click on the Update button.
To delete a modem, click on the check box next to the modem and then click on the Delete button. (Deleting a modem deletes all paging service providers and pagers that are assigned to it.)
You need to provide ESP with information about the paging service that you use so it can properly contact your pager.
Click on the Set Environment button.
Click on the Paging button.
Click on the Service Provider button.
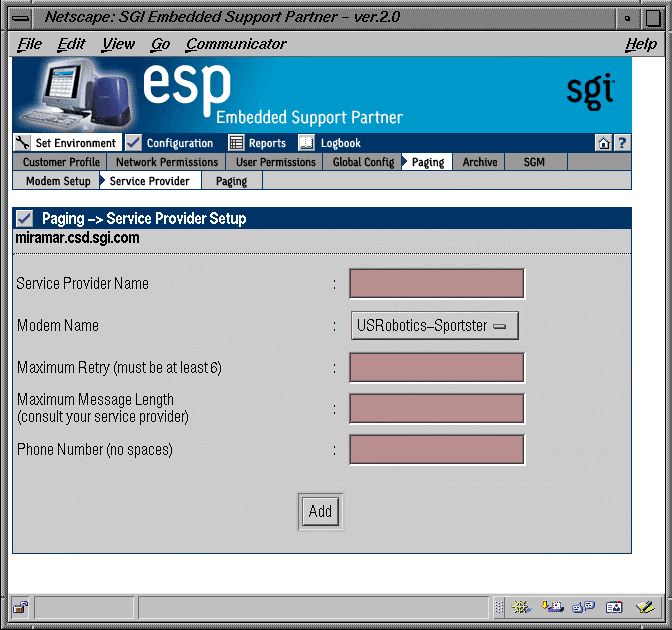
The interface displays the Paging -> Service Provider Setup window. (Refer to Figure 3-14.)
Update the parameters. (Table 3-5 describes the parameters.)
Table 3-5. Paging Service Provider Parameters
Parameter
Description
Service Provider Name
Specifies the name of the paging service
The interface displays this name on other pages to identify the paging service (Do not include blank spaces)
Modem Name
Specifies the modem to use
Select the modem from the menu
If the modem that you want to use is not in the menu, click on the Modem Setup button to add it
Maximum Retry (must be at least 6)
Specifies the number of times that ESP should attempt to contact this paging service
Maximum Message Length (consult your service provider)
Specifies the maximum number of characters that this service will accept
Contact your paging service provider for this information
Phone number (no spaces)
Specifies the phone number that ESP should dial to contact the paging service (Enter only numbers in this field; for example 17151234567)
Click on the Add button.
The interface displays a confirmation window.
Click on the Commit button
Once you have a paging service provider configured, you have the following options to modify the parameters when you click on the Service Provider button:
To add a new paging service provider, click on the Add button.
To update the paging service provider parameters, click on the check box next to the service provider name and then click on the Update button.
To delete the paging service provider, click on the check box next to the service provider name and then click on the Delete button. (Deleting a paging service provider deletes all pagers assigned to it.)
You also need to provide information about the pager that you want to use so ESP can properly contact it.
Click on the Set Environment button.
Click on the Paging button.
Click on the Paging button.
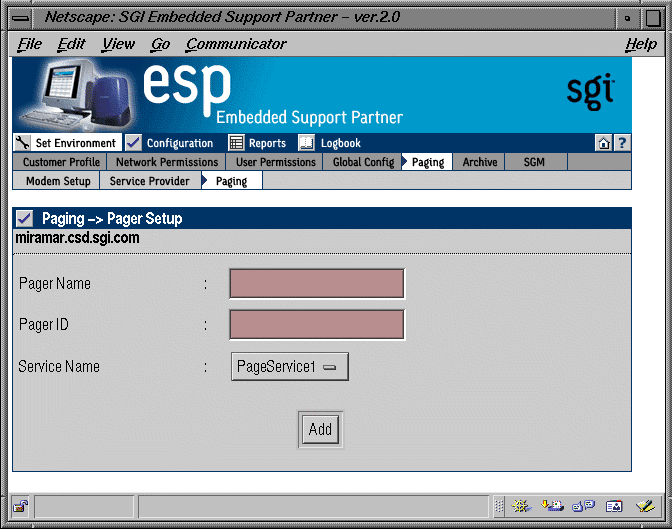
The interface displays the Paging -> Pager Setup window. (Refer to Figure 3-15.)
Enter a unique name for the pager in the Pager Name field. (Do not include blank spaces.) ESP uses this name on other interface pages to identify the pager.
Enter the pager identification number in the Pager ID field.
Your paging service provider assigns a unique pager identification number to each individual pager. This number could differ from the telephone number that you dial to access the pager. Contact your paging service provider to determine the pager identification number of your pager.
Choose the paging service provider that you want to use from the list of available paging service providers. (If you do not see the provider that you want to use, click on the Service Provider button to add it.)
Click on the Add button.
The interface displays a confirmation window.
Click on the Commit button
Once you have a pager configured, you have the following options to modify the parameters when you click on the Service Provider button:
To add a new pager, click on the Add button.
To update the pager parameters, click on the check box next to the pager name and then click on the Update button.
To delete the pager, click on the check box next to the pager name and then click on the Delete button.
ESP logs data in a database on the system as it registers events and performs actions. You can archive the current database to reduce the amount of disk space used on the system.
Use the esparchive command at a UNIX prompt to archive the current database that ESP is using on a system. The esparchive command shuts down ESP momentarily, compresses the current database to save space, opens a new database to receive data from ESP, and restarts ESP. (You must use the root account to execute the esparchive command; this command archives the current database only if it is 10 MB or larger.)
You can use the Web-based interface and command line interface to delete database archives that you no longer need.
| Warning: When you delete a database archive, the information in the database archive is permanently lost. You will not be able to view any system information that was stored in the database archive. |
Perform the following procedure to use the Web-based interface to delete a database archive:
Click on the Set Environment button.
Click on the Archive button.
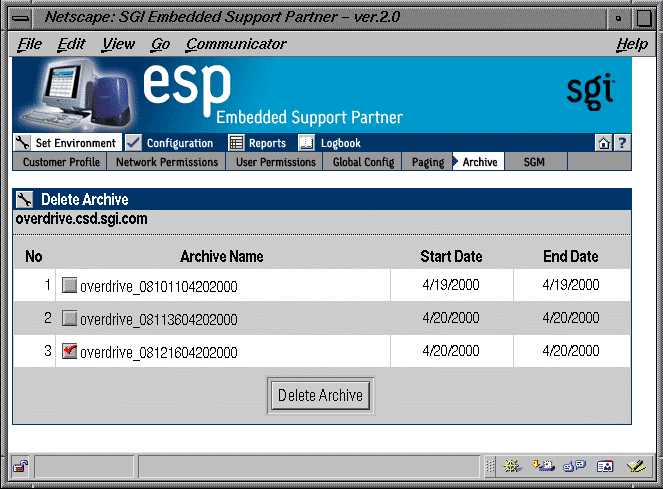
The interface displays the Delete Archive window. (Refer to Figure 3-16.)
Click on the check box next the name of the database archive that you want to delete.
Click on the Delete Archive button.
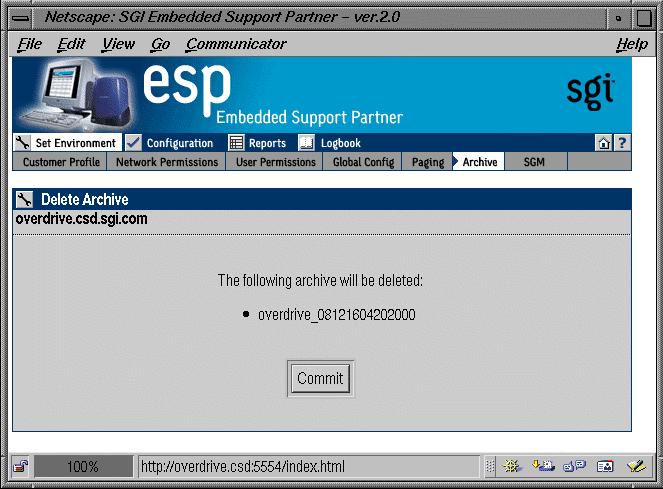
The interface displays a verification screen. (Refer to Figure 3-17.)
Click on the Commit button.
You can use the espconfig command to view information about the available database archives and to delete a specific database archive:
Use the following command syntax to view the available database archives:
/usr/sbin/espconfig -list archive [<archive name> ... <archive name>]
This command displays the name and date information for archives. If you specify one or more archive names, this command lists information about those archives. If you do not specify an archive name, this command displays information about all of the archives on the system.
Use the following command syntax to delete a database archive:
/usr/sbin/espconfig -drop archive <archive name>
The espconfig command also enables you to initialize the ESP database on your system.
| Warning: Initializing the ESP database on a system deletes all data for that system. If the system is a group manager, initializing the ESP database also deletes information about events on other systems in the group. |
Use the following command syntax to initialize the ESP database on your system to return it to the initial state:
/usr/sbin/espconfig -reconstructdb
Use the following command syntax to “clean” the ESP database tables on your system:
/usr/sbin/espconfig -flushdb [-sysid <system id>|-host <hostname>] [config | all]
Use the -sysid option to select a system by system ID. Use the -host option to select a system by hostname. If you do not specify the -sysid or -host option, this command “cleans” the database tables on the local system.
If you do not specify the config or all option, this command “cleans” the ESP data tables on the selected system. If you specify the config option, this command “cleans” only the configuration tables for the local system. If you specify the all option, this command “cleans” the configuration tables and the ESP data tables on the selected system.
The system group manager parameters enable you to configure one system (called a group manager or SGM server) to monitor events from other systems (called group members or SGM clients) at a site. To enable communication between these systems, you must configure the system group manager parameters on all of the systems in the group.
ESP on the SGM server uses RPC protocol to communicate with SGM clients. To provide increased security, ESP implements ReverseDNS lookup for SGM connections and uses HMAC-MD5 digital signatures for all data transfers to an SGM server.
On each group member system, you must register the SGM server system(s) to which the SGM client can send event information. You can register an SGM server on any system at a site.
Perform the following procedure to use the Web-based interface to register an SGM server:
Log on to ESP on the SGM client system that you want to configure. (You must have "Set Environment” permission on the system.)
Click on the Set Environment button.
Click on the SGM button.
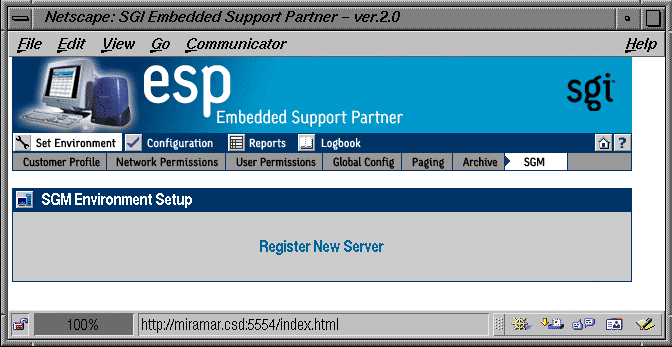
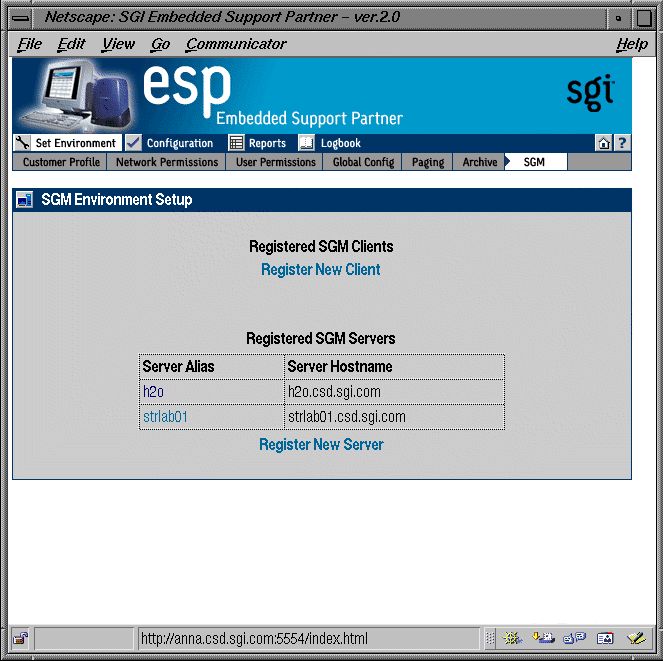
The interface displays the currently registered SGM servers and clients. (Refer to Figure 3-18. In this example, no servers or clients are registered.)

Note: If an SGM license is not installed on the system or if the SGM license for the system has expired, the interface displays only a list of registered SGM servers.
Click on the Register New Server link.
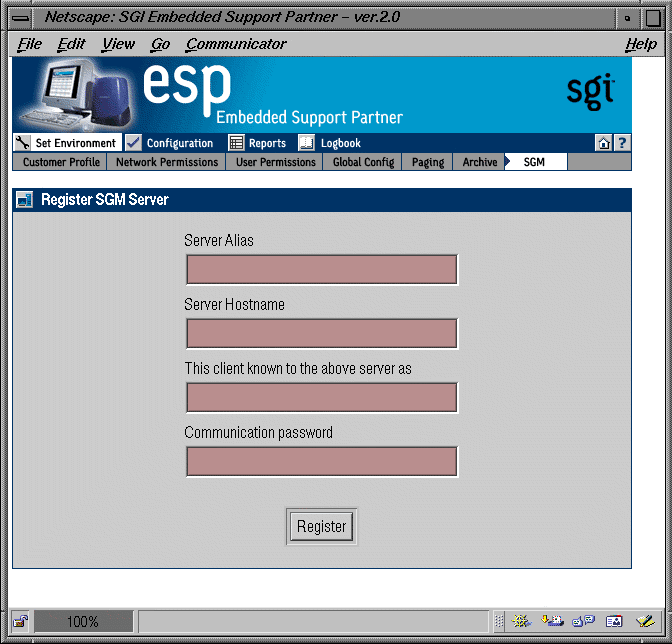
The interface displays the Register SGM Server window. (Refer to Figure 3-19.)
Enter the SGM server alias.
ESP uses the SGM server alias to identify the server to any clients. You use this alias to identify the SGM server on other interface pages. The alias does not have to be the actual system name. It must be 31 characters or less and may contain any characters, except spaces, single quotes, and double quotes.
Enter the SGM server hostname.
This parameter can be the actual hostname or an alias. This hostname must be recognized on the system that is running ESP. ESP resolves the specified name to a full hostname during the registration process.
Enter the SGM client alias.
ESP uses the SGM client alias to identify the SGM client. You use this alias to identify the SGM client on other interface pages. The alias does not have to be the actual system name. It must be 31 characters or less and may contain any characters, except spaces, single quotes, and double quotes.
Enter the communication password. (It must contain nine or more characters.)
ESP does not prompt you for this password again; however, you must enter the same password on the SGM server and the SGM clients. If you want to change a password, you must change it on the SGM server and related SGM clients.
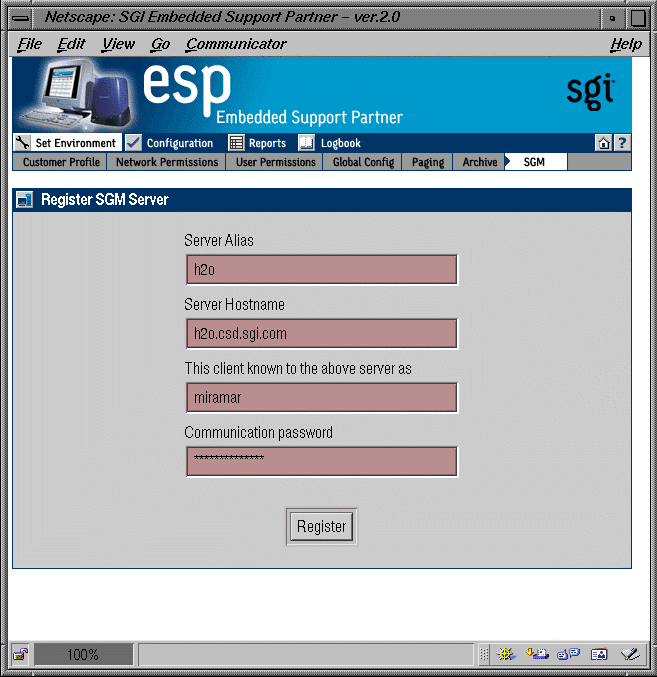
Figure 3-20 shows the Register SGM Server window with example parameters.
Click on the Register button.
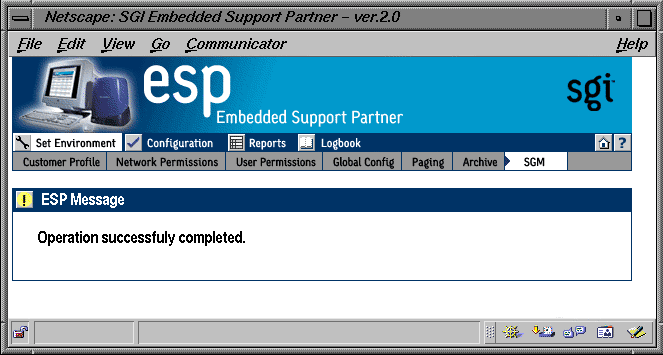
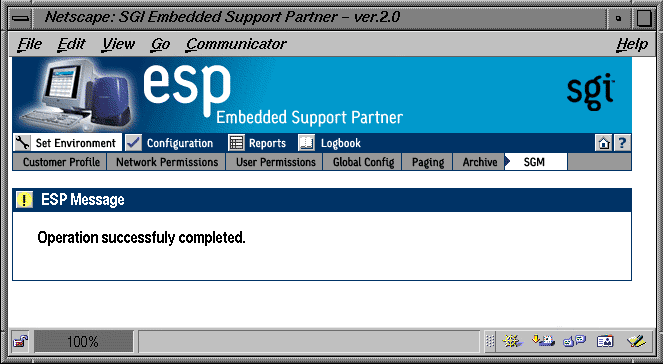
If registration is successful, the interface displays the window shown in Figure 3-21.
You can use the espconfig command to register an SGM server.
Use the following command syntax to register a server:
/usr/sbin/espconfig -add sgmserver <server alias> <server hostname> <client alias>
The command prompts you for a communication password.
Use the following command syntax to register a server:
/usr/sbin/espconfig -add sgmserver <server alias> <server hostname> <client alias> -p <password>
The command does not prompt you for a communication password. (Use this command syntax in scripts.)
On a group manager system, you must register the SGM client systems that the manager can access. You can register SGM clients only on systems that are running in system group manager mode.
Log on to ESP on the group manager system. (You must have “Set Environment” permission on the system.)
Click on the Set Environment button.
Click on the SGM button.
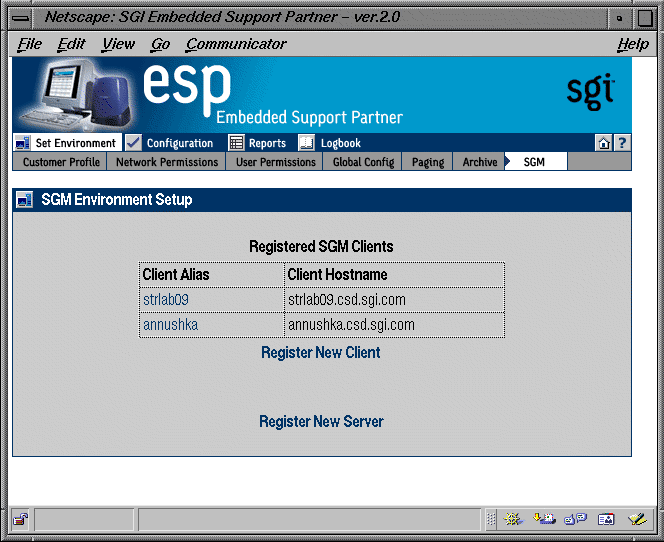
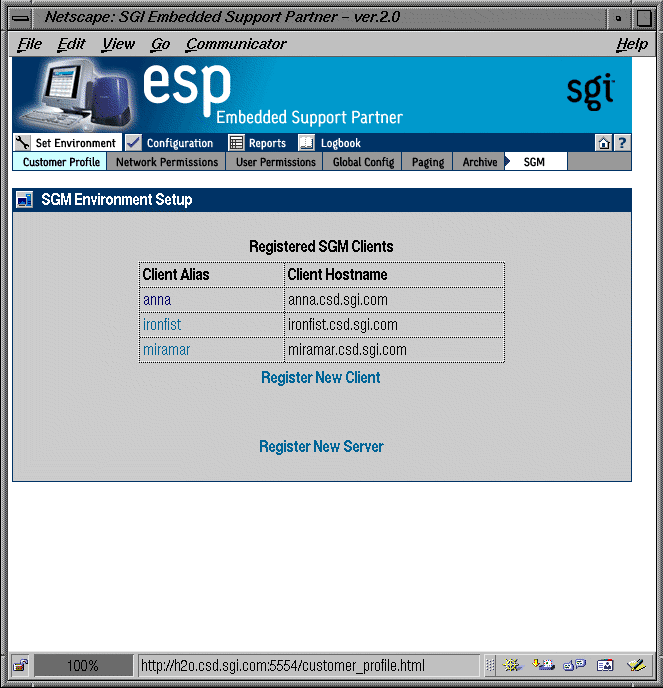
The interface displays the currently registered SGM servers and clients and the Register New Server and Register New Client links. (Refer to Figure 3-22.)

Note: If an SGM license is not installed on the system or if the SGM license has expired, the interface displays only a list of registered SGM servers.
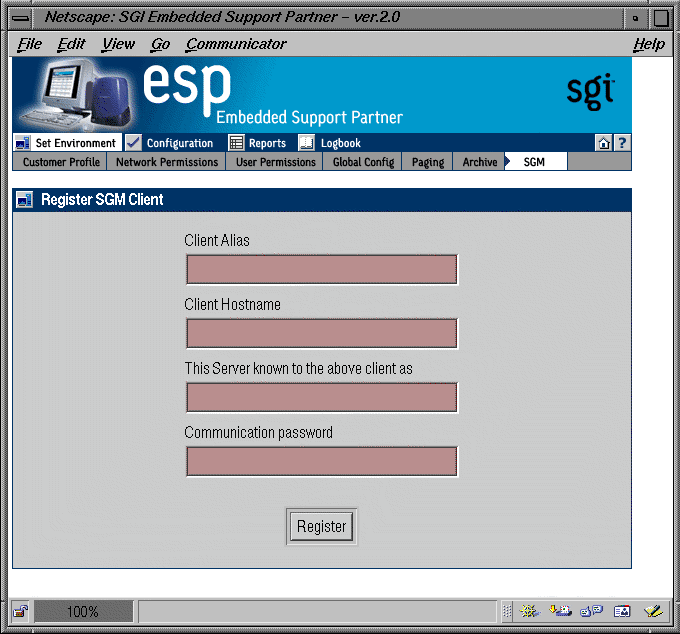
Click on the Register New Client link.

Note: If the Register New Client link does not appear on the interface, you must install a group management license on the system. The interface displays the Register SGM Client window. (Refer to Figure 3-23.)
Enter the SGM client alias.
ESP uses the SGM client alias to identify the SGM client. You use this alias to identify the SGM client on other interface pages. The alias does not have to be the actual system name. It must be 31 characters or less and may contain any characters, except spaces, single quotes, and double quotes.
Enter the SGM client hostname.
This parameter can be the actual hostname or an alias. This hostname must be recognized on the system that is running ESP. ESP resolves the specified name to a full hostname during the registration process.
Enter the SGM server alias.
ESP uses the SGM server alias to identify the server to any clients. You use this alias to identify the SGM server on other interface pages. The alias does not have to be the actual system name. It must be 31 characters or less and may contain any characters, except spaces, single quotes, and double quotes.
Enter the communication password. (It must contain nine or more characters.)
ESP does not prompt you for this password again; however, you must enter the same password on the SGM server and the SGM clients. If you want to change a password, you must change it on the SGM server and related SGM clients.
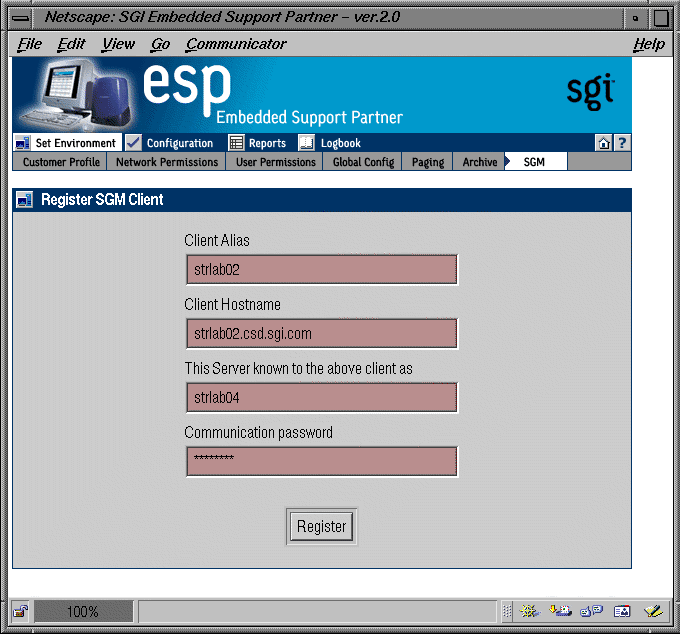
Figure 3-24 shows the interface with example parameters.
Click on the Register button.
If registration is successful, the interface displays the window that is shown in Figure 3-25.
You can use the espconfig command to register an SGM client.
Use the following command syntax to register a client:
/usr/sbin/espconfig -add sgmclient <client alias> <client hostname> <server alias>
The command prompts you for a communication password.
Use the following command syntax to register a client:
/usr/sbin/espconfig -add sgmclient <client alias> <client hostname> <server alias> -p <password>
The command does not prompt you for a communication password. (Use this command syntax in scripts.)
Once you configure an SGM server and related clients, you should test the connections between the systems to ensure that event information can be sent between the SGM clients and server. Be sure to test the connection in both directions (the server-to-client connection and the client-to-server connection).
Perform the following procedure to use the Web-based interface to test a server-to-client connection.
Log on to ESP on the SGM server.
Click on the Set Environment button.
Click on the SGM button.
The interface displays a list of registered SGM clients. (Refer to Figure 3-26.)
Click on the client to test.
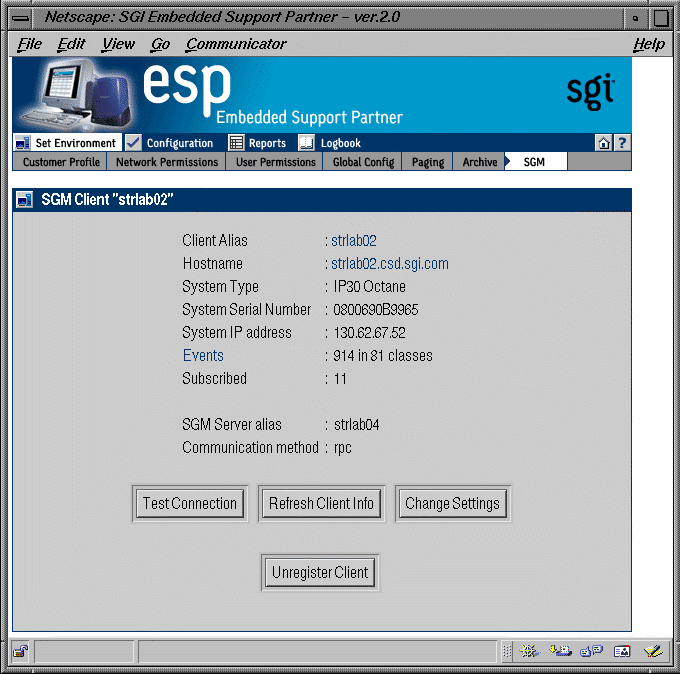
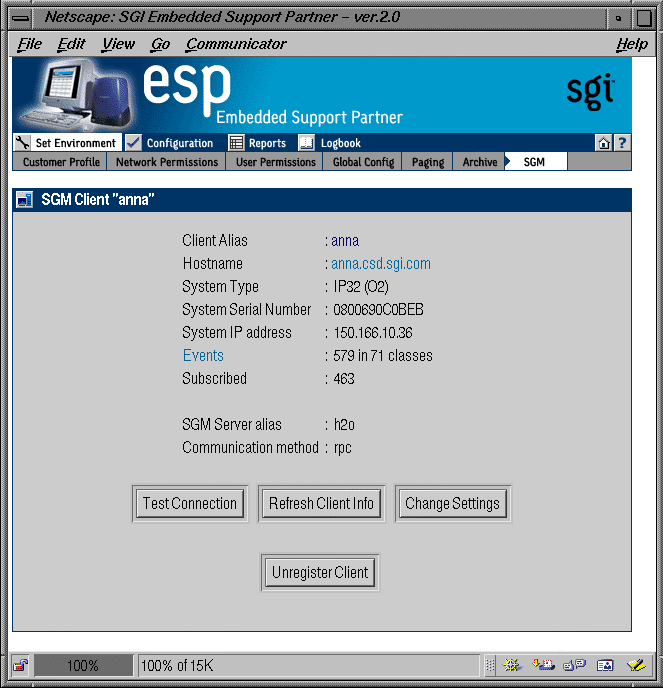
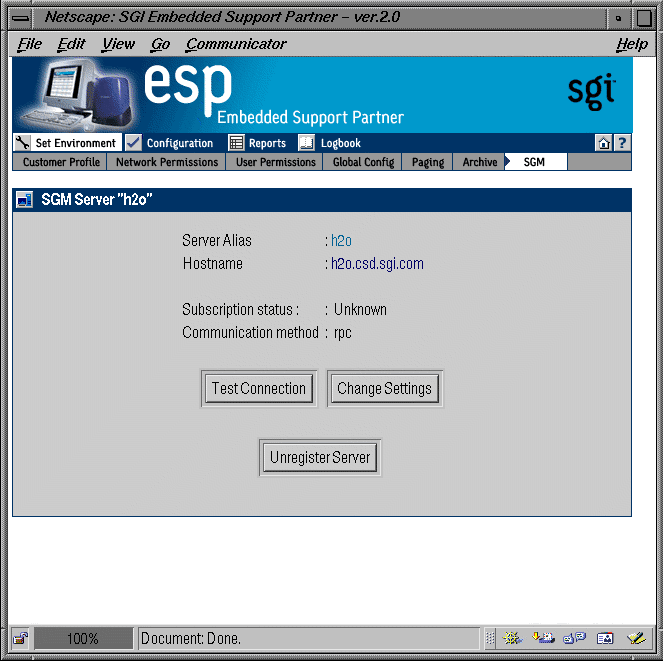
The interface displays information about the selected client. (Refer to Figure 3-27.)
Click on the Test Connection button.
The interface displays the results from testing the connection. (Refer to Figure 3-28.)
Perform the following procedure to use the Web-based interface to test a client-to-server connection:
Log on to ESP on the SGM client.
Click on the Set Environment button.
Click on the SGM button.
The interface displays a list of registered SGM servers. (Refer to Figure 3-29.)
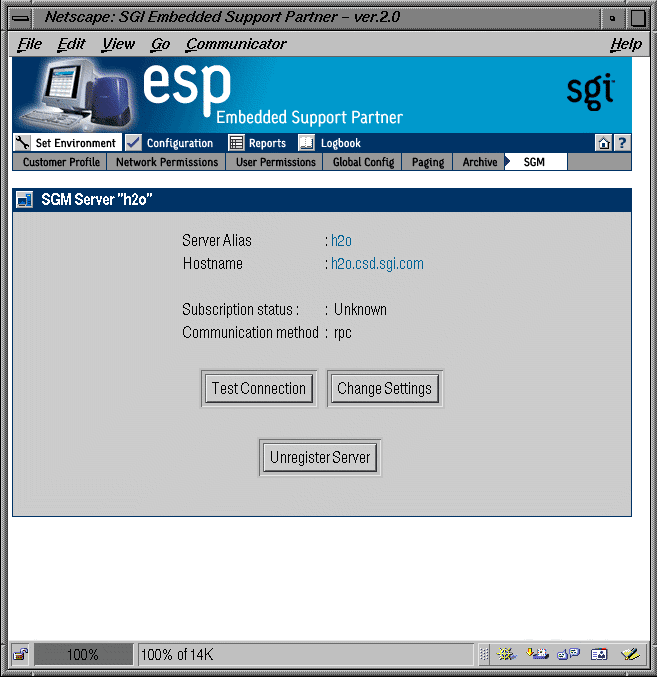
Click on the server to test.
The interface displays information about the selected server. (Refer to Figure 3-30.)
Click on the Test Connection button.
The interface displays the results from testing the connection. (Refer to Figure 3-31.)
You can use the espconfig command to test the connections.
Use the following command syntax to test a server-to-client connection:
/usr/sbin/espconfig -ping sgmclient <client alias>
Use the following command syntax to test a client-to-server connection:
/usr/sbin/espconfig -ping sgmserver <server alias>
There are several other system group management functions that you can perform with the espconfig command.
Use the following command syntax to view a list of all SGM clients registered on a group manager:
/usr/sbin/espconfig -show sgmclients
Use the following command syntax to view a list of all SGM servers registered on a group member:
/usr/sbin/espconfig -show sgmservers
Use the following command syntax to delete a group manager from a group member:
/usr/sbin/espconfig -delete sgmserver <server alias>
Use the following command syntax to delete a group member from a group manager:
/usr/sbin/espconfig -delete sgmclient <client alias>
Use the following command syntax to refresh the SGM license installed on a system and display information about the license:
espconfig -update sgmlicense

Tip: After you install or remove an SGM license, execute this command or restart ESP. Use the following command syntax to redefine a client on a group manager:
/usr/sbin/espconfig -update sgmclient <client alias> <server alias>
The command prompts you for a communication password.
Use the following command syntax to redefine a client on a group manager:
/usr/sbin/espconfig -update sgmclient <client alias> <server alias> -p <password>
The command does not prompt you for a communication password. (Use this command syntax in scripts.)
Use the following command syntax to update the event definitions on a group manager to match the event definitions on a client:
/usr/sbin/espconfig -update sgmevents <client alias>
Use the following command syntax to redefine a group manager on a client:
/usr/sbin/espconfig -update sgmserver <server alias> <server hostname> <client alias>
The command prompts you for a communication password.
Use the following command syntax to redefine a group manager on a client:
/usr/sbin/espconfig -update sgmserver <server alias> <server hostname> <client alias> -p <password>
The command does not prompt you for a communication password. (Use this command syntax in scripts.)
Use the following command syntax to convert SGM data from ESP 1.0 format to ESP 2.0 format:
/usr/sbin/espconfig -sgmconvert [-c][-f]
Use the following command syntax to enable logging with SGI for all subscribed events:
/usr/sbin/espconfig -logEnable <client alias> [-f <filename>] -a
Use the following command syntax to enable event logging with SGI for specific event classes or types:
/usr/sbin/espconfig -logEnable <client alias> [-f <filename>] [-c <event classes list>] [-e <events list>]
The following events have logging with SGI disabled by default:
1754
Process killed [limit exceeded]
1757
Process trapped [but signal held or ignored]
2922
Error on MSPEC access (0)
2923
Error on MSPEC access (1)
2097152
Live event

Note: You can manually enable logging for these events. The following event classes have logging with SGI disabled by default:
4001
Performance
4003
ESP Internal Events
4004
ESP Event Manager
7001
IRIX

Note: You can manually enable logging for the Performance and IRIX event classes. You cannot manually enable logging for the ESP Internal Events and ESP Event Manager classes; events in those classes cannot be logged with SGI. Use the following command syntax to disable logging with SGI for all subscribed events:
/usr/sbin/espconfig -logDisable <client alias> [-f <filename>] -a
Use the following command syntax to disable logging with SGI for specific event classes or specific event types:
/usr/sbin/espconfig -logDisable <client alias> [-f <filename>] [-c <event classes list>] [-e <events list>]
You can use the espconfig command to import and export ESP environments between systems. The espconfig command transfers the following environmental information: global configuration parameters, user configuration parameters, and IP address “allow access” and “restrict access” lists. All changes are effective immediately.
Use the following command syntax to save an ESP environment:
/usr/sbin/espconfig -save espenv [global] [ipaddr] [user] [site|customer_profile] [all] [-to <filename> ]
Use the global, ipaddr, and user options to specify the type of environment data to save. Use the all option to save all three types of data (global configuration, user configuration and IP address information). Use the -to option to specify the file that will hold the data.
Use the following command syntax to load an ESP environment:
/usr/sbin/espconfig -load espenv [global] [ipaddr] [user] [site|customer_profile] [all] -from <filename>
Use the global, ipaddr, and user options to specify the type of environment data to load. Use the all option to load all three types of data (global configuration, user configuration and IP address information). Use the -to option to specify the file that contains the data to load.
