This chapter describes the Tester usage model. It shows the general approach of applying Tester for coverage analysis. It contains these sections:
WorkShop Tester is a UNIX[tm]-based software quality assurance toolset for dynamic test coverage over any set of tests. The term covered means the test has executed a particular unit of source code. In this product, units are functions, individual source lines, arcs, blocks, or branches. If the unit is a branch, covered means it has been executed under both true and false conditions. This product is intended for software and test engineers and their managers involved in the development, test, and maintenance of long-lived software projects.
WorkShop Tester provides these general benefits:
Provides visualization of coverage data, which yields immediate insight into quality issues at both engineering and management levels.
Provides useful measures of test coverage over a set of tests/experiments.
Lets you view the coverage results of a dynamically shared object (DSO) by executables that use it.
Provides comparison of coverage over different program versions.
Provides tracing capabilities for arguments and function arcs that go beyond traditional test coverage tools.
Supports programs written in C, C++, and Fortran.
Is integrated into the CASEVision family of products.
Allows users to build and maintain higher quality software products.
There are two versions of Tester:
Most of the functionality is available from either program, although the graphical representations of the data are available only from cvxcov, the GUI tool.
Tester provides the following basic coverage:
Basic block—how many times was this basic block executed?
Function—how many times was this function executed?
Branch—did this condition take on both TRUE and FALSE values?
You can also request the following coverage information:
Arc—was function F called by function A and function B? Which arcs for function F were NOT taken?
Source line coverage—how many times has this source line been executed and what percentage of source lines is covered?
Argument—what were the maximum and minimum values for argument X in function F over all tests?
When the target program execs, forks, or sprocs another program, only the main target is tested, unless you specify which executables are to be tested, the parent and/or child programs.
You can conduct Tester coverage experiments for:
Separate tests.
A set of tests operating on the same executable.
A list of executables related by fork, exec, or sproc commands.
A test group of executables sharing a common dynamically shared object (DSO).
Tester presents the experiment results in these reports:
Summary of test coverage, including user parameterized dynamic coverage metric.
List of functions, which can be sorted by count, file, or function name and filtered by percentage of block, branch, or function covered.
Comparison of test coverage between different versions of the same program.
Source or assembly code listing annotated with coverage data.
Breakdown of coverage according to contribution by tests within a test set or test group.
The graphical user interface lets you view test results in different contexts to make them more meaningful. It provides:
Annotated function call graph highlighting coverage by counts and percentage (ASCII function call graph supported as well).
Annotated Source View showing coverage at the source language level.
Annotated Disassembly View showing coverage at the assembly language level.
Bar chart summary showing coverage by functions, lines, blocks, branches, and arcs.
Each test is a named object containing the following:
instrumentation file—This describes the data to be collected.
executable—This is the program being instrumented for coverage analysis.
executable list—If the program you are testing can fork, exec, or sproc other executables and you want these other executables included in the test, then you can specify a list of executables for this purpose.
command—This defines the program and command line arguments.
instrumentation directory—The instrumentation directory contains directories representing different versions of the instrumented program and related data. Instrumentation directories are named ver##<n> where n is the version number. Several tests can share the same instrumentation directory. This is true for tests with the same instrumentation file and program version. The instrumentation directory contains the following files, which are automatically generated:
   <program|DSO>.Arg     optional arg trace file
   <program|DSO>.Binmap  basic block & branches bitmap file
   <program|DSO>.Graph   arc data
   <program|DSO>.Log     instrumentation log file (cvinstr)
   <program|DSO>.Map     function map file
   <program|DSO>_Instr   instrumented executable
As part of instrumentation, you can filter the functions to be included or excluded in your test, through the directives INCLUDE, EXCLUDE, and CONSTRAIN.
experiment results—Test run coverage results are deposited in a results directory. Results directories are named exp##<n> where n corresponds to the instrumentation directory used in the experiment. There is one results directory for each version of the program in the instrumentation directory for this test. Note that results are not deposited in the instrumentation directory because the instrumentation directory may be shared by other tests. The results directory is different when you run the test with or without the -keep option.
When you run your test without the -keep option the results directory contains the following files:
COV_DESC
description file of experiment
COUNTS_<exe>
counts file for each executable; <exe> is an executable file name
USER_SELECTIONS
instrumentation criteria
When you run your test with the -keep option the results directory contains the following files:
COV_DESC
description file of experiment
COUNTS_ <exe>
counts file for each executable; <exe> is an executable file name.
USER_SELECTIONS
instrumentation criteria
ARGTRACE_<n>
argument trace database; <n> is a unique number for each process
COUNTS_<n>
basic block and branch counts database
DESC
experiment description file
FPTRACE_<n>
function pointer tracing database
LOG
experiment log file (cvmon)
TRAP
N/A
USAGE_<n>
N/A
There are also soft links of the instrumentation data files in the results directory to the instrumentation directory described above.
This section is divided into three parts:
"Single Test Analysis Process" shows the general steps in conducting a test.
"Automated Testing" discusses using scripts to automate your testing.
"Additional Coverage Testing" describes strategies using multiple tests.
In performing coverage analysis for a single test, you typically go through the following steps:
Plan your test.
Test tools are only as good as the quality and completeness of the tests themselves.
Create (or reuse) an instrumentation file.
The instrumentation file defines the coverage data you wish to collect in this test. You can define:
COUNTS—three types of count items perform tracking. bbcounts tracks execution of basic blocks. fpcounts counts calls to functions through function pointers. branchcounts tracks branches at the assembly language level.
INCLUDE/EXCLUDE—lets you define a subset of functions to be covered. INCLUDE adds the named functions to the current set of functions. EXCLUDE removes the named functions from the set of functions. Simple pattern matching is supported for pathnames and function names. The basic component for inclusion/exclusion is of the form:
<shared library | program name>:<functionlist>
INCLUDE, EXCLUDE, and CONSTRAIN (see below) play a major role in working with DSOs. Tester instruments all DSOs in an executable whether you are testing them or not, so it is necessary to restrict your coverage accordingly. By default, the directory /usr/tmp/cvinstrlib/CacheExclude is used as the excluded DSOs cache and /usr/tmp/cvinstrlib/CacheInclude as the included DSOs cache. If you wish to override these defaults, set the CVINSTRLIB environment variable to the desired cache directory.
CONSTRAIN—equivalent to EXCLUDE *, INCLUDE <subset>. Thus, the only functions in the test will be those named in the CONSTRAIN subset. You can constrain the set of functions in the program to either a list of functions or a file containing the functions to be constrained. The function list file format is:
function_1
function_2
function_3
...
You can use the -file option to include an ASCII file containing all the functions as follows:
CONSTRAIN -file filename
TRACE—lets you monitor argument values in the functions over all experiments. The only restriction is that the arguments must be of the following basic types: int, char, long, float, double, or pointer (treated as a 4-byte unsigned int). MAX monitors the maximum value of an argument. MIN monitors the minimum value of an argument. BOUNDS monitors both the minimum and maximum values. RETURN monitors the function return values.
The default instrumentation file /usr/WorkShop/usr/lib/WorkShop/Tester/default_instr_file contains:
COUNTS -bbcounts -fpcounts -branchcounts
EXCLUDE libc.so.1:*
EXCLUDE libC.so:*
EXCLUDE libInventor.so:*
EXCLUDE libMrm.so.1:*
EXCLUDE libUil.so.1:*
EXCLUDE libX11.so.1:*
EXCLUDE libXaw.so:*
EXCLUDE libXawI18n.so:*
EXCLUDE libXext.so:*
EXCLUDE libXi.so:*
EXCLUDE libXm.so.1:*
EXCLUDE libXmu.so:*
EXCLUDE libXt.so:*
EXCLUDE libcrypt.so:*
EXCLUDE libcurses.so:*
EXCLUDE libdl.so:*
EXCLUDE libfm.so:*
EXCLUDE libgen.so:*
EXCLUDE libgl.so:*
EXCLUDE libil.so:*
EXCLUDE libks.so:*
EXCLUDE libmf.so:*
EXCLUDE libmls.so:*
EXCLUDE libmutex.so:*
EXCLUDE libnsl.so:*
EXCLUDE librpcsvc.so:*
EXCLUDE libsocket.so:*
EXCLUDE libtbs.so:*
EXCLUDE libtermcap.so:*
EXCLUDE libtermlib.so:*
EXCLUDE libtt.so:*
EXCLUDE libview.so:*
EXCLUDE libw.so:*
EXCLUDE nis.so:*
EXCLUDE resolv.so:*
EXCLUDE straddr.so:*
EXCLUDE tcpip.so:*
The excluded items are all dynamically shared objects that might interfere with the testing of your main program.

Note: If you do not use the default_instr_file file, functions in shared libraries will be included by default, unless your instrumentation file excludes them. The minimum instrumentation file contains the line:
COUNTS -bbcounts
You create an instrumentation file using your preferred text editor. Comments are allowed only at the beginning of a new line and are designated by the "#" character. Lines can be continued using a back slash (\) for lists separated with commas. White space is ignored. Keywords are case insensitive. Options and user-supplied names are case sensitive. All lines are additive to the overall experiment description.
Here is a typical instrument file:
COUNTS -bbcounts -fpcounts -branchcounts
# defines the counting options, in this case,
# basic blocks, function pointers, and branches.
CONSTRAIN program:abc, xdr*, functionF, \
 classX::methodY, *::methodM, functionG
# constrains the set of functions in the
# "program" to the list of user specified functions
TRACE BOUNDS functionF(argA)
# traces the upper and lower values of argA
TRACE MAX classX::methodY(argZ)
# traces the maximum value of argZ
EXCLUDE libc.so.1:*
...
Note: Instrumentation can increase the size of a program two to five times. Using DSO caching and sharing can alleviate this problem. Apply the instrument file to the target executable(s).
This is the instrumentation process. You can specify a single executable or more than one if you are creating other processes through fork, exec, or sproc.
The command line interface command is runinstr. The graphical user interface equivalent is the "Run Instrumentation" selection in the Test menu.
The effect of performing a run instrument operation is shown in Figure 5-1. An instrumentation directory is created (.../ver##<n>). It contains the instrumented executable and other files used in instrumentation.
-
This part of the process creates a test data directory (test0000) containing a test description file named TDF. See Figure 5-2.
Tester names the test directory test0000 by default and increments it automatically for subsequent make test operations. You can supply your own name for the test directory if you prefer.
The TDF file contains information necessary for running the test. A typical TDF file contains the test name, type, command-line arguments, instrument directory, description, and list of executables. In addition, for a test set or test group, the TDF file contains a list of subtests.
Note that Instrument Directory can be either the instrumentation directory itself (such as ver##0) or a directory containing one or more instrumentation subdirectories.
The command line interface command is mktest. The graphical user interface equivalent is the "Make Test" selection in the Test menu.
Run the instrumented version of the executable to collect the coverage data.
This creates a subdirectory (exp##0) under the test directory in which results from the current experiment will be placed. See Figure 5-3. The commands to run a test use the most recent instrumentation directory version unless you specify a different directory.
The command line interface command is runtest. The graphical user interface equivalent is the "Run Test" selection in the Test menu.
Analyze the results.
Tester provides a variety of column-based presentations for analyzing the results. The data can be sorted by a number of criteria. In addition, the graphical user interface can display a call graph indicating coverage by function and call.
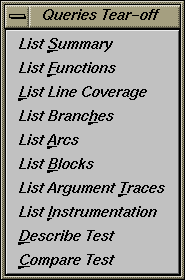
The Tester interface provides many kinds of queries for performing analysis on a single test. Table 5-1 shows query commands for a single test that are available either from the command line or the graphical user interface Queries menu.
Table 5-1. Common Queries for a Single Test
Command Line
Graphical User Interface
Description
List Arcs
Shows the function arc coverage. An arc is a call from one function to another.
List Blocks
Shows basic block count information.
List Branches
Shows the count information for assembly language branches.
List Functions
Shows coverage by function.
List Summary
Provides a summary of overall coverage.
List Argument Traces
Shows the results of argument tracing, including argument, type, and range.
lsline
List Line Coverage
Shows coverage for native source lines.
cattest
Describe Test
Describes the test details.
diff
Compare Test
Shows the difference in coverage between programs.
lsinstr
List Instrumentation
Show instrumentation details for a test.
Other queries are accessed differently from either interface.
lscall—shows a function graph indicating caller and callee functions and their counts. From the graphical user interface, function graphs are accessed from a Call Tree View (Views menu selection).
lssource—displays the source or assembly code annotated with the execution count by line. From the graphical user interface, you access source or assembly code from a Source View (using the Source button) or a Disassembly View (using the Disassembly button), respectively.
The queries available in the graphical user interface are shown in Figure 5-4.


Tester is best suited to automated testing of command-line programs, where the test behavior can be completely specified at the invocation. Command-line programs let you incorporate contextual information, such as environment variables and current working directory.
Automated testing of server processes in a client-server application proceeds basically the same as single-program cases except that startup time introduces a new factor. Tester can substantially increase the startup time of your target process so that the instrumented target process will run somewhat slower than the standard, uninstrumented one. Tests which start a server, wait a while for it to be ready, and then start the client will have to wait considerably longer. The additional time depends on the size and complexity of the server process itself and on how much and what kind of data you have asked Tester to collect. You will have to experiment to see how long to wait.
Automated testing of interactive or nondeterministic tests is somewhat harder. These tests are not completely determined by their command line; they can produce different results (and display different coverage) from the same command line, depending upon other factors, such as user input or the timing of events. For tests such as these, Tester provides a -sum argument to the runtest command. Normally each test run is treated as an independent event, but when you use "runtest -sum," the coverage from each run is added to the coverage from previous runs of the same test case. Other details of the coverage measurement process are identical to the first case.
In each case, you first need to instrument your target program, then run the test, sum the test results if desired, and finally analyze the results. There are two general approaches to applying cvcov in automated testing
If you have not yet created any test scripts or have a small number of tests, you should create a script that makes each test individually and then runs the complete test set. See Example 5-1, a script that automates a test program called target with different arguments:
Example 5-1. Making Tests and Then Running Them
# instrument program
cvcov runinstr -instr_file instrfile mypath/target
# test machinery
# make all tests
cvcov mktest -cmd "target A B C" -testname test0001
cvcov mktest -cmd "target D E F" -testname test0002
...
# define testset to include all tests
cvcov lstest > mytest_list
cvcov mktset -list mytest_list -testname mytestset
# run all tests in testset and sum up results
cvcov runtest mytestset
If you have existing test scripts of substantial size or an automated test machinery setup, then you may find it straightforward to embed Tester by replacing each test line with a script containing two Tester command lines for making and running the test and then accumulating the results in a testset, such as in Example 5-2. Of course, you can also rewrite the whole test machinery as described in Example 5-1.
Example 5-2. Applying a Make-and-Run Script
# instrument program
cvcov runinstr -instr_file instrfile mypath/target
# test machinery
# make and run all tests
make_and_run "target A B C"
make_and_run "target D E F"
...
# make testset
cvcov lstest > mytestlist
cvcov mktset -list mytestlist -testname mytestset
# accumulate results
cvcov runtest mytestset
where the make_and_run script is:
#!/bin/sh
testname=`cvcov mktest -instr_dir /usr/tmp -cmd "$*"`
testname=`expr "$testname" : ".*Made test directory: `.*'"`
cvcov runtest $testname
Note that both examples use simple testset structures—these could have been nested hierarchically if desired.
After running your test machinery, you can use cvcov or cvxcov to analyze your results. Make sure that your test machinery does not remove the products of the test run (even if the test succeeds), or it may destroy the test coverage data.
After you have created and run your first test, you typically need additional testing. Here are some scenarios.
You can define a test set so that you can vary your coverage using the same instrumentation. You can analyze the new tests singly or you can combine them in a set and look at the cumulative results. If the tests are based on the same executable, they can share the same instrumentation file. You can also have a test set with tests based on different executables but they should have the same instrumentation file.
You can change the instrumentation criteria to gather different counts, examine a different set of functions, or perform argument tracing differently.
You can create a script to run tests in batch mode (command line interface only).
You can run different programs that use a common dynamically shared object (DSO) and accumulate test coverage for a test group containing the DSO.
You can run the same tests using the same instrumentation criteria for two versions of the same program and compare the coverage differences.
You can run a test multiple times and sum the result over the runs. This is typically used for GUI-based applications.
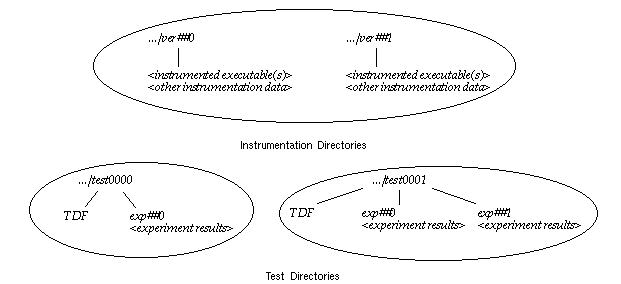
As you conduct more tests, you will be creating more directories. A typical coverage testing hierarchy is shown in Figure 5-5.
There are two different instrumentation directories, ver##0 and ver##1. The test directory test0000 contains results for a single experiment that uses the instrumentation from ver##0. (Note that the number in the name of the experiment results directory corresponds to the number of the instrumentation directory.) Test directory test0001 has results for two experiments corresponding to both instrumentation directories, ver##0 and ver##1.