The Performance Analyzer helps you understand your program in terms of performance, determine if there are problems, and correct them. This chapter provides a brief introduction to the Performance Analyzer tools and describes how to use them to solve performance problems. It includes the following sections:
To conduct performance analysis, you run a series of experiments to collect performance data. Prior to running an experiment, you specify the objective of your experiment through a task menu. The Performance Analyzer collects the required data and provides charts, tables, and annotated code to help you analyze the results.
The Performance Analyzer has three general techniques for collecting performance data:
Counting—It can count the exact number of times each function and/or basic block has been executed. This requires instrumenting the program, that is, inserting code into the executable to collect counts.
Profiling—It can periodically examine and record the program's PC (program counter), call stack, and resource consumption.
Tracing—It can trace events that impact performance, such as reads and writes, system calls, page faults, floating point exceptions, and mallocs, reallocs, and frees.
The Performance Analyzer processes the data to provide 28 different types of performance metrics.
These are the major windows in the Performance Analyzer toolset:
Performance Analyzer main window (see Figure 1-1)—contains:
Usage View (Graphical)—contains charts that indicate resource usage and the occurrence of sample corresponding to time intervals set by the time line calipers (see Figure 1-3)
Usage View (Textual)—provides the actual resource usage values corresponding to time intervals set by the time line calipers (see Figure 1-4)
Call Graph View—displays the functions (with their metrics) in a graphical format showing where the calls were made (see Figure 1-6)
Call Stack—displays the contents of the call stack at the selected event (see Figure 1-10)
Malloc Error View—displays each malloc error (leaks and bad frees) that occurred in the experiment, the number of times the malloc occurred (a count is kept of mallocs with identical call stacks), and the call stack corresponding to the selected malloc error.
Leak View—displays each memory leak that occurred in your experiment, its size, the number of times the leak occurred at that location during the experiment, and the call stack corresponding to the selected leak.
Malloc View—displays each malloc (whether or not it caused a problem) that occurred in your experiment, its size, the number of times the malloc occurred (a count is kept of mallocs with identical call stacks), and the call stack corresponding to the selected malloc.
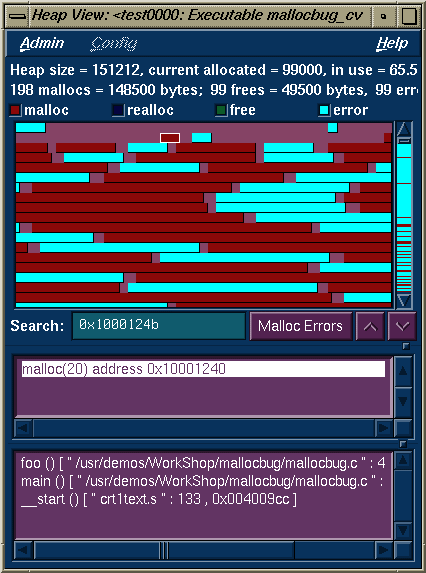
Heap View—displays a map of memory indicating how blocks of memory were used in the time interval set by the time line calipers (see Figure 1-9)
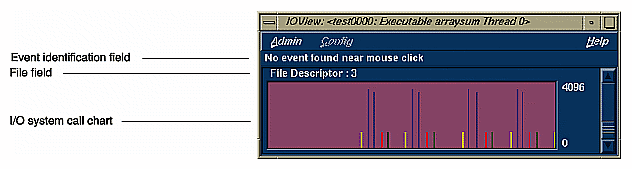
I/O View—displays a chart devoted to I/O system calls. Identifies up to 10 files involved in I/O (see Figure 1-11)
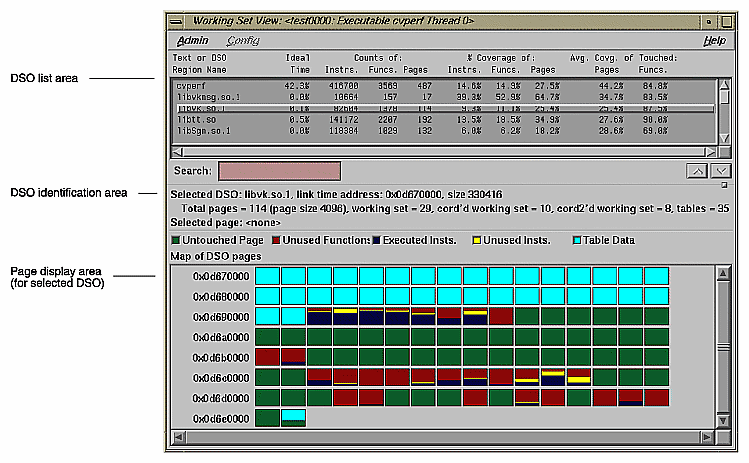
Working Set View—measures the coverage of the dynamic shared objects (DSOs) that make up your executable. It indicates instructions, functions, and pages that were not used when the experiment was run (see Figure 1-12).
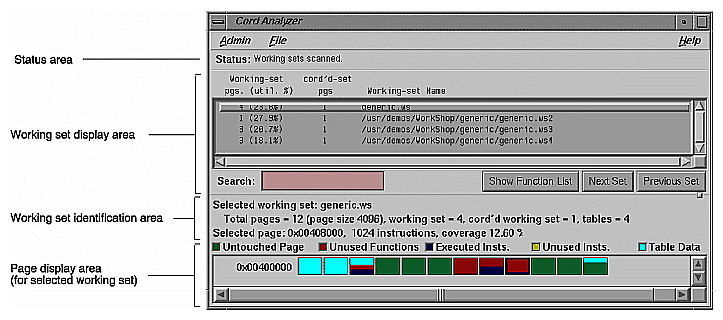
Cord Analyzer (accessed from cvcord)—works in conjunction with Working Set View to let you try out different working set configurations to improve performance (see Figure 1-13).
Source View with performance annotations—displays performance metrics adjacent to the corresponding line of source code (see
Figure 1-7)Disassembly View with performance annotations—displays the performance metrics adjacent to the corresponding machine code. For the "Get Ideal Time (pixie) per function & source line" experiment, Source View can show where and why a clock may have stalled during an instruction.
To tune a program's performance, you need to determine its consumption of machine resources. At any point (or phase) in a process, there is one limiting resource controlling the speed of execution. Processes can be slowed down by:
CPU speed and availability
I/O processing
memory size and availability
bugs
instruction and data cache size
any of the above in different phases
A CPU-bound process spends its time in the CPU and is limited by CPU speed and availability. To improve its performance on CPU-bound processes, you may need to streamline your code. This can entail modifying algorithms, reordering code to avoid interlocks, removing nonessential steps, blocking to keep data in cache and registers, or using alternative algorithms.
An I/O-bound process has to wait for I/O to complete and may be limited by disk access speeds or memory caching. To improve the performance of I/O-bound processes, you can try one of the following techniques:
improve overlap of I/O with computation
optimize data usage to minimize disk access
use data compression
A program that continuously needs to swap out pages of memory is called memory-bound. Page thrashing is often due to accessing virtual memory on a haphazard rather than strategic basis. One telltale indication of a page-thrashing condition is noise due to disk accesses. To fix a memory-bound process, you can try to improve the memory reference patterns or, if possible, decrease the memory used by the program.
You may find that a bug is causing the performance problem. For example, you may find that you are reading in the same file twice in different parts of the program, that floating point exceptions are slowing down your program, that old code has not been completely removed, or that you are leaking memory (making malloc calls without the corresponding calls to free).
Since programs exhibit different behavior during different phases of operation, you need to identify the limiting resource during each phase. A program can be I/O-bound while it reads in data, CPU-bound while it performs computation, and I/O-bound again in its final stage while it writes out data. Once you've identified the limiting resource in a phase, you can perform an in-depth analysis to find the problem. And after you have solved that problem, you can check for other problems within the phase—performance analysis is an iterative process.
Before we discuss the mechanics of using the Performance Analyzer, let's look at these features that help you understand the behavior of your processes:
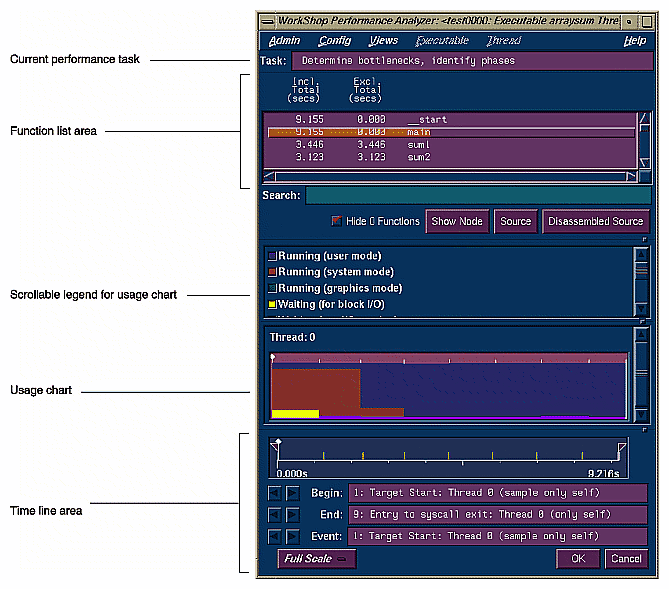
Have you ever considered timing a program with a stopwatch? The Performance Analyzer time line serves the same function. The time line shows where each sample event in the experiment occurred. By setting sample traps at phase boundaries, you can analyze metrics on a phase-by-phase basis. The simplest metric, time, is easily recognized as the space between events. The triangular icons are calipers; they let you set the scope of analysis to the interval between the selected events.
Figure 1-2 shows the time line portion of the Performance Analyzer window with typical results. Events #3 and #4 are labeled. By looking at the distance between them and counting tick marks on the scale, you can see that this phase lasted for approximately 6 seconds.

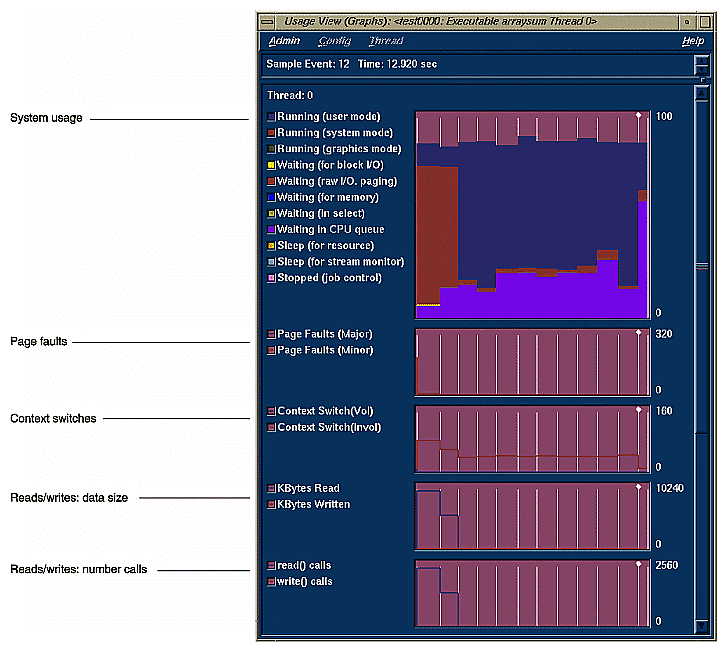
The Performance Analyzer lets you look at how different resources are consumed over time. It produces a number of resource usage graphs that are tied to the time line (see Figure 1-3, which shows six of the graphs available). These resource usage graphs indicate trends and let you pinpoint problems within phases.
Resource usage data refers to items that consume system resources. They include
user and system time
page faults
context switches
the size of reads and writes
read and write counts
poll and I/O calls
total system calls
process signals
process size
Resource usage data is always recorded (written to file) at each sample point. In addition, setting a time in the Fine Grained Usage field enables you to record resource usage data at regular intervals. Fine-grained usage allows you to see fluctuations at a finer gradation than the phases defined by sample points. If you discover inconsistent behavior within a phase, you can set new sample points and break the phase down into smaller phases.
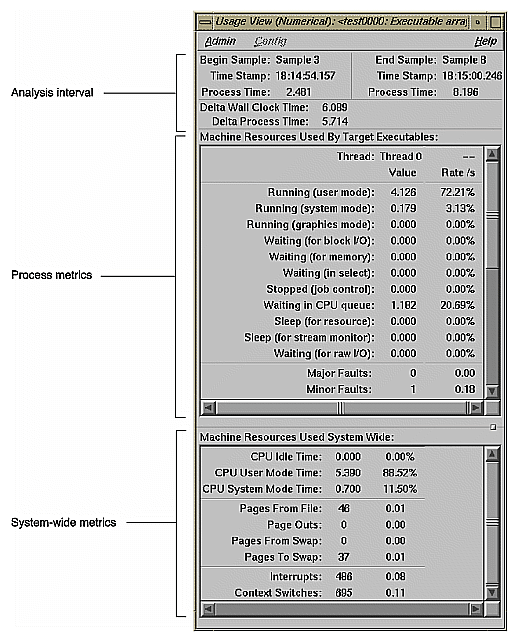
You can analyze resource usage trends in the charts in Graphical Usage View and can view the numerical values in the Textual Usage View.
Fine grained usage has little effect on the execution of the target process during data collection. It is of limited use if the program is divided into phases of uniform behavior by the placement of the sample points.
The usage graphs show the patterns; the textual usage views let you view the aggregate values for the interval specified by the time line calipers. Figure 1-4 shows a typical Textual Usage View window.
The function list displays all functions in the source code, annotated by performance metrics and ranked by the criterion of your choice, such as counts or one of the time metrics. Figure 1-5 is an example of the function list, ranked by exclusive CPU time (defined as the time this function spent in the CPU, excluding jumps to other blocks).
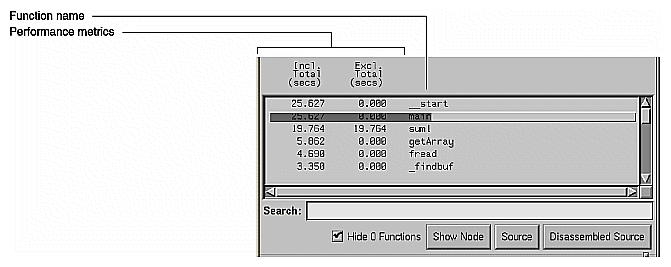
You can configure how functions appear in the function list area by selecting "Preferences..." in the Config menu. It lets you select which performance metrics display, whether they display as percentages or absolute values, and the style of the function name. The "Sort..." selection in the Config menu lets you order the functions in the list by the selected metric. Both selections disable those metric selections that were not collected in the current experiment.
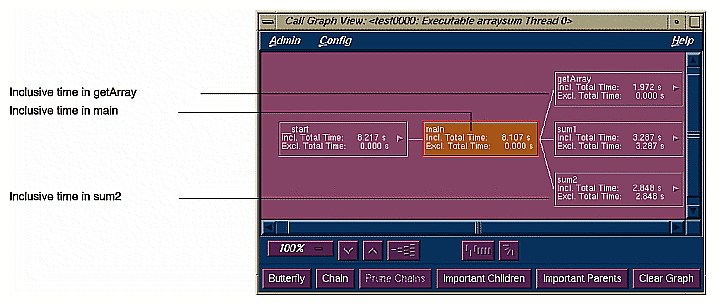
In contrast to the function list which provides the performance metrics for functions, the call graph puts this information into context by showing you where the calls are made. The call graph displays functions as nodes and calls as arcs. The nodes are annotated with the performance metrics; the arcs come with counts by default and can include other metrics as well.
In Figure 1-6, for example, the inclusive time spent by the function main is 8.107 seconds. Its exclusive time was 0 seconds, meaning that the time was actually spent in called functions. main can potentially call three functions. Call Graph View indicates that in the experiment main called three functions: getArray which consumed 1.972 seconds, sum1 which consumed 3.287 seconds, and sum2 which consumed 2.848 seconds.
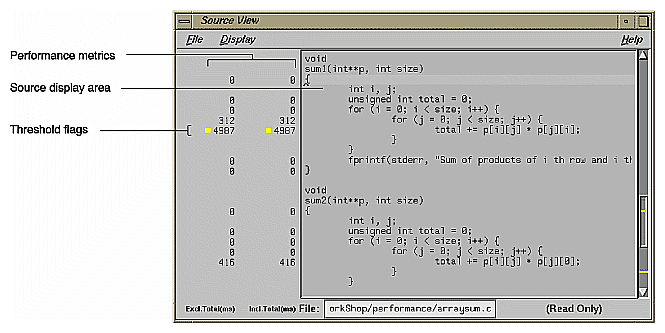
The Performance Analyzer lets you view performance metrics by source line in Source View (see Figure 1-7) or by machine instruction in Disassembly View. Displaying performance metrics is set in the Preferences dialog box, accessed from the Display menu in Source View and Disassembly View. The Performance Analyzer sets thresholds to flag lines that consume more than 90% of a total resource. These indicators appear in the metrics column and on the scroll bar.
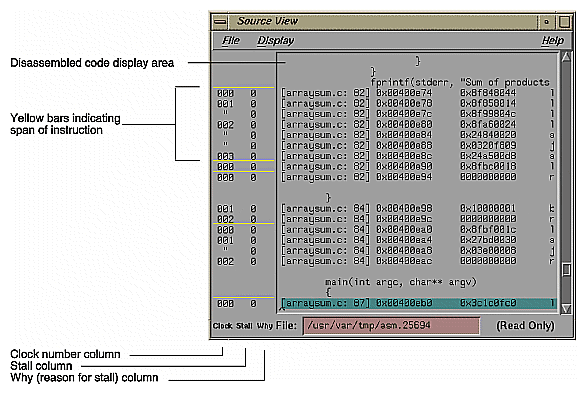
The Performance Analyzer also lets you view performance metrics by machine instruction. You can view any of the performance metrics that were measured in your experiment. If you ran a "Get Ideal Time (pixie) per function & source line" experiment, you can get a special three-part annotation that providing information about on stalled instructions (see Figure 1-8). The yellow bar spanning the top of three columns in this annotation indicates the first instruction in each basic block. The first column labelled Clock in the annotation displays the clock number in which the instruction issues relative to the start of a basic block. If you see clock numbers replaced by ditto marks ("), it means that multiple instructions were issued in the same cycle. The second column is labelled Stall and shows how many clocks elapsed during the stall before the instruction was issued. The third column labelled Why shows the reason for the stall. There are three possibilities:
The Performance Analyzer lets you look for memory problems. The Malloc Error View, Leak View, Malloc View, and Heap View windows address two common types of memory problems that can inhibit performance:
The difference between these windows lies in the set of data that they collect. Malloc Error View displays all malloc errors: both memory leaks and bad frees. When you run a memory leak experiment and problems are found, a dialog box displays suggesting you use Malloc Error View to see the problems. Leak View shows memory leak errors only. Malloc View shows each malloc operation whether faulty or not. Heap View displays a map of heap memory indicating where both problems and normal memory allocations occur and can tie allocations to memory addresses. The first two views are better for focusing on problems; the latter two views show the big picture.
Memory leakage occurs when a program dynamically allocates memory and fails to deallocate that memory when it is through using the space. This causes the program size to increase continuously as the process runs. A simple indicator of this condition is the Process Size stripchart in Process View. The strip chart only indicates the size; it does not show the reasons for an increase.
Leak View displays each memory leak in the executable, its size, the number of times the leak occurred at that location, and the corresponding call stack (when you select the leak), and is thus the most appropriate view for focusing on memory leaks.
A region allocated but not freed is not necessarily a leak. If the calipers are not set to cover the entire experiment, the allocated region may still be in use later in the experiment. In fact, even when the calipers cover the entire experiment, it is not necessarily wrong if the program does not explicitly free memory before exiting, since all memory is freed anyway on program termination.
The best way to look for leaks is to set sample points to bracket a specific operation that should have no effect on allocated memory. Then any area that is allocated but not freed is a leak.
A bad free (also referred to as an anti-leak condition) occurs when a program frees some structure that it had already freed. In many such cases, a subsequent reference picks up a meaningless pointer, causing a segmentation violation. Bad frees are indicated in both Malloc Error View and in Heap View. Heap View identifies bad frees in its memory map display. It helps you find the address of the freed structure, search for the malloc event that created it, and the free event that released it. Hopefully, you can determine why it was prematurely freed or why a pointer to it was referenced after it had been freed.
Heap View also identifies unmatched frees in an information window. An unmatched free is a free that does not have a corresponding allocation in the same interval. As with leaks, the caliper settings may cause false indications. An unmatched free that occurs in any region not starting at the beginning of the experiment may not be an error. The region may have been allocated before the current interval and the unmatched free in the current interval may not be a problem after all. A segment identified as a bad free is definitely a problem; it has been freed more than once in the same interval.
A search facility is provided in Heap View that allows the user to find the allocation and deallocation events for all blocks containing a particular virtual address.
The Heap View window lets you analyze memory allocation and frees between selected sample events in your experiment. Heap View displays a memory map that indicates mallocs, reallocs, bad frees, and valid frees during the selected period, as shown in Figure 1-9. Clicking an area in the memory map displays the address.
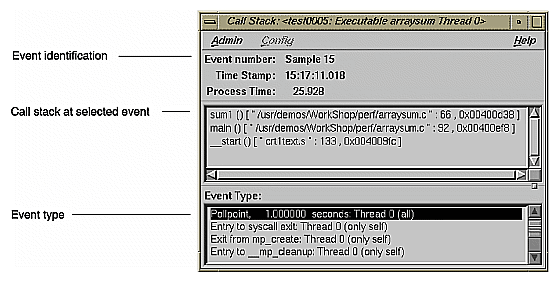
The Performance Analyzer enables you to recall call stacks at sample events, which helps you reconstruct the calls leading up to an event so that you can relate the event back to your code. Figure 1-10 shows a typical call stack. It corresponds to sample event #2 in an experiment.
I/O View helps you determine the problems in an I/O-bound process. It produces a graph of all I/O system calls and identifies up to 10 files involved in I/O. See Figure 1-11.
Working Set View measures the coverage of the dynamic shared objects (DSOs) that make up your executable (see Figure 1-12). It indicates instructions, functions, and pages that were not used when the experiment was run. It shows the coverage results for each DSO in the DSO list area. Clicking a DSO in the list displays its pages with color-coding to indicate the coverage of the page.
The Cord Analyzer is not actually part of the Performance Analyzer and is invoked by typing cvcord at the command line. The Cord Analyzer (see Figure 1-13) lets you explore the working set behavior of an executable or dynamic shared library (DSO). With it you can construct a feedback file for input to cord to generate an executable with improved working-set behavior.