To install software in a client tree, you run the /var/boot/client_setup program to create a new client tree configuration file that specifies the requirements of your client and swap trees. To modify a client tree configuration file that already exists, you use a text editor. When the configuration file is finished, you run the client tree installation script, /var/boot/client_inst, to install the client and swap trees. Both the client tree configuration file and the share tree configuration file are used in the client tree installation process. After the client and swap trees are installed, clients are ready to be booted and put into service.
This chapter provides the information and procedures that are needed to configure and install client and swap trees. It contains these sections:
| Note: To update an existing client tree with a newer version of the software, use the information in Chapter 5, “Updating Software on Diskless Trees.” |
The client tree configuration file contains a list of variables that specify the location of the client tree, the location and size of the swap tree, and the NIS domain of the client. This file also specifies the hardware components of the client, because hardware-specific software modules must be installed in each client tree. The software installed in a client tree is obtained from the share tree that supports it.
| Note: Your server should already have a default copy of a client tree configuration file in /var/boot/client.dat as a result of installing Diskless software. |
To create a new client tree configuration file, you can run the /var/boot/client_setup program, or you can create a working copy of the /var/boot/client.dat file that was stored on the server during the Diskless software installation process. If you plan to modify an existing client tree configuration file, you must use a text editor to make your changes.
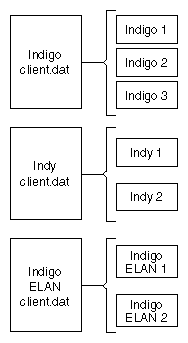
Although each client in a diskless implementation must have its own client tree, it is not necessary to create an individual client tree configuration file for each client. Because the information in one configuration file frequently pertains to an entire client class, a single copy of the file can often be used to create multiple client trees. You can use the client tree configuration file for multiple client trees whenever these conditions are true:
Clients are identical workstation models (including graphics hardware).
Client trees for all clients is in the same directory.
Swap trees for all clients is in the same directory and contain the same amount of swap space.
For example, a single working copy of client.dat can be used to install the client trees for a group of Indigo R4000 Elan workstations with client trees in the /diskless/client directory, swap trees in the /diskless/swap directory, and 64 MB of swap space.
Client tree configuration files are stored in the /var/boot directory. By convention, a client tree configuration file is named for the model of clients that it configures. For example, client tree configuration files might have names like this:
/var/boot/Indigo.dat
/var/boot/Indigo_XS.dat
/var/boot/O2.dat
Figure 4-1 illustrates two client configuration files that are used to create client trees for seven clients.
The variables in the upper portion of the client configuration file specify the location of the client tree and swap tree, the size of the swap space, and the NIS domain name for clients using this file.
Example 4-1 illustrates the upper portion of the client.dat file.
# Information for diskless client setup. # Please make a copy of this file for each class of diskless machines. # # $Revision: 1.3 $ # # # DISKLESS CLIENT TREE SPECIFICATIONS # # CLROOT : directory where client tree resides. # SWAP : directory where swap file resides. # SWAPSIZE : size of swap file. # Same format as “mkfile” takes. # NISDOMAIN : If set to any value, then NIS domain is set # as specified. If set to null, then client's # NIS domain is set as diskless server's NIS domain # unless client's NIS domain is set previously. # # NOTE: # If one wants to prevent the client from using # swap space on server, then set SWAPSIZE=”0”. # However, If one still wants to preserve already # existing swap space on server for some reason, # then set SWAP=””. # CLROOT=”$DISKLESS/client/$HOST” SWAP=”$DISKLESS/swap/$HOST” SWAPSIZE=”64m” NISDOMAIN=” ” |
The variables in this portion of client.dat have these meanings:
| CLROOT | Specifies the pathname of the client tree (see Figure 2-1). The default value is $DISKLESS/client/$HOST. Reset this value if you plan to install your client trees in a directory other than the one specified by the $DISKLESS variable (in the share tree configuration file); be sure your entry ends in the string $HOST. The value of $HOST is the hostname of the client that you enter on the client_inst command line to install the client tree. | |||
| SWAP | Specifies the pathname of the swap tree (see Figure 2-1). The default value is $DISKLESS/swap/$HOST. Reset this value if you plan to install your swap trees in a directory other than the one specified by the $DISKLESS variable (in the share tree configuration file); be sure your entry ends in the string $HOST. The value of $HOST is the hostname of the client that you enter on the client_inst command line to install the swap tree. | |||
| SWAPSIZE | Specifies the size of the swap space, in megabytes. The default value is 64 megabytes. If you change this value, your entry must end with the letter m (lowercase), the only allowable value for megabytes. | |||
| NISDOMAIN | Specifies the domain name for a client. The default setting is null ( " "), which assigns the server's domain name to its clients. This setting can vary for individual clients in a class. Set NISDOMAIN to null (" ") to assign the server's domain name to the client. The client_inst script will enter the server's domain name in the client's copy of /var/yp/ypdomain. Set NISDOMAIN to an alternative domain name if clients are using a domain name that is different from the server's. The client_inst script will enter the domain name you specify in the client's copy of /var/yp/ypdomain.
|
The variables in the lower portion of client.dat specify the hardware components of client workstations. Example 4-2 illustrates the table in the lower portion of client.dat.
# Client CPUARCH/CPUBOARD/GFXBOARD/MODE values for releases 5.1 and
# beyond. CPUARCH should be omitted for releases prior to 4.0.4, but will
# not hurt if present (as long as the server is at 4.0.4 or later)
#
# NOTES    NOTES    NOTES    NOTES    NOTES
#
# 1. For CPUARCH values which are derivatives of the R4000 architecture,
#        like R4400, just use R4000 as the CPUARCH value.
#
# 2.  CPUARCH should be set to the values shown below.
#
# 3. If you modify the supported or unsupported architectures below, please
#        change the file d1_classes.
#
# 4. The MACH variable is no longer applicable to current releases.
#
# 5. The MODE pad should be set on Indigo2 R10000, O2, & OCTANE.
#
#+-------------------+---------+----------+------------------------------------+
#| Machine Type      | CPUARCH | CPUBOARD | GFXBOARD                  | VIDEO  |
#|                   |         | /MACH    |                           |        |
#+-------------------+---------+----------+---------------------------+--------|
#| Indigo R4K        | R4000   |   IP20   | “LIGHT   -mSUBGR=LG1MC”   |        |
#| Indigo R4K DH     | R4000   |   IP20   | “LIGHT   -mSUBGR=LG1MC”   |        |
#| Indigo R4K XS     | R4000   |   IP20   | “EXPRESS -mSUBGR=EXPRESS” |        |
#| Indigo R4K XZ     | R4000   |   IP20   | “EXPRESS -mSUBGR=EXPRESS” |        |
#| Indigo R4K Elan   | R4000   |   IP20   | “EXPRESS -mSUBGR=EXPRESS” |        |
#|  Note: Indigo is also known as 4D/RPC. |                           |        |
#|                   |         |          |                           |        |
#| Indigo2 Extreme   | R4000   |   IP22   | “EXPRESS -mSUBGR=EXPRESS” |        |
#| Indigo2 XZ        | R4000   |   IP22   | “EXPRESS -mSUBGR=EXPRESS” |        |
#| Indigo2 Extreme+XL| R4000   |   IP22   |”NEWPRESS -mSUBGR=NEWPRESS”|        |
#| Indigo2 XL        | R4000   |   IP22   |“NEWPORT -mSUBGR=NG1”      |        |
#| Indigo2 IMPACT    | R4000   |   IP22   | “MGRAS   -mSUBGR=MGRAS”   |        |
#|   Notes: (1) Extreme+XL indicates dual heads: one Extreme, one XL.          |
#|  (2) The galileo board is only a graphics option.  It does not change       |
#|      the architecture of a diskless client.                                 |
#
#| Indy              | R4000   |   IP22   | “NEWPORT -mSUBGR=NG1”     | VINO   |
#| Indy R5000        | R5000   |   IP22   | “NEWPORT -mSUBGR=NEWTON”  | VINO   |
#|   Note: VIDEO tag is only used by Indy for now.                    |        |
#|                   |         |          |                           |        |
#| Indigo2 10000     |         |          |                           |        |
#|         IMPACT    | R10000  |   IP28   | “MGRAS -mSUBGR=I2_64”     |        |
#|         Extreme   | R10000  |   IP28   | “EXPRESS -mSUBGR=I2_64”   |        |
#|         XZ        | R10000  |   IP28   | “EXPRESS -mSUBGR=I2_64”   |        |
#| NOTE: MODE=”64bit”|         |          |                           |        |
#|                   |         |          |                           |        |
#| OCTANE            |         |          |                           |        |
#|         SI/SSI/MXI| R10000  |   IP30   | “MGRAS -mSUBGR=RACER”     |        |
#| NOTE: MODE=”64bit”|         |          |                           |        |
#|                   |         |          |                           |        |
#| O2                | R5000   |   IP32   | “CRIME -mSUBGR=CRM”       | VICE   |
#|                   | R10000  |   IP32   | “CRIME -mSUBGR=CRM”       | VICE   |
#| NOTE: MODE=”32bit”|         |          |                           |        |
#|                   |         |          |                           |        |
#+--------------------+---------+----------+---------------------------+-------+
#
# The following machines are NOT supported for diskless operation in the
# current release.  The last column states the version of IRIX which last
# supported a specific architecture.  NEVER means a specific architecture
# was never supported in a diskless configuration.
#
#+--------------------+---------+----------+---------------------------+-------+
#| Machine Type       | CPUARCH | CPUBOARD |          GFXBOARD         |VERSION|
#+--------------------+---------+----------+---------------------------+-------+
#| 4D/50G             | R3000   |   IP4    | “CLOVER1”                 | NEVER  |
#| 4D/50GT            | R3000   |   IP4    | “CLOVER2 -mSUBGR=IP4GT”   | NEVER  |
#| 4D/70G             | R3000   |   IP4    | “CLOVER1”                 | NEVER  |
#| 4D/70GT            | R3000   |   IP4    | “CLOVER2 -mSUBGR=IP4GT”   | NEVER  |
#|                    |         |          |                           |        |
#| 4D/120GTX          | R3000   |   IP5    | “CLOVER2 -mSUBGR=IP5GT”   | NEVER  |
#|                    |         |          |                           |        |
#| 4D/xy0GTX          | R3000   | IP{5,7,9}| “CLOVER2 -mSUBGR=IP7GT”   | NEVER  |
#| 4D/xy0RE           | R3000   | IP{5,7,9}| “VENICE  -mSUBGR=IP7”     | NEVER  |
#| 4D/xy0SKY          | R3000   | IP{5,7,9}| “STAPUFT -mSUBGR=SKYWR”   | NEVER  |
#| 4D/xy0VGX          | R3000   | IP{5,7,9}| “STAPUFT -mSUBGR=IP7GT”   | NEVER  |
#|  where x=2, 3 or 4, and y=1, 2, 4, or 8.                            |        |
#|                    |         |          |                           |        |
#| 4D/20{G,TG}        | R3000   |   IP6    | “ECLIPSE -mSUBGR=ECLIPSE” |  5.3   |
#| 4D/25{G,TG}        | R3000   |   IP6    | “ECLIPSE -mSUBGR=ECLIPSE” |  5.3   |
#| Key:  4D/20{G,TG} is an abbreviation for 4D/20, 4D/20G, and 4D/20TG.|        |
#|                    |         |          |                           |        |
#| 4D/210GTX
#| 4D/30{G,TG}        | R3000   |   IP12   | “ECLIPSE -mSUBGR=ECLIPSE” |  5.3   |
#| 4D/30EG (Elan)     | R3000   |   IP12   | “EXPRESS -mSUBGR=EXPRESS” |  5.3   |
#| 4D/30XS{24}        | R3000   |   IP12   | “EXPRESS -mSUBGR=EXPRESS” |  5.3   |
#| 4D/35XS{24}        | R3000   |   IP12   | “EXPRESS -mSUBGR=EXPRESS” |  5.3   |
#|                    |         |          |                           |        |
#| 4D/35{G,TG}        | R3000   |   IP12   | “ECLIPSE -mSUBGR=ECLIPSE” |  5.3   |
#| 4D/35EG (Elan)     | R3000   |   IP12   | “EXPRESS -mSUBGR=EXPRESS” |  5.3   |
#|                    |         |          |                           |        |
#| Indigo             | R3000   |   IP12   | “LIGHT   -mSUBGR=LIGHT”   |  5.3   |
#| Indigo Dual Head   | R3000   |   IP12   | “LIGHT   -mSUBGR=LIGHT”   |  5.3   |
#| Indigo XS{24}      | R3000   |   IP12   | “EXPRESS -mSUBGR=EXPRESS” |  5.3   |
#| Indigo Elan        | R3000   |   IP12   | “EXPRESS -mSUBGR=EXPRESS” |  5.3   |
#|                    |         |          |                           |        |
#| Crimson BLG        | R4000   |   IP17   | “LIGHT   -mSUBGR=IP17”    | NEVER  |
#| Crimson XS{24}     | R4000   |   IP17   | “EXPRESS -mSUBGR=IP17”    | NEVER  |
#| Crimson Elan       | R4000   |   IP17   | “EXPRESS -mSUBGR=IP17”    | NEVER  |
#| Crimson GTX        | R4000   |   IP17   | “CLOVER2 -mSUBGR=IP17”    | NEVER  |
#| Crimson VGX        | R4000   |   IP17   | “STAPUFT -mSUBGR=IP17”    | NEVER  |
#| Crimson VGXT       | R4000   |   IP17   | “STAPUFT -mSUBGR=IP17SKY” | NEVER  |
#| Crimson RE         | R4000   |   IP17   | “VENICE  -mSUBGR=IP17”    | NEVER  |
#|                    |         |          |                           |        |
#| Onyx               |         |          |                           |        |
#|    Extreme         | R4000   |   IP19   | “EXPRESS -mSUBGR=IP19”    | NEVER  |
#|    Extreme         | R10000  |   IP25   | “EXPRESS -mSUBGR=IP25”    | NEVER  |
#|    RealityEngine2  | R4000   |   IP19   | “VENICE  -mSUBGR=IP19”    | NEVER  |
#|    RealityEngine2  | R10000  |   IP25   | “VENICE  -mSUBGR=IP25”    | NEVER  |
#|    InfiniteReality | R4000   |   IP19   | “KONA    -mSUBGR=IP19”    | NEVER  |
#|    InfiniteReality | R10000  |   IP25   | “KONA    -mSUBGR=IP25”    | NEVER  |
#|                    |         |          |                           |        |
#| PowerOnyx          |         |          |                           |        |
#|    Extreme         | R8000   |   IP21   | “EXPRESS -mSUBGR=IP21”    | NEVER  |
#|    RealityEngine2  | R8000   |   IP21   | “VENICE  -mSUBGR=IP21”    | NEVER  |
#|    InfiniteReality | R8000   |   IP21   | “KONA    -mSUBGR=IP21”    | NEVER  |
#|                    |         |          |                           |        |
#| Power Indigo2      |         |          |                           |        |
#|         Extreme    | R8000   |   IP26   | “EXPRESS -mSUBGR=I2_64”   | 6.0.1  |
#|         XZ         | R8000   |   IP26   | “EXPRESS -mSUBGR=I2_64”   | 6.0.1  |
#+--------------------+---------+----------+---------------------------+--------+
#
CPUBOARD=”IP20”
CPUARCH=R4000
MACH=”IP20”
GFXBOARD=”LIGHT -mSUBGR=LG1MC”
VIDEO=” ”
|
The variables in the hardware specification section of client.dat have these meanings:
| CPUARCH | Specifies the type of CPU architecture in a client workstation. The default value for CPUARCH is R4000. Set CPUARCH to the value for the workstation model using this client tree. CPUARCH must be assigned only one value in client.dat. See Example 4-2 or the tables in client.dat for valid entries. | |
| CPUBOARD | Specifies the CPU subsystem in a client workstation. The default value for CPUBOARD is IP20. Set CPUBOARD to the workstation model using this client tree. CPUBOARD must be assigned only one value in client.dat. See Example 4-2 or the tables in client.dat for valid entries. | |
| GFXBOARD | Specifies the type of graphics subsystem in a client workstation. A subgroup designation is also required in this setting. The default value for GFXBOARD is LIGHT, whose subgroup is LG1MC. Set GFXBOARD to the value for the workstation model using this client tree. GFXBOARD and its subgroup must be assigned only one value in client.dat. See Example 4-2 or the tables in client.dat for valid entries. | |
| VIDEO | Specifies the video chip for Indy (VINO) and O2 (VICE) workstations. The default setting is null, which indicates systems with no on-board video hardware. Set VIDEO to VINO for Indy workstations; set it to VICE for O2 workstations. For other models, use the default setting (null). | |
| MODE | Specifies the 32-bit or 64-bit version of the operating system. |
Use the client_setup setup program to create a client tree configuration file for an individual client or class of clients in your diskless implementation (see “Client Tree Configuration File”).
| Note: If you prefer to use an editor to create this file, or if you need to modify an existing client tree configuration file, use the information in “Editing the Client Tree Configuration File” instead of this procedure. |
This procedure explains how to create a new client tree configuration file using client_setup.
Start client_setup.
# cd /var/boot
# ./client_setup
After your entry, this prompt is displayed:
This program will help you create a client tree configuration
file for the client you would like to install.

Choose the CPU board:
       1. IP20
       2. IP22
       3. IP28
       4. IP30
       5. IP32
Choose one (1 2 3 4 5):
Enter the number of your selection.
After your entry, your selection is confirmed and another prompt is displayed:
>> IP28 selected.
  Choose the graphics board:
       1. LIGHT
       2. EXPRESS
Choose one (1 2):
Enter the number of your selection.
After your entry, your selection is confirmed and another prompt is displayed:
>>LIGHT selected.
You have defined a client class with these components:
        CPUBOARD=IP20
        CPUARCH=R4000
        GFXBOARD=LIGHT -mSUBGR=LG1MC
        VIDEO=
        MODE=32bit
Specify a size in MB for swap.
Swap size (Default is 64m - <Enter> for default):
Specify the size of your swap file.
If you wish to specify a swap file that is different from the default, enter the size (the unit of measure is megabytes). Or, press Enter to set the swap size to 64 megabytes.
After your entry, this prompt is displayed:
Enter your NIS domain name (hit <Enter> for no domain name):
Specify a domain or simply press Enter.
If the clients supported by this file are using an NIS domain name that is different from the server's, enter the domain name for the clients. Otherwise, press Enter to set the client domain name to the domain name of the server.
After your entry, this prompt is displayed:
Specify a name for your client tree configuration file
(no extension please):
Specify a name for this client tree configuration file.
See “Client Tree Configuration File” for naming conventions.
Verify that your client tree configuration file executes.
See the information in “Verifying the Client Tree Configuration File” for this step.
To modify an existing client tree configuration file, use a text editor to make your changes. You can also use a text editor instead of client_setup to create a new client tree configuration file.
When you install Diskless software on a server, a default version of the configuration file is stored at /var/boot/client.dat. If you are creating a new configuration file with a text editor, use a working copy of client.dat as the source for the new file. (Do not edit the original version of client.dat; make a copy of it and make your changes to the copy.) You will need to change several values in the default version of client.dat.
Refer to these sections for information on setting variables when you edit a working copy of client.dat:
The client.dat file and its working copies are executable shell scripts. After you create a new client tree configuration file or edit an existing one, check its syntax by executing it, as shown in this example:
# sh Indigo_XS.dat |
If a prompt is returned after your entry, then the syntax in your configuration file is correct. If you receive any other response, the execution was not successful. Check your entries in the working file and correct any syntax errors. Then, execute the working file again.
| Note: This command does not check the validity of your settings in client.dat; it checks only the file syntax. |
To install a client tree, run client_inst, which reads the working copy of the client and share tree configuration files for configuration information; then client_inst calls inst to install the software. Because the share tree serves as the software source, you must have installed the share tree before installing any of the client trees that will use it. After you create one client tree, you can use the client_clone program to create additional copies of the tree (see “Cloning Client Trees”). Individual client trees are stored in /diskless/client_root/client_name.
| Note: You must install the nfs.sw.dskless_client subsystem in every client tree. |
As part of the client tree installation process, client_inst installs the swap tree for each client in /diskless/swap/client_name. It also creates the /etc/fstab and /etc/hosts files that clients need and includes them in the client trees. Finally, client_inst adds entries that clients need in the server's /etc/exports file and /etc/bootparams file (or that of the NIS master server). The internet address for a client must be available to network software when you install its client tree (see “Assigning Internet Addresses” in Chapter 2 for details).
The client_inst command initiates client and swap tree installations. This command requires arguments that identify the hostname of the client being installed and the share tree and client tree configuration files to be used in the installation.
Syntax for the client_inst command is shown below (see the man page client_inst for a more complete description).
client_inst -h hostname -r release -c class [-d] |
Arguments to client_inst have these meanings:
| -h hostname | Specifies the hostname of an individual client whose tree you are installing. | |
| -r release | Specifies the share tree configuration file (without the .dat extension) that is used during client tree installations. | |
| -c class | Specifies the working copy of client.dat for this class (without the .dat extension). | |
| -d | Deletes a client tree. |
The following sample illustrate client_inst command entries.
client_inst -h starlite -r IRIX_65-32 -c O2 |
The entry in this sample installs a client tree and swap tree for a client named starlite using a share tree configuration file called IRIX_ 65-32 (the .dat extension is omitted) and a client tree configuration file named O2 (the .dat extension is omitted).
The procedure in this section explains how to use client_inst to launch a client tree installation that creates a client and swap tree. Remember, only software that is installed on the share tree can be installed in a client tree.
When running client_inst, use the same media in the same order that you used with share_inst, that is, the operating system CD first, then the NFS CD, and any other source media.
The procedure assumes that you are using Inst, the command-line interface to the installation program, but you can use Software Manager, the graphical interface, instead. (See IRIX Admin: Software Installation and Licensing for information on using Inst; see the Personal System Administration Guide for information on using Software Manager.) After a client tree is created, you can add new clients by cloning the tree (see “Cloning Client Trees”).
| Note: If you are updating an existing client tree, do not use the procedures that follows. Use the update procedures in Chapter 5 instead. |
Shut down the client system.
From the /var/boot directory, start client_inst, use the same media in the same order that you used with share_inst, that is, the operating system CD first, then the NFS CD, and any other source media.
# ./client_inst -h starlite -r IRIX_65-32 -c O2
This example directs client_inst to create a client tree for starlite using configuration information in IRIX_65-32.dat for its share tree and O2.dat for its client tree. A swap tree is automatically created for this client.
After processing this entry, client_inst displays this prompt:
Client tree = /diskless/client/starlite,
                     shared tree = /diskless/share/IRIX_65-32
Enter confirmation (y/Y):
Create 64m swap file ........
Note: The pathname of the client and share trees in this prompt should match the pathnames that appear in this prompt. Enter y or Y (yes) to confirm the start of installation.
After your entry, the Inst main menu is displayed:
Default location of new software is <previous installation location>
If you are a first-time inst user, give the command “help beginner".
Inst Main Menu
 1. from [source...]          Specify location of software to be installed
 2. open [source...]          Specify additional software locations
 3. close [source]            Close distributions
 4. list [keywords][names]    Display information about software subsystems
 5. go                        Perform software installation and removal now
 6. install [keywords][names] Select subsystems to be installed
 7. remove [keywords][names]  Select subsystems to be removed
 8. keep [keywords][names]    Do not install or remove these subsystems
 9. step [keywords][names]    Enter interactive mode for install/remove/keep
10. conflicts [choice...]     List or resolve installation conflicts
11. help [topic]              Get help in general or on a specific word
12. view ...                  Go to the View Commands Window
13. admin                     Go to the Administrative Commands Menu
14. quit                      Terminate software installation

Inst>
Enter list to check to check the software selected for installation (optional).
The list option displays the contents of the share tree; the subsystems selected for installation (automatically chosen by inst) are marked by the letter i.
The list option also calculates the disk space needed to install the default selections and displays the amount of disk space that is available for installation. When the calculations are complete, check the disk space summary to determine the amount of disk space the client tree will require.
Install the nfs.sw.dskless_client subsystem.
This subsystem is required for diskless operation.
Inst> install nfs.sw.dskless_client
Change the default selections if necessary.
If you want to change the default selections, use the step i option to advance through the list of selected subsystems on the source. Use one of these entries for each subsystem that the step option posts:
Enter To leave the selection unchanged.
r Enter If it is marked i and you do not want it installed
i Enter If it is not marked i and you want to install it.
Enter go to launch the installation:
The go option installs all software subsystems marked for installation.
As it works, inst reports status messages and identifies subsystems that it is installing:
Installing new versions of selected subsystem.
When it finishes, inst displays this message:
Installation and/or removal succeeded.
Enter quit to finish the installation:
After your entry, inst processes a suite of exit commands. Allow the exit commands several minutes to process. During exit processing, watch for a “building kernel” message.

Caution: Do not make any entries that will interrupt processing of the exit commands (such as Ctrl+C, for example). Doing so can result in damage to your system.
When processing is complete, one client tree is installed on the server system. You can repeat this procedure for other clients, or use the clone_client command to reproduce additional client trees automatically (see “Cloning Client Trees”).
Client trees can be reproduced using the clone_client program. Like the conventional client_inst process, clone_client automatically creates a swap tree when it creates a client tree. When you use clone_client, you can create a duplicate client tree from another client tree or from the share tree. The software installed in cloned trees is obtained from the same source as the software used to install the model client or share tree originally. For example, if the software in the model client tree /diskless/client/starlite was installed from the remote distribution directory sandy:/dist/IRIX65-32, then the software in any tree cloned from the starlite tree is obtained from that directory on sandy.
The clone_client command has this syntax:
client_inst -f filename -r release -c class -clone src_root |
Specify this information in command arguments:
| -f filename | A file containing the names of hosts whose trees are being created by the cloning process. | |
| -r release | The working copy of the share tree configuration file that defines this client's share tree (without the .dat extension). | |
| -c class | Is the name of the working copy of client tree configuration file that was used for the model client tree (without the .dat extension). | |
| -clone src_root |
|
Once you finish building a client tree, diskless software is ready to support clients. The procedure that follows explains how to prepare a client workstation, then boot it to run as a diskless system.
| Note: Be sure that bootparams is enabled in the server's /etc/inetd.conf file before you begin this procedure (see step 9 of “Checking a Server”). |
Go to the client workstation to do this procedure:
Shut down the client, if it is running.
If the client is running, type shutdown on the console to bring down the system. If you do not shut down the client, a message warns you that the client might crash.
Go to the Command Monitor.
This step is different for different workstation models. See the owner's guide for this model if you need instructions.
-
Enter printenv and check its output for NVRAM variables. It should have several lines of these variables.
Set the NVRAM variables that support diskless operation.
The sample commands that follow illustrate how to set NVRAM variables. Notice that Indigo R4000 workstations require two variables to specify the boot file setting:
>>setenv diskless 1
>>setenv netaddr 192.0.2.6
>>setenv bootfile bootp()sandy:/var/boot/starlite/unix
>>setenv SystemPartition bootp()sandy:/var/boot/starlite
>>setenv OSLoadPartition bootp()sandy:/var/boot/starlite
>>setenv OSLoader /unix
The variables in these examples have the following meaning:
diskless The variable that enables diskless service. Set diskless to 1.
netaddr The client's Internet address. See “Assigning Internet Addresses” in Chapter 2 if you need help with this setting.
bootfile The complete pathname for the client's boot file. In the sample command above, /var/boot/starlite/unix on server sandy will be used to boot client starlite.
SystemPartition The directory where the operating system loader is located. In the previous sample command, the directory /var/boot/starlite on server sandy contains the operating system loader for starlite.
OSLoadPartition The directory where the core operating system is located. In the previous sample command, the directory /var/boot/starlite on server sandy contains the boot file for starlite.
OSLoader is the name of the IRIX boot file. The previous sample command specifies the boot file to be /unix.
Enter printenv to verify your entries.
Check the values of the NVRAM variables in the output from printenv to verify that the settings are correct.
Enter init to set NVRAM variables.
If your system's Ethernet transceiver has light emitting diodes (LED), you will see Ethernet activity for about 3 to 10 minutes, depending on other Ethernet activity. After a few minutes, the Command Monitor menu is displayed.
To start the client, select 1) Start System from the Command Monitor.
Configure the client as you would normally configure any host.
For many networks, host configuration commonly includes such tasks as setting a netmask, mounting (or automounting) filesystems, and setting up user accounts. Perform such tasks on the diskless clients that you are running.
Reboot each client to put them into operation.
Once booting is complete, the client workstation is running as a diskless workstation. Step 4 of this procedure should be repeated if any environment variables change (if the client gets a new Internet address, for example).