To create a new share tree, you run the /var/boot/share_setup program to create a share tree configuration file that specifies the requirements of your share tree. To modify a share tree configuration file that already exists, use a text editor. When the configuration file is finished, you run the share tree installation script, /var/boot/share_inst, which installs the share tree software based on the specifications that you provided in the configuration file. This process is repeated for each share tree that you plan to run (see Figure 2-5 for an illustration of this process).
This chapter provides the information and procedures that are needed to configure and install a share tree. It contains the following sections:
| Note: To update an existing share tree with a newer software version, use the information in Chapter 5, “Updating Software on Diskless Trees.” |
The share tree configuration file contains a list of variables that specify the diskless server and its clients. Specifically, these variables identify the host that will act as the diskless server, the name and location of the share tree, and the hardware components for each client class that the tree supports (see “Influence of Client Classes” for background information).
| Note: Your server should already have a default copy of a share tree configuration file in /var/boot/share.dat as a result of installing Diskless software. |
To create a new share tree configuration file, you can run the /var/boot/share_setup program, or you can create a working copy of the /var/boot/share.dat file that was stored on the server during the Diskless software installation process. If you plan to modify an existing share tree configuration file, you must use a text editor to make your changes.
Share tree configuration files are stored in the /var/boot directory. This directory contains a separate configuration file for each share tree that it supports. For example, if a server supports three share trees, then the /var/boot directory contains three separate share tree configuration files.
By convention, a share tree configuration file is named for the release of IRIX that the tree contains; a .dat extension is appended to its name. For example, this file contains configuration information for a share tree of IRIX 6.5 for 32-bit systems:
/var/boot/IRIX_65-32.dat |
| Note: Configuration information for share trees supporting 32-bit and 64-bit versions of the same IRIX release must be stored in separate share tree configuration files. |
Server variables in a share tree configuration file specify the host that will act as the diskless server and whether NIS will provide any client information. Example 3-1 illustrates the server specification section of share.dat.
# SERVER ENVIRONMENT SETUP # # HOSTNAME : Do not change unless you understand network topologies. # This variable should contain the name of the interface # that is connected directly to the client machines. # For example, a server machine “foobar” has two interfaces. # Its primary interface is FDDI, and its secondary interface # is ethernet. The client machines are on an ethernet # subnet connected to foobar's ethernet interface. foobar's # ethernet interface is named “ether-foobar”. In this # case, the HOSTNAME variable below needs to be set to # “ether-foobar” because hostname will return “foobar”. # SHAREHOST : Do not change # SERVER_NIS : yes - server is running NIS.Implies NIS name lookup # during installation. Please note that after # yp_boot_param runs, it takes time for the information # to propagate back to the diskless server from the # NIS master. Also, this option is only fully functional # for SGI NIS masters. # no -- server is using local naming service. # HOSTNAME=”`hostname`” SHAREHOST=”$HOSTNAME” SERVER_NIS=”no” |
The variables in the server specification section have these meanings:
| Note: Diskless Workstation software installation scripts do not perform name and address resolution by means of DNS. However, DNS is supported after the share and client trees are installed. |
Share tree variables in a share tree configuration file identify the directory that contains the share tree for a given release of IRIX. Example 3-2 illustrates the share tree specification section of share.dat.
# SHARE TREE SETUP # # DISKLESS : directory where all the share and client trees reside. # SHARE : Do not change # DISKLESS=”/diskless” SHARE=”$DISKLESS/share/$RELEASE” The variables in the share tree specification section of share.dat have these meanings: |
| DISKLESS | Specifies the pathname to the root of the diskless tree; that is, this directory contains the subdirectories for the share tree, client trees, and swap trees (see Figure 2-2). Set DISKLESS to the pathname of the root of your diskless tree.
| |||
| SHARE | Specifies the pathname to the root of the share tree (see Figure 2-2). The default setting for SHARE ($DISKLESS/share/$RELEASE) specifies the root of the share tree. Do not change this setting. The default setting assigns to $DISKLESS the value that you specified for DISKLESS, the previous variable. This setting assigns to $RELEASE the name of the share tree, which you supply as an argument to the share_inst command when installing the share tree (see “Share Tree Installation Procedure”). |
Client hardware variables in a share tree configuration file specify the architectural components of the client models that the tree supports. These entries determine the hardware-specific files that are included in the share tree. During client tree installation, the hardware specific modules that an individual workstation needs are selected from the share tree and installed into its client tree.
By default, share_setup assumes that a share tree supports all client classes listed in Table 2-1. However, to reduce the amount of disk space that the share tree requires, include only the client classes that will use the tree.
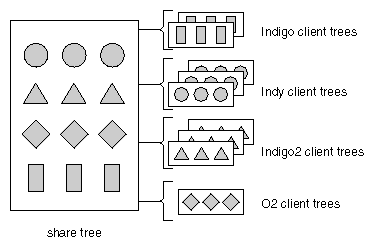
Figure 3-1 illustrates the hardware-specific modules that a share tree must contain to build the client trees for four classes.
Example 3-3 illustrates the hardware specification section of share.dat.
# CLIENT ARCHITECTURE SETUP # # The following variables are set using the table provided in client.dat. # Please consult that file for valid values. # # It is no longer possible to install a share tree with all possible # architectures. The MODE variable must be set to either # (32bit or 64bit). This is due to 32bit kernels or 64bit # kernels running on the client. So a share tree can contain # only 32bit kernels or 64bit kernels, but not both. # # To configure a share tree to install 32bit (or 64bit) kernels # in the /usr tree, set the MODE variable to 32bit or 64bit. If a # subset of client classes are to be installed, set all 5 variables # for each class. The example below shows settings for an R4000 # Indigo with LIGHT graphics. (The MACH variable is obsolete.) #CPUBOARD=”IP20” #CPUARCH=R4000 #GFXBOARD=”LIGHT -mSUBGR=LG1MC” #VIDEO=” ” #MODE=” ” # # To install multiple architectures, set the 5 variables as shown below. # Notice that the initial symbols CPUBOARD, CPUARCH, and GFXBOARD are # imbedded in the values for the respective variables. The example below # contains an R5k O2 with CRIME graphics and an R4k Indy with # NEWPORT/NG1 graphics. (The MACH variable is obsolete.) # #CPUBOARD=”IP20 -mCPUBOARD=IP12” #CPUARCH=”R4000 -mCPUARCH=R3000” #MACH=”IP20 -mIP12” #GFXBOARD=”LIGHT -mSUBGR=LG1MC -mGFXBOARD=EXPRESS -mSUBGR=EXPRESS” #VIDEO=” ” |
| Note: Use Table 2-1, Example 4-2, or the tables in the client.dat file to determine the components in your client workstations. Be sure you include the components of all workstation models that the share tree will support. |
The variables in the hardware specification section of share.dat have these meanings:
| CPUBOARD |
Set CPUBOARD to the values needed by your clients. If your clients include different workstation models, you might need to assign multiple settings to this variable (see Table 2-1 for details). Check the samples in Example 3-3 (or the client.dat file) for the correct format of your settings. | ||
| CPUARCH | Specifies the type of CPU architecture in client workstations. You can assign these values to CPUARCH:
Set CPUARCH to the values needed by your clients. If your clients include different workstation models, you might need to assign multiple settings (see Table 2-1 for details). Check the samples in Example 3-3 (or the client.dat file) for the correct format of your settings. | ||
| GFXBOARD | Specifies the type of graphics subsystems in client workstations. A subgroup designation is also required in this setting. You can assign these values to GFXBOARD:
Set GFXBOARD to the values needed by your clients. If your clients include different workstation models, you might need to assign multiple settings. Check the samples in Example 3-3 (or the client.dat file) for the correct format of your settings. | ||
| VIDEO | Specifies the video chip. The default setting is null, which indicates a system with no on-board video hardware. You can assign these values to VIDEO:
| ||
| MODE | Specifies the version of an IRIX release. You can assign these values to MODE:
|
Use the /var/boot/share_setup program to create a separate configuration file for each share tree in your diskless implementation. Remember that a 32-bit and a 64-bit version of a particular IRIX release (such as IRIX 6.5) require separate share trees and therefore separate share tree configuration files.
| Note: If you prefer to use an editor to create this file, or if you need to modify an existing share tree configuration file, use the information in “Editing a Share Tree Configuration File” instead of this procedure. |
This procedure explains how to create a new share tree configuration file with share_setup.
Create the root directory for the diskless tree.
Start share_setup.
# cd /var/boot
# ./share_setup
After your entry, you see this prompt:
This program will help you create a share tree configuration file for a single IRIX version. Create a separate share tree configuration file for a 32-bit and a 64-bit version of the same IRIX release.
Retrieving system information...
Hostname is hostname
If you wish to use a different interface name for this host, enter it now (press return if hostname is ok):
Press Enter to accept the default interface name or enter a different interface name.
The share_setup program retrieves the name of the primary interface on the host where it is running. If clients are attached to a different interface, enter the other interface name at this prompt. Otherwise, press the Enter key to accept the hostname that share_setup retrieved. After you enter the interface name, this prompt is displayed:
Do you want client boot information stored on hostname (y/n)?
Specify whether client boot information should be stored on hostname.
The share_setup program assumes that client names and addresses are stored in the local copy of the /etc/hosts file. If client information is stored locally, answer yes. This prompt is displayed after your entry:
Enter the root directory of the diskless tree (e.g. /diskless):
Client name and address information and information about client filesystems can be stored on an NIS host in its /etc/bootparams file rather than in the local /etc/hosts file. If this information is stored on an NIS host, answer no to the previous question. This prompt is displayed after your entry (the updaters file allows users on the hostname system to write changes to the NIS database):
Make sure hostname is listed in the server's /etc/updaters file
Enter the root directory of the diskless tree (e.g. /diskless):
Enter the name of the root directory for the diskless tree.
See “Diskless Filesystems” if you need help. After your entry, this prompt is displayed:
Enter the name of the share tree (e.g. IRIX65):
Enter the directory name of the share tree.
Enter only the directory name for the share tree; do not include a pathname in your entry. The share_setup program will construct the pathname for you. After your entry, share_setup posts the complete pathname of the share tree (share_dir in the example below) and prompts for the name of the share tree configuration file:
Share tree will be installed at /diskless/share/share_dir
Enter the name of the share tree configuration file (no extension please):
Enter the filename for the share tree configuration file.
After your entry, share_setup posts the complete pathname of the share tree configuration file (/var/boot/myfile.dat in the example below) and prompts you to press Enter to continue:
Share tree configuration file will be written at /var/boot/myfile.dat
Press [Enter] to continue
Press Enter to begin specifying the hardware components of your clients.
After your entry, this prompt is displayed:
***CLIENT ARCHITECTURE INFORMATION***
*** PLEASE READ CAREFULLY ***
If you are using a 32 bit machine as your diskless server, you can only
install share trees for 32 bit platforms.  If you have a 64 bit server,
you can install either a 32 or a 64 bit share tree.
Do you want to install a share tree for all client platforms (y or n):
Answer yes or no to this question.
If you answer yes, share_setup creates a configuration file that contains all the software needed to support all classes of Silicon Graphics clients (see “Client Hardware Variables in the Share Tree Configuration File” for more information).
If you answer no, share_setup props you to specify the hardware components in one class. To include additional classes in the tree, answer yes when you see this prompt:
Are there more client classes using this share tree (y/n)?
When you finish specifying the hardware components for all classes, share_setup saves the information in the configuration file under the name that you specified in step 7.
Verify that your share tree configuration file executes.
See the information in “Verifying the Share Tree Configuration File” for this step.
To modify an existing share tree configuration file, you must use a text editor to make your changes. You can also use a text editor instead of share_setup to create a new share tree configuration file.
When you install Diskless software on a server, a default version of the configuration file is stored at /var/boot/share.dat. If you are creating a new configuration file with a text editor, use a working copy of share.dat as the source for the new file. (Do not edit the original version of share.dat; make a copy of it and make your changes to the copy.) Some values in the default version of share.dat, though not all, must be changed to reflect conditions in your diskless implementation.
Refer to these sections for information on setting variables when you edit a working copy of share.dat:
The share tree configuration file is an executable shell script. After you create a new configuration file or edit an existing one, check its syntax by executing it, as shown in this example:
# sh IRIX_65-32.dat |
If a prompt is returned after your entry, the syntax in your configuration file is correct. If you receive any other response, check your entries in the file for syntax errors.
| Note: This command does not check the validity of the settings in a share tree configuration file; it checks file syntax only. |
To build a share tree, enter the share_inst command and the name of the share tree as a command argument. The share_inst command automatically calls inst to install the software from its installation location. The following example illustrates a share_inst command entry. Notice that the .dat extension is omitted from the filename of the share tree configuration file:
# share_inst -r 32-bitIRIX_6.5 |
See Table 2-2 for a list of subsystems recommended for share tree installations.
| Note: The nfs.sw.skless_client subsystem is mandatory. |
The share_inst command launches a share tree installation and also deletes a share tree. Syntax for the share_inst command is described below (see the man page share_inst for a more complete description).
share_inst -r release_name [-d]
|
The arguments to share_inst command have the following meaning.
| -r | The flag for the release_name argument. | |
| release_name | The name of the configuration file (a working copy of share.dat) without the .dat extension. See “Share Tree Configuration File” for details. | |
| -d | The flag to delete a share tree. |
This example deletes .
# share_inst -d IRIX_62 |
The procedure below explains how to use share_inst to launch a share tree installation. It assumes that you are using Inst, the command line interface to the installation program, but you can use Software Manager, the graphical interface, instead. (See IRIX Admin: Software Installation and Licensing for information on using Inst; see the Personal System Administration Guide for information on using Software Manager.) The location of the installable software source (local CDs, remotely-mounted CDs, or a remote directory) affects steps 3 and 4 of this procedure.
| Note: If you are updating an existing share tree, do not use this procedure; use the procedures in Chapter 5 instead. |
Start share_inst as shown in this example:
# cd /var/boot
# ./share_inst -r IRIX_65-32
This entry directs share_inst to read IRIX_ 65-32.dat (the working copy of share.dat) to build a share tree for 32-bit clients running IRIX 6.5. After it processes your entry, share_inst displays a confirmation prompt:
About to install shared tree at/diskless/share/IRIX_65-32......
Enter confirmation (y/Y):

Note: The pathname of your share tree should match the pathname that appears in this prompt. Enter y or Y (yes) to confirm the start of installation.
After your entry, the Inst Main menu is displayed:
Default location  of new software is <previous installation location>
If you are a first-time inst user, give the command “help beginner".
Inst Main Menu
 1. from [source...]          Specify location of software to be installed
 2. open [source...]          Specify additional software locations
 3. close [source]            Close distributions
 4. list [keywords][names]    Display information about software subsystems
 5. go                        Perform software installation and removal now
 6. install [keywords][names] Select subsystems to be installed
 7. remove [keywords][names]  Select subsystems to be removed
 8. keep [keywords][names]    Do not install or remove these subsystems
 9. step [keywords][names]    Enter interactive mode for install/remove/keep
10. conflicts [choice...]     List or resolve installation conflicts
11. help [topic]              Get help in general or on a specific word
12. view ...                  Go to the View Commands Window
13. admin                     Go to the Administrative Commands Menu
14. quit                      Terminate software installation

Inst>
Specify the location of your software.
If you are installing the software locally from a CD, you can accept the default location for the software:
Insert the CD in its drive.
Press Return.
If you are installing the software from a remote source, specify its location:
Enter from to select an alternative source
Specify the location of the software, as shown in the following examples. These examples show entries that specify a remote directory and remotely mounted CD as the source of the software:
Inst> from bigsgi:/d2/irix51
Inst> from bigsgi:/CDROM/dist
After your entry, inst confirms that it will look for the software at the location you specified, then it reads the products available at that location.
Insert the next CD, if needed.
If you have more than one CD to install, enter the open command after inserting each additional CD so that its contents can be read:
open bigsgi:/CDROM/dist
Enter list to check selected subsystems and space requirements (optional):
Inst> list
Computing disk space changes:
The list option posts the names of software subsystems available from the source; the subsystems that inst selects as default installation choices are designated by the letter i. The list option also calculates the disk space needed to install the selected subsystems.
Verify that nfs.sw.dsk_client is selected for installation.
Change the default selections if necessary.
If you want to change the default selections, use the step i option to advance through the list of selected subsystems on the source. Use one of these entries for each subsystem that the step option posts:
Enter To leave the selection unchanged.
r Enter If it is marked i and you do not want it installed
i Enter If it is not marked i and you want to install it.
Since it is time consuming to install a share tree, you might want to verify your selections by typing list again.
Check for conflicts and resolve them, if you have any.
Inst> conflicts
Use the messages returned by the conflicts command to adjust your selections.
Enter go to launch the installation.
Inst> go
Installing new versions of selected subsystem_name subsystems.
As it works, inst displays messages that identify the subsystems being installed. You see this message when the installation is finished:
Installation and/or removal succeeded.
Inst>
Enter quit to complete the installation:
Inst> quit
Running exit commands...
If there is a problem with the exports file (it might be corrupted or in use by another user, for example), you will see a message in your current window and a message is sent to the console. If there is a problem in exports, correct the /etc/exports file; then run exportfs -a manually to correct the problem.
Allow the exit commands several minutes to process.

Caution: Do not make any entries that will interrupt processing of the exit commands (such as Ctrl+C, for example). Doing so can result in damage to your system.
When processing is complete, the share tree is installed on the server system. To verify the installation, change to the directory for the share tree and list its contents:
# cd /diskless/share/IRIX_65-32 # ls dev/ lib/ sbin/ var/ |