Consistent models increase the user's sense of control of a system. By implementing consistent models across systems and applications, you encourage that sense of control. This chapter describes the models OSF/Motif uses to interact with the components:
The keyboard focus model, which determines which component on the screen receives keyboard events.
The input device model, which describes how different input devices, such as the keyboard and the mouse, interact with applications.
The navigation, activation, and selection models, also important for system and application consistency, are described in Chapter 3, "Navigation," Chapter 4, "Selection," and Chapter 5, "Component Activation."
A typical workspace can contain many windows. Each window will receive input from the keyboard, the mouse, or both. The window that receives keyboard events has the input focus. Indeed, when keyboard input is directed to a window, it is actually received by some control within the window. The keyboard focus model determines which window in the workspace and which component within that window gets each keyboard input. The keyboard focus may also be referred to as the input focus.
In order to avoid conflicts, the window manager must allow only one window to have the keyboard focus at a time. The window with the keyboard focus must be highlighted in some way, usually by a change in shade or color to the window border. Each application must allow only one component at a time to have the keyboard focus within the window that has the keyboard focus.
The keyboard focus model is defined by a focus policy. A focus policy is a specific mechanism for moving the focus among windows and components. The focus policy can be different between windows than it is within windows. This section only attempts to describe the focus policies; however, their impact on window managers, applications, and components is described in detail where it applies. It is sufficient at this point to note that window managers, applications, and new components must support both explicit and implicit focus policies. Chapter 7, "Window Manager Design Principles" describes in detail how to move the focus among windows that use explicit and implicit focus policies.
In the implicit focus policy, the keyboard focus tracks the mouse pointer. No explicit action (other than mouse motion) is performed to set the keyboard focus in the implicit focus model. When an implicit focus policy is used at the window level, keyboard events are sent to the window that the mouse pointer is in. When an implicit focus policy is used within a window, keyboard events are sent to the component that the mouse pointer is in. In implicit mode, the keyboard focus tracks the mouse pointer. Because of this, there is no way to move the keyboard focus from the keyboard using implicit mode. Implicit focus is sometimes referred to as pointer, track pointer, or track listener policy, or as being real-estate driven. In this focus policy, the location cursor for keyboard events does not need to be shown except in components like Text, in which keyboard input is common; however, the application can show it.
The explicit focus policy requires the user to explicitly select which window or component receives the keyboard focus. In explicit focus mode at the window level, a user moves the keyboard focus to a window by pressing BSelect while the mouse pointer is over the window. Simply moving the mouse pointer over a window does not give the window the keyboard focus. Because of this, explicit mode is often called click-to-type. In explicit mode within a window, a user generally moves the keyboard focus to a specific component within a window by pressing BSelect over the component. Pressing BSelect must not move focus to a component that is not traversable or does not accept input. Pressing BSelect in a component that is used only to change the visible portion of another component, such as a ScrollBar or Sash, should act on that component but should not move focus to it. In this focus policy, the location of keyboard focus must be shown by a location cursor.
In explicit mode, focus can also be moved among windows by the keyboard using <Alt> <F6>,<Alt> <Tab>,<Alt> <Shift> <Tab>,and <Alt> <Shift> <F6>.
In explicit mode, keyboard focus moves explicitly among the components in a window as well as among the windows. Moving the keyboard focus among components in a window using the keyboard is called component navigation. Keyboard events go to the component in the window with the keyboard focus. Keyboard focus is moved among components using <Tab>,<Ctrl> <Tab>,<Shift> <Tab>,<Ctrl> <Shift> <Tab>,<F10>,<Menu>,<Down arrow>,<Left arrow>,<Right arrow>,and <Up arrow>.Internal window navigation is described in detail in Chapter 3, "Navigation."
If the focus policy is implicit, an implementation can still enable keyboard-based operations that explicitly move the location cursor. It must at least implement the special cases for Menu traversal as described in Chapter 3, "Navigation." <F10> (or <Shift> <Menu> if <F10> is not available) moves the cursor to the MenuBar. <Menu> (or <Shift> <F10> if <Menu> is not available) pops up a Popup Menu.
User interface applications can take input from both pointing devices and keyboards. For whatever reason, a user may prefer to interact with an application by using either a keyboard or a pointing device. Some users may even be restricted to using only a keyboard. Because of these preferences and possible restrictions, all application functionality must be available from the keyboard alone.
Design your application so that the user can control it using a pointing device, the keyboard, or both. Although you can decide to make the pointing device the primary means of control, you must provide the user with keyboard methods to control the application. Designing applications for dual accessibility enables users to choose the input device they find best suited to their particular work situation and personal preferences.
Certain disabled users are unable to keep modifier keys pressed while typing another key. Underlying window systems should provide a mode in which a typed modifier key acts as if it remains pressed until the next nonmodifier key is typed.
A pointing device is a tool that lets the user move a pointer around on the screen. A pointing device also has some means of activating the object under the pointer. A pointing device allows the user to directly manipulate screen objects. Rather than entering a keyboard command for each action, a user can point to an object and directly manipulate it using the pointing device.
The most typical pointing device is a mouse, although a graphics tablet, track ball, joystick, and other tools also work as pointing devices. Throughout this guide we use the term mouse to refer to all pointing devices. You can use any pointing device in place of a mouse.
With a mouse, objects on the screen can be manipulated by combining the mouse pointer with the mouse buttons. This guide assumes that a mouse, or any pointing device, has three buttons:
| BSelect | Used for selection, activation, and setting the location cursor. This button must be the leftmost button, except for left-handed users where it can be the rightmost button. | |
| BTransfer | Used for moving and copying elements. This button must be the middle mouse button, unless dragging is integrated with selection. Details about the effects of integrating BTransfer with BSelect are described in Section 4.3.5, "Integrating Selection and Transfer." | |
| BMenu | Used for popping up Menus. This button must be the rightmost button, except for left-handed users, where it can be the leftmost button. |
If your pointing device only has two buttons, BSelect still must be bound to the leftmost button. There are a number of alternatives to properly binding BTransfer and BMenu:
The mouse can be treated as a 3-button mouse if chording the two buttons is treated as the third button. Chording buttons means to press, click, or release two or more buttons simultaneously. The chorded buttons can be treated as the second or third button on a 3-button mouse, in which case the unchorded buttons are treated as the first and third, or first and second buttons, respectively.
Alternatively, BTransfer can be bound to the rightmost button, and BMenu is then bound to <Alt> BSelect.
Finally, BMenu can be bound to the rightmost button, and BTransfer is then integrated with the selection button.
As with a 3-button mouse, the actions of the rightmost and leftmost mouse buttons can be switched for left-handed users.
If your mouse has only one button, BSelect must be bound to it, BTransfer can be integrated with BSelect, and BMenu must be bound to <Alt> BSelect. Mouse-based primary and quick transfer mechanisms are unavailable using a 1-button mouse.
If your mouse has more than three buttons, the first three correspond to those on a 3-button mouse.
Users can combine mouse button press and release actions along with mouse movements to activate elements of applications and components. Various mouse button actions are described as follows, along with this guide's usage conventions:
| Press | Indicates pressing a mouse button without releasing it. This mouse action is often used to select an object for action. This guide uses BSelect Press to indicate a press on the first mouse button. | |
| Release | Indicates releasing a mouse button after pressing it. This mouse action is often used to perform the action initiated by a press or a drag. This guide uses BSelect Release to indicate a release on the first mouse button. | |
| Click | Indicates pressing and releasing a mouse button without moving the pointer. This mouse action is used to select an object or perform an action. The activation action actually occurs on the release of the mouse button. This guide uses BSelect Click to indicate a click on the first mouse button. | |
| Motion | Indicates pressing a mouse button without releasing it and then moving the position of the pointer. The action of a drag operation tracks the position of the mouse pointer. The drag action ends with a release action. This mouse action is commonly used to select a range of objects, or move a selected object. This guide uses BSelect Motion to indicate a drag using the first mouse button. | |
| MultiClick | Indicates a number of clicks in quick succession. MultiClicks are often referred to by the actual number of clicks, as in double-click or triple-click. A double-click is often used to perform the default action of an object. This guide uses BSelect Click 2 to indicate a double-click on the first mouse button, BSelect Click 3 to indicate a triple-click, and so on. This guide uses BSelect Click 2+ to indicate two or more clicks on the first mouse button. | |
| MultiPress | Indicates a number of clicks in quick succession without a final release. As in MultiClick, MultiPresses are often referred to by the actual number of presses. This guide uses BSelect Press 2 and the variations mentioned in MultiClick to indicate MultiPress actions on the first mouse button. | |
| MultiMotion | Indicates a MultiPress action followed by moving the position of the pointer. The action of a MultiMotion operation tracks the position of the mouse pointer. The MultiMotion action ends with a release action. As in MultiClick, MultiMotions are often referred to by the actual number of presses. This guide uses BSelect Motion 2 and the variations mentioned in MultiClick to indicate MultiMotion actions using the first mouse button. |
The shape of the mouse pointer provides the user with an important visual cue, indicating the functionality of the area in which the mouse pointer is currently located. You should not create new mouse pointer shapes for functions that already have mouse pointer shapes associated with them, except for localization, but you can create new mouse pointer shapes for functions not already associated with a pointer shape. You should not use a predefined shape to symbolize a function that it was not designed to represent.
A list of the defined pointer shapes follows, along with their usage and hotspots. A pointer's hotspot is the actual position on the pointer that tracks the movements of the mouse. As the pointer changes from one shape to another, the location of the hotspot must not move on the screen. The hotspot is the precise location on the pointer where mouse actions occur.

The upper-left pointing arrow pointer is a general-purpose pointer. It is used in most window areas for single-object selection and activation. The hotspot for the arrow pointer should be in the point of the arrow.

You can optionally use an I-beam pointer in any Text component. It is used to change the location of the text insertion cursor and to perform actions on text. If the I-beam is used, it can be hidden during the time between any keyboard action and a mouse movement. This helps the user distinguish the I-beam pointer from the text insertion cursor, which can also be an I-beam. The hotspot for the I-beam pointer should be on the vertical bar of the I-beam about one-third up from the bottom.

The X pointer can indicate when the pointer is outside of any application area. The hotspot for the X pointer should be where the lines intersect.
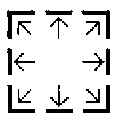
The resize pointers indicate positions for area resize, and they remain during a resize operation. The direction of the arrow in the pointer indicates the direction of increasing size. The horizontal and vertical pointers indicate resize in either the horizontal or vertical direction. The diagonal pointers indicate resize in both the horizontal and vertical directions simultaneously. The hotspot for the resizing pointers should be on the elbow or the line at the position pointed to by the arrow.

The hourglass pointer, a working pointer, indicates that an action is in progress in the area, and that the pointer has no effect in the area. While the hourglass pointer is active, all mouse button and keyboard events are ignored in the area. The hotspot for the hourglass pointer should be located at the center of the hourglass, although it should not be used for activation. The hourglass pointer can be used interchangeably with the watch pointer.

The watch pointer, a working pointer, indicates that an action is in progress in the area, and that the pointer has no effect in the area. While the watch pointer is active, all mouse button and keyboard events are ignored in the area. The hotspot for the watch pointer should be located at the top of the watch, although it should not be used for activation. The watch pointer can be used interchangeably with the hourglass pointer.

The 4-directional arrow pointer indicates a move operation is in progress, or a resize operation before the resize direction has been determined. During a move operation, the object, or an outline of the object should move to track the location of the pointer. During a resize operation, the pointer is used to indicate a direction for resizing. The 4-directional arrow pointer should change to the appropriate resize arrow when the resize direction is determined, either by crossing an object boundary with the pointer or by pressing a keyboard direction key. The hotspot for the 4-directional arrow pointer should be at the spot where the arrows intersect.

The sighting pointer is used to make fine position selections. For example, in a drawing program it can be used to indicate a pixel to fill or the connecting points of lines. The hotspot for the sighting pointer should be at the spot where the lines intersect.

The caution pointer is used to indicate that action is expected in another area before input can be given to the current area, and that the pointer has no effect in the area. While the caution pointer is active, all mouse button and keyboard events are ignored in the area. The hotspot for the caution pointer should be located at the center of the caution symbol, although it should not be used for activation.

The question pointer is used to request an input position or component from the user. This is often used to input an object for interactive help. The user requests interactive help, then the question pointer is displayed to allow the user to indicate what position or component help is requested for. The hotspot for the question pointer should be at the bottom of the question mark.
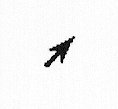
You can optionally use an arrow pointing to the upper-right corner to indicate a pending Menu action. This shape indicates that a Menu is popped up or pulled down and waiting for a Menu item to be activated or the Menu to be removed. The hotspot for this arrow pointer should be in the point of the arrow.
If you need to design a new mouse pointer shape, keep the following in mind:
The shape of the pointer should give a hint to its purpose.
The hotspot should be easy to locate, and obvious.
The shape should be easy to see.
The shape should not create visual clutter.
The details of how the pointer tracks the motion of the mouse are not handled at the level of the application, but they are worth noting here. There are two concepts that define how the pointer tracks the motion of the mouse: gain and acceleration.
Gain refers to the ratio of the distance the pointer moves to the distance the mouse moves. If the gain is increased, the mouse pointer moves farther for a given mouse movement. The gain should not change across the environment. Instead, if your application requires finer motion, it should include a zoom feature. A zoom feature changes the relative size of an area of your application. Zooming in on an area allows the user to make finer adjustments than normal. Zooming out from an area allows the user to move through the application more quickly.
Acceleration is a temporary change in the gain. It is commonly used to change the gain, based on the speed of the mouse movements. The acceleration could be set so that, if the mouse moves slowly, the gain is reduced to allow for finer adjustments of pointer position or, if the mouse moves quickly, the gain is increased to allow quicker screen movement. This can be very confusing to new users. Gain and acceleration are handled on a global scale in the system, outside of the application. Applications should not change the gain and acceleration characteristics of mouse movement.
The pointer position is intended only as input to applications. It is not intended as an output mechanism for applications. Changing the location of the mouse pointer is known as warping the pointer. Your application must not warp the pointer, unless you provide the user with a means of disabling this behavior.
Warping the pointer is confusing to users, and reduces their sense of control. Also, warping the pointer can cause problems for users of absolute location pointing devices (like graphics tablets). Graphics tablets map pointer device locations to absolute screen locations; so, if the pointer is warped, the pointer loses synchronization with the pointing device, making some screen locations impossible to reach. Note that for these types of devices, accelerating the pointer has the same effect as warping the pointer, but this can be handled by the pointer driver software.