This chapter provides recommendations and a summary of the steps required to initially configure a cluster using either the graphical user interface (GUI) or the cmgr command. You may also wish to use the worksheet provided in Appendix F, “Initial Configuration Checklist”. If you are converting from an existing FailSafe cluster, see “Set Up an Existing FailSafe Cluster for CXFS with the GUI” in Chapter 10.
This chapter points to detailed descriptions in the task reference chapters and in the XVM Volume Manager Administrator's Guide.
For the initial installation, SGI highly recommends that you use the GUI guided configuration tasks; see “Configuring with the GUI”. You should also read through the entire book, including Chapter 18, “Troubleshooting”, before configuring the cluster.
CXFS requires a license to be installed on each node. If you increase the number of CPUs in your system, you may need a new license; see Chapter 6, “IRIX CXFS Installation”. For information about other operating systems, see the CXFS MultiOS Client-Only Guide for SGI InfiniteStorage.
If you want to use the file alteration monitor (fam), you must remove the /dev/imon file from CXFS nodes. Removing this file forces fam to poll the filesystem. For more information about the monitor, see the fam man page.
If there are any network issues on the private network, fix them before trying to use CXFS. Ensure that you understand the information in “Hostname Resolution and Network Configuration Rules” in Chapter 5.
Use a network switch rather than a hub for performance and control.
For large clusters, SGI recommends that you first form a functional cluster with just server-capable nodes and then build up the large cluster in small groups of client-only nodes. This method make it easier to locate and fix problems, should any occur. See “Configuring a Large Cluster”.
Create a new cluster using server-capable nodes that have the same version of the OS release installed. When the cluster is functioning, you can later upgrade selected nodes to an adjacent release.
If you want to run CXFS and Trusted IRIX, all server-capable nodes in the cluster must run Trusted IRIX. The client-only nodes can run IRIX. Linux 64-bit and the multiOS platforms are not supported in a cluster with Trusted IRIX. You should configure your system such that all nodes in the cluster have the same user IDs, access control lists (ACLs), and capabilities.
Avoid unnecessary metadata traffic by avoiding the use of the find command. Because CXFS filesystems are considered as local on all nodes in the cluster, the nodes may generate excessive filesystem activity if they try to access the same filesystems simultaneously while doing a find. Edit the nodes' crontab file to only execute find on one metadata server of the cluster.
Always contact SGI technical support before using xfs_repair on CXFS filesystems. Only use xfs_repair on metadata servers and only when you have verified that all other cluster nodes have unmounted the filesystem.
When using xfs_repair, make sure it is run only on a cleanly unmounted filesystem. If your filesystem has not been cleanly unmounted, there will be un-committed metadata transactions in the log, which xfs_repair will erase. This usually causes loss of some data and messages from xfs_repair that make the filesystem appear to be corrupted.
If you are running xfs_repair right after a system crash or a filesystem shutdown, your filesystem is likely to have a dirty log. To avoid data loss, you MUST mount and unmount the filesystem before running xfs_repair. It does not hurt anything to mount and unmount the filesystem locally, after CXFS has unmounted it, before xfs_repair is run.
Use an odd number of server-capable nodes.
Use an odd number of CXFS administration nodes.
Shut down cluster services before maintenance. Disabled nodes are not used in CXFS kernel membership calculations, so this action may prevent a loss of quorum.
Use relocation and recovery only on standby nodes.
Do the following before shutting down a node:
Flush the system buffers in order in order to minimize the amount of buffered information being lost:
nodeA# sync
Stop the CXFS services for the node using the force flag. You must run this command from one of the other CXFS admin nodes:
otherAdmin# stop cx_services on node nodeA for cluster ClusterName force
You could also perform this step with the CXFS GUI. See “Stop CXFS Services (Normal CXFS Shutdown) with the GUI” in Chapter 10 and “Stop CXFS Services with cmgr” in Chapter 11
If you do not want the cluster services to run during maintenance, run the following commands:
nodeA# chkconfig cxfs_cluster off
nodeA# chkconfig cluster off

Note: If you do an upgrade of the cluster software, these flags will be automatically reset to on and the cluster services will be started. Reboot the node.
Enable the forced unmount feature for CXFS filesystems, which is off by default. Many sites have found that enabling this feature improves the stability of their CXFS clusters, particularly in situations where the filesystem must be unmounted.
On IRIX nodes, this feature uses the umount -k option. The -k option attempts to kill processes that have open files or current directories in the appropriate filesystems and then unmount them. That is, it attempts to terminate any I/O going to the filesystem, so that it can unmount it promptly, rather than having to wait for the I/O to finish on its own, causing the unmount to possibly fail.
On Linux 64-bit nodes, a similar function is performed with the fuser -m -k command and the umount command
This feature is available through the following CXFS GUI menu:
Tasks -> Filesystems -> Unmount a CXFS Filesystem
You can also specify this feature using the cmgr commands to define the filesystem.
See “Unmount CXFS Filesystems with the GUI” in Chapter 10, and “Define a CXFS Filesystem with cmgr” in Chapter 11.
Do not use any filesystem defragmenter software. You can use the IRIX fsr command or the Linux 64-bit xfs_fsr command only on a metadata server for the filesystem it acts upon.
If you are using I/O fencing, you must keep the telnet port on the Fibre Channel switch free at all times; do not perform a telnet to the switch and leave the session connected.
| Note: Administration must be performed using the GUI connected to a CXFS administration node (one that has the cluster_admin software package installed) or using the cmgr command on a CXFS administration node. |
Complete the following steps to ensure that you are ready to configure the initial cluster:
During the course of configuration, you will see various information-only messages in the log files. See “Normal Messages” in Chapter 18.
Verify that you have a CXFS license by using the -d option to the cxfslicense command. For example:
# /usr/cluster/bin/cxfslicense -d CXFS license granted. |
If you have a properly installed license, you will also see a FEATURE CXFS line in the license.dat file on all nodes:
IRIX: /var/flexlm/license.dat
Linux 64-bit: /etc/flexlm/license.dat
| Note: The license.dat file cannot simply be copied between nodes because it is unique to each node. |
For Linux 64-bit, you also need a license for XVM.
For more information about installing software licenses, see the IRIX 6.5 Installation Instructions booklet.
Enter the following on CXFS administration node to start the cluster daemons:
# /etc/init.d/cxfs_cluster start |
When you first install the software, the following daemons should be running:
After you start CXFS services, the clconfd daemon is also started.
To determine which daemons are running, enter the following:
# ps -ef | grep cluster |
The following shows an example of the output when just the initial daemons are running; for readability, whitespace has been removed and the daemon names are highlighted:
cxfs6 # ps -ef | grep cluster root 31431 1 0 12:51:36 ? 0:14 /usr/lib32/cluster/cbe/fs2d /var/cluster/cdb/cdb.db # root 31456 31478 0 12:53:01 ? 0:03 /usr/cluster/bin/crsd -l root 31475 31478 0 12:53:00 ? 0:08 /usr/cluster/bin/cad -l -lf /var/cluster/ha/log/cad_log --append_log root 31478 1 0 12:53:00 ? 0:00 /usr/cluster/bin/cmond -L info -f /var/cluster/ha/log/cmond_log root 31570 31408 0 14:01:52 pts/0 0:00 grep cluster |
If you do not see these processes, go to the logs to see what the problem might be. If you must restart the daemons, enter the following:
# /etc/init.d/cxfs_cluster start |
For more information, see “Stopping and Restarting Cluster Infrastructure Daemons” in Chapter 18, and “Daemons” in Appendix A.
When you are initially configuring the cluster with cmgr , you must use fully qualified hostname when defining the first node in the pool. (This information is automatically supplied for you in the GUI.)
Also, if you use nsd, you must configure your system so that local files are accessed before the network information service (NIS) or the domain name service (DNS).
| Caution: It is critical that these files are configured properly and that you enter the primary name for the first node defined in the pool; aliases may be used for subsequent node definitions. See Chapter 6, “IRIX CXFS Installation”. |
Ensure that the appropriate chkconfig flags are on.
For an IRIX node, ensure that chkconfig displays the following
# chkconfig
        Flag                 State
        ====                 =====
        cluster              on
cxfs_cluster on |
If they are not, set them to on and reboot.
For example:
irix# /etc/chkconfig cluster on irix# /etc/chkconfig cxfs_cluster on irix# init 6 |
Or:
irix# init 1 irix# /etc/chkconfig cluster on irix# /etc/chkconfig cxfs_cluster irix# init 2 |
For a Linux 64-bit node, use the following commands to verify the chkconfig flags:
[root@linux64 root]# chkconfig --list cluster cluster 0:off 1:off 2:on 3:on 4:on 5:on 6:off [root@linux64 root]# chkconfig --list cxfs cxfs 0:off 1:off 2:on 3:on 4:on 5:on 6:off |
If they are not, set them to on and reboot.
For example:
[root@linux64 root]# chkconfig cxfs on [root@linux64 root]# chkconfig cluster on |
To initially configure the cluster with GUI, do the following:
The CXFS administration node to which you connect the GUI affects your view of the cluster. You should wait for a change to appear in the view area before making another change; the change is not guaranteed to be propagated across the cluster until it appears in the view area. You should only make changes from one instance of the GUI at any given time; changes made by a second GUI instance may overwrite changes made by the first instance.
Start the CXFS Manager by entering the following:
# /usr/sbin/cxfsmgr |
You can also start the GUI from your web browser on a Microsoft Windows, Linux, or other platform. To do this, enter http:// server/CXFSManager/ (where server is the name of a CXFS administration node in the pool) and press Enter. At the resulting webpage, click the CXFS Manager icon. This method of launching CXFS Manager requires you to have enabled Java in your browser's preferences and have installed the appropriate Java plug-in. (After installing the plug-in, you must close any existing Java windows and restart your browser.) The CXFS administration node must be running a web server, such as Apache, and have the following software installed:
IRIX: sysadm_cxfs.sw.web
Linux 64-bit: sysadm_cxfs-web
| Note: If you load the GUI using Netscape on IRIX and then switch to another page in Netscape, CXFS Manager GUI will not operate correctly. To avoid this problem, leave the CXFS Manager GUI web page up and open a new Netscape window if you want to view another page. |
There are other methods of starting the GUI. For more information, see “Starting the GUI” in Chapter 10.
Supply the name of the CXFS administration node you wish to connect to and the root password.
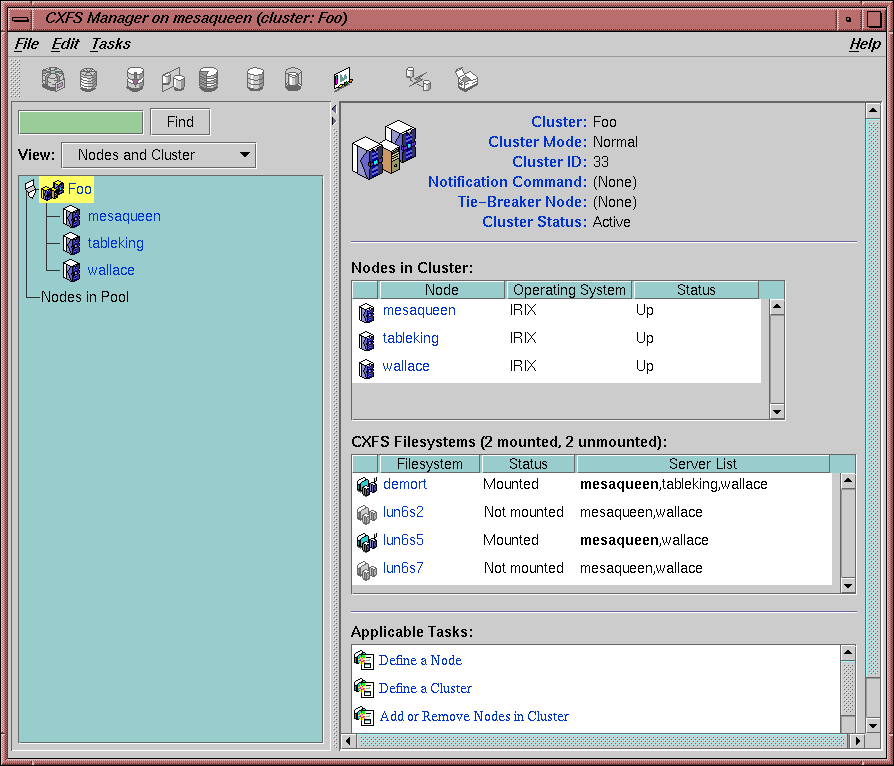
Figure 9-1 shows an example of the CXFS Manager window.
| Note: Within the CXFS tasks, you can click any blue text to get more information about that concept or input field. In every task, the cluster configuration will not update until you click on OK. |
The Set Up a New Cluster task in the Guided Configuration menu leads you through the steps required to create a new cluster. It encompasses tasks that are detailed elsewhere.
Do the following:
Click Define a Node to define the CXFS administration node to which you are connected. See “Define a Node with the GUI” in Chapter 10.
Note: If you attempt to define a cluster or other object before the local node has been defined, you will get an error message that says: No nodes are registered on servername. You cannot define a cluster until you define the node to which the GUI is connected. To do so, click "Continue" to launch the "Set Up a New Cluster" task.
(Optional) After the first node icon appears in the view area on the left, click step 2, Define a Node, to define the other nodes in the cluster. The hostname/IP-address pairings and priorities of the networks must be the same for each node in the cluster. See “Define a Node with the GUI” in Chapter 10.
Note: Do not define another node until this node appears in the view area. If you add nodes too quickly (before the database can include the node), errors will occur.
Repeat this step for each node. For large clusters, define only the administration nodes first; see “Configuring a Large Cluster”.
Click Define a Cluster to create the cluster definition. See “Define a Cluster with the GUI” in Chapter 10. Verify that the cluster appears in the view area. Choose View: Nodes and Cluster.
After the cluster icon appears in the view area, click Add/Remove Nodes in Cluster to add the nodes to the new cluster. See “Add or Remove Nodes in the Cluster with the GUI” in Chapter 10.
Click Next to move to the second screen of tasks.
(Optional) Click on Test Connectivity to verify that the nodes are physically connected. See “Test Node Connectivity with the GUI” in Chapter 10. (This test requires the proper configuration; see “IRIX Modifications Required for CXFS Connectivity Diagnostics” in Chapter 6, “Linux 64-bit Modifications Required for CXFS Connectivity Diagnostics ” in Chapter 7.)
If you are using I/O fencing, define the Brocade Fibre Channel switch in the cluster. I/O fencing is required for nodes without system controllers; see “Requirements” in Chapter 1.
Click Start CXFS Services . See “Start CXFS Services with the GUI” in Chapter 10.
Click Close. Clicking on Close exits the task; it does not undo the task.
| Note: Within the CXFS tasks, you can click any blue text to get more information about that concept or input field. In every task, the cluster configuration will not update until you click OK. |
The Set Up a New CXFS Filesystem task leads you through the steps required to create a new filesystem and mount it on all nodes in your cluster. It encompasses tasks that are detailed elsewhere.
Do the following:
Click Start CXFS Services if the services have not been started already. (The current status is displayed beneath the task link.) See “Start CXFS Services with the GUI” in Chapter 10.
Click Label Disks.
Note: The disk must be initialized before being labeled. If your disk has not been initialized during factory set-up, use the IRIX fx command or Linux 64-bit fdisk command to initialize the disk.
For information about XVM tasks, see the XVM Volume Manager Administrator's Guide.
Create slices, which define the physical storage, on the labeled disk. Click Slice Disks.
Create the type of filesystem you want: stripe, mirror, or concat.
Click Make the Filesystem. If you do not want to use the default options, click Specify Sizes and go to the next page. For more information, see the mkfs man page, the IRIX Admin: Disks and Filesystems guide, and the XVM Volume Manager Administrator's Guide.
Click Define a CXFS Filesystem. This task lets you define a new filesystem, set the ordered list of potential metadata servers, and set the list of client nodes for the filesystem. See “Define CXFS Filesystems with the GUI” in Chapter 10.
Click Mount a CXFS Filesystem. This task lets you mount the filesystem on all nodes in the cluster. See “Mount CXFS Filesystems with the GUI” in Chapter 10.
Repeat these steps for each filesystem.
| Note: For the initial installation, SGI highly recommends that you
use the GUI guided configuration tasks. See “Configuring with the GUI”.
For details about cmgr commands, see the man page and Chapter 11, “Reference to cmgr Tasks for CXFS”. |
To initially configure the cluster with the cmgr command, do the following:
Follow the directions in “Preliminary Cluster Configuration Steps”.
Define the nodes that are eligible to be part of the cluster. The hostname/IP-address pairings and priorities of the networks must be the same for each node in the cluster. See “Define a Node with cmgr” in Chapter 11.
For large clusters, SGI recommends that you define only the first three CXFS administration nodes and then continue on to the next step; add the remaining nodes after you have a successful small cluster.
The following example sequence defines three nodes. (To use the default value for a prompt, press the Enter key. The Enter key is not shown in the examples in this guide.)
To define the first node, named cxfs6, enter the following:
cxfs6 # /usr/cluster/bin/cmgr -p
Welcome to SGI Cluster Manager Command-Line Interface

cmgr> define node cxfs6
Enter commands, you may enter "done" or "cancel" at any time to exit

Hostname[optional] ?
Is this a FailSafe node <true|false> ? false
Is this a CXFS node <true|false> ? true
Operating System  <IRIX|Linux32|Linux64|AIX|HPUX|Solaris|MacOSX|Windows> ? irix
Node Function <server_admin|client_admin|client_only> ? server_admin
Node ID[optional]?
Partition ID[optional] ? (0)
Do you wish to define failure hierarchy[y/n]:n
Reset type <powerCycle|reset|nmi>  ? (powerCycle)
Do you wish to define system controller info[y/n]:y
Sysctrl Type <msc|mmsc|l1|l2> ? (msc)
Sysctrl Password[optional] ? ( )
Sysctrl Status <enabled|disabled> ? enabled
Sysctrl Owner ? cxfs8
Sysctrl Device ? /dev/ttyd2
Sysctrl Owner Type <tty> ? (tty)
Number of Network Interfaces ? (1)
NIC 1 - IP Address ? cxfs6
NIC 1 - Heartbeat HB (use network for heartbeats) <true|false> ? true
NIC 1 - (use network for control messages) <true|false> ? true

NIC 1 - Priority <1,2,...> 1


Successfully defined node cxfs6
To define the second node, named cxfs7, enter the following:
cmgr> define node cxfs7
Enter commands, you may enter "done" or "cancel" at any time to exit

Hostname[optional] ?
Is this a FailSafe node <true|false> ? false
Is this a CXFS node <true|false> ? true
Node Function <server_admin|client_admin|client_only> ? server_admin
Operating System <IRIX|Linux32|Linux64|AIX|HPUX|Solaris|MacOSX|Windows> ? irix
Node ID[optional] ?
Partition ID[optional] ? (0)
Do you wish to define failure hierarchy[y/n]:n
Reset type <powerCycle|reset|nmi>  ? (powerCycle)
Do you wish to define system controller info[y/n]:y
Sysctrl Type <msc|mmsc|l2> ? (msc)
Sysctrl Password[optional] ? ( )
Sysctrl Status <enabled|disabled> ? enabled
Sysctrl Owner ? cxfs6
Sysctrl Device ? /dev/ttyd2
Sysctrl Owner Type <tty> ? (tty)
Number of Network Interfaces ? (1)
NIC 1 - IP Address ? cxfs7
NIC 1 - Heartbeat HB (use network for heartbeats) <true|false> ? true
NIC 1 - (use network for control messages) <true|false> ? true

NIC 1 - Priority <1,2,...> 1

Successfully defined node cxfs7
To define the third node, named cxfs8, enter the following:
cmgr> define node cxfs8
Enter commands, you may enter "done" or "cancel" at any time to exit

Hostname[optional] ?
Is this a FailSafe node <true|false> ? false
Is this a CXFS node <true|false> ? true
Node Function <server_admin|client_admin|client_only> ? server_admin
Operating System <IRIX|Linux32|Linux64|AIX|HPUX|Solaris|MacOSX|Windows> ? irix
Node ID[optional] ?
Partition ID[optional] ? (0)
Do you wish to define failure hierarchy[y/n]:n
Reset type <powerCycle|reset|nmi>  ? (powerCycle)
Do you wish to define system controller info[y/n]:y
Sysctrl Type <msc|mmsc|l2> ? (msc)
Sysctrl Password[optional] ? ( )
Sysctrl Status <enabled|disabled> ? enabled
Sysctrl Owner ? cxfs7
Sysctrl Device ? /dev/ttyd2
Sysctrl Owner Type <tty> ? (tty)
Number of Network Interfaces ? (1)
NIC 1 - IP Address ? cxfs8
NIC 1 - Heartbeat HB (use network for heartbeats) <true|false> ? true
NIC 1 - (use network for control messages) <true|false> ? true

NIC 1 - Priority <1,2,...> 1

Successfully defined node cxfs8
You now have three nodes defined in the pool. To verify this, enter the following:
cmgr> show nodes in pool

3 Machine(s) defined
        cxfs6
        cxfs7
        cxfs8
To show the contents of node cxfs6, enter the following:
cmgr> show node cxfs6

Logical Machine Name: cxfs6
Hostname: cxfs6.americas.sgi.com
Operating System: irix
Node Is FailSafe: false
Node Is CXFS: true
Node Function: server_admin
Nodeid: 13203
Partition id: 0
Reset type: powerCycle
System Controller: msc
System Controller status: enabled
System Controller owner: cxfs8
System Controller owner device: /dev/ttyd2
System Controller owner type: tty
ControlNet Ipaddr: cxfs6
ControlNet HB: true
ControlNet Control: true
ControlNet Priority: 1
Define the cluster and add the nodes to it. See “Define a Cluster with cmgr” in Chapter 11.
For example, to define a cluster named cxfs6-8 and add the nodes that are already defined, enter the following:
cmgr> define cluster cxfs6-8
Enter commands, you may enter "done" or "cancel" at any time to exit

Is this a FailSafe cluster <true|false> false ?
Is this a CXFS cluster  <true|false> true ?
Cluster Notify Cmd [optional] ?
Cluster Notify Address [optional] ?
Cluster mode <normal|experimental>[optional]
Cluster ID ? 22

No nodes in cluster cxfs6-8

Add nodes to or remove nodes from cluster cxfs6-8
Enter "done" when completed or "cancel" to abort

cxfs6-8 ? add node cxfs6
cxfs6-8 ? add node cxfs7
cxfs6-8 ? add node cxfs8
cxfs6-8 ? done
Successfully defined cluster cxfs6-8

Added node <cxfs6> to cluster <cxfs6-8>
Added node <cxfs7> to cluster <cxfs6-8>
Added node <cxfs8> to cluster <cxfs6-8>
The fail action hierarchy is the set of instructions that determines which method is used in case of failure. If you set a hierarchy including fencing, you could define the switch at this point. For more information, see “Switches and I/O Fencing Tasks with cmgr” in Chapter 11.
For more information, see “Define a Cluster with cmgr” in Chapter 11.
To verify the cluster and its contents, enter the following:
cmgr> show clusters

1 Cluster(s) defined
        cxfs6-8

cmgr> show cluster cxfs6-8
Cluster Name: cxfs6-8
Cluster Is FailSafe: false
Cluster Is CXFS: true
Cluster ID: 22
Cluster CX mode: normal

Cluster cxfs6-8 has following 3 machine(s)
        cxfs6
        cxfs7
        cxfs8
For an example of this step using a script, see “Script Example” in Chapter 11.
Start CXFS services for the cluster by entering the following:
start cx_services for cluster clustername
cmgr> start cx_services for cluster cxfs6-8

CXFS services have been activated in cluster cxfs6-8
This action starts CXFS services and sets the configuration so that CXFS services will be restarted automatically whenever the system reboots.
Note: If you stop CXFS services using either the GUI or cmgr , the automatic restart capability is turned off. You must start CXFS services again to reinstate the automatic restart capability.
To verify that the cluster is up, you can use the following cmgr command:
show status of cluster clustername
cmgr> show status of cluster cxfs6-8

Cluster (cxfs6-8) is not configured for FailSafe


CXFS cluster state is ACTIVE.
You can also use the clconf_info command. For example:
cxfs6 # /usr/cluster/bin/clconf_info
Membership since Wed May 16 14:42:48 2001
Node         NodeId     Status    Age   Incarnation     CellId
cxfs7           12812       UP      0             0          1
cxfs6           13203       UP      0             0          0
cxfs8           14033       UP      0             0          2
0 CXFS FileSystems
For more information, see “Display a Cluster with cmgr” in Chapter 11.
Obtain a shell window for one of the CXFS administration nodes in the cluster and use the fx command to create a volume header on the disk drive. For information, see IRIX Admin: Disks and Filesystems.
Create the XVM logical volumes. In the shell window, use the xvm command line interface. For information, see the XVM Volume Manager Administrator's Guide.
Make the filesystems. In the shell window, use the mkfs command. For information, see the XVM Volume Manager Administrator's Guide and IRIX Admin: Disks and Filesystems.
Define the filesystems by using the define cxfs_filesystem subcommand to cmgr. See “CXFS Filesystem Tasks with cmgr” in Chapter 11.
The following example shows two potential metadata servers for the fs1 filesystem; if cxfs6 (the preferred server, with rank 0) is not up when the cluster starts or later fails or is removed from the cluster, then cxfs7 (rank1) will be used. It also shows the filesystem being mounted by default on all nodes in the cluster (Default Local Status enabled) but explicitly not mounted on cxfs8.
Do the following:
cmgr> define cxfs_filesystem fs1 in cluster cxfs6-8

(Enter "cancel" at any time to abort)

Device ? /dev/cxvm/d76lun0s0
Mount Point ? /mnts/fs1
Mount Options[optional] ?
Use Forced Unmount ? <true|false> ? false
Default Local Status <enabled|disabled> ? (enabled)

DEFINE CXFS FILESYSTEM OPTIONS

        0) Modify Server.
        1) Add Server.
        2) Remove Server.
        3) Add Enabled Node.
        4) Remove Enabled Node.
        5) Add Disabled Node.
        6) Remove Disabled Node.
        7) Show Current Information.
        8) Cancel. (Aborts command)
        9) Done. (Exits and runs command)

Enter option:1

No current servers

Server Node ? cxfs6
Server Rank ? 0

        0) Modify Server.
        1) Add Server.
        2) Remove Server.
        3) Add Enabled Node.
        4) Remove Enabled Node.
        5) Add Disabled Node.
        6) Remove Disabled Node.
        7) Show Current Information.
        8) Cancel. (Aborts command)
        9) Done. (Exits and runs command)

Enter option:1
Server Node ? cxfs7
Server Rank ? 1


        0) Modify Server.
        1) Add Server.
        2) Remove Server.
        3) Add Enabled Node.
        4) Remove Enabled Node.
        5) Add Disabled Node.
        6) Remove Disabled Node.
        7) Show Current Information.
        8) Cancel. (Aborts command)
        9) Done. (Exits and runs command)

Enter option:5

No disabled clients

Disabled Node ? cxfs8

        0) Modify Server.
        1) Add Server.
        2) Remove Server.
        3) Add Enabled Node.
        4) Remove Enabled Node.
        5) Add Disabled Node.
        6) Remove Disabled Node.
        7) Show Current Information.
        8) Cancel. (Aborts command)
        9) Done. (Exits and runs command)

Enter option:7

Current settings for filesystem (fs1)

CXFS servers:
        Rank 0          Node cxfs6
        Rank 1          Node cxfs7

Default local status: enabled

No explicitly enabled clients

Explicitly disabled clients:
        Disabled Node: cxfs8

        0) Modify Server.
        1) Add Server.
        2) Remove Server.
        3) Add Enabled Node.
        4) Remove Enabled Node.
        5) Add Disabled Node.
        6) Remove Disabled Node.
        7) Show Current Information.
        8) Cancel. (Aborts command)
        9) Done. (Exits and runs command)

Enter option:9
Successfully defined cxfs_filesystem fs1

cmgr> define cxfs_filesystem fs2 in cluster cxfs6-8

(Enter "cancel" at any time to abort)

Device ? /dev/cxvm/d77lun0s0
Mount Point ? /mnts/fs2
Mount Options[optional] ?
Use Forced Unmount ? <true|false> ? false
Default Local Status <enabled|disabled> ? (enabled)

DEFINE CXFS FILESYSTEM OPTIONS

        0) Modify Server.
        1) Add Server.
        2) Remove Server.
        3) Add Enabled Node.
        4) Remove Enabled Node.
        5) Add Disabled Node.
        6) Remove Disabled Node.
        7) Show Current Information.
        8) Cancel. (Aborts command)
        9) Done. (Exits and runs command)

Enter option:1

Server Node ? cxfs8
Server Rank ? 0

        0) Modify Server.
        1) Add Server.
        2) Remove Server.
        3) Add Enabled Node.
        4) Remove Enabled Node.
        5) Add Disabled Node.
        6) Remove Disabled Node.
        7) Show Current Information.
        8) Cancel. (Aborts command)
        9) Done. (Exits and runs command)

Enter option:7

Current settings for filesystem (fs2)

CXFS servers:
        Rank 0          Node cxfs8

Default local status: enabled

No explicitly enabled clients

No explicitly disabled clients

        0) Modify Server.
        1) Add Server.
        2) Remove Server.
        3) Add Enabled Node.
        4) Remove Enabled Node.
        5) Add Disabled Node.
        6) Remove Disabled Node.
        7) Show Current Information.
        8) Cancel. (Aborts command)
        9) Done. (Exits and runs command)

Enter option:9
Successfully defined cxfs_filesystem fs2
To see the modified contents of cluster cxfs6-8, enter the following:
cmgr> show cxfs_filesystems in cluster cxfs6-8

fs1
fs2
Mount the filesystems on all nodes in the cluster by using the admin cxfs_mount cxfs_filesystem subcommand to cmgr. See “Mount a CXFS Filesystem with cmgr” in Chapter 11. For example:
cmgr> admin cxfs_mount cxfs_filesystem fs1 in cluster cxfs6-8
cxfs_mount operation successful

cmgr> admin cxfs_mount cxfs_filesystem fs2 in cluster cxfs6-8
cxfs_mount operation successful
To quit out of cmgr, enter the following:
cmgr> quit
When configuring a large cluster, you should ensure that a small cluster containing just the server-capable administration nodes is fully functional before adding client-only nodes. By building up the cluster with client-only nodes in small groups, you will minimize concurrent operational issues and use the database most efficiently. Do the following:
Create the initial cluster with just the server-capable nodes and test it:
Define all of the server-capable administration nodes.
Define the cluster.
Add all of the server-capable administration nodes to the cluster.
Create the filesystems as described in “Set Up a New CXFS Filesystem with the GUI”.
Verify that the nodes are all part of the cluster membership and that the filesystems are mounted and fully functional.
Add the client-only nodes to the database:
Define all client-only nodes.
Add all client-only nodes to the cluster.
Gradually build up the functional cluster with subsets of client-only nodes:
Repeat step 3 as needed to complete the cluster membership.
Following is an example script for configuring a one-node cluster that can be copied and repeated for the number of nodes required:
#!/usr/cluster/bin/cmgr -f
# Node nodename definition
define node nodename
        set hostname to nodename
        set operating_system to OS
        set node_function to server_admin|client_admin|client_only
        set is_failsafe to false
        set is_cxfs to true
        set nodeid to nodeID#
        set hierarchy to [system][fence][reset][fencereset][shutdown]
        set reset_type to powerCycle|reset|nmi
        add nic IP address  or nodename
                set heartbeat to true
                set ctrl_msgs to true
                set priority to 1
        done
done
# Define cluster and add nodes to the cluster
define cluster clustername
        set is_failsafe to false
        set is_cxfs to true
        set cx_mode to normal
        set clusterid to clusterID#
done
modify cluster clustername
        add node nodename
done
set cluster clustername
define cxfs_filesystem filesystemname
        set device_name to /dev/cxvm/volumename
        set mount_point to /mountpoint
        set force to false
        set dflt_local_status to enabled
        add cxfs_server server1, server2, etc
                set rank to 0
        done
done
# Setting CXFS parameters
modify cx_parameters
        set tie_breaker to none
done
start cx_services for cluster clustername
quit |
After adding one client node to the cluster, use the build_cmgr_script command to generate a script that can be used as a template for adding more client-only nodes to the cluster. The build_cmgr_script will generate a script for defining the entire cluster. The commands for generating the single client-only node can be easily extracted, replicated, and modified in a new script to define the remaining client-only nodes. Using scripts to define the client-only nodes in a large cluster is highly recommended.
For more information about using scripts and the cmgr command, see Chapter 11, “Reference to cmgr Tasks for CXFS”