This chapter contains:
This section contains:
Synthesizer Editor is an application for creating, modifying, and auditioning MIDI synthesizer preset files. It enables two different types of editing:
Editing a preset file independent of the internal MIDI synthesizer.
Modifying sound as it is transmitted through the internal MIDI synthesizer.
This introduction contains: “Concepts and Terms to Know,” “Overview of Preset Structure,” and “Some Background on MIDI.”
Before using Synthesizer Editor, it helps to understand the following related concepts and terms:
Software synthesizer
The documentation often mentions the “software synthesizer.” This term refers to the MIDI synthesizer that is included in your system software. It is an internal program that can be controlled and monitored with programs like Synthesizer Editor and MIDI Keyboard
. For example, when you use Sound Player
to play a MIDI file, what you are hearing is the software synthesizer.
MIDI Channel
Any one of 16 pathways that the MIDI standard provides for the transmission and reception of data. The number of the channel over which MIDI data should be transmitted is specified by a number in the MIDI data stream.
Voice
A note generated by a synthesizer.
Preset
A preset is template for MIDI voices. It specifies all the parameters that determine the synthesizer voice, timbre, and behavior. For example, if the Clarinet preset is assigned to MIDI channel 1, each played over channel 1 will create a voice that sounds like a clarinet, and although different keys generate different voices, the preset (clarinet) remains the same.
Sample
A sample is a sound file plus additional information concerning its placement on the keyboard (key map), loop points, tuning, and more. An oscillator can contain any number of samples.
Oscillator
An oscillator is a preset element that contains sound samples and the keyboard mapping for the samples. See “About Oscillator Control” for details.
Envelope
An envelope is a preset element that generates time-varying control values (usually in response to a key press). These control values are used to modulate the parameters of other preset elements. For example, an envelope could be created that would cause a voice volume to start soft, become loud, and then gradually fade. See “About Envelope Control” for more information.
Filter
Filters are optional preset components that allow detailed tone control through the process of weakening or strengthening specific signal frequencies. See also “About Filter Control.”
Modulation
Within a MIDI voice structure, there are two basic types of signals, an audio signal and a control (modulating) signal. The audio signals produce a directly audible sound, whereas the modulating signals alter the parameters of other elements. Modulation elements are elements of the preset that generate modulation signals. Envelopes are always modulation elements: they are used to modulate oscillators, filters, or other envelopes. Filters never function as modulation elements. Oscillators can be used as an audio signal or they can modulate other oscillators or filters. For example, Figure 1-1 diagrams one possible MIDI voice structure. In this example:

Figure 1-2 shows the basic contents of a preset. The Synthesizer Editor interface has different panels for each of the four different parts of a preset: the oscillators, envelopes, filters, and general parameters. Use these panels to edit preset parameters. Table 1-1 lists all the parameters you can edit with Synthesizer Editor.

MIDI stands for Musical Instrument Digital Interface. It is a standardized digital language (and hardware specification) that enables computers and a variety of electronic musical instruments/devices to communicate with each other. Officially introduced in 1983, MIDI has come to offer musicians advanced avenues of creative sound and instrument coordination through computers.
Essentially, MIDI is a protocol for the transmission of real-time musical performance data. Here is how a MIDI synthesizer keyboard works: when you press a note on a MIDI synthesizer keyboard, the “Note On” message transmitted contains the note number (e.g., middle C = 60) and the velocity. When the key is released, the corresponding “Note Off” message is transmitted. The MIDI sequence files included with your software contain channel voice messages, which include events such as Note On, Note Off, polyphonic key pressure, channel pressure, pitch bend change, program change, and control change. Since MIDI messages are simple data streams, they are much easier to edit and they take up less disk space than other forms of audio. The file size ratio between MIDI files and audio files of equivalent length is about 100:1.
The following books may offer useful background and supplementary information about working with MIDI:
The Musician's Guide to MIDI, by Christian Braut, SYBEX, Inc., 1994.
The MIDI Manual, by David Miles Huber, SAMS, 1991.
If the Synthesizer Editor isn't already running, you can open it now in any one of the following ways:
Click this launch link: Synthesizer Editor
From the Toolchest, choose Find > Media Tools, then double-click the Synthesizer Editor icon.
Select a preset file icon, then choose “Edit” from the Selected menu.
From the command line, type syntheditor
You can edit the presets that come with the software synthesizer, or create a new one by selecting File > New.
This section includes:
To select from the presets shipped with your software, choose Sounds > Presets, then choose from:
| General MIDI | Brings up an icon view window containing 128 General MIDI preset icons. Includes sounds ranging from Acoustic Grand Piano to Gunshot. | |
| Golden Analog | Brings up an icon view window containing a set of presets for synthesizer sounds with a character popular in the 1970s and 1980s. | |
| Miscellaneous | Brings up an icon view of presets that demonstrate various features and capabilities of the software synthesizer. |
Drag and drop a preset icon into the preset icon drop pocket. The Preset name window updates to indicate that the new preset has been accepted.
| Note: Alternatively, you can select any arbitrary preset by typing the preset file pathname in the preset path field at the top of the Synthesizer Editor window. |
Now you can edit the preset by adjusting various controls in the Synthesizer Editor window. See “About Oscillator Control,” “About Filter Control,” “About Envelope Control,” and “About General Preset Parameter Control” for details.
To clear the current preset and all current settings from the Synthesizer Editor window, select File > New. This loads a default preset.
Replace a preset with a new preset by dropping the new preset icon on top of the old one in the icon drop pocket. The Preset name updates to reflect the new preset.
When a MIDI controller (such as Sound Player , Synthesizer Panel , MIDI Keyboard , or an external controller) is transmitting MIDI data to your system's software synthesizer, you can modify the sound as it is being played. To do this, match the MIDI channels on the controller and Synthesizer Editor, using the MIDI > Channel menu. Then use Synthesizer Editor controls to dynamically alter the sound being generated.
This is a good way to experiment and it does not affect the original data or file. Rather, it controls the way the internal software synthesizer plays the data being transmitted.
Start with a default preset by choosing File > New or select a preset (see “Selecting Presets to Edit”).
Edit it with Synthesizer Editor.
See “About Oscillator Control,” “About Filter Control,” “About Envelope Control,” and “About General Preset Parameter Control” for details.
Choose File > Save As... to save it as a new preset.
To set the number of oscillators in a preset, use the Architecture menu. Choose Oscillators > n (where n is the number of oscillators).
Click the Oscillator radio button in the Synthesizer Editor window to display the Oscillator panel(s) (see Figure 1-3).
An oscillator is a mandatory component of a preset. It contains sound samples that define the type of sound signal a preset creates. An oscillator can be modulated by an envelope or by another oscillator. So you can create an oscillator as an audio signal or as a modulation element.
The rest of this section includes:
An oscillator consists of any number of samples, each with its own key map, velocity map, and loops. Each has its own gain and tuning as well. The two maps determine which sample will be used when the oscillator runs: the sample whose key map and velocity map matches the current note's key number and velocity is the one that will be played.
See also:
Figure 1-2 to see how oscillators fit into the structure of a preset.
Figure 1-1 to see how oscillators fit into the MIDI sound creation path.
Each oscillator in a preset has its own panel in the Synthesizer Editor window, distinguished by tabs. Each oscillator panel includes the following settings:
| Sample Set and Key Map | ||
| Tracks Keyboard |
| |
| Modulation Element |
| |
| Gain | Use the thumbwheel to adjust the oscillator gain (amplitude) of the sound. This affects the gain of all samples. | |
| Pitch/Tune | Use the thumbwheel to adjust the oscillator pitch (frequency) of the sound, measured in semitones. | |
| InterpolationMethod |
| |
| Gated | Click the Gated checkbox to turn the gated feature on or off; a check mark indicates it is on. If an oscillator is gated, each sample that is played loops indefinitely using its sustain loop (if there is one), until the key is released. | |
| Siblings | The output waveform from an oscillator may be duplicated up to four times via oscillator siblings. Siblings provide a way to create more sounds from one oscillator. They typically share the same current sample, but may be tuned independently. Set the number of siblings by using the Sibling Count menu button. The Siblings panel contains text fields and thumbwheels for adjusting the tuning. The Tune Spread thumbwheel allows you to control the relative detuning of all the siblings as a group. |
You can choose up to five different gain and tune modulation sources to modulate the oscillator. Use the Source menu buttons to choose sources to modulate the current oscillator. You can also enter new numbers in the Depth fields to set the modulation depth of each source.
| Tip: As you choose oscillator parameters, use the Play button to audition the sound. |
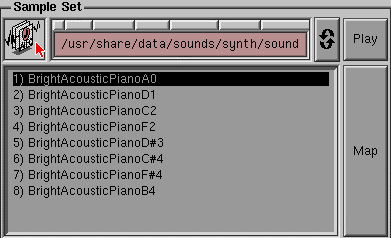
To add a sample to an oscillator, drag the icon of the sample into the drop pocket that appears under the words “Sample Set” (see Figure 1-4). Or, type the sample pathname in the pathname field to the right of the drop pocket.
| Tip: You can access a directory of samples from Sounds > Sound Files. |
To replace a sample:
From the Sample Set in the oscillator panel of the Synthesizer Editor window, select the sample you want to replace.
Click the Replace button.
Use the file browser that appears to select a new sample.
An easy way to do this is to launch a directory from Sounds > Sound Files, then drag and drop a sample icon from the directory into the file browser drop pocket.
To audition a sample, select the one you want to play from the Sample Set (the selected name highlights) then click the small, rectangular Play button. If the sample is looped, it will play for as long as the Play button is held.
| Note: When a sample is auditioned, all amplitude and rate modulations are turned off. |
To view and edit the sample maps for the oscillator, click the Map button. The oscillator Sample Map Keyboard window appears.
The orange-colored keys are the root pitches for various samples in the oscillator. This window allows to you set the key map by adjusting the root, low, and high keys for the sample. You can also set the velocity range and the pan in the sample map window. See “The Sample Map Keyboard Window” for details about all the Sample Map Keyboard features.
To set the sustain and release loop, including direction, select the sample and click the Edit button—a loop editing dialog appears. See “Setting Sample Boundaries and Loops” for details.
To set sample boundaries and loops, select the name of the sample you want to edit (sample names appear in the gray box under the sample drop pocket), then click the Edit button. The sample editing window appears.
A loop is a portion of the sound sample that is repeated over and over, sustained for as long as the key is held down, or faded for as long as the release time indicates. See Figure 1-5 for an example of a sustain loop.
| Note: In Figure 1-5, you'll notice that there is an actual sample start and end, as well as a sample start and end. This is to show that you can start a sample at an offset from it start point, and end it prior to the last sample. |

Use the loop window to turn looping on and off, set loop direction, and to adjust the start and end points for the loop(s) and for the sample itself.
The Loop window also displays the duration and size (in bytes) of the sample. Use it to set the start and end time the sustain and the release. The new times and weights are also displayed in the loop window.
To set the number of filters in a preset, use the Architecture menu. Choose Filters > n (where n is the number of filters). To display the filter setting panel(s), click the Filters radio button in the Synthesizer Editor window (shown in Figure 1-6).
The Synthesizer Editor Filter control panel allows detailed tone control through the process of weakening or strengthening specific signal frequencies. As you adjust the parameters for each filter, the plot on the right side of the window gives you a visual representation of the frequency response of the filter you are editing. As you change filter parameters, use the Play button to test the sound settings.
The rest of this section includes:
See also:
Figure 1-2 to see how filters fit into the structure of a preset.
Figure 1-1 to see how filters fit into the MIDI sound creation path.
Use the Frequency slider to adjust the cut-off frequency of the filter. This is the frequency above or below which the filter will attenuate or amplify the harmonic content of the signal being filtered. The frequency value is represented by a scale of zero to one, where zero corresponds to approximately 50hz, and one is 18khz.
Use the Resonance slider to adjust the filter resonance or “Q”. Resonance is an effect that results in increased amplitude of the cut-off frequency. For example, in low and high pass filters, increased resonance creates the familiar “wah-wah” filter effect. In bandpass and bandstop (notch) filters, increasing the resonance narrows the band and makes the sides steeper. Note that resonance has no affect on first-order low and high pass filters.
Use the Type menu button to choose one of the following types of filters:
| Low Pass | Controls brightness. Removes the higher frequencies, allowing lower frequencies to pass through, producing a muffled effect. | |
| High Pass | Controls brittleness. Removes lower frequencies, letting higher frequencies pass. | |
| Band Pass | Attenuates or weakens frequencies outside the frequency band. | |
| Band Stop | Attenuates or weakens frequencies in a band. Also known as a band reject or notch filter. |
Next to the Type menu button is the Order menu button. Use it to specify filter order (number of sections). Higher orders allow steeper cut-off slopes, and suppression of frequencies past the cut-off frequency. Note that higher order filters require more computer processing.
Sometimes the addition of a filter may increase or decrease the gain of a voice to such an extent that some additional gain adjustment may be desired. Use the gain slider to bring the voice back into an acceptable volume range.
To set the number of envelopes in a preset, use the Architecture menu. Choose Envelopes > n (where n is the number of envelopes). To display the Envelopes setting panel(s), click the Envelopes radio button in the Synthesizer Editor window (shown in Figure 1-7).
The Synthesizer Editor envelope control panel allows you to set the amplitude for each segment of the each envelope, and the time it takes to move between segments. Each envelope can be used to control oscillator and/or filter parameters over time. You can create an envelope if none exists, add extra envelopes, or choose to apply no envelope at all. Default envelopes have four levels, but you can have from two to eight levels.
The rest of this section includes:
See also:
Figure 1-2 to see how envelopes fit into the structure of a preset.
Figure 1-1 to see how envelopes fit into the synthesizer sound creation path.
Figure 1-8, which illustrates how Synthesizer Editor sets envelope parameters.
There are several methods for configuring an envelope. You can:
Use the Macro menu button to select an envelope shape that most closely represents the amplitude curve for the sound you want to imitate. For example, if you choose Piano, the envelope will have the level vs. time characteristics of a piano: a nearly instantaneous rise in amplitude, followed by a gradual decay.
Or, edit the envelope “manually,” by editing the Time and Level fields, as described below.
To understand the concept envelope control, it helps to see a visual example. See Figure 1-8 for an example of a four-level envelope. This example includes:
| Level 0 | Marks the beginning of the first segment of an envelope. When a Note On MIDI message is received (when a key is pressed down) the envelope begins at Level 0. | |
| Level 1 | The level reached after Time 1, the initial attack. | |
| Level 2 | The level reached after Time 2, the initial decay. If the envelope is gated, the signal will remain at this level until a MIDI Note Off message (caused by a key release) is received. | |
| Level 3 | Marks the end of release segment. |
There is a Gated checkbox under the level thumbwheels. If this checkbox is selected, the envelope progresses through its segments until it reaches the last level associated with the sustain portion of the envelope (typically Level 2). It remains at this level until the key is released, at which time it continues through any remaining segments. This means that if the envelope is gated, the duration of the sustain is determined by how long the key is held down. If the Gated checkbox is not selected, the envelope progresses through all segments, following the durations that were assigned for each segment.
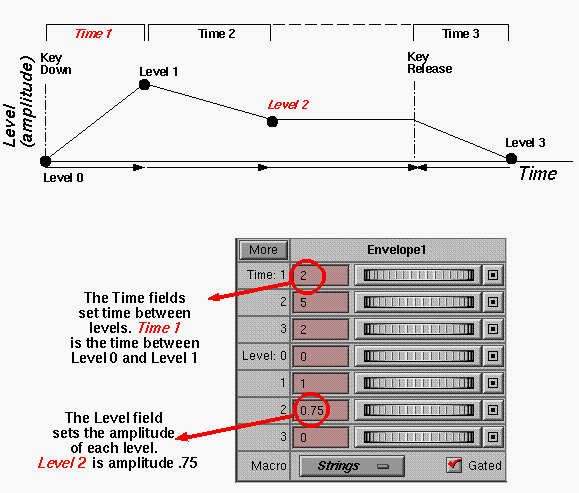
Figure 1-8 illustrates how to set envelopes:
Use the Time thumbwheels or edit the Time fields to adjust the amount of time between levels.
Use the Level thumbwheels or edit the Level fields to adjust the starting amplitude of each level.
| Note: You can set the number of levels. The minimum number of levels is two and the maximum is eight. By default, envelopes have four levels, which create the traditional four envelope parts: attack, decay, sustain, and release. |
The plot on the right side of the thumbwheels displays a visualization of the envelope you are creating. As you choose envelope parameters, use the Play button to listen to the effects of your changes at any given moment.
You can make the envelope follow an exponential curve between levels by putting a check in the Exponential Curve checkbox. This is useful for sounds such as acoustic piano or guitar, that have extended natural decays.
Use the Trigger Mode menu button to select how the envelope responds to the keyboard. Choices:
| Single Reset | All voices share one envelope which restarts with each new key press. | |
| Multiple Reset | Each voice has its own envelope, and each one restarts with each new key press. This is the default mode. | |
| Single Trigger | All voices share one envelope, which restarts only on the first key press. |
When an envelope is a gate element, the voice will not end until the envelope has reached its final level. A check mark in the Gate Element checkbox indicates that the envelope is a gate element.
Below the envelope display window is a panel that you can use to set which envelope segments are included in the sustain portion of the voice, and which are part of the release portion. In addition, any set of adjacent segments may be looped as part of the sustain or release. You can do the following:
Define loops within envelopes.
Loops are useful for creating an envelope with repeating patterns in its sustain or release segment. The loop Type menu button lets you choose the direction of the loop. Use the loop Start and End menu buttons to specify when you want the loops to start and end.
Set sustain and release start and end points.
Specifying these start and end points lets you define which of the envelope's segments will be included within the sustain portion of the envelope, and which will be within the release.
| Note: The numbers on the Start and End menu buttons correspond with the Time values you have set in the envelope (as illustrated in Figure 1-8). |
General parameters modify the preset as a whole. To display the General Parameters setting panel, click the General Parameters radio button in the Synthesizer Editor window (see Figure 1-9).
The rest of this section includes:
Gain Wheel
Adjust the overall preset gain by using the Gain thumbwheel.
Tune Wheel
Adjust the overall preset Tune by using the Tune thumbwheel.
Transpose Wheel
Adjust the transposition of the preset in semitone increments. Transposition differs from tuning in that it takes sample key maps into consideration.
Pan Position
If you choose a constant or swap voice pan mode, you can use the Position thumbwheel to set the voice pan on a scale between the left and right speaker.
Pan Mode Menu Button
Use the Pan Mode menu button to choose a constant, center, or swap form of voice panorama. Pan settings position sound between left and right speakers. Choose from:
Center No panning, regardless of MIDI pan messages.
Constant All voices panned at specific position, regardless of MIDI messages.
MIDI The default setting—panning is set by any received MIDI messages.
ConstantSwap Alternating channels, value set in preset.
MIDISwap Alternating channels, value set via MIDI pan.
Pan Curve Menu Button
Use to choose the type of curve used to determine the relative amplitude of the left and right channels during a pan.
Output Bus Menu
The output assignment for this preset's voices. The software synthesizer has eight output busses, which are assigned sequentially to each available audio port output channel. If the software synthesizer is started in 2-channel mode (the default), only the first two busses are useful; starting it in 8-channel mode allows all eight busses to be used.
Choose from:
Stereo1 Voices panned across busses (and channels) 1 and 2. The default.
Stereo2 Voices panned across busses (and channels) 3 and 4. Only useful in 4- or 8-channel mode.
Stereo3 Voices panned across busses (and channels) 5 and 6. Only useful in 8-channel mode.
Stereo4 Voices panned across busses (and channels) 7 and 8. Only useful in 8-channel mode.
Quad1 Voices panned across busses 1 through 4. Panning defined as X/Y values using PanPositionX and PanPositionY for static values, and PanPositionControlSourceX, PanPositionControlSourceY, etc., for controllable parameters. Only useful in 4- or 8-channel mode.
Quad2 Voices panned across busses 5 through 8. Same rules for panning as above. Only useful in 8-channel mode.
Mode Menu Button
The voice assignment mode determines how subsequent voices are allocated as notes and played on a MIDI channel.
Choose from:
Rotate Voice pool is cycled; if there are no available voices, no voice is played.
Reassign If no voices are playing, or if a voice with the same key number is already playing, a new voice is assigned.
ReassignSteal The default. Voice pool is cycled, and if no voices are available, one is “stolen” from the active voices.
RotateSteal New note only plays if another voice is currently playing the same pitch, in which case the old voice is “reassigned” to the new note event.
MonoPriorityLastNote
Most recently played note cuts off all notes. This is used for instruments that play a single note at a time.Voice Limit Field
Edit this field to control how many simultaneous voices can sound on a give channel. This is useful for reducing CPU consumption.
Tracking Factor Wheel
Use this thumbwheel or field to set the factor used in determining how the sample transposition tracks the keyboard. For example, if the Tracking Factor is set to 2, then each half step changes the pitch of the sample by 2 half steps, rather than by one half step.
Pitch Bend Range Wheel
Use the range thumbwheel set the pitch bend range. That is, to set how the pitch (measured in semitones) will bend when the voice receives MIDI pitch bend messages (usually from the pitch bend wheel).
Pitch Bend Quantize Wheel
Use the Quantization thumbwheel to adjust pitch bend quantization. This allows you to decrease the pitch bend change resolution. Often, moving the pitch bend causes a continuous pitch glide over an octave. When you set the quantization to one semitone, your pitch bend jumps in semitones.
Velocity Controls
Use the Velocity Curve menu button to set the key velocity response curve. The velocity curve represents the way in which voice amplitude is affected by the Note On velocity. The plot to the right of the menu button displays the curve. If you choose a constant curve, you can specify the constant velocity speed with the Constant slider bar below the velocity Curve menu button.
Use the Reverb Level and/or Chorus Level fields and sliders to set a fixed amount of these effects in a preset.
To set the channel on which Synthesizer Editor listens and broadcasts, choose MIDI > Channel, and select a channel from the MIDI channel submenu.
You may also want to use this menu to match channels if you want to dynamically edit MIDI voices on a particular channel. For example, say a MIDI controller (such as Sound Player , Synthesizer Panel , MIDI Keyboard , or an external controller) is transmitting MIDI data to your system's internal MIDI synthesizer. Match the Synthesizer Editor MIDI channel to the channel on which the controller is transmitting. Then use Synthesizer Editor to alter the preset parameters. This does not affect the original data or file. Rather, it controls the way the internal MIDI synthesizer plays data being transmitted.
For more explanation of MIDI channels, see “Some Background on MIDI.”
This section contains:
This table describes which parameters you can edit for each part of a preset. Some editable features are particularly advanced, and are so marked in the table.
In many cases, the same parameters can be edited in more than one section of the preset. For example, you can edit the General gain, the Oscillator gain, the Sample gain, the Envelope gain, and the Filter gain. In this case, the general gain affects all the other gains in the preset. In such a case as this, when the same type of setting exists in different parts of the preset, the horizontal list of the parameters indicates which settings will affect other settings of the same type. For example, the Oscillator tune affects the Sample tune, as is indicated by the table, which lists the parameters in this order: General > Oscillator > Sample > Envelope> Filter.
Table 1-1. Table of Parameters You Can Edit With Synthesizer Panel
General Preset Parameters | Oscillator Parameters | Sample Parameters | Envelope Parameters | Filter Parameters |
|---|---|---|---|---|
gain | gain | gain | gain | gain |
tune
| tune | tune | time values | resonance |
voice pan curve | interpolation method | sustain and release loop (loop start, end, and direction) | level values | cutoff frequency |
voice assignment mode | make oscillator a control element (on/off) | sample start and end times | sustain end point, release start point (advanced) | filter mode/type |
pitch bend quantization value | number of siblings
| sample direction | define loop within envelope (advanced) | filter order |
pitch bend range | sibling tune
| key map (root, low, and high key)
| exponential curves (advanced) |
|
transpose | gated (on/off)
| velocity map (set velocity range)
| gated (on/off) |
|
keyboard tracking (on/off) |
| pan | make envelope a gate element (on/off) |
|
|
|
| number of levels
|
|
The Sample Map Keyboard window is a graphical display of the sample maps. The orange-colored keys are the root pitches for various samples in the oscillator. The lower half of this window includes the following features:
The lower left side indicates the currently selected sample—you can select the sample you want to edit by clicking on the orange key representing the root pitch of the sample, or by selecting the sample in the oscillator Sample Set of the main window (see Figure 1-4).
You can set the key map by editing the root, low, and high keys for the sample.
You can also set the velocity map and the pan for individual samples. For example, you could use these controls to make the samples incrementally pan further to the right as you move up the keyboard.
The features available from the Sample Map Keyboard menus are described below.
| Tile Keyboard Map |
| |
| Tile Velocity Map |
| |
| Basic Velocity Map |
| |
| Spread Samples to View |
|
| Report Swapped Limits |
| |
| Report Holes | Reports any spaces between sample map ranges. | |
| Report Overlaps |
| |
| Root Notes Octave Up/Down Commands |
| |
| Edges Octave Up/Down Commands |
| |
| Edges Note Up/Down Commands |
|
| Graphics Examiner |
| |||
| MIDI Input Animation |
| |||
| Typing Animation |
| |||
| Note Name Labels |
| |||
| Key Number Labels |
|
Reorders the sample distribution, for experimental purposes. You can choose to have the samples reordered according to the root pitch value, and choose whether they should be reordered by increasing value or decreasing value.
| New | Returns Synthesizer Editor to default settings. | |
| Open | Opens a file browser dialog so that you can select a file to open. | |
| Save | Allows you to save current settings. | |
| Save As | Allows you to save current settings and preset under a new filename. | |
| Quit | Closes Synthesizer Editor. |
Use the Architecture menu to select the number of Oscillators (each preset must have at least one), Filters, and Envelopes. See “Introduction to Synthesizer Editor” for an overview of preset architecture.
| Channel | Determines which channel the Synthesizer Editor is listening on, and therefore determines which channel's preset is edited. | |||
| Interface | Lets you choose the MIDI device with which Synthesizer Editor communicates.
|
| General Parameters... | ||
| Envelope Plots | Hides or shows envelope plots. | |
| Filter Plots | Hides or shows filter plots. |
| MIDI Songs | Opens a folder of MIDI files that come with the software. Double-click an icon to play the file with Sound Player. | |
| Presets Menu | The Presets menu allows you to choose from two different icon views of presets. You can open any of these presets in Synthesizer Editor. See “Selecting Presets to Edit.” | |
| Sound Files Menu |
|
Turns the sustain on or off. When this checkbox is marked, all notes remain in the sustain stage—they behave as they would if you were holding down a sustain pedal. Uncheck the box to turn the sustained notes off.
Plays one note using the current preset. Allows you to audition preset changes without using an external device or another MIDI application.
The preset selection field and drop pocket allow you to select a preset file by dropping the icon in the drop pocket, or typing the file pathname in the field. See “Selecting Presets to Edit.”
This section addresses some of the problems you might encounter while using Synthesizer Editor:
Problem: A note appears to be “stuck” and is playing on and on.
Solution: Click the All Sound Off button.
Problem: A preset sustains infinitely.
Solution: Enable the Gated option in the Oscillator and Envelope control panels of the Synthesizer Editor. A check mark next to the word Gated indicates that the Gated option is enabled.