This chapter describes the Digital Media buffers (DMbuffers) real-time visual data transport facility, which is currently supported on O2 workstations. Time-sensitive visual data is moved through system memory using DMbuffers. This method provides a unified approach to facilitating data flow between live video devices. DMbuffers provide a pipelined I/O model—the application can direct the flow of multiple images on multiple paths simultaneously. This chapter builds on video I/O concepts presented in Chapter 4, “Digital Media I/O.”
DMbuffers feature
an operating system-generic live image data storage and transport facility
a library-transparent interface that allows real-time data interchange with compression/decompression (dmIC) and OpenGL
an application-centered nonblocking I/O method that provides event processing by means of a single select() loop
a software-configurable memory allocation method that provides the dedicated memory and throughput resources to suit visual data transport requirements using general-purpose system memory
Because the bandwidth of digital video signals far exceeds the bandwidth of typical data storage devices and communications links, video is usually compressed when storing to disk or sending over a network. This software interface supports specialized multimedia hardware on O2 workstations which further boosts visual data processing performance.
DMbuffers and DMbufferpools provide the method for allowing your application to allocate and use general-purpose system memory for transporting visual data.
A DMbufferpool is a custom storage facility created by the application. Video I/O devices, compression devices and algorithms, and graphics devices have direct access to this storage on a compartmental basis called a DMbuffer. The application can define what this compartment represents, but in general, a DMbuffer represents an image. An image can be in the form of raw uncompressed pixel data for a video field or frame, or in the form of a picture's worth of compressed data (JPEG, MPEG, or so on).
When creating the storage facility, the application describes its data requirements in a DMparams structure. The application also queries every device that plans on using the facility about their needs, and obtains from them a DMparams list describing their requirements for allocating and apportioning memory. Using this information, the storage facility(DMbufferpool) is configured with the proper number, size, and type compartments (DMbuffers) sufficient for containing the data and its associated bookkeeping information.
Because a DMbuffer is created according to all necessary data and device requirements, and with universal content descriptors, every device that needs access to it can tell what's stored inside and can share and use the contents without making modifications.
To transfer the contents of a compartment, it is much easier and faster to transport only a pointer to the storage location rather than moving the actual contents. DMbuffers are really placeholders which contain only the pointers to the actual data; the data itself is stored elsewhere. When data is transferred, only pointers describing the data are passed, not the actual data. This means that the process doesn't have to handle or copy the data in order to transport it.
DMbufferpools contain a fixed number of DMbuffers, all the same size. It's up to you to decide how many DMbuffers to use, but, in general, three DMbuffers are sufficient for most applications: one to receive data, one to send data, and one available in case of contention between the sending and receiving processes.
DMbuffers give the application access to memory which is
reserved at start-up and guaranteed for the life of the application
not visited by the page daemon and therefore can't be swapped
When an image needs to be transported, a DMbuffer is allocated from the pool. Once allocated, a DMbuffer can go to a video I/O device, an image converter, or graphics I/O in any order, regardless of the order of allocation. Multiple DMbuffers with independent agendas can coexist. When the transfer is complete, a DMbuffer can be returned to the pool for reuse or retained for future use. It is not necessary to keep the same DMbuffer waiting to complete processing before accepting more input because another DMbuffer can be allocated from the pool.
Compared with the traditional VLbuffers, DMbuffers
use the same event mechanism to deliver input and output buffer events to the application, rather than using different file descriptors for input and output
deliver data buffers ordered with VL events on the video input path
allow buffers to be sent to video multiple times, held by the application, or reordered
Currently, the DM buffers method is supported by:
Image Converter Library (dmIC)
Video Library
Movie Library
OpenGL
DMbuffers have the following attributes:
Type
Size
MSC/UST
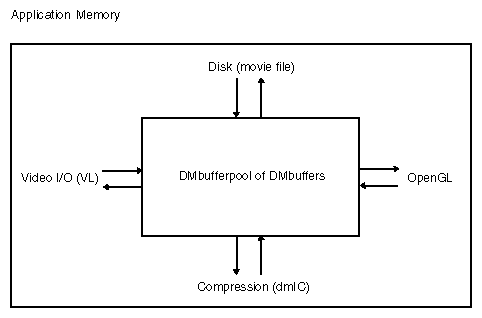
This section presents the framework for eight types of live data transport paths that can be realized using DMbuffers:
Figure 5-1 shows the eight live data transport paths that can use DMbuffers.
Each path can be used as a stage in a more complex path. For example:
video-to-memory—>memory-to-dmIC—>dmIC-to-memory—>memory-to-movie file
are the 4 paths involved in recording compressed live video to disk.
In general, the calls outlined in this section simply move data around; they do not directly encode, decode, or otherwise process the images. This means that data is typically passed untouched along these pathways.
| Note: The outlines presented in this section are intended to provide a sketch of the calls necessary for each path; the sequence of the calls may vary within each step and the actual coding may involve more routines. See the reference pages for details about using these routines. |
This section presents a basic sketch for memory to video output.
Open video output by calling:
vlOpenVideo(3dm), to open the video server
vlGetNode(3dm), to get the video drain node (VL_DRN, VL_VIDEO)
vlGetNode(3dm), to get the memory source node (VL_SRC, VL_MEM)
Create a DMbufferpool for output of video fields or frames by calling:
dmBufferSetPoolDefaults(3dm), to initialize the DMparams list
vlDMPoolGetParams(3dm), to determine the video I/O device requirements
dmBufferCreatePool(3dm), to create a pool using list modified by previous query
Associate the DMbufferpool with this path by calling:
vlDMPoolRegister(3dm)
Prepare the pool to use select() to be notified of a free DMbuffer by calling:
vlGetTransferSize(3dm), to get the size of one field or frame in this path
dmBufferSetPoolSelectSize(3dm), to set the memory available threshold for waking from select
dmBufferGetPoolFD(3dm), to get the input file descriptor for the buffer pool
Get a video output path file descriptor (for notification of errors/drops) by calling:
vlGetFD(3dm)
Start the video flow by calling:
vlBeginTransfer(3dm)
Get notification of a free DMbuffer in the output pool by calling:
select(2)
Fill the DMbuffer with pixel data from the desired DMbuffer path
Enqueue the DMbuffer for video output by calling:
vlDMBufferSend(3dm)
This section presents a basic sketch for video input to memory using DMbuffers:
Open video input by calling:
vlOpenVideo(3dm), to open the video server
vlGetNode(3dm), to get the video source node (VL_SRC, VL_VIDEO)
vlGetNode(3dm), to get the memory drain node (VL_DRN, VL_MEM)
Create a DMbufferpool for input of video fields or frames by calling:
dmBufferSetPoolDefaults(3dm), to initialize the DMparams list
vlDMPoolGetParams(3dm), to determine the video I/O device requirements
dmBufferCreatePool(3dm), to create a pool with a list modified by previous query
Associate the DMbufferpool with this path by calling:
vlDMPoolRegister(3dm)
Get a video input file descriptor (for use with select(2)) by calling:
vlPathGetFD(3dm)
Start the video flow by calling:
vlSelectEvents(3dm), to select events, namely VLTransferCompleteMask, and VLSequenceLostMask at a minimum, and others that the process might require
vlBeginTransfer(3dm), to initiate video transfer
Get notification of each new field or frame by calling:
select(2), to wait for an event
Get a new field or frame in the form of a DMbuffer by calling:
vlEventRecv(3dm), to dequeue the next VLEvent
vlEventToDMBuffer(3dm), to convert the VLEvent into a DMbuffer
Find the appropriate image converter by calling:
dmICGetNum(3dm), to get the number of image converters installed in the system
dmICGetDescription(3dm), to get the description of a given converter, then search them all (using the total returned) to find the index of the one that performs the desired conversion
Create the image converter context/instance by calling:
dmICCreate(3dm)
Configure the image converter by calling:
dmSetImageDefaults(3dm), to initialize the DMparams list with image defaults
dmICSetSrcParams(3dm), to configure the source (input) image parameters
dmICSetDstParams(3dm), to configure the destination (output) image parameters
dmICSetConvParams(3dm), to configure the conversion algorithm (quality, etc.)
Create a DMbufferpool for the image converter input by calling:
dmBufferSetPoolDefaults(3dm), to initialize the DMparams list
dmICGetSrcPoolParams(3dm), to modify the list to reflect the image converter's buffering requirements (other DMbuffer paths using this pool must also be queried for their requirements before creating the buffer pool)
dmBufferCreatePool(3dm), to create a buffer pool with the required attributes
Prepare the pool to use select() to be notified of a free DMbuffer by calling:
dmBufferSetPoolSelectSize(3dm), to set the memory available threshold for waking from select
dmBufferGetPoolFD(3dm), to get the buffer pool file descriptor
Get notification of a free DMbuffer in the input pool by calling:
select(2), to wait for a free DMbuffer
dmBufferAllocate(3dm), to allocate a DMbuffer
Fill the DMbuffer with pixel data (if encoding) or bits (if decoding) by calling:
dmBufferMapData(3dm), to get a pointer to the data area of the DMbuffer
dmBufferSetSize(3dm), to set the image size, which is possibly obtained from one of: dmImageFrameSize(3dm), vlGetTransferSize(3dm), mvGetTrackDataInfo(3dm), or mvGetTrackDataFieldInfo(3dm)
dmBufferSetUSTMSCpair(3dm), to set the sequence number of this image
Enqueue the DMbuffer for input to the converter by calling:
dmICSend(3dm)
Find the appropriate image converter by calling:
dmICGetNum(3dm), to get the number of image converters installed in the system
dmICGetDescription(3dm), to get the description of a given converter, then search them all (using the total returned) to find the index of the one that performs the desired conversion
Create the image converter context/instance by calling:
dmICCreate(3dm)
Configure the image converter by calling:
dmSetImageDefaults(3dm), to initialize the DMparams list with image defaults
dmICSetSrcParams(3dm), to configure the source (input) image parameters
dmICSetDstParams(3dm), to configure the destination (output) image parameters
dmICSetConvParams(3dm), to configure the conversion algorithm (quality, etc.)
Create a DMbufferpool for the image converter output by calling:
dmBufferSetPoolDefaults(3dm), to initialize the DMparams list
dmICGetDstPoolParams(3dm), to modify the list to reflect the destination parameters (other DMbuffer paths using this pool must also be queried for their requirements before creating the buffer pool)
dmBufferCreatePool(3dm), to create a pool with the required attributes
dmICSetDstPool(3dm), to attach this pool to the image converter
Get a converter file descriptor for notification of new output from the image converter by calling:
dmICGetDstQueueFD(3dm)
Get notification of a new DMbuffer of converted data by calling:
select(2)
Get the new DMbuffer by calling:
dmICReceive(3dm), to dequeue the converted image from the converter
dmBufferGetUSTMSCpair(3dm), to get the sequence number of this image
dmBufferGetSize(3dm), to get the size of the image data in bytes
dmBufferMapData(3dm), to get a pointer to the image data
Open or create a movie file with an image track using one of the following methods:
Create a new movie file by calling:
mvCreateFile(3dm), to get a handle to the new movie file
mvAddTrack(3dm), to insert an empty image track into the movie file
Open an existing movie file by calling:
mvOpenFile(3dm), to get a handle to the existing movie
mvFindTrackByMedium(3dm), to find the movie's image (DM_IMAGE) track
mvGetTrackLength(3dm), to find the playing time of the current track
Determine the image size by calling:
dmBufferMapData(3dm), to get a pointer to the image
dmBufferGetSize(3dm), to get the size of the image in bytes

Note: Perform these operations twice for field-based data (once per field) Save the image to the movie file using one of the following methods (pass the pointer and the size returned in the previous step to the function):
Write the data from a single DMbuffer as a frame by calling:
mvInsertTrackData(3dm)
Write the data from 2 DMbuffers (one per field) by calling:
mvInsertTrackDataFields(3dm)
Open a movie file for reading by calling:
mvOpenFile(3dm)
mvFindTrackByMedium(3dm), to find the DM_IMAGE track
mvGetImageWidth(3dm), to get the width of the image
mvGetImageHeight(3dm), to get the height of the image
mvGetTrackMaxFieldSize(3dm), to get the size (in bytes) of the largest compressed field, which can be used for configuring DMbuffer size when creating a buffer pool
Get a free DMbuffer by calling:
dmBufferAllocate(3dm), to allocate a DMbuffer
dmBufferMapData(3dm), to get a pointer to the data area of the DMbuffer
Get the movie file index for the desired image by calling:
mvGetTrackDataIndexAtTime(3dm)
Import the compressed image data into memory using one of the following methods:
If image data is stored as a frame, call:
mvGetTrackDataInfo(3dm), to get the size of the compressed data
mvReadTrackData(3dm), to copy the compressed data from the movie file directly into the DMbuffer
If image data is stored as fields, call:
mvGetTrackDataFieldInfo(3dm), to get the sizes of the compressed fields
mvReadTrackDataFields(3dm), to copy the 2 compressed fields directly into 2 DMbuffers
Set the DMbuffer size(s) by calling:
dmBufferSetSize(3dm)
This section presents a sketch of transporting video images to a window on the graphics display.
Get a pointer to the image data in a DMbuffer by calling:
dmBufferMapData(3dm)
Display image in a graphics context (window or offscreen buffer) by calling:
glPixelZoom(zoomx, -zoomy), to set a negative y zoom indicating top-to-bottom orientation (needed for video)
glDrawPixels(3G), using
GL_YCRCB_422_SGIX, (to convert from YCrCb to RGB)
GL_INTERLACE_SGIX (as supported—an OpenGL interlacing extension for sending two noninterlaced fields of video to an interlaced graphics display by automatically interlacing alternate lines from two video fields)
This section explains how to get video into memory using DMbuffers. Refer to the sample program dmplay.dmic in Video Capture with Compression in Chapter 4 of “Digital Media Programmer's Examples” for a demonstration of this method.
Figure 5-2 shows the video compression path.

The first step in video I/O is getting the video data into a DMbuffer. Once you have a buffer of video data, you can send it to dmIC to compress it, send it to graphics for display, applying effects along the way, or write it to a movie file. You can create separate threads for the video input and image conversion to ensure that the processing remains event-driven. In addition, the DMbuffers method provides the capability of performing multiple image conversion operations simultaneously within the same application with no performance penalty.
Getting video into memory requires
a video source (input) node
a memory drain (output) node
a path that connects the two nodes
an video input DMbufferpool associated with the memory drain node
This method of compressing video into memory also uses
an input DMbufferpool on the input to the DM image converter (this is the DM buffer pool associated with the memory drain node)
an output DMbufferpool to contain the output from the converter
The first three items are the same regardless of whether you use a DMbuffer or a VLbuffer to transport visual data, and are explained in Chapter 4.
The basic model for video input to memory using DMbuffers is:
Initialize the DMparams list by calling dmBufferSetPoolDefaults(3dm).
Query each device about its requirements for memory allocation:
Determine video I/O device requirements using vlDMPoolGetParams(3dm)
Determine image converter requirements using dmICGetSrcPoolParams(3dm) and dmICGetDstPoolParams(3dm) as described in “3. Creating Data Buffers Using the Image Conversion API” in Chapter 6.
Create buffer pools using the DMParams lists returned by the previous queries, by calling dmBufferCreatePool(3dm).
Register the input buffer pool as the video input destination (drain) by calling vlDMPoolRegister(3dm).
This application can be divided into the following major areas (each of which is further broken down into detailed steps):
Video initialization, which involves
opening a connection to the video server (vlOpenVideo())
if necessary, determining which device the application will use (vlGetDevice(), vlGetDeviceList())
getting input information, such as the size of the video images
Note: Image size (in pixels) can be determined from the video timing and packing. Use dmImageGetSize() to determine the size of an image in bytes. The dmplay.dmic program first sets the capture mode to noninterlaced to get the size of each field, and then resets the capture mode to interlaced before initiating video transfer. Creating and setting up a video data transfer path, which involves
specifying nodes on the data path (vlGetNode())
creating a path connecting the specified nodes (vlCreatePath())
setting up the hardware for the path (vlSetupPaths())
Getting and setting controls for video data transfer, which involves
getting input parameters (controls) for the nodes on the path (vlGetControl())
setting output parameters (controls) for the nodes on the path (vlSetControl())
Creating and registering DMbufferpools to handle video data, which involves
initializing the DMparams list by calling dmBufferSetPoolDefaults()
querying each device about its requirements for memory allocation:
Determine video I/O device requirements using vlDMPoolGetParams().
Determine image converter requirements using dmICGetSrcPoolParams() and dmICGetDstPoolParams() as described in “3. Creating Data Buffers Using the Image Conversion API” in Chapter 6.
creating buffer pools using the DMParams lists modified by the previous queries, by calling dmBufferCreatePool()
registering the input buffer pool as the video input destination (drain) by calling vlDMPoolRegister()
Transfer initiation, which involves:
setting the video transfer mode using VL_CAP_TYPE
specifying path-related events to be captured by calling vlSelectEvents()
obtaining a VL file descriptor to wait upon by calling vlGetFD()
initiating the video transfer by calling vlBeginTransfer()
Main loop, which involves
waiting for video events using select()
dequeueing the next video event using vlEventReceive()
obtaining the video field or frame as a DMbuffer for further transport to the appropriate destination (dmIC, OpenGL, etc.) using vlEventtoDMbuffer()
Cleanup, which involves
freeing the DMBuffers and destroying the DMbufferpools