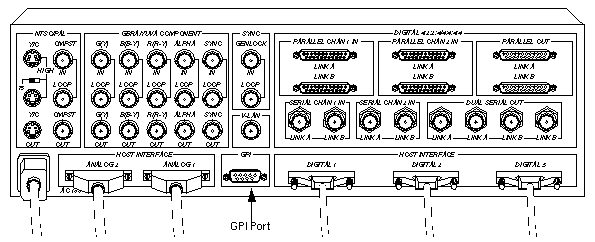
Use the two-channel GPI (General-Purpose Interface) port on the Sirius Video breakout box to communicate with various video devices. Figure 4-1 shows the location of the nine-pin GPI port on the Sirius Video breakout box.
This chapter explains how to control the GPI:
using Sirius Video utilities for the GPI
using VL controls for the GPI
GPI pinouts
This section explains how to use the following utilities to control the GPI:
vcp
sir_vidtomem and sir_memtovid
The command-line option for sir_vidtomem and sir_memtovid that generates a pair of GPI notify events is -T. This option generates the notify events at the start (GPI_1 output) and end (GPI_2 output) of the transfer.
The command-line option for sir_vidtomem and sir_memtovid that specifies an external trigger source that initiates the output DMA sequence is -t#.
For more information on sir_vidtomem and sir_memtovid, see Appendix E, “Example Programs,” later in this guide.
To use the video control panel to set modes for GPI channels 1 and 2, follow these steps:
Call up vcp:
/usr/sbin/vcp
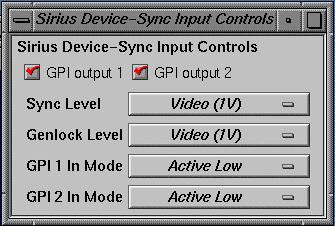
In the Pro menu (in the menu bar), select Device Controls; select Synchronization Controls. The Sirius Device-Sync Input Controls window appears, as shown in Figure 4-2.
Click GPI output 1, GPI output 2, or both, depending on the equipment you are using. Red checks in the boxes mean that these outputs are enabled for vcp.
To set input to active low, select “Active Low” in the GPI 1 In Mode or GPI2 In Mode menu item of the Sync Input Controls menu, as shown in Figure 4-2.
In active low mode (Abekas switch closure mode), the triggering device must drive either GPI_IN + line high with its GPI_OUT + line. The GPI_IN + line from the triggering device should be connected to the Sirius Video breakout box's ground pin (pin 5).
To set input to active high, select “Active High” in the GPI 1 In Mode or GPI2 In Mode menu item of the Sync Input Controls menu, as shown in Figure 4-2.
In active high mode, the triggering device must drive either GPI_IN + line high with its GPI_OUT + line. The GPI_IN + line from the triggering device should be connected to the Sirius Video breakout box's ground pin (pin 5).
This section explains the device-dependent VL controls for controlling the GPI. Table 4-1 summarizes these controls.
Table 4-1. VL Controls for GPI Triggering
Purpose | Control |
|---|---|
Trigger a GPI event | VL_SIR_TRIGGER: |
Issue GPI events relative to the start and end of the transfer | VL_SIR_XFER_[START,STOP}_NOTIFY: SIR_TRIGGER_NONE, SIR_TRIGGER, GPI_1, or SIR_TRIGGER_GPI_2 |
Configure GPI inputs | VL_SIR_GPI_CHAN1_IN_MODE |
Write to GPI outputs | VL_SIR_GPI_OUT_CHAN0 |
Sirius Video responds to GPI input if the VL_SIR_TRIGGER control is applied, that is, if a GPI trigger event is requested; thus, memory-based transfers constitute the communication from GPI input to Sirius Video. You can send a GPI event at the start or at the end of a transfer. You can also write directly to the GPI, as explained later in this chapter.
To turn off GPI triggering, set the control(s) to SIR_TRIGGER_NONE.
| Note: No VL event is associated with the GPI inputs. |
If a GPI trigger event is requested, the transfer pauses and waits for a GPI event from the external device connected to the GPI port on the breakout box. When such an event is received, the read/write DMA transfer proceeds. When the last DMA request has been serviced, the software checks to see if an end transfer notify trigger was requested. If it was, the requested GPI line is pulled low for 20 msec.
For GPI triggers, the hardware plugged into the GPI port on the Sirius video breakout box must provide the GPI event. That event should match the input level expected by the GPI port as selected by the device control panel, or by the VL_SIR_GPI_CHAN1_IN_MODE or VL_SIR_GPI_CHAN2_IN_MODE control.
You can also generate GPI output events at the beginning and at the end of each transfer by setting the VL_SIR_TRANSFER_START_NOTIFY and VL_SIR_TRANSFER_STOP_NOTIFY controls, respectively, to either VL_SIR_TRIGGER_GPI_1 or VL_SIR_TRIGGER_GPI_2.
At the start of a DMA transfer, the transfer start notify trigger (VL_SIR_GPI_XFER_START_NOTIFY) drives the GPI output line low for
20 msec. The start and stop GPIs should usually go to different pins.
Specify mode for each GPI channel separately:
vlSetControl(svr, path, dev, VL_SIR_GPI_CHAN1_IN_MODE [value]) vlSetControl(svr, path, dev, VL_SIR_GPI_CHAN2_IN_MODE [value]) |
GPI input can be configured as active low or active high only; specify the input according to the hardware you are using. Each possibility is explained separately.
In active low mode, the triggering device must drive either GPI_IN + line high with its GPI_OUT + line. The GPI_IN + line from the triggering device should be connected to the Sirius Video breakout box's ground pin (pin 5).
To set input to active low, specify the channel and the mode; for example:
vlSetControl(svr, path, dev, VL_SIR_GPI_CHAN1_IN_MODE, SIR_GPI_IN_MODE_ABEKAS_SWITCH_CLOSURE) |
or
vlSetControl(svr, path, dev, VL_SIR_GPI_CHAN1_IN_MODE SIR_GPI_IN_MODE_ACTIVE_LOW) |
In active high mode, the triggering device must drive either GPI_IN + line high with its GPI_OUT + line. The GPI_IN + line from the triggering device should be connected to the Sirius Video breakout box's ground pin (pin 5).
To set input to active high, specify the channel and the mode; for example:
vlSetControl(svr, path, dev, VL_SIR_GPI_CHAN1_IN_MODE, SIR_GPI_IN_MODE_ACTIVE_HIGH) |
Specify output mode for each GPI channel separately:
vlSetControl(svr, path, dev, VL_SIR_GPI_OUT_CHAN1 [value]) vlSetControl(svr, path, dev, VL_SIR_GPI_OUT_CHAN2 [value]) |
Like input, GPI output can be driven either high (off) or low (on). When GPI output is driven high, the photovoltaic relay is in an active state; when GPI output is driven low, the photovoltaic relay is passive.
| Note: For GPI output, 0 is on and 1 is off. |
To set output to high (off), specify the channel and the mode; for example:
vlSetControl(svr, path, dev, VL_SIR_GPI_OUT_CHAN1 SIR_GPI_OUT_OFF) |
To set output to low (on), specify the channel and the mode; for example:
vlSetControl(svr, path, dev, VL_SIR_GPI_OUT_CHAN1 SIR_GPI_OUT_ON) |
For each of two channels, the GPI provides positive and negative (actually, bidirectional) input and output wires. Figure 4-3 shows pinouts for the GPI.
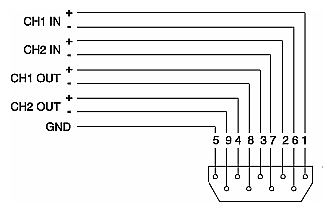
Table 4-2 summarizes these pinouts in numerical order.
Pin | Use |
|---|---|
1 | Channel 1 input positive |
2 | Channel 2 input positive |
3 | Channel 1 output positive |
4 | Channel 2 output positive |
5 | GND |
6 | Channel 1 input negative |
7 | Channel 2 input negative |
8 | Channel 1 output negative |
9 | Channel 2 output negative |
| Note: Input and output pins in this table are actually bidirectional; positive and negative nomenclature is for reference only. |