This book describes how to integrate your application into the IRIX Interactive Desktop environment. It assumes that your application already runs on Silicon Graphics workstations. This is strictly a how-to guide—refer to the IRIX Interactive Desktop User Interface Guidelines for style guidelines.
This introduction contains these sections:
“About the IRIX Interactive Desktop Environment” presents a brief overview of the IRIX Interactive Desktop and explains why it's important to integrate your application into the Desktop environment.
“Implementation Strategies and Toolkits” provides a checklist to help developers focus on the items that most benefit their users.
“Integrating an Application” offers a brief, general list of the basic steps for integration.
The IRIX Interactive Desktop environment provides a graphical user interface (GUI) to the IRIX filesystem and operating system. This interface allows users to interact with the workstation using a point-and-click interface, based on icons and windows. The Desktop provides tools and services for the users' convenience, many of which are accessible directly from the Desktop's toolchests.
Integrating your application into the Desktop environment is an important step in creating your product. Since users are already familiar with the Desktop, they have certain expectations about how applications should look and behave in the Desktop environment. By integrating your application into the Desktop, you insure that these expectations are met—thus helping your users get the most out of your application.
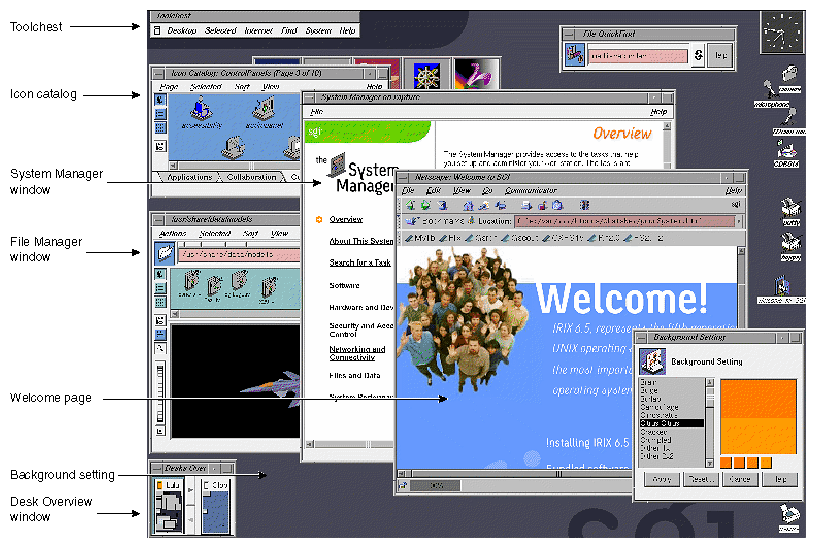
Figure 1 shows an example of the IRIX Interactive Desktop, introduced with IRIX version 6.5.14, with the following tools running:
Welcome page design and navigation (the center, blue Netscape window). This window can be launched from the Welcome_to_SGI icon.
Toolchest. The Toolchest serves as the primary access point for desktop user interfaces. For example, users can access interfaces for everyday tasks such as customizing their desktop, accessing applications and Web tools, backing up and restoring their files, and finding information (help) on a variety of desktop topics. By default, the Toolchest is located in the upper left corner.
New background patterns. The background in the new screensnap is one of the new patterns available from the Background Setting panel. The Background Setting panel itself is visible in the screensnap (lower right), previewing the new background pattern called "Citrus Citrus.” The background panel can be launched from the Toolchest by selecting “Desktop > Customize > Background.”
System Manager (center window). This window has a new design but the same functionality as before. System Manager can be launched from the Toolchest by selecting “System > System Manager.”
Desks Overview window. With the Desks Overview window, users can switch from one “desk,” or group of applications, to another. When your application appears in a desk other than the one currently in use, it is in a state similar to the minimized state. You need to be careful about what processes your application runs while in a minimized state. The Desks Overview window is shown in the lower left corner.
Icon Catalog. Users can access icons from the different pages in the Icon Catalog. Some of the pages are: Applications, Demos, Desktop Tools, Media Tools, and Web Tools. Since the Icon Catalog is one of the first places users look when they need to find an application, you should add your product's icons to this catalog. By default, the Icon Catalog is below the Toolchest.
File Manager window. From this window, you can view file contents (example shown is a model of an X29 fighter jet, partly obscured by the System Manager window). The File Manager window is shown at the left, above the Desks Overview window.
In addition, the “noiconlogin-mode” image has been updated to show the new SGI logo. The EZsetup account login and web page design have also been updated. Other elements that remain from the previous desktop design include the File QuickFind (shown in the upper right), minimized windows (five across on the left side under the Toolchest), and device icons along the right side. These are just a few examples of the kinds of things you will need to consider to integrate your application into the Desktop Environment. This book provides complete and detailed instructions for integration, while the IRIX Interactive Desktop User Interface Guidelines gives you style guidelines. For the best results, use both books together.
This section presents strategies for implementing your application and suggests some toolkits that will make the implementation easier. Topics include:
Table 1 provides a checklist to help you focus your resources on the items that most benefit your users. The checklist lists tasks in order of importance. Try to adhere to the user interface guidelines in the order presented in the checklist.
For a summary of user interface guidelines that includes a complete checklist, see Appendix A, “Summary of Guidelines,” in IRIX Interactive Desktop User Interface Guidelines.
Table 1. Checklist of Implementation Tasks and References
Task | IRIX Interactive Desktop User Interface Guidelines | Implementation Reference |
|---|---|---|
Icons and File Typing Rules (FTRs) | Chapter 2 | Desktop Integration Guide, Chapters 11-15 |
IRIX Interactive Desktop Look* | Chapter 3 | Desktop Integration Guide, Chapters 2-3 |
Menus and Accelerators* | Chapter 3 | OSF/Motif Programmer's Guide, Chapter 6 |
Copy and Paste* | Chapter 5 | Desktop Integration Guide, Chapter 7 |
Window Management | Chapter 3 | Desktop Integration Guide, Chapters 5-6 |
Software Installation | Chapter 4 | S/W Packager User's Guide |
Session Management | Chapter 3 | Desktop Integration Guide, Chapter 5 |
Online Help | Chapter 4 | Desktop Integration Guide, Chapter 9 |
Selection, Focus* | Chapter 7 | OSF/Motif Programmer's Guide, Chapter 13 |
Feedback | Chapter 11 | OSF Motif Programmer's Guide |
Internationalization | Chapter 4 | Topics in IRIX Programming, Chapter 4 |
* Items requiring use of the Motif toolkit.
It's also useful to know which changes you can make without modifying the application's source code and which items require the use of the IRIS IM (OSF/Motif) toolkit. The Silicon Graphics style is based on Motif, so using the Motif toolkit makes compliance much easier. Table 2 lists which tasks require application code changes and which require Motif.
Table 2. Tasks Requiring Application Changes and/or Motif
Task | Application Code Changes | Requires Motif |
|---|---|---|
Icons and FTRs |
|
|
IRIX Interactive Desktop Look |
| yes |
Menus/Accelerators |
| yes |
Copy & Paste | yes | yes (Xt) |
Window Management |
|
|
Software Installation |
|
|
Session Management | yes |
|
Online Help | yes | yes |
Selection, Focus |
| yes |
Feedback | yes |
|
Internationalization | yes |
|
Besides using Motif, other toolkits and tools can make integrating your application easier. These include:
IRIS ViewKit is a C++ based, user-interface toolkit based on OSF/Motif. ViewKit also runs on Dec, HP, IBM, SCO, SunOS, and Sun Solaris.
Table 3 lists integration tasks that you can achieve by using ViewKit.
Table 3. Integration and ViewKit
Task | ViewKit |
|---|---|
Icons and FTRs |
|
IRIX Interactive Desktop Look | Color schemes set by default |
Menus and Accelerators |
|
Copy and Paste | VkCutPaste Class |
Window Management |
|
Software Installation |
|
Session Management | Initial session management set |
Online Help | Help menu entry and context sensitive help |
Selection, Focus |
|
Feedback | Busy state and cursor are easily set |
Internationalization |
|
Your application can provide World Wide Web access by using VkWebViewerBase, which provides basic Web functionality. For more information, see the IRIS ViewKit Programmer's Guide .
Developer Magic RapidApp is an interactive tool for creating applications. It integrates with other Developer Magic tools, including cvd, cvstatic, cvbuild, and others, to provide an environment for developing object-oriented applications as quickly as possible. RapidApp generates C++ code, with interface classes based on the IRIS ViewKit toolkit. In addition to the conveniences provided by IRIS ViewKit, you can use RapidApp to help create your application (see Table 4).
Table 4. Integration and RapidApp
Task | RapidApp |
|---|---|
Icons and FTRs | Generates an FTR rule and sample icon |
IRIX Interactive Desktop Look | sgiMode & schemes set by default |
Menus and Accelerators | Standard & Common menu entries |
Copy and Paste |
|
Window Management |
|
Software Installation | Automatically builds an inst image |
Session Management | Initial session management set |
Online Help |
|
Selection, Focus |
|
Feedback |
|
Internationalization |
|
For more information, see the Developer Magic: RapidApp User's Guide.
This section lists the basic steps for integrating an existing application into the IRIX Interactive Desktop environment. The steps are listed in a very general way, to give you a brief overview of the process.
If you're writing a new application, here are a few tips:
If possible, use IRIS ViewKit. Refer to the IRIS ViewKit Programmer's Guide for instructions.
Don't use IRIS GL. Use OpenGL or Open Inventor instead.

Note: Open Inventor isn't part of the IRIS Developer's Option, it is a separate option. In the United States and Canada, call SGI Direct at 800–800-SGI1 (7441) for more information about how to order the Open Inventor Option; outside the United States and Canada, please contact your local sales office or distributor.
To integrate your application into the IRIX Interactive Desktop, follow these steps:
If your application uses IRIS GL, port to OpenGL if possible. If it's impractical for you to port to OpenGL at this time, at least switch to mixed-model IRIS GL programming, if you haven't already done so. (Mixed-model programs use Xt for event and window management).
For information on porting from IRIS GL to OpenGL and for switching your program to mixed-model, refer to the OpenGL Porting Guide. This manual is included online in the IRIS Developer's Option (IDO). View it using the IRIS InSight Viewer.
Set up your application to comply with the IRIX Interactive Desktop look and feel:
use the Enhanced IRIS IM look
use Schemes
use the new and enhanced IRIS IM widgets where appropriate
set up your application for correct window, session, and desks management
customize the minimize window image for your application (optional)
use the extensions provided in the Selection Library and the File Alteration Monitor (optional)
These topics, as well as information on fonts, are covered in Part 1 of this guide.
Create Desktop icons for your application and add them to the Icon Catalog. You'll need an icon for the application itself as well as icons for any unusual data formats. See Part 2 of this manual for instructions.
Use swpkg to package your application so that your users can install it easily. See the Software Packager User's Guide for information for instructions on using swpkg.