This chapter explains how to use the Digital Media Library routines that facilitate real-time input and output between live media devices. In particular, it describes using the Video Library (VL) and the Audio Library (AL) to create the interface between your application program, the workstation CPU, and external devices.
The VL enables live video flow into a program. This section explains basic video I/O concepts of the VL.
Video I/O programming with the VL involves
devices, for processing video (each including sets of nodes)
nodes, for defining endpoints or internal processing points of a video transport path
ports, for producing or consuming video data
controls, for modifying the behavior of video nodes and transport paths
events, for monitoring video I/O status
buffers, for sending video data to and receiving video data from host memory; these can be either VLbuffers, as described in this chapter or DMbuffers, as described in Chapter 5, “Digital Media Buffers.”
Each of these topics is discussed in a separate section.
The manner in which video data transfer is accomplished differs slightly depending on the buffering method, but the essential concepts of using paths, nodes, controls, and events apply to both methods.
There are two types of video devices: external devices that are connected to a video jack on the workstation, and VL video devices, which are internal video boards and options for processing video data. The application should perform a query to determine which external video devices are connected and powered on, by calling vlGetDeviceList()
int vlGetDeviceList ( VLServer svr, VLDevList *devlist ) |
which fills the supplied VLDevList structure with a list of available devices, including the number of devices available and an array of VLDevice structures describing the available devices. A VLDevice structure contains the index of the device, the device name, the number of nodes available, and a list of VLNodeInfo structures describing the nodes available on that device.
To select the desired node, find the entry in the node list for the device name you want in the return argument of vlGetDeviceList(), then pass in the corresponding node number to vlGetNode().
A node is an endpoint or internal processing element of the video transport path, such as a video source such as a camera, a video drain (such as to the workstation screen), a device (video), or the blender in which video sources are combined for output to a drain.
Nodes have three attributes:
type, which specifies the node's function in a path
class, which identifies the type of system resource associated with the node
number, which differentiates among multiple node instances and typically corresponds to the numbering of the video connectors on the video board
Node types are
| VL_SRC | the origination point (source) of a video stream | |||
| VL_DRN | the destination point (drain) to which video is sent | |||
| VL_INTERNAL |
| |||
| VL_DEVICE | a special node for device-global controls shared by all paths
Putting a VL_DEVICE node on a path gives that path access to global device controls that can affect all paths on the device. |
Node classes are
| VL_VIDEO | a hardware video port that connects to a piece of video equipment such as a video tape deck or camera. All video devices have at least one port. The VL_SRC node type signifies an input port; VL_DRN signifies an output port. | |
| VL_MEM | a memory buffer used to send or receive video data | |
| VL_GFX | a direct connection between a video device and a graphics framebuffer | |
| VL_SCREEN | a direct connection between a video device and a graphics display device, but different from VL_GFX because the video data does not interact directly with the graphics framebuffer and cannot be manipulated with graphics routines | |
| VL_TEXTURE | an interface to graphics hardware for transferring video data directly to or from texture memory | |
| VL_BLENDER | a filter that operates on data flowing from source to drain | |
| VL_CSC | an interface to an optional real-time color space converter on systems that support it (and that have the option board installed) | |
| VL_FB | an internal framebuffer node for freezing video on certain systems |
Additional node classes may be available on certain video options; refer to the documentation that came with your video option for details.
To create a video node, call vlGetNode(). Its function prototype is
VLNode vlGetNode ( VLServer vlSvr, int type, int class, int number ) |
Upon successful completion, vlGetNode() returns a VL Node (a handle to a node), which identifies the node for functions that perform an action on a node.
To use the default node for a device, specify its number as VL_ANY:
nodehandle = vlGetNode( svr, VL_SRC, VL_VIDEO, VL_ANY ); |
A path is a route between video nodes for directing the flow of video data.
Using a path involves
creating the path
getting the device ID
adding nodes (if needed)
specifying the data transfer characteristics of the path
setting up the data path
These steps are explained in the sections that follow.
Use vlCreatePath() to create the video data transfer path. Its function prototype is
VLPath vlCreatePath ( VLServer svr, VLDev dev, VLNode source, VLNode drain ) |
You can create a path using any available node by specifying the generic value VL_ANY for the device. This code fragment creates a path if the device is unknown:
if ((path = vlCreatePath(vlSvr, VL_ANY, src, drn)) < 0) {
    vlPerror(_progName);
    exit(1);
}
|
This code fragment creates a path that uses a device specified by parsing a devlist:
if ((path = vlCreatePath(vlSvr, devlist.devices[devicenum].dev, src,
    drn)) < 0) {
    vlPerror(_progName);
    exit(1);
}
|
| Note: If the path contains one or more invalid nodes, vlCreatePath() returns VLBadNode. |
If you specify VL_ANY as the device when you create the path, use vlGetDevice() to discover the device ID selected. Its function prototype is
VLDev vlGetDevice ( VLServer vlSvr, VLPath path ) |
For example:
devicenum = vlGetDevice(vlSvr, path);
deviceName = devlist.devices[devicenum].name;
printf("Device is: %s/n", deviceName);
|
You can add nodes to an existing path to provide additional processing or I/O capabilities. For this optional step, use vlAddNode(). Its function prototype is
int vlAddNode ( VLServer vlSvr, VLPath vlPath, VLNodeId node ) |
where
| vlSvr | names the server to which the path is connected | |
| vlPath | is the path as defined with vlCreatePath() | |
| node | is the node ID |
Path attributes specify usage rules for video controls and data transfers. Even though the names are the same, the intent and function of the usage attributes depend on whether they specify control or stream (data) usage.
Control usage attributes are
VL_SHARE, meaning other paths can set controls on this node; this control is the desired setting for other paths, including vcp, to work

Note: When using VL_SHARE, pay attention to events. If another user has changed a control, a VLControlChanged event occurs. VL_READ_ONLY, meaning controls cannot be set, only read; for example, this control can be used to monitor controls
VL_LOCK, which prevents other paths from setting controls on this path; controls cannot be used by another path
VL_DONE_USING, meaning the resources are no longer required; the application releases this set of paths for other applications to acquire
Stream (data) usage attributes are
VL_SHARE, meaning transfers can be preempted by other users; paths contend for ownership
Note: When using VL_SHARE, pay attention to events. If another user has taken over the node, a VLStreamPreempted event occurs. VL_READ_ONLY, meaning the path cannot perform transfers, but other resources are not locked; set this value to use the path for controls
VL_LOCK, which prevents other paths that share data transfer resources with this path from transferring (except that two paths can share a video source when locked); existing paths that share resources with this path are preempted
VL_DONE_USING, meaning the resources are no longer required; the application releases this set of paths for other applications to acquire
Once the path has been created and usage attributes assigned, its settings do not go into effect until the path is set up with vlSetupPaths(). Its function prototype is
int vlSetupPaths ( VLServer vlSvr, VLPathList paths,
                   u_int count, VLUsageType ctrlusage,
                   VLUsageType streamusage )
|
where
This example fragment sets up a path with shared controls and a locked stream:
if (vlSetupPaths(vlSvr, (VLPathList)&path, 1, VL_SHARE,
    VL_LOCK) < 0)
{
    vlPerror(_progName);
    exit(1);
}
|
For each internal node on the path, all unconnected input ports are connected to the first source node added to the path. Pixel ports are connected to pixel ports and alpha ports are connected to alpha ports.
For each drain node on the path, all unconnected input ports are connected to the first internal node placed on the path, if there is an internal node, or to the first source node placed on the path. Pixel ports are connected to pixel ports and alpha ports are connected to alpha ports.
| Note: Do not combine implicit and explicit routing. |
Controls determine the behavior of a node or path and provide information about them. Controls are specific to the path and node, and can also be device-dependent, depending on the control type. In general, controls on a video node are independent of controls on a memory or screen node. Even though controls on different types of nodes have the same names, they have different meanings, different units, and different behavior, depending on what node class they control.
The type definition of a VL control is:
typedef int VLControlType; |
To get the value of a control, call vlGetControl():
int vlGetControl ( VLserver svr, VLPath path, VLnode node,
                   VLControlType type, VLControlValue *value )
|
The control is located according to the svr, path, node, and type and its value is returned in a pointer to a VLControlValue structure:
typedef union {
 VLFraction       fractVal;
 VLBoolean        boolVal;
 int              intVal;
 VLXY             xyVal;
 char             stringVal[96];
 float            matrixVal[3][3];
 uint             pad[24];
 VLExtendedValue  extVal;
} VLControlValue;

typedef struct {
 int  x, y;
} VLXY;

typedef struct {
 int  numerator;
 int  denominator;
} VLFraction;
|
To obtain information about the valid values for a given control, call vlGetControlInfo():
VLControlInfo *vlGetControlInfo ( VLserver svr, VLPath path, VLnode node,
                                  VLControlType type )
|
The control is located according to the svr, path, node, and type, and its value is returned in a pointer to a VLControlInfo structure:
typedef struct __vlControlInfo {
 char                name[VL_NAME_SIZE]; /* name of control */
 VLControlType       type;            /* e.g. WINDOW, HUE */
 VLControlClass      ctlClass;       /* SLIDER, DETENT, KNOB, BUTTON */
 VLControlGroup      group;          /* BLEND, VISUAL QUALITY, SYNC */
 VLNode              node;           /* associated node */
 VLControlValueType  valueType;      /* what kind of data */
 int                 valueCount;     /* how many data items */
 int                 numFractRanges; /* number of ranges */
 VLFractionRange     *ranges;        /* range of values of control */
 int                 numItems;       /* number of enumerated items */
 VLControlItem       *itemList;      /* the actual enumerations */
} VLControlInfo;
|
These controls are highly interdependent, so the order in which they are set is important. In most cases, the value being set takes precedence over other values that were previously set.
There are two types of controls: “path” controls and “device” controls:
Path controls are those such as VL_SIZE, VL_OFFSET, and VL_ZOOM, which are capable of actively controlling a transfer. These controls are private to a path and any changes (with some exceptions) cause events to be sent only to the process owning the path. These controls are active while the path is transferring, and retain their values when the transfer is suspended for any reason. In practice, this means that the user program can set up the desired transfer controls, and then restart a preempted transfer without restoring controls to their previous values.
Device controls are those such as VL_BRIGHTNESS and VL_CONTRAST, which are outside the realm of a “path” and can possibly affect the data that another path is processing. Because most of these controls directly affect some hardware change, they retain their values after the paths are removed.
VL_DEFAULT_SOURCE specifies which of the input nodes is to be considered the “default” input. This is automatically set up when the video driver is loaded according to Table 4-1, which indicates which input signal(s) is active.
Table 4-1. Default Video Source
S-video | Composite | Camera | Default_Source |
|---|---|---|---|
yes | x | x | svideo |
no | yes | x | composite |
no | no | yes | camera |
no | no | no | composite |
For example, if a VCR is connected to the S-Video input and it is powered on, then it is the default input.
When the VL_DEFAULT_SOURCE is changed, a VLDefaultSource event is sent to all processes that have this event enabled in their vlEventMask.
Most source controls are read-only values that are set either by the user (from the Video Control Panel) or automatically, according to the characteristics of the video input signal. However, reading the values of these controls is useful for obtaining information about the input video stream that is necessary for setting controls on the drain node.
The VL_FORMAT control on the video source node is usually set using the Video Control Panel. It is often of no concern to a vid-to-mem application, except with Sirius Video™, where it is used to determine color space conversion.
VL_FORMAT selects the input video format (use VL_MUXSWITCH if there is more than one to select):
VL_FORMAT_COMPOSITE selects analog composite video.
VL_FORMAT_SVIDEO selects analog composite video.
VL_FORMAT_DIGITAL_COMPONENT and VL_FORMAT_DIGITAL_COMPONENT_SERIAL select digital video.
VL_FORMAT_DIGITAL_INDYCAM and VL_FORMAT_DIGITAL_CAMERA select the connected camera.
The VL_TIMING control on the video source node is usually set from the Video Control Panel. The input source timing also affects the value returned by the VL_SIZE control on the video source node.
Use VL_TIMING to determine whether the input source timing is PAL or NTSC, and whether the input pixels are square or not. Knowing whether the input signal is PAL or NTSC timing is useful for setting the VL_RATE control on the memory drain node. (For Sirius Video, it is also used to determine the value for the VL_TIMING control on the memory drain node.) An easy way to set the VL_TIMING value for the memory node is to read the value of the VL_TIMING control from the video source node, and then set that value into the VL_TIMING control for the memory node.
The VL_TIMING control is an integer value that adjusts the video filter for different video standards.
The 525 (NTSC) or 625 (PAL) timing standards are specified, and the pixels are considered to be in the accepted video aspect ratio for those standards (also known as “non-square”) for VL_TIMING_525_CCIR601 and VL_TIMING_625_CCIR601.
The 525 (NTSC) or 625 (PAL) timing standards are specified and, depending on the VL video device and the connector type, a non-square-to-square pixel filter can be engaged so that in memory, the pixels are in a 1:1 aspect ratio (which is compatible with OpenGL) for VL_TIMING_525_SQ_PIX and VL_TIMING_625_SQ_PIX.
When these timings are applied to a path that has a standard digital camera attached, then the 525 (NTSC) or 625 (PAL) timing standards are interpreted to mean that the external pixels are in a 1:1 aspect ratio, and there is no non-square format available for the internal pixels.The pixel conversion applies a ratio of 11/10 for NTSC, and a ratio of 11/12 for PAL.
| Note: The application program should always check the default VL_SIZE after a timing change to determine the size of the resultant images. |
The VL_SIZE control on the video source node is a read-only control. The x and y values returned by this control are affected by the setting of the VL_TIMING control on the video source node. The x and y values of this control are not, in general, affected by the settings of any controls in the memory drain node, including VL_ZOOM, VL_SIZE, and VL_CAP_TYPE.
The x component value of this control reveals the width, in pixels, of the unzoomed, unclipped video input images (in fields or frames, depending on the VL_CAP_TYPE). The meaning of the y component value of the video source node's VL_SIZE control depends on the video device. On Sirius, the y value is the number of pixel rows in each field, and includes the count of rows of pixel samples taken from the field's Vertical Retrace Interval. On EV1 and VINO, the y value is the number of pixel rows in each frame (pair of fields), and does not include any pixel rows from the Vertical Retrace Interval.
This section describes setting controls on the memory drain node.
A vid-to-mem application chooses the color space (that is, the set of components that make up each pixel–for example–RGB, RGBA, YUV, YCrCb, Y, YIQ) and the particular packing of those pixel components into memory using the VL_PACKING control (on all video devices) and also with the VL_FORMAT control on Sirius video.
On all VL video devices except Sirius, VL_FORMAT is not applicable to memory drain nodes, and VL_PACKING is used to select the color space as well as the packing. Packings that imply RGB or RGBA color spaces select those spaces. Packings that imply Y, YUV, or YCrCb color spaces select one of those spaces.
On all VL video devices except Sirius, the capture mode can be set by the application. Its setting determines whether the images in the buffers returned by the VL are individual fields, interleaved frames, or pairs of non-interleaved fields.
VL_CAP_TYPE specifies the capture mode:
VL_CAPTURE_INTERLEAVED captures or sends buffers that contain both the F1 and F2 fields interlaced in memory. A side effect of changing from non-interleaved to interleaved is that the VL_RATE is halved.
VL_CAPTURE_NONINTERLEAVED captures or sends buffers that contain only one field each but are transferred in pairs keeping the F1 and even field of a picture together. A side effect of this characteristic is, if a transfer error occurs in the second field, then the first is not transferred.
VL_CAPTURE_FIELDS captures or sends buffers that contain only one field each and are transferred individually. Since these are separate fields, VL_RATE is effective on individual fields, and a single field may be dropped. Also, changing from interleaved to fields doubles the VL_RATE.
VL_CAPTURE_EVEN_FIELDS captures only the F1 fields. For output, the field is transferred during both field times.
VL_CAPTURE_ODD_FIELDS captures only the F1 fields. For output, the field is transferred during both field times
There is no single VL_CAP_TYPE that is available, and implemented in the same way, on all VL video devices. VL_CAPTURE_NONINTERLEAVED is available on all devices, but has different meanings on different platforms. VL_CAPTURE_INTERLEAVED, VL_CAPTURE_EVEN_FIELDS, and VL_CAPTURE_ODD_FIELDS are available and common to all VL video devices except Sirius.
On Sirius Video, VL_CAP_TYPE is read-only, and is permanently set to VL_CAPTURE_NONINTERLEAVED. Each captured buffer contains exactly one field, unclipped, unzoomed, with n leading pixel rows of samples from the Vertical Retrace Interval.
EV1 implements VL_CAPTURE_NONINTERLEAVED differently from all other VL video devices. On all VL video devices except EV1, when VL_CAP_TYPE is set to VL_CAPTURE_NONINTERLEAVED, each image buffer that the VL gives to the application contains one field, either F1 or F2, and VL_RATE (the rate at which these buffers are returned) is in fields per second, not frames per second. But on EV1 video devices, when VL_CAP_TYPE is set to VL_CAPTURE_NONINTERLEAVED, each image buffer contains two non-interleaved fields, and VL_RATE is in frames per second.
On all VL video devices except Sirius, VL_RATE sets the target rate (upper bound) of image buffers per second to be captured and returned to the application. The VL does not deliver more buffers per second than the rate you specify, but it can deliver less.
The contents of each image buffer is either a frame or a field, as determined by the VL_CAP_TYPE control. Accordingly, VL_RATE is in units of fields per second or frames per second, as determined by the VL_CAP_TYPE control.
VL_RATE is effective on a pair of fields, though it is still interpreted as a field rate. What this means is that if a field is to be dropped because of the effects of VL_RATE, then both fields are dropped (for output, if the VL_RATE causes some fields to be dropped, then the preceding fields are repeated). Also, changing from interleaved to non-interleaved mode doubles the VL_RATE.
VL_RATE is expressed as a fractional value (an integer numerator divided by an integer denominator) and ranges from the maximum rate (60/1 for NTSC, 50/1 for PAL, and half of each value for VL_CAPTURE_INTERLEAVED) down to 1/0xffff in any increment. Both the numerator and denominator must be specified. The usual value for the denominator is 1. Some devices convert the fraction to an integer number of images per second by truncating rather than rounding, so using values that are equivalent to integer values is the safest thing to do. Because VL_RATE is a fraction, vlGetControlInfo() cannot be used to obtain the minimum or maximum values for VL_RATE.
Acceptable values are determined from the following list of devices:
VL_CAPTURE_NONINTERLEAVED for all devices except EV1 and Sirius
NTSC: all multiples of 10 and 12 between 10 and 60
PAL: all multiples of 10 between 10 and 50
VL_CAPTURE_NONINTERLEAVED (EV1)
NTSC: all multiples of 5 and 6 between 5 and 30
PAL: all multiples of 5 between 5 and 25
VL_CAPTURE_INTERLEAVED, VL_CAPTURE_EVEN_FIELDS, and VL_CAPTURE_ODD_FIELDS
NTSC: all multiples of 5 and 6 between 5 and 30
PAL: all multiples of 5 between 5 and 25
VL_CAPTURE_NONINTERLEAVED for Sirius Video. This control is read-only. Its value is determined by the setting of the VL_TIMING control on the memory node.
NTSC: 60 fields per second
PAL: 50 fields per second
VINO's VL_RATE cannot be set to a value less than 5/1.
Figure 4-1 shows a diagram of an NTSC F1 field.
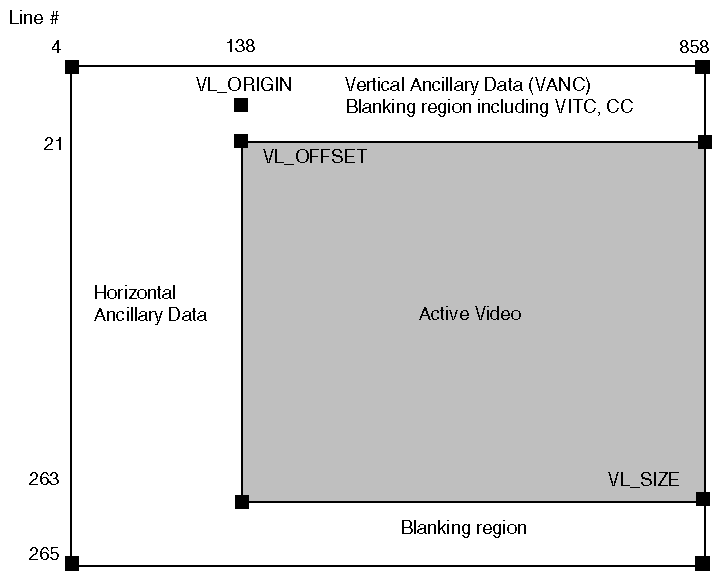
The data contained within the area labeled “Active Video” is the default data transferred to and from memory, but the hardware and video driver allow the transfer to include most all the portion of the “hidden” video, or the Horizontal and/or Vertical Ancillary Data (HANC/VANC).
The following controls specify the capture region (all these controls are path controls):
VL_ORIGIN is used on the screen capture device to specify the origin of the capture area. For Video input, the VL_ORIGIN can be used to specify a “black fill” region.
VL_OFFSET is used on a source or drain memory node to specify an (x, y) value that signifies the upper left corner of the active video region. For input, the area to the left and above the VL_OFFSET is omitted. For output, the same region is filled with “black.”
The VL_OFFSET values are in “ZOOMED” coordinates (see “Using VL_ZOOM on the Memory Drain Node” below). VL_OFFSET has a default of 0,0. Negative values of VL_OFFSET specify non-picture data such as horizontal and vertical ancillary data, which must be decoded separately from the picture data.
Certain restrictions apply to the value of VL_OFFSET. The resultant offset must be on a 2-pixel boundary, and the minimum offset is restricted to the values listed in the reference pages for the VL video devices. See also “Using VL_SIZE and VL_OFFSET on the Memory Drain Node,” for detailed information about these values for memory drain nodes.
Note: The actual minimum offset is affected by VL_ZOOM and VL_ASPECT. VL_SIZE is used on a source or drain memory node to specify an (x, y) value that defines the extent of the active video region. Adding the VL_SIZE coordinates to the VL_OFFSET coordinates gives the coordinates of the lower right corner of the active video region (VL_OFFSET + VL_SIZE = lower right corner). For input, the area to the right and below this corner is omitted. For output, the same region is filled with “black.”
The VL_SIZE values are in “ZOOMED” coordinates. See “Using VL_SIZE and VL_OFFSET on the Memory Drain Node,” for details about VL_SIZE values.
Certain restrictions apply to the value of VL_SIZE: The resultant size must be on a 2-pixel boundary and the number of bytes to be transferred must be a multiple of 8.
The maximum VL_SIZE is defined by the total number of lines in the video standard. Increasing the VL_SIZE beyond the maximum horizontal dimension causes VL_OFFSET to assume negative values. Out-of-range values return vlErrno VLValueOutOfRange.
The use of all these controls is explained in the sections that follow.
This section discusses the VL_SIZE control and the VL_OFFSET control on the memory drain node.
The VL_SIZE control on the memory drain node determines the number of rows of pixels, and the number of pixels in each row, in each image buffer (field or frame) that the VL returns to the application. If zooming (decimation) is being done, the VL_SIZE control on the memory drain node specifies the size of the image after it has been decimated.
The VL_SIZE control on the memory drain node can be used to “clip” a region out of an image by setting the x and/or y components to values that are smaller than the size of the captured (and decimated, if applicable) image.
When the (possibly decimated) image is being clipped, the clipped region does not have to come from the upper left hand corner of the (possibly decimated) source image. The VL_OFFSET control on the memory drain node determines the number of top pixel rows to skip and the number of leading pixels to skip in each row to find the first pixel in the (possibly decimated) image to place in the image buffer, the first pixel of the clipping region.
When zooming (decimation) is being used, VL_OFFSET is always in coordinates of the zoomed image. It is as if the entire source image is decimated down, and then the clipping function is applied to the decimated image. In practice, the hardware usually clips before decimating, but the VL API always specifies the VL_OFFSET in the coordinates of the decimated (virtual) image.
On all VL devices except Sirius, the vertical (y) component of VL_OFFSET may be specified with a negative value. This causes the clipping region to include row of samples taken before the top of the image, for example, rows from the Vertical Retrace Interval. This feature is usually used with VL_ZOOM of 1/1, since the information in the Vertical Retrace Interval isn't an image and doesn't make sense to decimate or average, at least not in the vertical direction.
The VL imposes these requirements on the values of VL_OFFSET and VL_SIZE:
The sum of the vertical components of VL_OFFSET and VL_SIZE must not exceed the height of the virtual (zoomed) image, and
The sum of the horizontal components of VL_OFFSET and VL_SIZE must not exceed the width of the virtual (zoomed) image.
When an attempt to set either one of these controls violates either of these rules, the call to vlSetControl() fails with the vlErrno VLValueOutOfRange, and the offending component (horizontal or vertical) is set to the largest non-negative value that does not violate the rule, or to zero if no such non-negative value exists.
Both VL_OFFSET and VL_SIZE cannot be set in one atomic operation. A change in either component of either control could violate one of the rules, especially after VL_ZOOM is set to a smaller fraction. It may be necessary to alternately and repeatedly set VL_OFFSET and VL_SIZE until no VLValueOutOfRange errors are reported.
Every VL video device places additional limitations on the range of acceptable values of VL_SIZE and VL_OFFSET. Each device has different limitations.
Sirius doesn't clip at all. VL_SIZE and VL_OFFSET are read-only in Sirius.
EV1 supports clipping only in the vertical (Y) direction. The entire width of the (possibly decimated) image is always placed in the image buffer. Application-specified horizontal clipping values are ignored.
VINO imposes an additional list of requirements on VL_SIZE and VL_OFFSET, along with the following clipping requirements:
The right side edge of the clipped image must always coincide with the right side edge of the virtual (possibly decimated) image. That is, the clipped image must always come from the right side of the (possibly decimated) source image. Consequently, when vlSetControl() is called to set the VL_OFFSET or VL_SIZE control on a memory node, if the sum of the horizontal components of the (new) settings of VL_OFFSET and VL_SIZE is less than the width of the virtual (zoomed) image, the vlSetControl() call succeeds, and the horizontal component of the other control is adjusted so that the sum of the two components exactly equals the width of the virtual (zoomed) image. This is done only in the horizontal direction.
Each pixel row in the image buffer must be a multiple of 8 bytes in length. This means that the horizontal component of VL_SIZE must be a multiple of 2, 4, or 8 pixels, depending on the pixel packing (size of the individual pixels in memory).
VL_ZOOM controls the expansion or decimation of the video image. Values greater than 1 expand the video; values less than 1 perform decimation. The only value of VL_ZOOM that works on all VL devices is 1/1. Acceptable values for vid-to-mem applications follow.
VINO may exhibit the following effects at these decimation factors: 1/4, 1/5, 1/6, 1/7, and 1/8:
Y values that are not adjacent horizontally are averaged together
The decimated images appear extremely green.
As a workaround, the VINO driver implements decimation by 1/4 and 1/6 by decimating in hardware by 1/2 or 1/3, and then decimating by an additional factor of 1/2 in software. This produces acceptable looking images, but at significant cost in CPU time. The three other VL_ZOOM factors, 1/5, 1/7, and 1/8, also exhibit the green image effect.
For example, the listed zoom factors on VINO may behave as follows:
| 1/1, 1/2, 1/3 | Implemented in hardware. Looks OK. | |
| 1/4, 1/6 | Implemented partially in hardware, partially in software. Looks OK, but is slower and uses 10% of an R4600 CPU. | |
| 1/5, 1/7, 1/8 | Implemented in hardware. Exhibits green shift. |
For example, the listed zoom factors on EV1 may behave as follows:
| 1/1, 1/2, 1/4, 1/8 |
| |
| 1/3, 1/5, 1/7 | Works only for vid-to-screen, not vid-to-mem, and only with VL_CAPTURE_INTERLEAVED | |
| 2/1, 4/1 | Works only for vid-to-screen, not vid-to-mem |
| Note: Sirius and Galileo 1.5 accept only a 1/1 zoom factor (Sirius and Galileo 1.5 don't zoom). |
VL_ZOOM specifies the decimation of the input video to a fraction of its original size. Scaling from 1/1 down to 1/256 is available; the actual increments are: 256 to 1/256. The actual zoom value is affected by VL_ASPECT.
| Note: VL_ZOOM is available only on the VL_DRN/VL_MEM (input) node. |
VL_SYNC selects the type of sync used for video output. The choices are:
VL_SYNC_INTERNAL means that the timing for the output is generated using an internal oscillator appropriate for the timing required (NTSC or PAL).
VL_SYNC_GENLOCK means that the timing for the output is “genlocked” to the VL_SYNC_ SOURCE.
VL_SYNC_SOURCE selects which sync source is used when VL_SYNC is set to VL_SYNC_GENLOCK.
VL_LAYOUT specifies the pixel layout (same as DM_IMAGE_LAYOUT):
VL_LAYOUT_LINEAR means that video pixels are arranged in memory linearly.
VL_LAYOUT_GRAPHICS means that video pixels are arranged in memory in a Pbuffer fashion that is compatible with the O2 OpenGL.
VL_LAYOUT_MIPMAP means that video pixels are arranged in memory in a texture or mipmapped fashion that is compatible with the O2 OpenGL.
The following signal quality controls are available (as supported by the video device):
VL_BRIGHTNESS
VL_CONTRAST
VL_H_PHASE
VL_HUE
VL_SATURATION
VL_RED_SETUP
VL_GREEN_SETUP
VL_GRN_SETUP
VL_BLUE_SETUP
VL_BLU_SETUP
VL_ALPHA_SETUP
VL_V_PHASE
Each of these controls is defined if they are provided in the analog encoder or decoder. They are not available in the digital domains.
VL_SIGNAL can be either VL_SIGNAL_NOTHING, VL_SIGNAL_BLACK, or VL_SIGNAL_REAL_IMAGE.
VL_FLICKER_FILTER enables or disables the “flicker” filter.
VL_DITHER_FILTER enables or disables the “dither” filter.
VL_NOTCH_FILTER enables or disables the “notch” filter.
To determine default values, use vlGetControl() to query the values on the video source or drain node before setting controls. For all these controls, it pays to track return codes. If the value returned is VLValueOutOfRange, the value set is not what you requested.
Table 4-2 summarizes the VL controls. For each control, the ASCII name of the control, the type of value it takes, and the node types and classes to which it can be applied is listed.
Table 4-2. Summary of VL Controls
Control | ASCII Name | Value | Node Type/Class |
|---|---|---|---|
VL_DEFAULT_SOURCE | default_input | intVal | VL_SRC/VL_VIDEO |
VL_TIMING | timing | intVal | VL_SRC/VL_VIDEO |
VL_ORIGIN | origin | xyVal | VL_ANY/VL_MEM |
VL_SIZE | size | xyVal | VL_ANY/VL_MEM |
VL_RATE | fieldrate | fractVal | VL_ANY/VL_MEM |
VL_ZOOM | zoom | fractVal | VL_ANY/VL_MEM |
VL_ASPECT | aspect | fractVal | VL_ANY/VL_MEM |
VL_CAP_TYPE | fieldmode | intVal | VL_ANY/VL_MEM |
VL_PACKING | packing | intVal | VL_ANY/VL_MEM |
VL_FORMAT | format | intVal | VL_SRC/VL_VIDEO, VL_ANY/VL_MEM |
VL_SYNC | sync | intVal | VL_DRN/VL_VIDEO |
VL_SYNC_SOURCE | sync_source | intVal | VL_DRN/VL_VIDEO |
VL_LAYOUT | layout | intVal | VL_ANY/VL_MEM |
VL_SIGNAL | signal | intVal | VL_DRN/VL_VIDEO |
VL_FLICKER_FILTER | flicker_filter | boolVal | VL_SRC/VL_SCREEN |
VL_DITHER_FILTER | dither_filter | boolVal | VL_SRC/VL_VIDEO |
VL_NOTCH_FILTER | notch_filter | boolVal | VL_DRN/VL_VIDEO |
The ASCII name is used to assign values to controls in the VL Resources file and can also be found in the control table returned by vlGetControlList().
The following list is a key to which nodes the control can be applied:
VL_SRC/VL_VIDEO—source video node
VL_DRN/VL_VIDEO—drain video node
VL_ANY/VL_VIDEO—source or drain video node
VL_SRC/VL_SCREEN—source screen node
VL_SRC/VL_MEM—source memory node
VL_DRN/VL_MEM—drain memory node
VL_ANY/VL_MEM—source or drain memory node
Video events provide a way to monitor the status of a video I/O stream. Typically, a number of events are combined into an event mask that describes the events of interest. Use vlSelectEvents() to specify the events you want to receive. Its function prototype is
int vlSelectEvents( VLServer vlSvr, VLPath path, VLEventMask eventmask ) |
where
| vlSvr | names the server to which the path is connected | |
| path | specifies the data path | |
| eventmask | specifies the event mask; Table 4-3 lists the possibilities |
Table 4-3 lists and describes the VL event masks
Symbol | Meaning |
|---|---|
VLStreamBusyMask | Stream is locked |
VLStreamPreemptedMask | Stream was grabbed by another path |
VLStreamChangedMask | Video routing on this path has been changed by another path |
VLAdvanceMissedMask | Time was already reached |
VLSyncLostMask | Irregular or interrupted signal |
VLSequenceLostMask | Field or frame dropped |
VLControlChangedMask | A control has changed |
VLControlRangeChangedMask | A control range has changed |
VLControlPreemptedMask | Control of a node has been preempted, typically by another user setting VL_LOCK on a path that was previously set with VL_SHARE |
VLControlAvailableMask | Access is now available |
VLTransferCompleteMask | Transfer of field or frame complete |
VLTransferFailedMask | Error; transfer terminated; perform cleanup at this point, including vlEndTransfer() |
VLEvenVerticalRetraceMask | Vertical retrace event, even field |
VLOddVerticalRetraceMask | Vertical retrace event, odd field |
VLFrameVerticalRetraceMask | Frame vertical retrace event |
VLDeviceEventMask | Device-specific event, such as a trigger |
VLDefaultSourceMask | Default source changed
|
When transferring video, the main event is a VLTransferComplete.
In the traditional video I/O model, you use the buffering, data transfer, and event handling routines supplied by the VL. One of the consequences of this approach is that it might require you to copy data passed outside the VL. (See Chapter 5 for the DMbuffers I/O method for O2™ workstations.)
A basic VL application has the following components:
Preliminary path setup:
vlOpenVideo()—open the video server
vlGetDeviceList()—discover which devices and nodes are connected to this system
vlGetNode()—get the source and drain nodes
vlCreatePath()—create a video path with the source and drain nodes specified
vlSetupPath()—set the path up to be usable given the access requested
vlDestroyPath()—remove a video path
Specific control settings:
vlSetControl()—set various parameters associated with the video transfer
vlGetControl()—get various parameters associated with the video transfer
Preparing to capture or output video to/from memory:
vlCreateBuffer()—create a VLbuffer
vlRegisterBuffer()—register this buffer with the path
Starting and controlling the video transfer:
vlBeginTransfer()—initiate the transfer
vlEndTransfer()—terminate the transfer
vlNextEvent()—handle events from the video device
vlGetNextValid()—get incoming buffers with captured video
vlPutValid()—send outgoing buffers with inserted video
Showing a still frame from a recorded video sequence (either uncompressed or compressed using JPEG) presents an enigma. Displaying a still frame requires a complete set of spatial information at a single instant of time—the data is simply not available to display a still frame correctly.
One way to display a still frame is to combine the lines from two adjacent fields, as shown in Figure 4-2. No matter which pair of fields you choose, the resulting still frame exhibits artifacts.
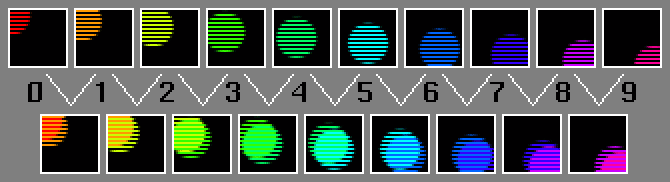
Figure 4-2 shows a display artifact known as tearing or fingering, which is an inevitable consequence of putting together an image from bits of images snapped at different times. You don't notice the artifact if the fields are flashed in rapid succession at the field rate, but when you try to freeze motion and show a frame, the effect is visible. You wouldn't notice the artifact if the objects being captured were not moving between fields.
These types of artifacts cause trouble for most compressors. If you are capturing still frames to pass frame-sized images on to a compressor, you definitely should avoid tearing. A compressor wastes a lot of bits trying to encode the high-frequency information in the tearing artifacts and fewer bits encoding your actual picture. Depending on the size and quality of compressed image you want, you might consider sending every other field (perhaps decimated horizontally) to the compressor, rather than trying to create frames that compress well.
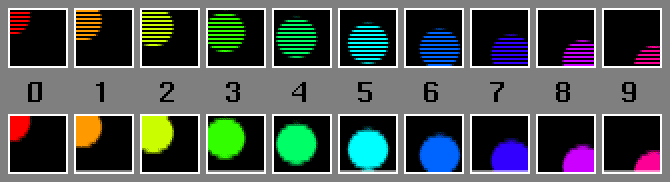
Another possible technique for producing still frames is to double the lines in a single field, as shown in Figure 4-3.

This looks a little better, but there is an obvious loss of spatial resolution (as evidenced by the visible “jaggies” and vertical blockiness).
To some extent, this can be reduced by interpolating adjacent lines in one field to get the lines of the other field, as shown in Figure 4-4.
There are an endless variety of more elaborate tricks you can use to come up with good still frames, all of which come under the heading of “de-interlacing methods.” Some of these tricks attempt to use data from both fields in areas of the image that are not moving (so you get high spatial resolution), and double or interpolate lines of one field in areas of the image that are moving (so you get high temporal resolution). Many of the tricks take more than two fields as input. Since the data is simply not available to produce a spatially complete picture for one instant, there is no perfect solution. But depending on why you want the still frame, the extra effort may well be worth it.
When a CRT-based television monitor displays interlaced video, it doesn't flash one frame at a time on the screen. During each field time (each 50th or 60th of a second), the CRT lights up the phosphors of the lines of that field only. Then, in the next field interval, the CRT lights up the phosphors belonging to the lines of the other field. So, for example, at the instant when a pixel on a given picture line is refreshed, the pixels just above and below that pixel have not been refreshed for a 50th or 60th of a second, and will not be refreshed for another 50th or 60th of a second.
So if that's true, then why don't video images flicker or jump up and down as alternate fields are refreshed?
This is partially explained by the persistence of the phosphors on the screen. Once refreshed, the lines of a given field start to fade out slowly, and so the monitor is still emitting some light from those lines when the lines of the other field are being refreshed. The lack of flicker is also partially explained by a similar persistence in your visual system.
Unfortunately though, these are not the only factors. Much of the reason you do not perceive flicker on a video screen is that good-looking video signals themselves have built-in characteristics that reduce the visibility of flicker. It is important to understand these characteristics, because when you synthesize images on a computer or process digitized images, you must produce an image that also has these characteristics. An image that looks good on a non-interlaced computer monitor can look inferior on an interlaced video monitor.
A complete understanding of when flicker is likely to be perceived and how to get rid of it requires an in-depth analysis of the properties of the phosphors of a particular monitor (not only their persistence but also their size, overlap, and average viewing distance), it requires more knowledge of the human visual system, and it may also require an in-depth analysis of the source of the video (the persistence, size, and overlap of the CCD elements used in the camera, the shape of the camera's aperture, and so on). This description is intended to give only a general sense of the issues.
Standard analog video (NTSC and PAL) has characteristics (such as bandwidth limitations) that can introduce many artifacts similar to the ones described here into the final result of video output from a computer. Describing these artifacts is beyond the scope of this document, but they are important to consider when creating data to be converted to an analog video signal. An example of this would be antialiasing (blurring) data in a computer to avoid chroma aliasing when the data is converted to analog video.
Here are some of the major areas to be concerned about when creating data for video output:
Abrupt vertical transitions: 1-pixel-high lines
First of all, typical video images do not have abrupt vertical changes. For example, say you output an image that is entirely black except for one, 1-pixel-high line in the middle.
Since the non-black data is contained on only one line, it appears in only one field. A video monitor updates the image of the line only 30 times a second, and the line flickers on and off quite visibly. To see this on a video-capable machine, run videoout, turn off the antiflicker filter, and point videoout's screen window at the line.
You do not have to have a long line for this effect to be visible: Narrow, non-antialiased text exhibits the same objectionable flicker.
Typical video images are more vertically blurry; even where there is a sharp vertical transition (the bottom of an object in sharp focus, for example), the method typical cameras use to capture the image will cause the transition to blur over more than one line. It is often necessary to simulate this blurring when creating synthetic images for video.
Abrupt vertical transitions: 2-pixel-high lines
These lines include data in both fields, so part of the line is updated each 50th or 60th of a second. Unfortunately, when you actually look at the image of this line on a video monitor, the line appears to be solid in time, but it appears to jump up and down, as the top and bottom line alternate between being brighter and darker. You can also see this with the videoout program.
The severity of these effects depends greatly on the monitor and its properties, but they are generally objectionable. One partial solution is to vertically blur the data you are outputting. Turning on the “flicker filter” option to videoout causes some boards (such as EV1) to vertically prefilter the screen image by a simple 3-tap (1/4,1/2,1/4) filter. This noticeably improves (but does not remove) the flickering effect.
There is no particular magic method that produces flicker-free video. The more you understand about the display devices you care about, and about when the human vision system perceives flicker and when it does not, the better you can produce a good image.
When you modify digitized video data or synthesize new video data, the result must consist of fields with all the same properties, but temporally offset and spatially disjointed. This may not be trivial to implement in a typical renderer without wasting a lot of rendering resources (rendering 50/60 images a second, throwing out unneeded lines in each field) unless the developer has fields in mind from the start.
You might think that you can generate synthetic video by taking the output of a frame-based renderer at 25/30 frames per second and pulling two fields out of each frame image. This does not work well: the motion in the resulting sequence on an interlaced video monitor noticeably stutters, due to the fact that the two fields are scanned out at different times, yet represent an image from a single time. Your renderer must know that it is rendering 50/60 temporally distinct images per second.
Two relatively easy tasks to do with frame-based data, such as movies, are playing it slowly (by outputting some frames more than once) or dealing with frames that are missing in the input stream by duplicating previous frames. There are more elaborate ways to generate better-looking results in these cases, and they, too, are not difficult to implement on frame-based data.
Suppose you are playing a video sequence, and run up against a missing field, as shown in Figure 4-5 (the issues discussed here also come up when you want to play back video slowly).

To keep the playback rate of the video sequence constant, put some video data in that slot. Which field do you choose?
Suppose you choose to duplicate the previously displayed field (field 2), as shown in Figure 4-6.

You can also try duplicating field 4 or interpolating between 2 and 4, but with all of these methods there is a crucial problem: The surrounding fields contain data from a different spatial location than the missing field. If you view the resulting video, you immediately notice that the image visually jumps up and down at this point. This is a large-scale version of the same problem that made the 2-pixel-high line jump up and down: Your eye is very good at picking up on the vertical “motion” caused by an image being drawn to the lines of one field, then being drawn again one picture line higher, into the lines of the other field. You would see this even if the ball was not in motion.
Suppose instead you choose to fill in the missing field with the last non-missing field that occupies the same spatial locations, as shown in Figure 4-7.

Now you have a more obvious problem: You are displaying the images temporally out of order. The ball appears to fly down, fly up again for a bit, and then fly down. Clearly, this method is not good for video that contains motion. But for video containing little or no motion, it works pretty well, and does not suffer the up-and-down jittering of the previous approach.
Which of these two methods is best thus depends on the video being used. For general-purpose video where motion is common, you'd be better off using the first technique, the “temporally correct” technique. For certain situations such as computer screen capture or video footage of still scenes, however, you can often get guarantees that the underlying image is not changing, and the second technique, the “spatially correct” technique, is best.
As with de-interlacing methods, there are many more elaborate methods for interpolating fields that use more of the input data. For example, you can interpolate fields 2 and 4 and then interpolate the result of that vertically to guess at the content of the other field's lines. Depending on the situation, these techniques may or may not be worth the effort.
The problem of getting a good still frame from a video input has a counterpart in video output. Suppose you have a digitized video sequence and you want to pause playback of the sequence. Either you, the video driver, or the video hardware must continue to output video fields even though the data stream has stopped, so which fields do you output?
If you choose the “temporally correct” method and repeatedly output one field (effectively giving you the “line-doubled” look), then you get an image with reduced vertical resolution. But you also get another problem: As soon as you pause, the image appears to jump up or down, because your eye picks up on an image being drawn into the lines of one field, and then being drawn one picture line higher or lower, into the lines of another field. Depending on the monitor and other factors, the paused image may appear to jump up and down constantly or it may appear to jump only when you enter and exit pause.
If you choose the “spatially correct” method and repeatedly output a pair of fields, then if there is any motion at the instant where you pause, you see that motion happening back and forth, 60 times a second. This can be very distracting.
There are, of course, more elaborate heuristics that can be used to produce good looking pauses. For example, vertically interpolating an F1 to make an F2 or vice versa works well for slow-motion, pause, and vari-speed play. In addition, vertical interpolation can be combined with inter-field interpolation for “super slow-motion” effects.
The Audio Library (AL) provides a device-independent C language API for programming audio I/O on all Silicon Graphics workstations. It provides routines for configuring the audio hardware, managing audio I/O between the application program and the audio hardware, specifying attributes of digital audio data, and facilitating real-time programming. This section describes how to set up and use the AL facilities that provide audio I/O capability.
Programming audio I/O involves three basic concepts:
An ALport provides a one-way (input or output) interface between an application program and the host audio system. More than one ALport can be opened by the same application; the number of ALports that can be active at the same time depends on the hardware and software configurations you are using. Open ALports use CPU resources, so be sure to close an ALport when I/O is completed and free the ALconfig when it is no longer needed.
An ALport consists of a queue, which stores audio data awaiting input or output, and static and dynamic state information.
Audio I/O is accomplished by opening an audio port and reading audio data from or writing audio data to the port. For audio input, the hardware places audio sample frames in an input port's queue at a constant rate, and your application program reads the sample frames from the queue. Similarly, for audio output, your application writes audio sample frames to an output port's queue, and the audio hardware removes the sample frames from the queue. A minimum of two ALports are needed for input and output capability for an audio application.
You can open an ALport with the default configuration, or you can customize an ALconfig for configuring an ALport suited to your application needs.
These settings provide an ALport that is compatible with CD- and DAT-quality data, but if your application requires different settings, you must create an ALconfig with the proper settings before opening a port. The device, channel, and queue-size settings for an ALport are static—they cannot be changed after the port has been opened.
The steps for configuring and opening an ALport are listed below.
If the default ALconfig settings are satisfactory, you can simply open a default ALport by using 0 for the configuration in the alOpenPort() routine; otherwise, create a new ALconfig by calling alNewConfig().
If nondefault values are needed for any of the ALconfig settings, set the desired values as follows:
Call alSetChannels() to change the number of channels.
Call alSetQueueSize() to change the sample queue size.
Call alSetSampFmt() to change the sample data format.
Call alSetWidth() to change the sample data width.
Call alSetFloatMax() to set the maximum amplitude of floating point data (not necessary for integer data formats).
Open an ALport by passing the ALconfig to the alOpenPort() routine.
Create additional ALports with the same settings by using the same ALconfig to open as many ports as are needed.
To create a new ALconfig structure that is initialized to the default settings, call alNewConfig(). Its function prototype is
ALconfig alNewConfig ( void ) |
The ALconfig that is returned can be used to open a default ALport, or you can modify its settings to create the configuration you need. In Example 4-1, the channel, queue size, sample format, and floating point data range settings of an ALconfig named audioconfig are changed.
alNewConfig() returns an ALconfig structure upon successful completion; otherwise, it returns 0 and sets an error code that you can retrieve by calling oserror(3C). A possible error is:
AL_BAD_OUT_OF_MEM | insufficient memory available to allocate the ALconfig structure |
Audio ports are opened and closed by using alOpenPort() and alClosePort(), respectively. Unless you plan to use the default port configuration, set up an ALconfig structure by using alNewConfig() and then use the routines for setting ALconfig fields, such as alSetChannels(), alSetQueueSize(), and alSetWidth() before calling alOpenPort().
Example 4-1 demonstrates how to configure and open an output ALport that accepts floating point mono sample frames.
ALconfig audioconfig;
ALport audioport;
int err;

void audioinit /* Configure an audio port */
{
audioconfig = alNewConfig();

alSetSampFmt(audioconfig, AL_SAMPFMT_FLOAT);
alSetFloatMax(audioconfig, 10.0);
alSetQueueSize(audioconfig, 44100);
alSetChannels(audioconfig,AL_MONO);

audioport = alOpenPort("surreal","w",audioconfig);
if (audioport == (ALport) 0) {
    err = oserror();
    if (err == AL_BAD_NO_PORTS) {
        fprintf(stderr, " System is out of audio ports\n");
    } else if (err == AL_BAD_DEVICE_ACCESS) {
        fprintf(stderr, " Couldn't access audio device\n");
    } else if (err == AL_BAD_OUT_OF_MEM) {
        fprintf(stderr, " Out of memory\n");
    }
    exit(1);
}
|
Audio sample frames are placed in the sample queue of an ALport to await input or output. The audio system uses one end of the sample queue; the audio application uses the other end.
During audio input, the audio hardware continuously writes audio sample frames to the tail of the input queue at the selected input rate, for example, 44,100 sample frames per second for 44.1 kHz stereo data. If the application can't read the sample frames from the head of the input queue at least as fast as the hardware writes them, the queue fills up and some incoming sample data is irretrievably lost.
During audio output, the application writes audio sample frames to the tail of the queue. The audio hardware continuously reads sample frames from the head of the output queue at the selected output rate, for example, 44,100 sample pairs per second for 44.1 kHz stereo data, and sends them to the outputs. If the application can't put sample frames in the queue as fast as the hardware removes them, the queue empties, causing the hardware to send 0-valued sample frames to the outputs (until more data is available), which are perceived as pops or breaks in the sound.
For example, if an application opens a stereo output port with a queue size of 100,000, and the output sample rate is set to 48 kHz, the application needs to supply (2 × 48,000 = 96,000) sample frames to the output port at the rate of at least 1 set of sample frames per second, because the queue contains enough space for about one second of audio at that rate. If the application fails to supply data at this rate, an audible break occurs in the audio output.
On the other hand, if an application tries to put 40,000 sample frames into a queue that already contains 70,000 sample frames, there isn't enough space in the queue to store all the new sample frames, and the program blocks (waits) until enough of the existing sample frames have been removed to allow for all 40,000 new sample frames to be put in the queue. The AL routines for reading and writing block; they do not return until the input or output is complete.
To allocate and initialize an ALport structure, call alOpenPort(). Its function prototype is
ALport alOpenPort ( char *name, char *direction, ALconfig config ) |
where
Upon successful completion, alOpenPort() returns an ALport structure for the named port; otherwise, it returns a null-valued ALport, and sets an error code that you can retrieve by calling oserror(3C). Possible errors include:
AL_BAD_CONFIG | config is either invalid or null |
AL_BAD_DIRECTION | direction is invalid |
AL_BAD_OUT_OF_MEM | insufficient memory available to allocate the ALport structure |
AL_BAD_DEVICE_ACCESS | audio hardware is inaccessible |
AL_BAD_NO_PORTS | no audio ports currently available |
alClosePort() closes and deallocates an audio port—any sample frames remaining in the port are not output.
Example 4-2 opens an input port and an output port and then closes them.
input_port = alOpenPort("waycoolinput", "r", 0);
if (input_port == (ALport) 0 {
err = oserror();
if (err == AL_BAD_NO_PORTS) {
fprintf(stderr, " System is out of audio ports\n");
} else if (err == AL_BAD_DEVICE_ACCESS) {
fprintf(stderr, " Couldn't access audio device\n");
} else if (err == AL_BAD_OUT_OF_MEM) {
fprintf(stderr, " Out of memory: port open failed\n");
}
exit(1);
}
...
output_port = alOpenPort("killeroutput", "w", 0);
if (input_port == (ALport) 0 {
err = oserror();
if (err == AL_BAD_NO_PORTS) {
fprintf(stderr, " System is out of audio ports\n");
} else if (err == AL_BAD_DEVICE_ACCESS) {
fprintf(stderr, " Couldn't access audio device\n");
} else if (err == AL_BAD_OUT_OF_MEM) {
fprintf(stderr, " Out of memory: port open failed\n");
}
exit(1);
...
alClosePort(input_port);
alClosePort(output_port);
|
This section explains how an audio application reads and writes audio sample frames to and from ALports.
Audio input is accomplished by reading audio data sample frames from an input ALport's sample queue. Similarly, audio output is accomplished by writing audio data sample frames to an output ALport's sample queue.
alReadFrames() and alWriteFrames() provide mechanisms for transferring audio sample frames to and from sample queues. They are blocking routines, which means that a program halts execution within the alReadFrames() or alWriteFrames() call until the request to read or write sample frames can be completed.
alReadFrames() reads a specified number of sample frames from an input port to a sample data buffer, blocking until the requested number of sample frames have been read from the port. Its function prototype is
int alReadFrames ( const ALport port, void *samples, const int framecount ) |
where
| port | is an audio port configured for input | |||||||||||
| samples | is a pointer to a buffer into which you want to transfer the sample frames read from input. samples is treated as one of the following types, depending on the configuration of the ALport:
| |||||||||||
| framecount | is the number of sample frames to read |
To prevent blocking, framecount must be less than the return value of alGetFilled().
When 4-channel data is input on systems that do not support 4 line-level electrical connections, that is, when setting AL_CHANNEL_MODE to AL_4CHANNEL is not possible, alReadFrames() provides 4 sample frames per frame, but the second pair of sample frames is set to 0.
Table 4-4 shows the input conversions that are applied when reading mono, stereo, and 4-channel input in stereo mode (default) and in 4-channel mode hardware configurations. Each entry in the table represents a sample frame.
Table 4-4. Input Conversions for alReadFrames()
Input | Hardware Configuration Indigo, and Indigo2 or Indy in Stereo Mode |
Indigo2 or Indy in 4-channel Mode |
|---|---|---|
Frame at physical inputs | (L1, R1) | (L1, R1, L2, R2) |
Frame as read by a mono port | (L1 + R1) /2 | (Clip (L1 + L2), Clip (R1 + R2)) /2 |
Frame as read by a stereo port | (L1, R1) | (Clip (L1 + L2), Clip (R1 + R2)) |
Frame as read by a 4-channel port | (L1, R1, 0, 0) | (L1, R1, L2, R2) |
| Note: If the summed signal is greater than the maximum allowed by the audio system, it is clipped (limited) to that maximum, as indicated by the Clip function. |
Sample frames placed in an output queue are played by the audio hardware after a specific amount of time, which is equal to the number of sample frames that were present in the queue before the new sample frames were written, divided by the (sample rate × number of channels) settings of the ALport.
alWriteFrames() writes a specified number of sample frames to an output port from a sample data buffer, blocking until the requested number of sample frames have been written to the port. Its function prototype is
int alWriteFrames ( ALport port, void *samples, long framecount ) |
where
| port | is an audio port configured for input | |
| samples | is a pointer to a buffer from which you want to transfer the sample frames to the audio port | |
| framecount | is the number of sample frames you want to read |
Table 4-5 shows the output conversions that are applied when writing mono, stereo, and 4-channel data to stereo mode (default) and 4-channel mode hardware configurations.
Table 4-5. Output Conversions for alWriteFrames()
|
| Hardware Configuration |
|
|---|---|---|---|
Output | Frame as Written into Port | Indigo, and Indigo2 or Indy in Stereo Mode | Indigo2 or Indy in |
Mono Port | (L1) | (L1, L1) | (L1, L1, 0, 0) |
Stereo Port | (L1, R1) | (L1, R1) | (L1, R1, 0, 0) |
4-channel Port | (L1, R1, L2, R2) | (Clip (L1 + L2), Clip (R1 + R2)) | (L1, R1, L2, R2) |
This section describes facilities for audio I/O control.
The AL programming model encompasses both the tangible elements of the audio system, such as the system itself, the audio boards and the devices on them and the conceptual elements of the software, such as the ALport from the application program to the audio hardware, methods of specifying the flow of data and control information, and synchronization. In the AL, both the tangible and the conceptual elements are represented as resources.
Resources are organized in a hierarchy. Data and control information flow through the hierarchy from the application to the hardware and vice versa.
At the top of the hierarchy is a port. The port is the application's handle to the audio hardware. Ports transport data and control information to and from the application. The port can be thought of as straddling the application level and the driver level. Information is routed from the application through the port to the driver level and hardware level resources along a software-configurable route.
Software resources called connections provide point-to-point routing from a port to a device or from device to device. Multiple connections to a single device are possible.
Within the driver level is the system and subsystem(s). Subsystems contain devices, which are the audio hardware's handle to the system. Devices transport data and control information to and from the machine.
At the hardware level, device resources are the central processing point for both data and control information. A software resource called an interface provides a mapping to the external jacks.
A master clock is a resource that generates timing information. A master clock provides a baseline rate, such as the output of a crystal, a video signal, or the timing information encoded in a digital audio stream.
The reference rate of a master clock can be transformed by a software resource called a clock generator. Timing information flows from a master clock to a device as transformed by a clock generator.
Resources have attributes that are represented by parameters. Because parameters are resource-specific, only certain resources recognize certain parameters. The resource hierarchy permits parameter inheritance, whereby a parameter is passed down the hierarchy until it reaches a resource that recognizes it. In this way, control information flows through the resource hierarchy until it reaches a resource that is capable of implementing that particular control. Control requests can be sent to a particular resource or to a class of resources.
The following parameters and the resources they are associated with are supported by the AL.
All resources support this set of universal parameters
AL_TYPE
AL_NAME
AL_PARAMS
AL_NO_OP
System (AL_SYSTEM) Parameters are
AL_DEFAULT_INPUT
AL_DEFAULT_OUTPUT
AL_MAX_PORTS
AL_UNUSED_PORTS
AL_MAX_SETSIZE
Device Parameters are
AL_INTERFACE
AL_CLOCK_GEN
AL_CHANNELS
AL_PORT_COUNT
AL_MAX_SETSIZE
Clock Generator Parameters are
AL_RATE
AL_RATE_FRACTION
AL_MASTER_CLOCK
AL_VIDEO_LOCK
Master Clock Parameters are
AL_RATE
AL_CLOCK_TYPE
Interface Parameters are
AL_GAIN
AL_GAIN_REF
AL_WORDSIZE
AL_CHANNELS
Table 4-6 lists universal parameters which apply to all resources. The parameter token, its type, supported operations, and a description are listed for each parameter.
Table 4-6. Universal Parameters
Parameter | Type | Operations | Description |
|---|---|---|---|
AL_TYPE | 32-bit integer | Get | All resources have types. Some types are subtypes of another; in this case, parameters which apply to the supertype also apply to the subtype. See the alIsSubtype(3dm) manual page for more information. |
AL_NAME | Character string | Get | Each resource on each system has a unique name. This name is typically used internally in applications, for example, for saving parameters to files. AL_NAME can be passed into alGetResourceByName(3dm) to retrieve the original resource. |
AL_LABEL | Character string | Get, Set | This is a human-readable description of the resource. Use this, for example, for resource selection in menus, or for otherwise displaying resources to users. It is unique on a given system. I t is also user-configurable. Attempts to set its value to equal another existing label will be rejected. |
AL_NO_OP | None | Get, Set | The ALpv structure associated with this parameter is ignored. This effectively allows a program to “comment out” individual parameter/value pairs in a larger list without restructuring the list. |
AL_PARAMS | Set of enumerated types | Query | Returns the set of parameters supported by this resource. |
Control parameters change the hardware behavior of the audio system in real time, as opposed to changing the expected format of on-disk data the way an ALconfig does.
The AL provides its own parameter-value structure, called an ALpv, for working with AL parameters. The ALpv type definition is:
typedef struct {
    int     param;          /* parameter */
    ALvalue value;          /* value */
    short   sizeIn;         /* size in -- 1st dimension */
    short   size2In;        /* size out -- 2nd dimension */
    short   sizeOut;        /* size out */
    short   size2Out;       /* size out -- 2nd dimension */
} ALpv;
|
The ALvalue structure is a union of three types:
typedef union {
    int         i;          /* 32-bit integer values */
    long long   ll;         /* 64-bit integer and fixed-point values */
    void*       ptr;        /* pointer values */
} ALvalue;
|
The AL supports various data types, each of which uses a specific field of ALvalue:
| 32-bit integer | Uses the value.i field | |||||
| 64-bit integer | Uses the value.ll field | |||||
| resource | Uses the value.i field | |||||
| enumeration | Uses the value.i field | |||||
| fixed-point | Uses the value.ll field
|
There are also required size fields for these data types.
The AL routines for working with parameters are:
alQueryValues() | determines possible hardware parameters |
alGetParams() | gets current settings of hardware parameters |
alSetParams() | sets hardware parameters |
alGetParamInfo() | gets defaults and bounds of hardware parameters |
Some methods for using these routines are:
If you need a complete list of all available parameters on a particular resource, call alQueryValues().
If you are interested only in certain values, create an array that is twice the size of the number of parameters you are querying, and fill the even locations with the parameters of interest, then:
call alGetParams() to determine the current settings of the state variables.
fill in the even entries with the values that you want to change, and then call alSetParams() to change the values.
Some parameters might exist but might not allow the needed settings, so call alGetParamInfo() to get the parameter bounds and check to be sure that the values you want to use exist.