This chapter discusses various ways to make your network more secure. In general, you may need to establish policies regarding network access within a trusted local group, and other policies regarding access to and from external, untrusted networks such as the Internet.
| Note: The System Manager GUI provides a Security and Access Control tasks which you can use to help manage security on your local network. Refer to the Personal System Administration Guide for details. The discussion in this chapter is based on the command-line and file interface to many of the same functions controlled with the GUI. |
This chapter contains the following sections:
“Local Area Network Access” discusses security issues to consider when creating or connecting to a local area network.
“About Network Security and Firewalls” introduces issues concerned with how to build a “firewall,” or barrier, between your local system or site and external, untrusted networks such as the Internet.
“Hardware Configuration for Firewalls” summarizes network hardware design configurations from the point of view of security.
“IRIX Configuration for Security” describes the details of how to configure an IRIX host to serve as a firewall.
“Internal Network Security Configuration” summarizes issues relating to configuring Sendmail and DNS on your firewall and internal network.
| Note: This chapter assumes you already have taken measures to secure your host system(s) as described in Chapter 4. |
Within your local area network, you may be able to allow a degree of internetwork access that is not possible or desirable with networks outside of your control. This section discusses the use of network host and user permission files to control access within your local network.
Three files that help you control access to a host within your network are:
| /etc/hosts.equiv | A list of hosts that are considered trusted, or equivalent to you. | |
| .rhosts | A list of hosts that are allowed access to a specific user account. | |
| /etc/passwd | The list of system accounts and their encrypted passwords. |
These three files control whether access is granted or denied when a remote host issues an rlogin(1C), rcp(1C), rsh(1C), or rdist(1) request.
When a request for access is received, the file hosts.equiv is checked, and if the host is listed in that file, and the target user account is listed in /etc/passwd, no further checking is performed and remote access is allowed. In this case, a remote user with a local user ID has equivalent access from a remote host. By default, all successful remote accesses are logged to the SYSLOG file as auth.info messages; see syslogd(1M).
Users can expand this equivalence by listing hosts and specific accounts in .rhosts files in their home directories. The root login bypasses the /etc/hosts.equiv file and uses only the /.rhosts file in the root directory for equivalence checking. If there is an entry in the /.rhosts file for root, the root user on the remote system will have root privilege on your system. For obvious reasons, this is not a secure practice. It is much more secure to handle file transfers through a non-privileged account such as guest. Note also that a .rhosts file with a system name “localhost” allows su to work without requiring passwords. Refer to su(1M) for more information.
The owner of the .rhosts file must be either the user in whose home directory it resides, or the superuser, root. If it is owned by another user, or if the file permissions allow anyone who is not the owner of the file to modify it, the contents of a user's .rhosts file are automatically disregarded for security reasons.
You may wish to disallow use of .rhosts files altogether if connecting to an untrusted network (you can add the -l option to the rshd invocation in /etc/inetd.conf and thereby disallow these files. See rshd(1M) for more information). The more secure configurations for such connections are as discussed later in this chapter under “About Network Security and Firewalls”. For complete information about the /etc/hosts.equiv and .rhosts files, see the hosts.equiv(4) reference page.
The inetd process controls a number of network services that you may or may not want to support on your local area network. You can limit which services you offer and log access to those services by editing the /etc/inetd.conf file. See “Limiting inetd Services”, but note that that discussion refers to limiting these services when connecting to an untrusted network. You may wish to be more lenient in your configuration of inetd if you are concerned only with determining policy for a trusted local network.
With the X Window System, workstations can run client programs transparently on other hosts on the network. This access is completely independent of controls such as login accounts and passwords and is controlled instead through X protocols.
In particular, certain system files and a user command, xhost(1), control access to the local X server. Configuration of these files and control of this command determine remote access to the server. The system control files are /var/X11/xdm/Xsession, /var/X11/xdm/Xsession.dt, and /var/X11/xdm/xdm-config. These files and the xhost command are discussed in detail in the following sections.
| Note: The new default system configuration disables remote access by X servers. In earlier versions remote access was enabled by default. To change the default and allow X server access to a host, refer to “Limiting Access with the xhost Command”. |
When the X server starts, it first checks for the existence of an /etc/X*.hosts[3] file. If this file does not exist (this is the IRIX default, shipped configuration), all remote host access to the local X server is disallowed, pending evaluation of the Xsession files, which occurs next. The X server next reads the /var/X11/xdm/Xsession and /var/X11/xdm/Xsession.dt files, and if they do not execute an xhost command (this is the default—the xhost + command is commented out), no remote host access to the local X server is allowed.
The default X server initialization can be modified as described in the following sections.
You can selectively allow access to remote hosts by listing their names in an /etc/X*.hosts file. For example, if the file /etc/X0.hosts contains the following line, the remote host bronx is the only workstation allowed to access the local server for X server 0:
bronx |
In the above example, all other hosts are denied access to the local server at server initialization. (Assuming, that is, that no conflicting xhost command is then issued in the /var/X11/xdm/Xsession or /var/X11/xdm/Xsession.dt files at server startup or subsequently by a user.)
| Note: Do not link the file X*.hosts to any other network host database, such as /etc/hosts or /etc/hosts.equiv. When the X server starts, it attempts to establish a connection to all hosts that are allowed access permission in the X*.hosts file. If this file contains a large number of hosts that are allowed access to the server, you have to wait until connections are established with each of the hosts before the server is started. |
The xhost command modifies the internal state of the X server. Using xhost, you can allow or deny server access for specific hosts, or for all hosts. Note that the xhost options that affect access control can be run only from the same workstation as the server.
For example, to allow all other hosts access to the X server, remove the comment from the xhost line in /var/X11/xdm/Xsession and /var/X11/xdm/Xsession.dt. By default the entry looks like this:
# Gives anyone on any host access to this display # /usr/bin/X11/xhost + |
To allow access to all remote hosts, it should look like this:
# Gives anyone on any host access to this display /usr/bin/X11/xhost + |
To limit remote access to a specific server, say one named brooklyn, change the entry to look like this:
# Gives anyone on any host access to this display /usr/bin/X11/xhost +brooklyn |
The following section provides more examples of xhost commands you may want to place in these files.
The xhost command can also be used interactively. To completely deny access to all hosts on your network through X protocols, use this command:
# xhost - |
To allow complete access to all hosts on your network, use this command:
# xhost + |
To selectively grant or deny access, specify the name of the specific host or hosts on the command line. For example, this command grants access to a host named brooklyn:
# xhost +brooklyn |
(When granting access, the plus sign (+) is optional.)
This command denies access to both brooklyn and bronx:
# xhost -brooklyn -bronx |
To see which hosts are currently allowed access to the server, run xhost from the command line with no options:
# xhost |
You can advise users not to use xhost +, or you may delete the command from the system if it is a perceived security risk.
For even better security than the default X server configuration described in “Security and X Server Initialization”, you can enable X authority. To do this, change the DisplayManager*authorize entry in /var/X11/xdm/xdm-config to say:
DisplayManager*authorize: on
This makes xdm generate “magic cookies” (put in each user's $HOME/.Xauthority file), which are then required for any X client to connect to the X server. This provides a good means of X server access control. (Note that this may already be the default on your system.)
For more information about X security and authorization, see the xsecurity(1), xhost(1), xauth(1), xserver(1), and X(1) reference pages.
After establishing your host and site security policies, you may want to connect your site to external networks such as the Internet. This section is concerned with establishing such a connection with an “untrusted” network in which you do not control security. This requires special consideration of the interface between your internal, trusted network and the external network. This interface, if it stops some untrusted traffic from entering your trusted network, is called a “firewall” and is the subject of this section. The remainder of the discussion refers specifically to connecting to the Internet, but you can also apply it to connecting to any untrusted network.
The Internet is a vast, connected network of heterogeneous computer resources, spanning the globe and growing daily. Increasingly, individuals and organizations are finding access to the Internet to be of importance for a wide variety of services and resources pertinent to their businesses and other interests, including electronic mail, access to vast information archives, and keeping abreast of current developments in a host of areas.
Undoubtedly the most recent spur to the growth of interest in Internet access is the development of the World Wide Web, which provides for both a “friendly” graphical interface to Internet resources and a standardized means of presenting and accessing them. Products designed for this market, such as WebFORCE, allow their users to establish an Internet presence that can be accessed from around the world.
The Internet presents ways to share data that you want to share, but you must take measures to protect data that you want protected. This section addresses an important aspect of this internetworked accessibility: the need to establish and maintain the security of local computers and computer networks. Specifically, computer sites have a need and a right to determine the privacy and safety of their data from competitive interests as well as outright software vandalism.
If you are connecting to the Internet, you should configure your connection so that you do not unwittingly risk the exposure or corruption of important data. You should know exactly which (if any) data you are making publicly accessible, and you should guard against the possibility of unwanted intruders gaining access to your site. The Internet has many known (and some famous) instances of unwanted intrusions, vandalism, and so on, and acknowledging and taking measures to prevent such acts is the best way to ensure that your Internet presence is a pleasurable and profitable one.
While it is beyond the scope of this chapter to detail particular instances of malicious or criminal activity on computer networks, a great deal of such information is available on the Internet itself, and makes for useful reading for those responsible for computer security (refer to “Additional Resources” for pointers to additional information).
In general, you need to establish a line of defense between your trusted computer resources (your internal network) and the computer resources publicly accessible through the Internet (the external network). This line of defense should shield you from direct, external access, and it may be as simple as a single router or computer host or as complex as multiple routers and an entire computer network. (This section is concerned with establishing the secure firewalls possible with a computer host or network, not with the limited firewall protection of a router-only configuration.) Behind this line, you choose the degree to which you want to allow internal, trusted users access to the Internet, and the degree to which external users can access internal resources.
The line between the external world of untrusted hosts and the internal world of trusted hosts is established by creating a firewall. A firewall is a combination of computer hardware and software that allows you to restrict interactions with the external network (often the Internet) to the degree you desire. The simple formula is the more access you allow, the greater the security concerns; the greater the restrictions you place on access, the easier it is to monitor and maintain security. The tradeoff is one of ease of use versus peace of mind. For system and network administrators, this often translates as balancing the wishes of users with the needs and capacities of the administrator(s).
The downside of a firewall is that employees sometimes require legitimate access to packets that are filtered for security reasons. The alternative, practiced at some sites, is to maintain a high level of security on every networked computer.
An example of a simple firewall is shown in Figure 5-1. In this illustration, a single computer host is configured with two network interfaces to become what is known as a dual-homed host—a host with a presence on each of two different networks. When it is configured as described in this chapter, it represents a single, controlled obstruction between your internal network and the Internet where you can focus your security efforts. In this chapter, the term firewall host refers to an IRIX host configured for network security. (Gauntlet for IRIX is an example of a commercial firewall implementation for IRIX—see your sales representative for details.)
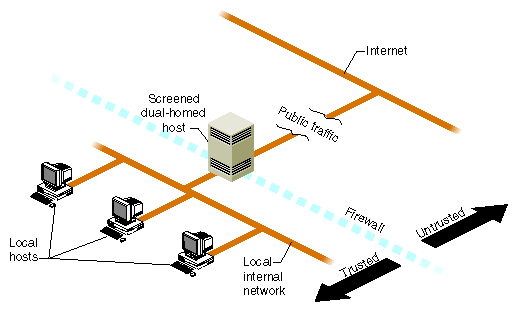
The firewall does not in any way restrict interactions on your internal network. Local hosts may share resources in the same way they did before connecting to the firewall. What is different now is how these hosts may interact with external sites as determined by your site policy—your policy determines how much or how little interaction is allowed. “Internal Network Security Configuration” presents some scenarios of how you might configure a network with a dual-homed host.
The key to administering network security is the firewall. While there are important issues concerning internal security, those issues are the same regardless of whether or not you are connected to the Internet. (See Chapter 4 for information on host security and “Local Area Network Access” for information on local network security.)
Regarding the firewall itself:
Limit users—if possible, limit users to the sole administrator of the system. If additional users are necessary, refer to Chapter 4 for a discussion of issues regarding password protection and educating users.
Limit services—the more services you allow, the more possible security holes you present. In addition and in general, the more complex the software providing these services, the more chance for compromise, and the newer the software, the less chance it has been well tested in the “real world.”
Monitor the system—this document helps you configure the IRIX software of your firewall to maintain log files that can provide information on accesses to your firewall host, including time of access and unsuccessful access attempts. Also, make use of the many standard IRIX tools such as w(1), ps(1), and so on that give you snapshots of current system activities (see Table 4-3 for a list of security-related commands).
Do not run applications on the firewall—any additional software, besides containing possible security weaknesses, further complicates the software environment, making security control more problematic.
Having a firewall does little good if you fail to monitor it adequately. There are several useful tools for checking the security of a firewall:
| Cops | Checks permission modes, poor passwords, /etc/password and /etc/group integrity, cron(tab) files, setuid files, checksum of important binary files, home directories and startup files, anonymous ftp setup, unrestricted access methods, superuser (root) security, dates of CERT advisories versus key files, and uses the Kuang expert system. Cops is available from ftp://ftp.cert.org/pub/tools/cops . | |
| Tripwire | Checks file and directory integrity, and compares designated files and directories against information in a previously generated database. Any differences are flagged and logged, including added or deleted entries. When run regularly, changes in critical system files are flagged so that damage control measures can be taken immediately. Tripwire is available from ftp://ftp.cert.org/pub/tools/tripwire . |
There is the same security issue inherent in accessing software on the World Wide Web that has always been an issue when acquiring software from any unknown or untrusted source. When a user clicks on a browser button for a network resource, what is invoked is unknown. A click, for example, could download an executable file with a potential for damage. Users should be aware of this issue. If this is a serious concern at your site, you may consider isolating and limiting those hosts having World Wide Web access.
Refer to “Additional Resources” for a pointer (URL) to additional information on security issues related to the World Wide Web.
This section discusses how to configure network hardware to serve as the hardware portion of a firewall solution. (For information on how to configure Silicon Graphics software in a firewall solution, refer to “IRIX Configuration for Security”.) Only setups that include an IRIX host as part of the solution are discussed, as router-only solutions tend to be too limited. A firewall host has the advantages of permitting and restricting specific applications, maintaining log files, and adding authentication to network access.
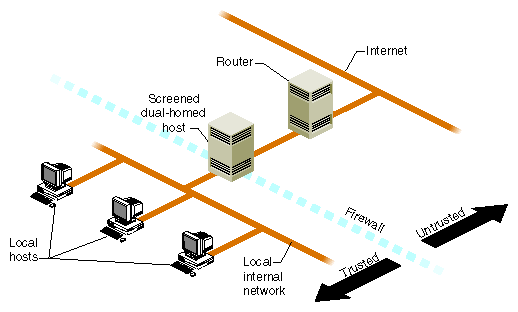
The firewall host is typically combined with a router, whether provided as part of your connection to your Internet service provider or added by you to your private configuration.
Routers, if properly configured, provide a certain degree of security by filtering IP packets. You can use your IRIX host as an IP packet filter as described in the ipfilterd(1M) reference page. Usually, routers are complete hardware devices that provide high-speed IP packet filtering. While many routers can be configured to provide IP packet-level security, they do not support such features as proxies and authentication.
Proxies are proxy servers, which provide for application specific control of network resources.[4] Authentication is a technique you can employ to require users to verify that they are who they say they are. To add these features and more, you must have a network hardware configuration such as the IRIX host setups described in the following sections.
You can use IP packet filtering and application-level controls by combining routers with firewalls. When using a router with a firewall host, configure it to allow traffic only to the firewall host. You should filter out:
ICMP[5] redirects not from the router
IP packets specifying the loose source routing option
external packets claiming to be from the internal network (known as “spoofing”).
Consult with your Internet service provider to determine the packet filtering options available for your Internet connection. You can also add routers to your firewall configuration as described in the next section, and then configure your routers with additional filtering options (refer to the router vendor documentation for details). (See also “Packet Filtering Gateways,” in Firewalls and Internet Security, by Cheswick and Bellovin, referenced in “Additional Resources”.)
This section discusses general hardware configuration issues for the basic setup of a dual-homed host acting as the firewall, and then presents the “screened host” and “screened subnet” firewall configurations.
You can configure your Silicon Graphics host hardware for use in a firewall by making it a dual-homed gateway—that is, giving it two network connections. Figure 5-1 illustrates the general idea of using a dual-homed host as the firewall.
Creating a dual-homed host may involve, for example, adding an additional Ethernet controller board, or you may already have two Ethernet connections. For specific information on the network hardware in your system, refer to your system documentation.
A screened host scenario uses a router to screen traffic between the Internet and the external network connection of the firewall host. Routers vary, but in general, they screen IP packets for certain addresses or settings that they have been programmed to disallow. They can further limit traffic to a few ports of the firewall host. No traffic is allowed from the outside to any other host on the internal network. This is the typical connection to the Internet in which the router is provided by the Internet service provider. Figure 5-2 illustrates the basic screened host scenario.
An additional level of complexity—and flexibility—is added when you expand the screened host scenario to a screened network scenario. The basic design remains the same, but the screened network receives all external traffic. Both the Internet and the internal network have access to the screened network, but traffic involving the internal network must still pass through the firewall host. This is useful for sites that want to make multiple servers available to the Internet and yet maintain a secure internal network. You could, for example, use one of the public hosts as your WWW server and another as an FTP server, depending on what you want to make available and the relative CPU loads expected.
Figure 5-3 illustrates a screened subnet.[6]
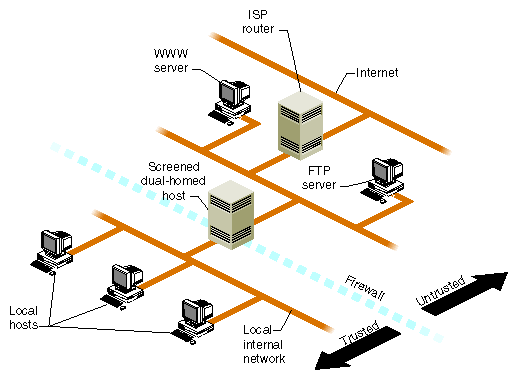
In the situation shown in Figure 5-3, you continue to concentrate your security efforts on the single firewall host. Remember though, that your servers outside of the firewall are more easily compromised as they are protected only by a router. Keep your private data on the internal network and forward important data collected on the public servers to an internal host. (Details on software configuration are discussed in the next section.)
This section discusses the basic network addressing configuration required on a firewall host, and then provides details on configuring IRIX software to tighten security on the host.
| Note: Unless specified otherwise, all the software changes discussed in this section are to be performed on the firewall host. |
A dual-homed host is configured in network software as if it were two hosts, each with a different network address and, optionally, a different name. Use separate IP addresses for the two (or more) network interfaces (see IRIX Admin: Networking and Mail ).
This section discusses various modifications you can make to the IRIX operating system software to provide increased network security. Some of these changes are highly desirable on a firewall; others are more a matter of personal choice depending on the level of security you feel is necessary. The issues discussed include why the changes must or might be made.
The following discussion of changes made to the firewall host software also applies to any host made publicly accessible, such as the WWW server and FTP server shown in the screened subnet example in Figure 5-3.
| Note: Do not connect your hardware to the external network until you make the changes described in this section. When you have finished the procedures, reboot your firewall system to ensure that all changes take effect. Many of these changes do not take effect until the system is rebooted. |
By default, IRIX forwards IP packets on machines with more than one network hardware interface. You must edit a kernel configuration file, run autoconfig, and then reboot to disable this default.
Follow this procedure to turn off automatic IP packet forwarding:
As root, edit the file /var/sysgen/master.d/bsd, changing the value of ipforwarding to 0:
Change the line
int ipforwarding = 1;
to
int ipforwarding = 0;
Save the modified /var/sysgen/master.d/bsd file and exit from the editor.
Run autoconfig with the -f option:
# autoconfig -f
This creates a /unix.install file, which becomes the new /unix after the system is rebooted.
Reboot your system (see reboot(1M)).
To verify that IP packet forwarding has been disabled after your system comes back up, use the netstat command:
# netstat -s -p ip | grep forwarding
You should see the following:
0 packets forwarded (forwarding disabled)
If you do not see this message, repeat steps 1 through 5 until you do. (Be sure that your root filesystem has enough disk space so that the /unix.install file is being created correctly. See autoconfig(1M) for more information.)
When your system starts up, the inetd process reads the /etc/inetd.conf file for a list of TCP/IP services to support. Comment out services listed in this file that are not very secure or that you are not using.
| Note: These services are being disabled on the firewall only. Services that are commented out in the system files on the firewall may still be available on your internal network—you just can't use them on the firewall host. |
Follow this procedure to disable selected inetd services:
Edit the file /etc/inetd.conf, and add the # symbol at the beginning of the following lines to comment them out (some may have already been commented out):
exec        stream  tcp     nowait  root    /usr/etc/rexecd         rexecd
bootp       dgram   udp     wait    root    /usr/etc/bootp          bootp
rstatd/1-3  dgram   rpc/udp wait    root    /usr/etc/rpc.rstatd     rstatd
walld/1     dgram   rpc/udp wait    root    /usr/etc/rpc.rwalld     rwalld
rusersd/1   dgram   rpc/udp wait    root    /usr/etc/rpc.rusersd    rusersd
rquotad/1   dgram   rpc/udp wait    root    /usr/etc/rpc.rquotad    rquotad
bootparam/1 dgram   rpc/udp wait    root    /usr/etc/rpc.bootparamd bootparam
ypupdated/1 stream  rpc/tcp wait    root    /usr/etc/rpc.ypupdated  ypupdated
rexd/1      stream  rpc/tcp wait    root    /usr/etc/rpc.rexd       rexd
In other words, they should look like this:
#exec        stream  tcp     nowait  root    /usr/etc/rexecd         rexecd
#bootp       dgram   udp     wait    root    /usr/etc/bootp          bootp
#rstatd/1-3  dgram   rpc/udp wait    root    /usr/etc/rpc.rstatd     rstatd
#walld/1     dgram   rpc/udp wait    root    /usr/etc/rpc.rwalld     rwalld
#rusersd/1   dgram   rpc/udp wait    root    /usr/etc/rpc.rusersd    rusersd
#rquotad/1   dgram   rpc/udp wait    root    /usr/etc/rpc.rquotad    rquotad
#bootparam/1 dgram   rpc/udp wait    root   /usr/etc/rpc.bootparamd bootparam
#ypupdated/1 stream  rpc/tcp wait    root   /usr/etc/rpc.ypupdated  ypupdated
#rexd/1      stream  rpc/tcp wait    root    /usr/etc/rpc.rexd       rexd
If you want details on the services you are disabling, refer to their reference pages. For example, refer to rexecd(1M) for information on the remote execution server, or rexd(1M) for information on the RPC-based remote execution server.
Comment out or restrict the following entries in /etc/inetd.conf:
ftp     stream  tcp     nowait  root    /usr/etc/ftpd   ftpd -la
telnet  stream  tcp     nowait  root    /usr/etc/telnetd        telnetd
shell   stream  tcp     nowait  root    /usr/etc/rshd           rshd -L
login   stream  tcp     nowait  root    /usr/etc/rlogind        rlogind
tftp    dgram   udp     wait    guest   /usr/etc/tftpd  tftpd -s \
/usr/local/boot /usr/etc/boot
If you comment them out (totally disable them), they should look like this:
#ftp     stream  tcp     nowait  root    /usr/etc/ftpd   ftpd -l
#telnet  stream  tcp     nowait  root    /usr/etc/telnetd        telnetd
#shell   stream  tcp     nowait  root    /usr/etc/rshd           rshd -L
#login   stream  tcp     nowait  root    /usr/etc/rlogind        rlogind
#tftp    dgram   udp     wait    guest   /usr/etc/tftpd  tftpd -s \
/usr/local/boot /usr/etc/boot
To be safe, it is best to disable all those services with the comment character as shown above. (Doing so means, however, that the host can only be accessed from the local console.) Of these services, enabling rshd is probably the most dangerous, and tftpd is almost never required on a firewall. Regarding ftpd, refer to IRIX Admin: Networking and Mail . If, however, you must include any of these services, change them as indicated below so that they record a log of their use in the file /var/adm/SYSLOG:
ftp     stream  tcp   nowait  root   /usr/etc/ftpd   ftpd -ll
shell   stream  tcp   nowait  root   /usr/etc/rshd   rshd -Lal
tftp    dgram   udp   wait    guest  /usr/etc/tftpd  tftpd -s -l -h /dev/null
Note the logging options added to each daemon invocation. (For more information, refer to the reference page for any daemon you modify.)
The telnetd and rlogind entries have not been included here because remote logins can (and should) be controlled with the use of one-time passwords. One-time passwords are just that—a password that can be used once to gain access, but any future use of that same password is disallowed. There are various ways to implement one-time passwords, and how (and if) you use them at your site depends on your need for remote login capability and the degree to which you want to authenticate such logins. Refer to the Firewalls and Internet Security book referenced in “Books”.
The fingerd service is also a potential security hole because it is a source of account names. You can use the -S option to suppress information about login status, home directory, and shell, which might be used to attack security:
finger stream tcp nowait guest /usr/etc/fingerd fingerd -S
Or, to be more secure, you can configure fingerd with the -f option, to return just a message file. In the following example, a message has been placed in /etc/fingerd.message:
finger  stream  tcp     nowait  guest   /usr/etc/fingerd        fingerd -f \
/etc/fingerd.message
The contents of /etc/fingerd.message might say something like:
Thank you for your interest in XYZ company. Please contact us at xyz.email.address or 1-800-XYZ-PHON for more information.
This message is then returned for any finger access.
When you have finished making changes to the /etc/inetd.conf file, write the changes and exit from the editor. The changes take affect after a reboot. If you want to apply them immediately, enter:
# killall -HUP inetd
Test any modified services to be sure they perform as expected.
Limit the number of users with login accounts on the firewall system as much as possible. All accounts in /etc/passwd should have a password (see passwd(1)).
Check to see if there are any /etc/hosts.equiv or $HOME/.rhosts files. These files can be configured to allow remote access without password protection, and should not be allowed on a firewall host. Refer to hosts.equiv(4) for more information.
Refer to “Password Administration” for details on host access password security.
You can limit access to the firewall host's RPC services by use of the portmap command's -a option. This allows you to specify the host(s) and/or network(s) that are allowed access to RPC-based services. Edit the file /etc/config/portmap.options to add options to the portmap command that is executed at system startup.
For example, suppose you create a /etc/config/portmap.options file with the following entries:
-a 192.0.2.0 -a 192.14.12.0 |
This restricts access to firewall host RPC services to hosts on the Class C networks 192.0.2 and 192.13.12.
The syntax for the -a option allows you to specify multiple network masks, network addresses, and host addresses. As usual, the fewer hosts or networks allowed access, the better the security. Refer to the reference page portmap(1M) for more information.
Because the nature of NIS (formerly called Yellow Pages) does not accommodate security needs, remove it from the firewall host:
Remove the NIS software from the firewall host with the versions command:
# versions remove nfs.sw.nis
Certain databases may have been modified to add NIS information by including a + symbol in a database entry. Use an editor to remove any lines beginning with the + symbol from the files /etc/passwd, /etc/group, and /etc/aliases.
Remove the /etc/netgroups file if it exists.
| Caution: You should not run NIS on a firewall. If you must run NIS, be sure the server is secure and have the clients run ypbind with the -ypsetme option which provides some minimal security. |
Exporting filesystems and remote-mounting external systems on the firewall presents security problems. You should not use NFS on a firewall—remove it with versions remove nfs.sw.nis. If for some reason you cannot do this, you have a few (less secure) options:
You can disallow NFS altogether, using this command:
# chkconfig nfs off
You can edit the /etc/exports file to limit exported filesystem permissions and access. You can, for example, use the rw=hostname option to limit read-write access to a specific host, or you can use the access=client option to limit mounting to specified hosts. Refer to the reference page for exports(4) for more information.
If you choose to mount external systems on the firewall host, use the mount command with the nosuid option to prevent running a Trojan horse. Refer to the fstab(4) reference page for details.
In general, you should mount all filesystems other than your system directories with the nosuid, nodev options (refer to mount(1M)).
Log files provide useful information to the firewall administrator, recording specific or all attempts at firewall host login. The various options used to turn on logging for different daemons have been covered in the discussions on each daemon. Note that the log files must be reviewed periodically to be of use.
Log files are sensitive information and are best not stored on the firewall host. See the syslogd(1M) reference page for information on how to forward syslog messages from the firewall host to a trusted host inside the firewall.
All software on a firewall host should be watched for modification. A record of checksums of software should be kept and compared periodically to detect unauthorized changes. For this reason too, the less software installed on the firewall host the better. You should always be on the watch for such things as device files outside of /dev, and files with SUID and GUID permissions set.
You can use the versions command to display a list of system files modified since installation. For example:
# versions changed Configuration Files m = modified since initial installation ? = modification unknown blank = file is as originally installed /etc/init.d/netsite m /etc/init.d/netsite.O m /etc/init.d/netsite.N m /etc/uucp/Devices /etc/uucp/Devices.N m /var/X11/xdm/Xsession.dt /var/X11/xdm/Xsession.dt.O /var/X11/xdm/xdm-config <etc> |
You can also use the versions -m command to list only modified installed files. Refer to versions(1M) for more information.
You can take great pains to make a secure firewall and then have security compromised by users ignorant of the consequences of their actions. If possible, do not allow user accounts on the firewall host. If you do allow user accounts, be sure to tell the account holders:
Don't use .rhosts files. (As the superuser, you can add the -l option to the rshd invocation in /etc/inetd.conf and thereby disallow these files on the firewall. See rshd(1M) for more information.)
Use passwords with long, non-dictionary, ASCII strings, change them frequently, and don't write them down!
Don't use the “xhost +” command. (As superuser, you can delete the binary, or limit its execution to the superuser as well).
Even your supposedly protected internal network can be compromised by inappropriate actions of users. If, for example, a user on an internal host attaches a modem and establishes a PPP or SLIP session with an external site, you now have a situation in which the external world has two connections to your internal network—one through the firewall, but the other directly to a non-secure, internal host.
While it is beyond the scope of this section to describe how to configure your internal network, this section discusses issues of DNS and Sendmail configuration that relate specifically to firewall security. Refer to IRIX Admin: Networking and Mail for information on basic Sendmail and DNS setup.
DNS, the name service used on the Internet, should be configured for your site to give out the addresses that other sites need to contact you. This might include the address of your router, your firewall host, and any other machines you want others to be able to communicate with. In the case of a simple firewall comprised of a dual-homed host, the dual-homed host would be a DNS server, providing the address of the Internet side of its network connection. In the case of a screened subnet, the DNS server could be any of the “public” hosts in the subnet, and it could provide addresses for all of these hosts and the router.
You should also set up the DNS Mail eXchanger (MX) record to advertise the name of the host(s) responsible for mail at your site. This may be the firewall host or another host.
Do not publish internal hostnames and addresses on the firewall host. If you have a single firewall host performing multiple services, say FTP and WWW serving, use CNAME records to “alias” the services to the hostname. This makes it easy to move these services to different hosts if you want to separate them later.
This section presents some suggestions for limiting the susceptibility of your site to an attack through the electronic mail system. Internet electronic mail is based on the Simple Mail Transfer Protocol, or SMTP. The program that implements SMTP is commonly referred to as sendmail. sendmail is a large and complicated program that is frequently the subject of attack.
Your mail system should be configured cooperatively with your DNS configuration. That is, whichever machine your DNS server is advertising as your Mail eXchanger (MX) host must have its sendmail configured to accept mail for your network, and to do the appropriate thing with it once it is received. Usually that means to forward the mail to a master mail machine on the internal network, which knows users' internal addresses and how to deliver the mail to them.
A note about current convention: It is popular to use the domain name of your network as your electronic mail address. For example, user “harry” at company XYZ corporation, whose domain name is XYZ.com would have the electronic mail address “harry@XYZ.com,” as opposed to “harry@machine1.XYZ.com.” Edit the /etc/sendmail.cf file to do this (see IRIX Admin: Networking and Mail ).
To reinforce the electronic mail address of your site, and to make it easy for others to reply to your users' mail, it is recommended that you configure your sendmail to rewrite all your addresses to conform to the above convention.
For details on how to configure sendmail.cf, refer to IRIX Admin: Networking and Mail .
If a barrage of email is sent to your firewall host, it can fill up the disk and paralyze further operation. If you are concerned about this possibility, isolate the mail spool by putting it on a disk or disk partition of its own. While this does not prevent email from being overwhelmed, it does keep a crucial system disk partition, such as /usr, from filling up.
A proxy server is an application that implements security for a particular network service. It is basically an application-level gateway that, by “understanding” the particular application protocol, is able to transparently intercept traffic and so implement protocol-specific security, logging, authentication, and so on.
Proxy servers provided on the firewall can allow, for example, internal users to use Netscape Navigator to access the World Wide Web, to use ftp to transfer files between a host on the internal network and one on the Internet, or to telnet to an external host for an interactive session.
The two most common proxy server solutions are server-side proxies and the SOCKS proxy server. The proxy servers available with the optional Gauntlet for IRIX firewall implement server-side-only applications, in which one proxy server exists for each supported application. The SOCKS approach utilizes a socksd process on the server, and then requires any application that communicates with it to be “SOCKSified”; that is, compiled with the SOCKS library. The Netscape Navigator, for example, comes already “SOCKSified.”
Refer to “Additional Resources” for information on creating your own proxy support, or contact your Silicon Graphics sales representative for information on Gauntlet for IRIX and the Netscape Proxy Server.
[3] In the configuration file's name, the asterisk (*) corresponds to the number of the X server on the local host. This is usually 0, so for most workstations the file is /etc/X0.hosts. When X server 0 starts, it checks for the file /etc/X0.hosts, X server 1 checks for /etc/X1.hosts, and so forth.
[4] For example, the Netscape Proxy Server offers application proxies for several common network services including World Wide Web HTTP servers.
[5] Internet Control Message Protocol
[6] The “screened subnet” is sometimes called a “demilitarized zone” (“DMZ”) or “red zone.”