This chapter shows you how to connect the Gigabit Ethernet Fiber-Optic and Copper boards to a network, and how to configure your system for these boards.
Following is a description of each section:
“Configuring the Gigabit Ethernet Board”
Origin2000 and Onyx2: A qualified SGI Graphics service provider installs the board.
Origin200: Follow the instructions in your system's owner's guide for installing a PCI card.
OCTANE: Follow the instructions in your system's owner's guide for installing a PCI card, or see the OCTANE PCI Module Installation Guide.
This section shows you how to connect the Fiber-Optic and Copper boards to a network.
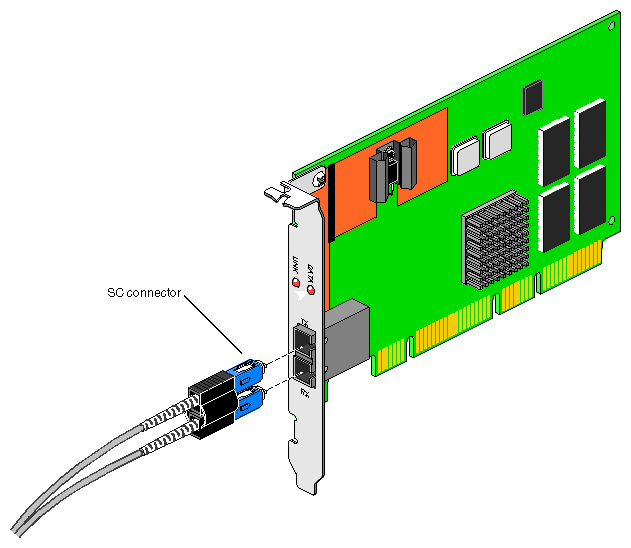
To connect your Gigabit Ethernet Fiber-Optic board to a network, insert the SC connector on one end of the fiber-optic cable into the Gigabit Ethernet board, as shown in Figure 2-1. Make sure the connector is inserted completely into the jack, then insert the connector on the other end of the fiber-optic cable into the jack on the Ethernet switch, or another computer system (as appropriate).
| Note: If your network connects to an Ethernet switch, consult the operating manual for the switch to ensure that the switch port is enabled and configured correctly. |
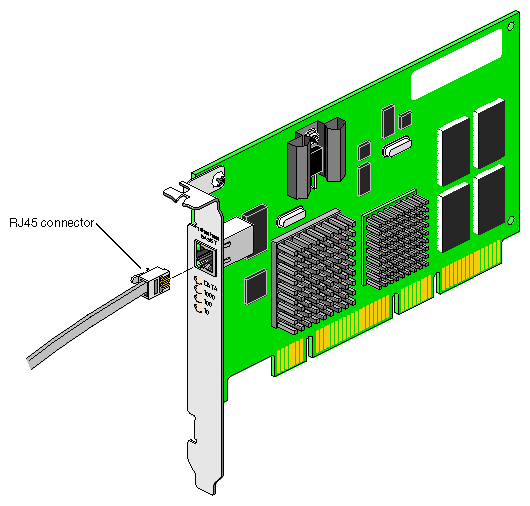
To connect your Gigabit Ethernet Copper board to a network, insert the RJ45 connector on one end of the copper cable into the Gigabit Ethernet board, as shown in Figure 2-2. Make sure the connector is inserted completely into the jack, then insert the connector on the other end of the copper cable into the jack on the Ethernet switch, or another computer system (as appropriate).
| Note: If your network connects to an Ethernet switch, consult the operating manual for the switch to ensure that the switch port is enabled and configured correctly. |
This section explains three ways to configure your system for gigabit Ethernet:
“Gigabit Ethernet as Primary and Fast Ethernet as Secondary ”
Recommended for systems with two network connections and a disk, this configuration provides the best performance.
“Fast Ethernet as Primary and Gigabit Ethernet as Secondary ”
This configuration is recommended for a diskless workstation.
“Gigabit Ethernet as the Only Network Interface ”
This section explains how to set up your system with the Gigabit Ethernet connection serving as the primary network interface and fast Ethernet as the secondary network interface. This configuration is the easiest to set up and provides the best performance. Follow these steps:
If necessary, become superuser (root):
% su
Password: thepassword
#
Determine your system's hostname: enter
# hostname
Use your favorite editor to edit the /etc/hosts file. To open the file with nedit, enter
# /usr/sbin/nedit /etc/hosts
Find the line with your system's hostname and add the IP address entries. For example, if you are making an entry for a system with a hostname of systemname residing in the domain group1.com with a gigabit Ethernet IP address of 187.8.27.6 and a fast Ethernet IP address of 199.26.34.6, enter these lines in the /etc/hosts file:
187.8.27.6 systemname.group1.com systemname # gigabit ethernet
199.26.34.6 gate-systemname.group1.com gate-systemname # fast ethernet
If your site uses an NIS service, make the changes in step 4 to the hosts database on the NIS server.
Open the file /etc/config/netif.options and find this line:
: if1name=
Change it to
if1name=eg0
Find this line:
: if1addr=
Change it to
if1addr=systemname
Find this line:
: if2name=
Change it to
if2name=ef0
Find the line:
: if2addr=
Change it to
if1addr=gate-systemname
Find this line:
: if_num=8
Change it to
if_num=2
Save and close the file.

Note: If you need to change the net mask or other options for the network interface cards, refer to IRIX Admin: Networking and Mail.
To configure your system with fast Ethernet as the primary interface and Gigabit Ethernet as the secondary interface, follow these steps:
If necessary, become superuser (root):
% su
Password: thepassword
#
Determine your system's hostname: enter
# hostname
Use your favorite editor to edit the /etc/hosts file. To open the file with nedit, enter
# /usr/sbin/nedit /etc/hosts
Find the line with your system's hostname and add the IP address entries. For example, if you are making an entry for a system with a hostname of systemname residing in the domain group1.com with a gigabit Ethernet IP address of 187.8.27.6 and a fast Ethernet IP address of 199.26.34.6, enter these lines in the /etc/hosts file:
187.8.27.6 gate-systemname.group1.com gate-systemname # gigabit ethernet
199.26.34.6 systemname.group1.com systemname # fast ethernet
If your site uses an NIS service, make the changes in step 4 to the hosts database on the NIS server.
Open the file /etc/config/netif.options and find this line:
: if1name=
Change it to
if1name=ef0
Find this line:
: if1addr=
Change it to
if1addr=systemname
Find this line:
: if2name=
Change it to
if2name=eg0
Find the line:
: if2addr=
Change it to
if1addr=gate-systemname
Find this line:
: if_num=8
Change it to
if_num=2
Save and close the file.
Note: If you need to change the net mask or other options for the network interface cards, refer to IRIX Admin: Networking and Mail.
To set up your system with the Gigabit Ethernet connection as the only network connection, follow these steps:
If necessary, become superuser (root):
% su
Password: thepassword
#
Determine your system's hostname: enter
# hostname
Use your favorite editor to edit the /etc/hosts file. To open the file with nedit, enter
# /usr/sbin/nedit /etc/hosts
Find the line with your system's hostname and add the IP address entries. For example, if you are making an entry for a system with a hostname of systemname residing in the domain group1.com with a gigabit Ethernet IP address of 187.8.27.6, enter this line in the /etc/hosts file:
187.8.27.6 systemname.group1.com systemname # gigabit ethernet
If your site uses an NIS service, make the changes in step 4 to the hosts database on the NIS server.
Open the file /etc/config/netif.options and find this line:
: if1name=
Change it to
if1name=eg0
Find this line:
: if_num=8
Change it to
if_num=1
Save and close the file.
Note: If you need to change the net mask or other options for the network interface cards, refer to IRIX Admin: Networking and Mail.