The Octane2 workstation uses compression connectors to connect several modules and boards to the frontplane.
A single compression connector is used on the following components:
Back of the PCI module
Each XIO option board
XIO Tri-Module
Two compression connectors are used on the system module.
The compression connector has 96 pads that enable signals to pass between the system (via the frontplane) and the system module, PCI module, or XIO option board.
The compression connector has two halves: one half is located on the frontplane of the chassis; the other half is on the system module, PCI module, or XIO board. Each pad on a frontplane connector is a flat gold-plated surface. Each pad on the system module, PCI module, or XIO board is composed of hundreds of tiny bristles (dendrites). When a bristled pad (see Figure A-1) is pressed into a gold-plated pad, a connection is created for one signal.
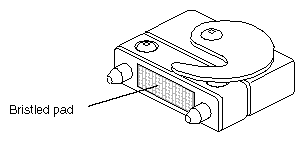
The bristled pad can attract and hold dust, lint, grease, powder, and dirt. The presence of these substances clogs or damages the bristles and prevents them from making proper contact with the gold-plated pads on the system's frontplane. It is important to prevent this.
To avoid damaging a compression connector and to keep it in optimal working condition, follow these guidelines when a board or module is not installed.
| Caution: Failure to follow these instructions can result in irreparable damage to the surface of the connector's pads, which may result in intermittent or complete failure of the product. |
Do not wipe or touch the pads of the compression connector with anything (no fingers, brushes, cloths, or probes), except as specified in the cleaning instructions, below. The bristles might be damaged.
When the board or module is not in the chassis, place the protective cap over the compression connector and place the board or module in an antistatic bag. Make sure you close (fold over) the open end of the bag to minimize exposure to dust and atmospheric gases.
Do not put anything (not even water) on the pads, except as specified in the cleaning instructions, below.
Before laying the board on a surface, make sure the surface is free of dust, lint, powder, metal filings, oil, water, and so on.
Do not blow dust, dirt, or powder anywhere near the board when it is not inside its protective bag.
A compression connector should never require cleaning if you keep its protective cover on when the module or board is not in the chassis. However, if the connector gets dirty, follow these steps for removing pollutants.
| Note: Some pollutants can irreversibly damage (corrode or chemically alter) the pad surfaces. Although cleaning may remove the pollutant, it does not repair damage incurred by this contact. |
To remove pollutants, follow these steps:
Obtain a can of dry compressed air or inert gas. The Envi-ro-tech Duster 1671 product manufactured by TECHSPRAY, (USA telephone 806-372-8523) works extremely well for this application.

Caution: Do not use a cleaning product that contains any of the following ingredients: halogenated hydrocarbons, aromatic hydrocarbons, ethers, sulfur, ketones, or solvents of any kind. These substances cause irreparable damage to the connector's surface. Follow the instructions on the can, for example, if a tube is provided, attach it to the can's dispensing mechanism.
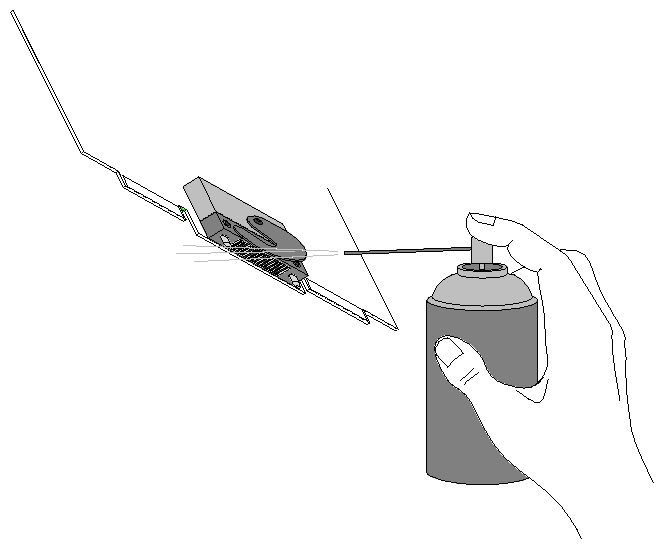
Hold the can in a vertical position.
Place or hold the board or module with the rounded edge of the compression connector facing up.

Note: The rounded edge is completely closed, so that air cannot flow into the connector, while the squared edge has an opening. Caution: Spraying into the squared (open) edge of the connector can destroy it. Position the board or module at an angle to the can, so that the tip of the can's applicator is 1 to 2 inches away from the first (top) row of pads, as shown in Figure A-2. Do not allow the applicator to touch the pads. When you spray, the air hits each pad and flows downward.
Start spraying.
As you spray, move the spray along the length of the compression connector until the entire length is sprayed. Move down a few rows and spray again along the entire length.
Note: Do not shake the can. Stop spraying if any visible material (for example, foam) appears. The foam blows away when you resume spraying air. Repeat the above procedure until all the pads are sprayed.
When you finish, cover the compression connector with its cap or immediately install the board or module.