This chapter guides you through an interactive sample session that demonstrates the main features in the Ada Browser. The session outlines common tasks you can perform with the Browser, using example Ada application source to illustrate the use of each function. For complete reference information on the browser's user interface, see Chapter 10, "The Browser Reference."
This chapter contains the following sections:
 | Note: The features described in this chapter are available only if you have purchased the ProDev Ada package. |
The demonstration directory, /usr/demos/Ada/WorkShop/tagged_example, contains the complete source code for a simple Ada application called tagged_example. To prepare for the session, you first need to create the fileset and static analysis database.
Prepare for the session by following these steps:
Open a shell window, and change to the /usr/demos/Ada/WorkShop/tagged_example directory. Start the Static Analyzer by entering cvstatic.
The Static Analyzer window opens. You need to create a new fileset using parser mode.
Pull down the Admin menu and select "Edit Fileset...".
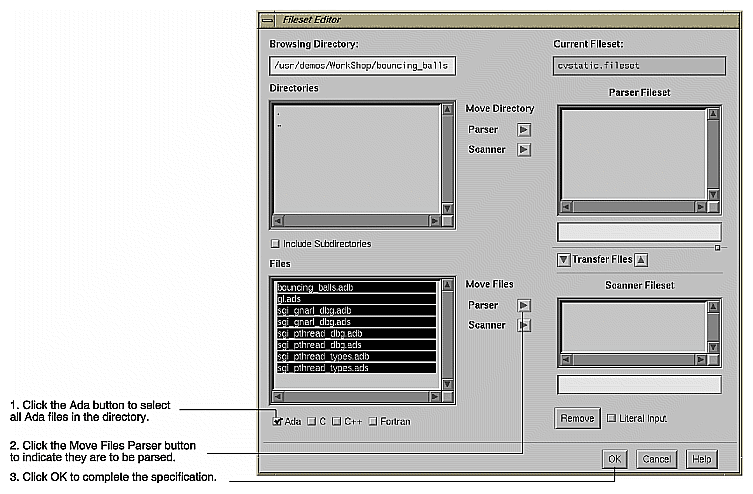
To create a parser mode fileset for this example, follow the instructions shown in Figure 9-1. It takes several minutes to build the database from the fileset.
When the fileset is built, select "List All Packages" from the "Packages" submenu in the Queries menu.
This displays all the packages in the fileset.
Select "List All Tagged Types" from the "Types" submenu in the Queries menu.
This displays all the tagged types in the fileset.
Select "List All Files" from the "Files" submenu in the Queries menu.
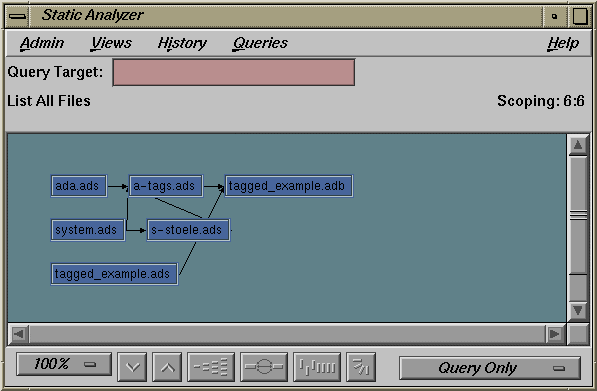
This displays all the source code files in the fileset.
Pull down the Views menu and select "File Dependency View."
File Dependency shows you the dependency between packages (packages are defined one to a file). If you double-click arcs in this view, you can see where packages are imported using the with clause and also definitions where packages are brought in.
Pull down the Static Analyzer Admin menu and select "Browser."
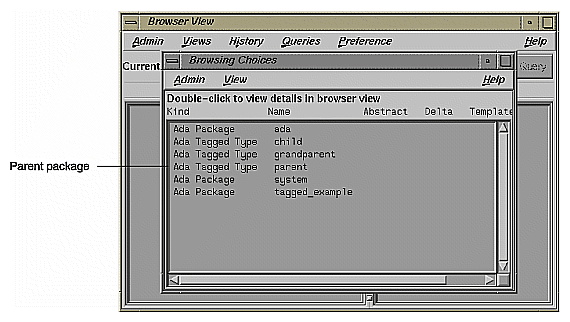
This displays the Browser View window and the Browsing Choices chooser window, which is used to select subjects for browsing. The Browsing Choices chooser window contains the complete list of Ada entities (packages, tagged types, and task types) included in the current fileset. See Figure 9-3.
Double-click the parent package in the chooser window.
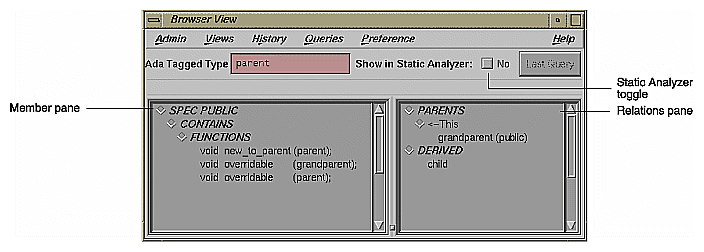
The Browsing Choices window is lowered, and the data for parent now appears in the Browser View window (see Figure 9-4). The subject parent is now displayed in the Current Subject text field and is identified as an Ada package. Information about Ada entities appears in the outline list views in the side-by-side panes.
Observe the Browser window.
The member pane in Browser View is on the left. It displays "members" according to their accessibility: SPEC PUBLIC, SPEC PRIVATE, or BODY.
The member pane displays these kinds of Ada members: DATA, TYPE, FUNCTIONS, ENTRIES,and PRIMITIVE OPERATIONS.
The relations pane displays information on related Ada entities, based on the point of view of the current subject: PARENTS and DERIVED.
You can customize the layout of both list displays.
Click the outline icon to the left of the FUNCTIONS category (see Figure 9-4).
This collapses the category, hiding the items. Outline icons with right-pointing arrows indicate that a category in the list is expandable, that is, that elements in the category are hidden from view.
Click the outline icon again to display the items.
Click the Queries menu and observe it.
To learn the details about the structure of your Ada code, you make queries—predefined questions—about the current subject's members and related entities. Queries are a focused view of a large, complicated structure from the viewpoint of any Ada entity.
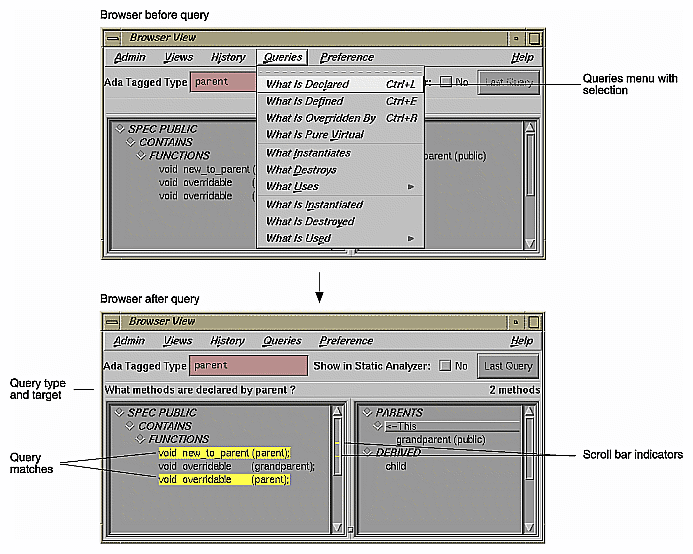
Queries search the static analysis database for specific information about subjects and their members. The Browser provides two types of Queries menus: a menu for the current subject that you access from the menu bar, and element-specific menus that you access by holding down the right mouse button while the pointer is over the selected element you wish to query. The Browser answers queries by highlighting items in the member and related class lists that match the query. Optionally, you can display more detailed query results in the Static Analyzer window from which you launched the Browser.
Select "What Is Declared" from the Queries menu.
The Queries menu in the menu bar lets you request relationship information for the current subject. In addition to highlighting the matching elements in the list, the Browser displays indicator marks in the scroll bar showing the relative locations of matching elements. Also, the query is identified in the field over the outline list area. If you click on an indicator mark, you'll scroll directly to the matching element. See Figure 9-5.
Accessing Source Code
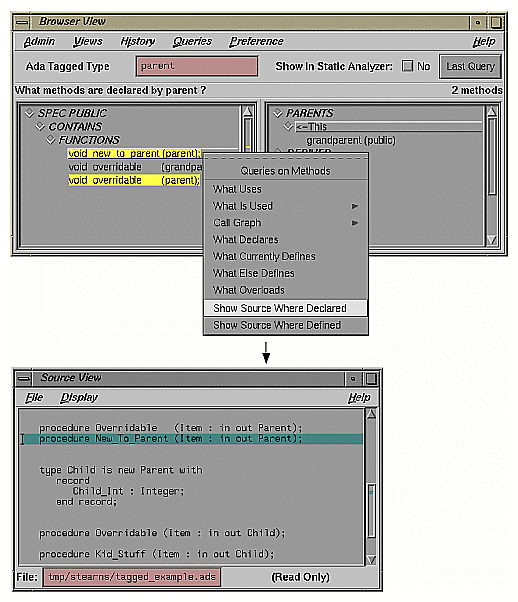
Select the new_to_parent function, hold down the right mouse button over it, and choose "Show Source Where Declared."
This displays Source View containing the source code where new_to_parent is declared. See Figure 9-6.
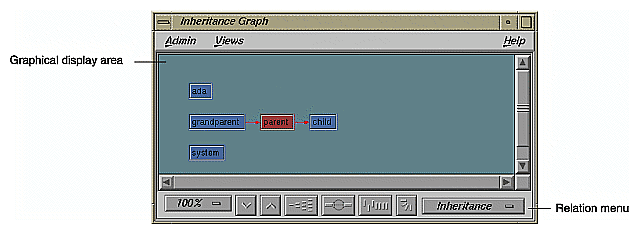
Pull down the Views menu in the Browser window and select "Show Inheritance Graph."
The Inheritance Graph window is displayed, as shown in Figure 9-7. You can switch to other relationship modes through the relation mode menu.
Go back to the Browser window, clear the Current Subject field, type a question mark (?), and press <Enter>.
This is a shortcut for displaying the Browsing Choices window. Instead of selecting through the Browsing Choices window, however, follow this tutorial to see how name completion works.
Type grand and press the space bar.
The Browser fills in the rest of the name (grandparent in this example) and its data.
This is the end of the sample session. You can exit both the Static Analyzer and the Ada Browser by choosing "Exit" from the Static Analyzer Admin menu.
