This chapter shows how you might use the Static Analyzer in a typical session. It doesn't go into full detail, but it does explain the fundamental concepts you'll need to use the Static Analyzer. It lists related commands and controls after each tutorial so you can experiment on your own. You'll find more specific details about Static Analyzer features in Chapters 3 - 6.
This chapter discusses the following topics:
In this tutorial, you will create a fileset for the demo program bounce using scanner mode and perform some basic queries in text mode.
Move to the /usr/demos/WorkShop/bounce directory by entering the following:
cd /usr/demos/WorkShop/bounce
This directory contains the source code files (C++) for the demo program bounce.
List the directory's contents to see if the file cvstatic.fileset exists (in case someone worked through a tutorial and forgot to remove the file). If it does exist, remove it along with any other files the Static Analyzer may have left:
rm cvstatic.* cvdb* vista.taf
Whenever you run the Static Analyzer, it checks the directory where you invoked it for cvstatic.fileset and uses the file's contents as its fileset. If it doesn't find cvstatic.fileset, it creates and saves its own fileset containing the expression *.[cCfF] so that all possible C files (.c), Fortran files(.f or .F), and C++ files (.C) in the current directory are included. When you quit the Static Analyzer, any fileset you or the Static Analyzer created remains in the directory for use in your next Static Analyzer session.
If you don't care to use the default fileset, you can create your own or modify the default fileset using the "Edit Fileset..." selection in the Admin menu. You can also create your own cvstatic.fileset file by hand; you'll find instructions in "Creating a Fileset Manually".
Start the Static Analyzer by entering the following:
cvstatic &
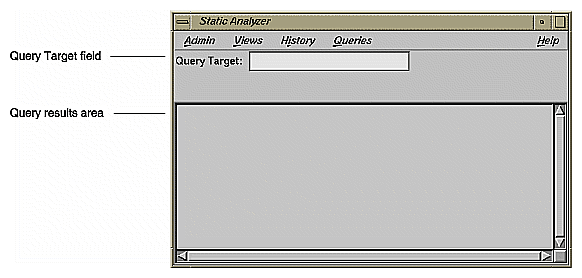
The Static Analyzer window appears (as shown in Figure 2-1).
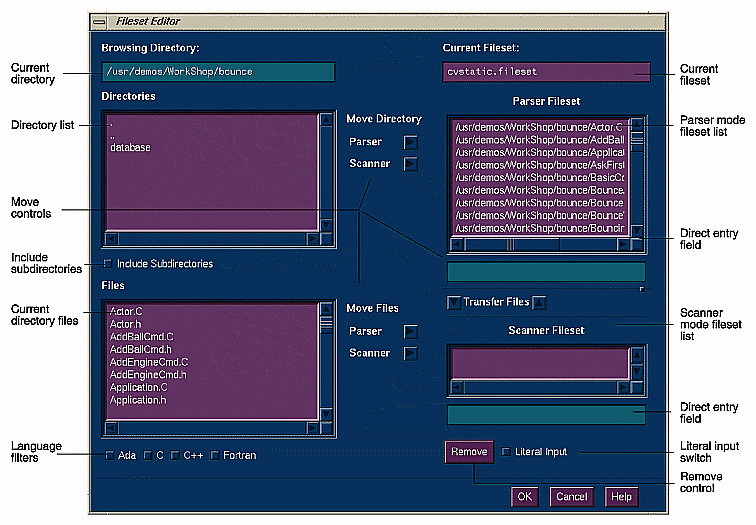
Choose "Edit Fileset..." from the Admin menu to open the Fileset Editor window (shown in Figure 2-2).
The current working directory appears in the Browsing Directory field at the top left. Subdirectories (if any) appear in the Directories list field. The files in the current working directory appear in the Files list field. You select the files you wish to include in the fileset from these two lists. For parser mode files, you click the associated Parser button; for scanning mode, the Scanner button. There are two sets of Parser and Scanner mode buttons: the upper set moves whole directories and the lower set individual files. The two fileset list fields Parser Fileset and Scanner Fileset are at the right of the window.
Select the expression *.[cCfF] in both the Parser Fileset and Scanner Fileset list fields (if it appears), and click the Remove button.
This removes any default expressions from the fileset.
Click the C++ language filter button.
This filters the Files list to include only those files with the .C extension (signifying C++ source files) and selects them all.
Now add these source code files to the fileset by clicking the Move Files:Scanner button.
The ScannerFileset list now displays the files selected from the Files list. These files will be scanned into the static analysis database when it is created.
Click the OK button at the bottom of the Fileset Editor window.
Once you've created the fileset, you can query it for useful information. Your first query prompts the Static Analyzer to extract static analysis data from the files in the fileset and create a cross-reference database (using scannner mode). This occurs prior to returning the results of your query. The database includes the relationships between functions, files, classes, and other elements of the code in the fileset, and is saved in a database file along with two accompanying index files. The database file is named cvstatic.xref; the accompanying files are named cvstatic.index and cvstatic.posting. These files are stored in the same directory as the fileset with which they're associated, and remain there after the Static Analyzer quits.
Subsequent queries use the same database until you ask the Static Analyzer to rescan the fileset, which creates an updated database. When you quit the Static Analyzer and return to it later, it automatically updates the database, going through any files in the fileset that have changed since the last session. If you use appropriate wild card expressions in the fileset, the fileset will automatically accommodate new files added to specified directories.
From a shell, list the contents of the cvstatic.fileset file.
All files and their paths to be included in the fileset should display. If you had selected files for parsing, they would have compiler flags following their paths.
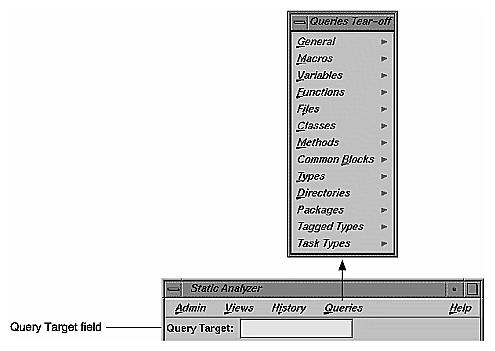
Click the Queries menu to open it.
To query the database, you choose a command from the Queries menu. You'll find the commands grouped in submenus according to types of query (see Figure 2-3).
The query submenus let you perform different searches:
"General" searches for text strings, regular expressions, and symbols.
"Macros" searches for locations of macro definitions and places where macros are used.
"Variables" searches for global and local variables and shows where they're defined and who references and sets the variables.
"Functions" searches for functions, shows where they're defined, and shows who calls them and whom they in turn call.
"Files" searches for files in the fileset (including headers and libraries) and shows which files are included by which other files.
"Classes" searches C++ files for classes and shows where they're defined. It also shows subclass and superclass relationships, and lists the methods defined within classes.
"Methods" searches C++ files for methods and shows where they're defined and declared.
"Common Blocks" searches Fortran files for common blocks.
"Types" searches C and C++ files for type information.
"Directories" lets you list directories or the files in a directory.
"Packages" lets you look for Ada packages.
"Tagged Types" lets you look for Ada tagged types.
"Task Types" lets you look for Ada task types.
To start a query, you choose the query you want from the Queries menu. The Static Analyzer then searches through its database or through the original source code to find what you asked for.
If you want to look for a specific function, file, string, or other element, you enter the target text in the Query Target field above the query results area (shown in Figure 2-1).
Queries that require text in the Query Target field (such as "Find String" in the General submenu and "Who Is Called By?" in the Functions submenu) are grayed in the Queries menu if there is no text present. More general queries that require no search text (such as "List All Functions" and "List Global Symbols") are always available.
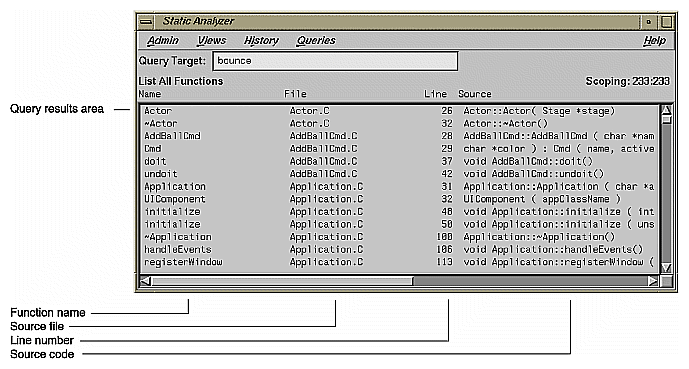
Choose "List All Functions" from the "Functions" submenu of the Queries menu.
The Static Analyzer builds its cross-reference database and notifies you that it's doing so. When it's finished, it displays a list of all functions found in the fileset (as shown in Figure 2-4), their file, the line number at which they are first defined or declared, with the actual source line.

Note: During this process, you may get a warning dialog box about multiple function occurrences. This is due to the inaccuracy of scanner mode; it has problems with #ifdef statements. You may also get an error message about missing files. This can happen if your include paths are not set correctly. The missing files are not necessary for this tutorial. Usually you can tell by looking at the files if you need to include them in the fileset.
The Static Analyzer returns the results of all queries in its query results area (below the Query Target field). It presents this information in text form (and by the previous type of view if applicable for subsequent queries). You can scroll through a text list to find specific data that interests you. Clicking any part of an element listed (a filename, a function name, a line number, and so on) pastes it into the Query Target field so you can use it as the base of your next search. For example, if you'd like to find out what functions a particular function calls, you can click its name to put it into the Query Target field and then choose "Who Is Called By" from the "Functions" submenu of the Queries menu.
Text View allows you to sort the element lines alphanumerically by any one of the fields in a line. For example, you can sort a list of functions alphabetically by function name or numerically by line number where they occur. To sort, click within an element line in the field by which you want to sort, and then choose "Sort" from the Admin menu. The Static Analyzer sorts the results of a query according to the field selected.
Click the function name Actor in the query results area.
The Static Analyzer pastes the name into the Query Target field.
Choose "Who Is Called By" from the "Functions" submenu of the Queries menu.
The Static Analyzer displays a list of all functions called by Actor.
Clear the Query Target field and then type buffer in it.
We are now going to look for any occurrences of the text string "buffer" that might lead us to information in the code concerning z-buffering or data buffering.
Choose "Find String" from the "General" submenu of the Queries menu.
The Static Analyzer returns all the lines of code that contain the text string "buffer," even if it only appears in a comment.
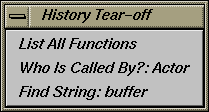
Click the History menu to open it.
It displays the queries you've made so far, as shown in Figure 2-5.
Choose "List All Functions" from the History menu to see a list of all functions once again.
This brings back your previous query results.
Double-click the Actor function.
Source View now appears, displaying the source code for Actor. You can examine it, check it out (if you have a versioning system), or edit it.
Select "Close" from the Source View File menu to close it.
Select "Exit" from the Static Analyzer Admin menu to end this tutorial.
In this tutorial, you will create a fileset for bounce using parser mode and perform some detailed static analysis in both text mode and graphic mode.
Move to the /usr/demos/WorkShop/bounce directory by entering the following:
cd /usr/demos/WorkShop/bounce
Type rm cvstatic.* cvdb* vista.taf
We need to remove these files to avoid using the previous fileset.
Start the Static Analyzer by entering the following:
cvstatic -mode PARSER &
The Static Analyzer window appears. The -mode PARSER option causes the Static Analyzer to use parser files only when queries are performed.
Select "Edit Fileset..." from the Admin menu.
We are going to apply parser mode through the Fileset Editor.
Remove the wild card defaults (*.[cCfF]) if they appear in the fileset lists.
Select the file called BouncingBall.C in the File list at the lower left and click the Move Files: Parser button to transfer the file to the Parser Fileset list.
This enters the file BouncingBall.C into the fileset and sets it for parsing mode.
Click OK to save the new fileset and from a shell, type
cat cvstatic.filesetThe contents of cvstatic.fileset display:
/usr/demos/WorkShop/bounce/BouncingBall.C NCC
Notice that the BouncingBall.C file has a compiler flag indicator as part of the entry. This is how parser mode files are indicated.
Select "List All Functions" from the Queries Menu.
The Static Analyzer builds a new database using parser mode. Since BouncingBall.C has a number of include files, this process may take a few minutes. During the process, a small window called Build Shell appears that displays any compiler errors or warnings. At the conclusion of the process, the functions in BouncingBall.C and its include files are listed in text form in the query results area.
Select "Call Tree View" from the Views menu.
The query results area now changes to graphical form. The functions are depicted as rectangles. In addition to listing functions, the Static Analyzer now provides us with relationship information, that is, who calls which functions. The function calls are shown as arrows (or arcs) pointing to the functions that were called.
Besides "Call Tree View," there are two other types of graphical views: "Class Tree View," which displays C++ classes and their hierarchy, and "File Dependency View," which displays the files in the fileset and their dependency on each other.
Whenever you use a tree view, the view interprets the results of your query according to the type of tree displayed. For example, if you perform a "Functions" query while you're in file dependency view, the view changes to show you which files contain the functions returned by the query. Some views don't make sense for displaying the results of a query, in which case the Static Analyzer switches to the view it thinks is most reasonable for the query.
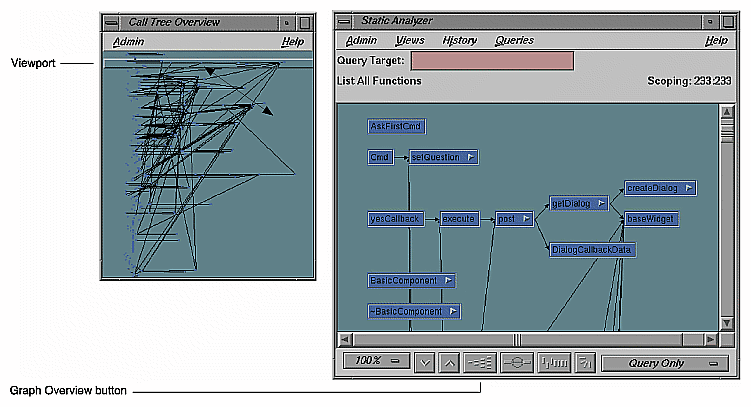
Click the Graph Overview button (the fourth button from the left at the bottom of the Static Analyzer window).
This displays the Call Tree Overview window, a feature to help users navigate through a graph. It displays the full call tree in overview, with a small rectangular outline (called the viewport) in the upper-left corner. The viewport shows which portion of the tree currently appears in the query results area of the Static Analyzer window and can be dragged by the mouse to expose other portions of the graph. See Figure 2-6.
Click in the center of the Call Tree Overview window.
The viewport jumps so that its upper-left corner matches the pointer location. The query results area in the Static Analyzer window shifts to display the part of the tree outlined by the viewport in the Call Tree Overview window.
Drag the viewport around in the Call Tree Overview window by holding down the left mouse button and moving the mouse. Finish by dragging the viewport to the upper-left corner of the call tree.
As the viewport moves over the call tree overview, the call tree shown in the Static Analyzer query results area scrolls to match.
Select "Close" from the Admin menu in the Call Tree Overview window to close it.
Enter colorSelected in the Query Target field and select "Who Calls?" from the "Functions" submenu in the Queries Menu.
This reduces the graph to three nodes: colorSelectedCallback and cancelCallback, which call colorSelected, and colorSelected itself.
Hold the right mouse button down over the node labeled colorSelected to open its popup menu.
This displays the individual node menu, which provides the selections: "Hide Node," "Collapse Subgraph," "Show Immediate Children," and "Show Parents." The triangular arrow at the right of the colorSelected node indicates that it has undisplayed child nodes: accordingly the "Show Immediate Children" is enabled. Since the parents of colorSelected are already displayed, the "Show Parents" selection is disabled.
If you hold the right mouse button down over a portion of the query results area where there are no nodes, the selected nodes menu displays, which provides the selections: "Hide Selected Nodes," "Collapse Selected Nodes," and "Expand Selected Nodes."
Choose "Show Immediate Children" from the popup menu.
The Static Analyzer displays the functions called by colorSelected.
For more information on the standard graph controls and node manipulation, see Appendix A, "Using Graphical Views," in the DeveloperMagic: ProDev WorkShop Overview. Note that the view options menu is unique to the Static Analyzer. It offers options that extend the range of the nodes you see in the tree to include nodes not included in the original query.
Open the History menu to review the commands you have selected.
Choose "Exit" from the Admin menu to exit the Static Analyzer.
Remove all the files generated by the Static Analyzer from the directory:
rm cvstatic.* cvdb* vista.taf
This tutorial takes you through the steps of creating a static analysis database, using parser mode.
Type cd /usr/demos/WorkShop/bounce to go to the bounce demonstration directory.
We will once again analyze the bounce demonstration program.
Type mkdir staticdir
This creates the subdirectory in which we will store the static analysis database. If a directory named staticdir already exists, remove it or use a different name.
Type cd staticdir to change directories and then initcvdb.sh.
The initcvdb.sh script creates the initial files cvdb*.* necessary for producing the database.
Change /usr/demos/WorkShop/bounce/Makefile as follows:
The most convenient method for applying the Static Analyzer parser to a large group of files is to modify the existing makefile so that it analyzes the files without producing object code.
Change the following line:
CC=CC
to
CC=NCC -sa,staticdir -nocode
Changing to NCC causes the C++ compiler to be used. The flag -sa tells the compiler to perform static analysis. Following -sa with ,staticdir tells the compiler to store the results in the staticdir subdirectory; otherwise, the current directory is assumed. The flag -nocode saves you time by telling the compiler not to create object code.
Make sure you are in the /usr/demos/WorkShop/bounce directory and type
make -kThis runs the compiler as you've specified in the makefile. This may take a while. Running parser mode performs the major operations of compiling, short of creating the object code.
Go to the staticdir subdirectory and type
cvstatic -mode PARSER -readonlyThis invokes the Static Analyzer set for parsed files. The other mode options are SCANNER for scanned files and BOTH if you mix scanned and parsed files. The -readonly safeguard flag protects against inadvertent changes. You can now perform any valid Static Analyzer operations, as in the previous tutorials.
You'll find more detailed information about querying in Chapter 5. To explore on your own, try these commands in the Admin menu, which also affect queries:

And with that warning, you're left to your own experimentation. For more details on individual Static Analyzer features, see Chapter 3 through Chapter 6.